


DrawerLayout 在实现沉浸状态栏的方法相对复杂,尤其在 Android 4.4 和 Android 5.0 以上的实现方法区别很大,本人在通过一段时间的研究,总结出比较完美的实现方法,现在这里分享。
首先需要针对 Android 5.0 以上和一下设置不同的 style,如图所示:
style的内容分别是:
value:
<resources>

    <style name="AppTheme" parent="Theme.AppCompat.Light.NoActionBar">
        <item name="colorPrimary">@color/colorPrimary</item>
        <item name="colorPrimaryDark">@color/colorPrimary</item>
        <item name="colorAccent">@color/colorAccent</item>
    </style>

    <style name="AppTheme.AppBarOverlay" parent="ThemeOverlay.AppCompat.Dark.ActionBar" />

    <style name="AppTheme.PopupOverlay" parent="ThemeOverlay.AppCompat.Light" />

</resources>
value-v21:
<resources>
    <style name="AppTheme" parent="Theme.AppCompat.Light.NoActionBar">
        <item name="colorPrimary">@color/colorPrimary</item>
        <item name="colorPrimaryDark">@color/colorPrimary</item>
        <item name="colorAccent">@color/colorAccent</item>
        <item name="android:navigationBarColor">@color/colorPrimaryDark</item>
    </style>

    <style name="AppTheme.AppBarOverlay" parent="ThemeOverlay.AppCompat.Dark.ActionBar" />

    <style name="AppTheme.PopupOverlay" parent="ThemeOverlay.AppCompat.Light" />
</resources>
可以看出,v21 以上的 style 中的 AppTheme 多了一个 android:navigationBarColor 属性,该属性是设置状态栏颜色用的,是 android 5.0 新增加的属性,这里为了保持导航栏和状态栏的颜色一致,我们把它的颜色设置为和状态栏颜色一致,即 colorPrimaryDark 。
接下来写布局文件:
activity_drawer:
<?xml version="1.0" encoding="utf-8"?>
<android.support.v4.widget.DrawerLayout
    xmlns:android="http://schemas.android.com/apk/res/android"
    xmlns:app="http://schemas.android.com/apk/res-auto"
    xmlns:tools="http://schemas.android.com/tools"
    android:id="@+id/drawer_layout"
    android:layout_width="match_parent"
    android:layout_height="match_parent"
    tools:openDrawer="start">

    <include
        layout="@layout/app_bar_drawer"/>

    <FrameLayout
        android:layout_width="match_parent"
        android:layout_height="match_parent"
        android:background="@drawable/side_nav_bar"
        android:layout_gravity="start">

    </FrameLayout>

</android.support.v4.widget.DrawerLayout>
app_bar_drawer:
<?xml version="1.0" encoding="utf-8"?>
<android.support.design.widget.CoordinatorLayout xmlns:android="http://schemas.android.com/apk/res/android"
    xmlns:app="http://schemas.android.com/apk/res-auto"
    xmlns:tools="http://schemas.android.com/tools"
    android:layout_width="match_parent"
    android:layout_height="match_parent"
    android:fitsSystemWindows="true"
    tools:context="com.example.ivy.myapplication.DrawerLayout.DrawerActivity">

    <android.support.design.widget.AppBarLayout
        android:layout_width="match_parent"
        android:layout_height="wrap_content"
        android:theme="@style/AppTheme.AppBarOverlay"
        app:elevation="0dp">

        <android.support.v7.widget.Toolbar
            android:id="@+id/toolbar"
            android:layout_width="match_parent"
            android:layout_height="?attr/actionBarSize"
            android:background="?attr/colorPrimary"
            app:popupTheme="@style/AppTheme.PopupOverlay" />

    </android.support.design.widget.AppBarLayout>

    <include layout="@layout/content_drawer" />

    <android.support.design.widget.FloatingActionButton
        android:id="@+id/fab"
        android:layout_width="wrap_content"
        android:layout_height="wrap_content"
        android:layout_gravity="bottom|end"
        android:layout_margin="@dimen/fab_margin"
        app:srcCompat="@android:drawable/ic_dialog_email" />

</android.support.design.widget.CoordinatorLayout>
<?xml version="1.0" encoding="utf-8"?>
<RelativeLayout xmlns:android="http://schemas.android.com/apk/res/android"
    xmlns:app="http://schemas.android.com/apk/res-auto"
    xmlns:tools="http://schemas.android.com/tools"
    android:id="@+id/content_drawer"
    android:layout_width="match_parent"
    android:layout_height="match_parent"
    android:paddingBottom="@dimen/activity_vertical_margin"
    android:paddingLeft="@dimen/activity_horizontal_margin"
    android:paddingRight="@dimen/activity_horizontal_margin"
    android:paddingTop="@dimen/activity_vertical_margin"
    app:layout_behavior="@string/appbar_scrolling_view_behavior"
    tools:context="com.example.ivy.myapplication.DrawerLayout.DrawerActivity"
    tools:showIn="@layout/app_bar_drawer">

</RelativeLayout>
这里有几点需要注意:
1、app_bar_drawer 的最外层布局必须设置 android:fitsSystemWindows="true" ,否则 ToolBar 会被顶到状态栏的位置;
2、由于 app_bar_drawer 的最外层布局为 CoordinatorLayout ,因而 content_drawer 的最外层布局必须设置 app:layout_behavior="@string/appbar_scrolling_view_behavior" 属性,否则 content_drawer 中的内容会被顶到 ToolBar 的位置。
最后就是 Activity 中的代码了:
public class DrawerActivity extends AppCompatActivity
        implements NavigationView.OnNavigationItemSelectedListener {


    private static final String TAG = "DrawerActivity";

    public static Intent newIntent(Context context) {
        return new Intent(context, DrawerActivity.class);
    }


    @Override
    protected void onCreate(Bundle savedInstanceState) {
        super.onCreate(savedInstanceState);
        setContentView(R.layout.activity_drawer);
        immersionBar(ContextCompat.getColor(this, R.color.colorPrimaryDark));

        Toolbar toolbar = (Toolbar) findViewById(R.id.toolbar);
        setSupportActionBar(toolbar);

        FloatingActionButton fab = (FloatingActionButton) findViewById(R.id.fab);
        fab.setOnClickListener(new View.OnClickListener() {
            @Override
            public void onClick(View view) {
                Snackbar.make(view, "Replace with your own action", Snackbar.LENGTH_LONG)
                        .setAction("Action", null).show();
            }
        });

        DrawerLayout drawer = (DrawerLayout) findViewById(R.id.drawer_layout);
        ActionBarDrawerToggle toggle = new ActionBarDrawerToggle(
                this, drawer, toolbar, R.string.navigation_drawer_open, R.string.navigation_drawer_close);
        drawer.setDrawerListener(toggle);
        toggle.syncState();

    }


    //沉浸状态栏和导航栏
    @TargetApi(19)
    private void immersionBar(int color) {
        if (Build.VERSION.SDK_INT >= Build.VERSION_CODES.LOLLIPOP) {
            Window window = getWindow();
            ViewGroup decorView = (ViewGroup) window.getDecorView();
            int option = View.SYSTEM_UI_FLAG_LAYOUT_HIDE_NAVIGATION
                    | View.SYSTEM_UI_FLAG_LAYOUT_FULLSCREEN
                    | View.SYSTEM_UI_FLAG_LAYOUT_STABLE;
            decorView.setSystemUiVisibility(option);
            window.setNavigationBarColor(Color.TRANSPARENT);
            window.setStatusBarColor(Color.TRANSPARENT);
            decorView.addView(createBarView(getNavigationBarHeight(), color, Gravity.BOTTOM), 0);
        } else if (Build.VERSION.SDK_INT >= Build.VERSION_CODES.KITKAT) {
            Window window = getWindow();
            window.addFlags(WindowManager.LayoutParams.FLAG_TRANSLUCENT_STATUS);
            window.addFlags(WindowManager.LayoutParams.FLAG_TRANSLUCENT_NAVIGATION);
            ViewGroup decorView = (ViewGroup) window.getDecorView();
            decorView.addView(createBarView(getStatusBarHeight(), color, Gravity.TOP), 0);
            decorView.addView(createBarView(getNavigationBarHeight(), color, Gravity.BOTTOM), 1);
        }
    }

    //创建一个View,用于设置状态栏或导航栏的颜色
    private View createBarView(int height, int color, int gravity) {
        View view = new View(this);
        view.setBackgroundColor(color);
        FrameLayout.LayoutParams params = new FrameLayout.LayoutParams
                (ViewGroup.LayoutParams.MATCH_PARENT, height, gravity);
        view.setLayoutParams(params);
        return view;
    }


    //获取状态栏高度
    private int getStatusBarHeight(){

        int statusBarHeight = 0;
        int resourceId = getResources().getIdentifier("status_bar_height", "dimen", "android");

        if (resourceId > 0) {
            statusBarHeight = getResources().getDimensionPixelSize(resourceId);
        }

        return statusBarHeight;
    }


    //获取导航栏高度
    private int getNavigationBarHeight() {
        int navigationBarHeight = 0;
        int resourceId = getResources().getIdentifier("navigation_bar_height", "dimen", "android");
        if (resourceId > 0) {
            navigationBarHeight = getResources().getDimensionPixelOffset(resourceId);
        }

        return navigationBarHeight;
    }


    @Override
    public void onBackPressed() {
        DrawerLayout drawer = (DrawerLayout) findViewById(R.id.drawer_layout);
        if (drawer.isDrawerOpen(GravityCompat.START)) {
            drawer.closeDrawer(GravityCompat.START);
        } else {
            super.onBackPressed();
        }
    }

    @Override
    public boolean onCreateOptionsMenu(Menu menu) {
        // Inflate the menu; this adds items to the action bar if it is present.
        getMenuInflater().inflate(R.menu.drawer, menu);
        return true;
    }

    @Override
    public boolean onOptionsItemSelected(MenuItem item) {
        // Handle action bar item clicks here. The action bar will
        // automatically handle clicks on the Home/Up button, so long
        // as you specify a parent activity in AndroidManifest.xml.
        int id = item.getItemId();

        //noinspection SimplifiableIfStatement
        if (id == R.id.action_settings) {
            return true;
        }

        return super.onOptionsItemSelected(item);
    }

    @SuppressWarnings("StatementWithEmptyBody")
    @Override
    public boolean onNavigationItemSelected(MenuItem item) {
        // Handle navigation view item clicks here.
        int id = item.getItemId();

        if (id == R.id.nav_camera) {
            // Handle the camera action
        } else if (id == R.id.nav_gallery) {

        } else if (id == R.id.nav_slideshow) {

        } else if (id == R.id.nav_manage) {

        } else if (id == R.id.nav_share) {

        } else if (id == R.id.nav_send) {

        }

        DrawerLayout drawer = (DrawerLayout) findViewById(R.id.drawer_layout);
        drawer.closeDrawer(GravityCompat.START);
        return true;
    }
}
分析一下上面的代码,沉浸状态栏和导航栏主要靠 immersionBar() 方法实现的,该方法接收一个 int 类型的参数,用来设置状态栏和导航栏的颜色,然后需要根据系统版本分两种情况,即 Android 5.0 以上和 Android 4.4,Android 4.4 以下,由于不支持透明状态栏和导航栏,这里不做讨论。
在 Android 4.4 上,首先设置透明状态栏和导航栏,然后分别在状态栏和导航栏的位置添加一个 View 用于设置颜色,而在 Android 5.0 以上,由于系统默认已经给 DrawerLayout 设置了透明状态栏,为了让抽屉能够显示在状态栏和导航栏上,我们需要把状态栏和导航栏的颜色设置为透明,此时,状态栏会默认使用 ToolBar 的颜色,不需要再手动设置,但是导航栏还是透明的,因此,我们同样需要在导航栏的位置添加一个‘ View 用于设置导航栏的颜色,这样,沉浸状态栏和导航栏就设置成功了。
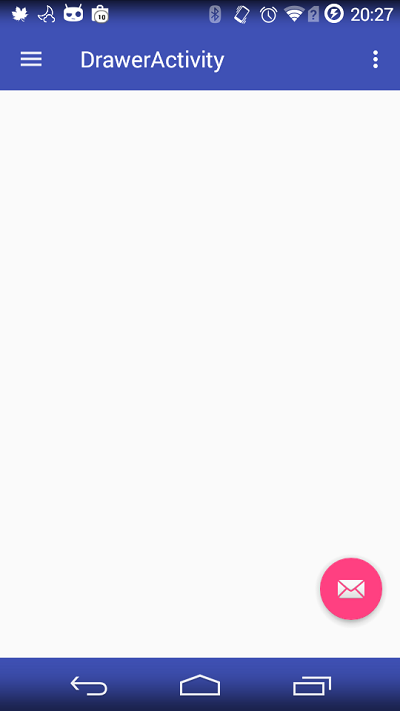
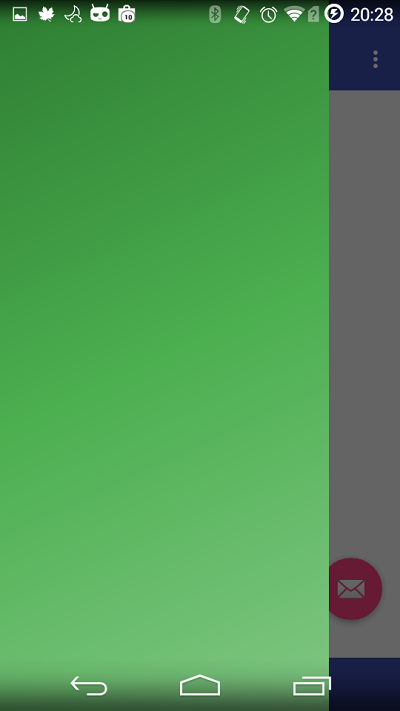
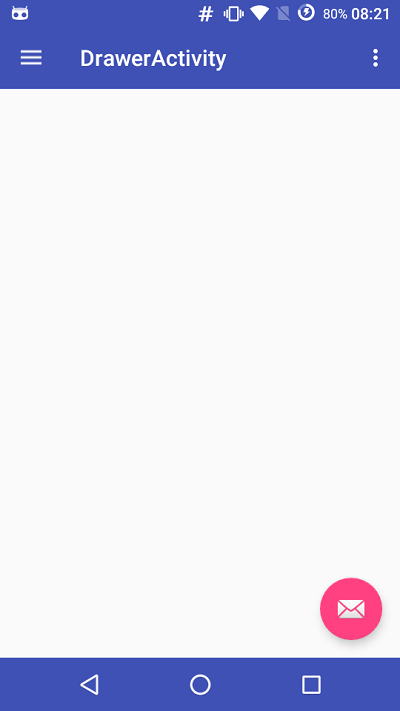
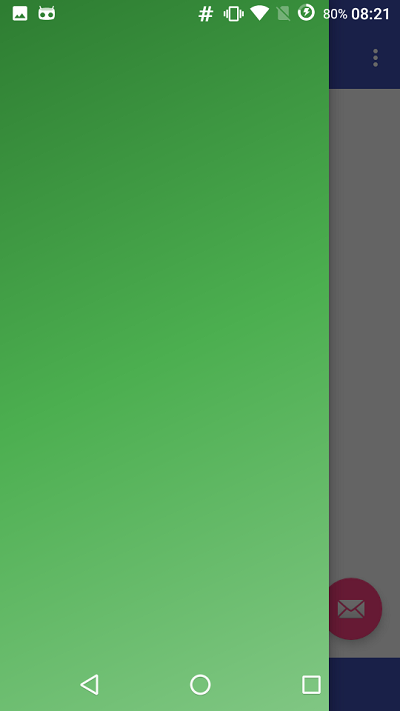
最后看一下在 Android 4.4 和 Android 5.0 以上手机上的运行效果:
Android 4.4:
Android 5.0 以上:


 368
368

 被折叠的 条评论
为什么被折叠?
被折叠的 条评论
为什么被折叠?
 到【灌水乐园】发言


