


Android 自定义控件之测量(onMeasure)初步
为什么要测量
测量的主要目的是View确定自身在父容器中的大小,可以回忆一下在咱们在写xml布局文件的时候经常用到以下代码:
android:layout_width="match_parent"android:layout_height="wrap_content"android:layout_width="300dp"
相信都很熟悉了,match_parent、wrap_content、300dp都是用来指定View的宽或高的值,但他们又有区别match_parent是匹配父容器的,
wrap_content是匹配自身内容的,300dp则是指定了一个确切的值,那么小伙伴们肯定不耐烦了,说了这么多,还是没有说明白到底为什么到测量呀,都可以用这些值来确定大小了,还要测量干嘛呢?别着急,咱们先来看一段代码:
public class CustomView extends View {

public CustomView(Context context) {
    this(context, null);
    }

public CustomView(Context context, AttributeSet attrs) {
    super(context, attrs);
    }
}
新建了一个CustomView,没有任何多余的操作,接着看下布局,看下咱们给它的宽高设为wrap_content,为了方便对比显示效果,我在布局中加入了一个TextView,请看代码:
<RelativeLayout xmlns:android="http://schemas.android.com/apk/res/android"
    android:layout_width="match_parent"
    android:layout_height="match_parent">

<com.zewar.demo.iphonestyleclock.view.CustomView
    android:layout_width="wrap_content"
    android:layout_height="wrap_content"
    android:layout_centerInParent="true"
    android:background="@android:color/black" />

<TextView
    android:layout_width="wrap_content"
    android:layout_height="wrap_content"
    android:layout_centerInParent="true"
    android:text="I'm a TextView"
    android:textColor="@android:color/white"
    android:textSize="32sp" />

</RelativeLayout>
代码很简单,但是显示效果却与想象中的不一样,请看图片:
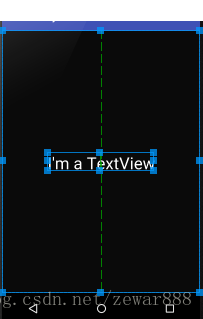
为什么CustomView和TextView的宽高都设为wrap_content,而显示的时候TextView与想象一致,匹配了自身文本所需的显示宽高,而CustomView却填充了父容器呢?差别在于TextView内部已经重写了测量的那部分代码,会根据文本、Drawables、Padding等属性计算出自身所需大小(有兴趣的话可以点开TextView去看下onMeasure的源码),而自定义的CustomView却没有重写那部分代码,现在是否已经明白自定义View需要根据情况测量自身大小呢?
如何去测量
知道了为什么要测量,那么如何去测量呢?需要重写View的onMeasure函数,咱们来简单实践下,让CustomView宽高设为wrap_content的时候
只显示500px的大小
首先重写onMeasure函数
@Override
protected void onMeasure(int widthMeasureSpec, int heightMeasureSpec) {
    super.onMeasure(widthMeasureSpec, heightMeasureSpec);
}
可以看到onMeasure函数有两个参数,这两个参数都是int型,分别代表宽和高的测量规格(而不是一个具体的尺寸,可以简单理解为包含模式和尺寸的一个结构体或者类),可以通过MeasureSpec这个测量工具类中的getMode和getSize函数解析出我们想要的模式和尺寸:
/**
* Extracts the mode from the supplied measure specification.
* 从提供的测量规格中提取模式
* @param measureSpec the measure specification to extract the mode from
* @return {@link android.view.View.MeasureSpec#UNSPECIFIED},
*         {@link android.view.View.MeasureSpec#AT_MOST} or
*         {@link android.view.View.MeasureSpec#EXACTLY}
*/
public static int getMode(int measureSpec) {
     return (measureSpec & MODE_MASK);
}

/**
* Extracts the size from the supplied measure specification.
* 从提供的测量规格中提取尺寸
* @param measureSpec the measure specification to extract the size from
* @return the size in pixels defined in the supplied measure specification
*/
public static int getSize(int measureSpec) {
     return (measureSpec & ~MODE_MASK);
}
接下来需要了解下以及测量的三种模式,分别为EXACTLY、AT_MOST、UNSPECIFIED
MeasureSpec.EXACTLY 精确模式
layout_width或layout_height指定为match_parent(就是父容器大小)或200dp这类确切大小的模式
MeasureSpec.AT_MOST 最大模式
layout_width或layout_height指定为wrap_content(根据自身内容决定的大小,并且不超过父容器大小)的模式
MeasureSpec.UNSPECIFIED 未定义模式
MeasureSpec类中的部分代码:
private static final int MODE_SHIFT = 30;
private static final int MODE_MASK  = 0x3 << MODE_SHIFT;

/**
 * Measure specification mode: The parent has not imposed any constraint
 * on the child. It can be whatever size it wants.
 * 父容器不会对子容器施加任何约束,可以是任何大小
 */
public static final int UNSPECIFIED = 0 << MODE_SHIFT;

/**
 * Measure specification mode: The parent has determined an exact size
 * for the child. The child is going to be given those bounds regardless
 * of how big it wants to be.
 * 父容器已经指定子容器的确切大小,但是不论多大,都不会超过父容器的边界
 */
public static final int EXACTLY     = 1 << MODE_SHIFT;

/**
 * Measure specification mode: The child can be as large as it wants up
 * to the specified size.
 * 子容器可以达到它想要的指定大小
 */
public static final int AT_MOST     = 2 << MODE_SHIFT;
测量模式和如何提取都过了一遍,那开始代码吧:
public class CustomView extends View {

private static final int DEFAULT_WIDTH_HEIGHT = 500;

public CustomView(Context context) {
    this(context, null);
}

public CustomView(Context context, AttributeSet attrs) {
    super(context, attrs);
}

@Override
protected void onMeasure(int widthMeasureSpec, int heightMeasureSpec) {
    //设置测量的最终尺寸
    setMeasuredDimension(measureWidth(widthMeasureSpec), measureHeight(heightMeasureSpec));
}

private int measureWidth(int widthMeasureSpec) {
    int result = 0;
    int mode = MeasureSpec.getMode(widthMeasureSpec);
    int size = MeasureSpec.getSize(widthMeasureSpec);
    if (mode == MeasureSpec.EXACTLY) {
        //这里就是match_parent或200dp对应的情况
        result = size;
    } else if (mode == MeasureSpec.AT_MOST) {
        //这里就是wrap_content对应的情况
        result = DEFAULT_WIDTH_HEIGHT;
    }
    return result;
    }

private int measureHeight(int heightMeasureSpec) {
    int result = 0;
    int mode = MeasureSpec.getMode(heightMeasureSpec);
    int size = MeasureSpec.getSize(heightMeasureSpec);
    if (mode == MeasureSpec.EXACTLY) {
        //这里就是match_parent或200dp对应的情况
        result = size;
    } else if (mode == MeasureSpec.AT_MOST) {
        //这里就是wrap_content对应的情况
        result = DEFAULT_WIDTH_HEIGHT;
    }
    return result;
    }
}
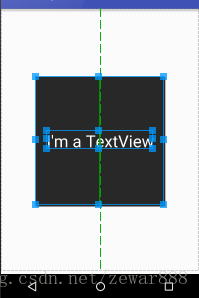
最后再来看下效果:
测量这部分基础就先学习到这里吧
如有描述不当、错误请指正,谢谢。


 457
457


 被折叠的 条评论
为什么被折叠?
被折叠的 条评论
为什么被折叠?
 到【灌水乐园】发言


