


我们这篇博客来介绍一下迭代器模式(Iterator Pattern),又称为游标(Cursor Pattern)模式,是行为型设计模式之一。迭代器模式算是一个比较古老的设计模式,其源于对容器的访问,比如 Java 中的 List、Map、数组等,我们知道对容器对象的访问必然会涉及遍历算法,我们可以将遍历的方法封装在容器中,或者不提供遍历方法。如果我们将遍历的方法封装到容器中,那么对于容器类来说就承担了过多的功能,容器类不仅要维护自身内部的数据元素而且还要对外提供遍历的接口方法,因为遍历状态的存储问题还不能对同一个容器同时进行多个遍历操作,如果我们不提供遍历方法而让使用者自己去实现,又会让容器的内部细节暴露无遗,正因于此,迭代模式应运而生,在客户访问类与容器体之间插入一个第三者——迭代器,很好地解决了上面所述的弊端。
转载请注明出处:http://blog.csdn.net/self_study/article/details/52502709。
PS:对技术感兴趣的同鞋加群544645972一起交流。
设计模式总目录
特点
提供一种方法顺序访问一个聚合对象中的各个元素,而又不暴露其内部的表示。
迭代器模式让我们能游走于聚合内的每一个元素,而又不暴露其内部的表示,把游走的任务放在迭代器上,而不是聚合上。这样简化了聚合的接口和实现,也让责任各得其所。
迭代器模式使用的场景也很简单:遍历一个容器对象时。
UML类图
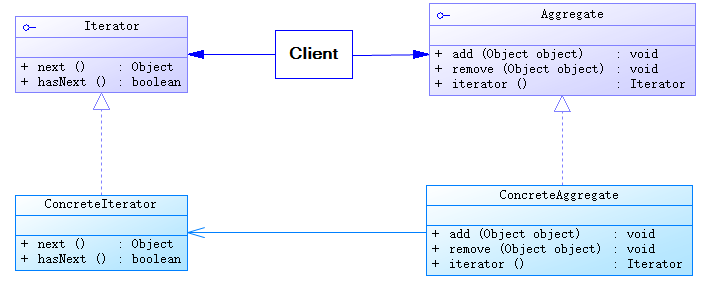
迭代器模式角色:
- Iterator:迭代器接口
- 迭代器接口负责定义、访问和遍历元素的接口。
- ConcreteIterator:具体迭代器类
- 具体迭代器类的目的主要是实现迭代器接口,并记录遍历的当前位置。
- Aggregate:容器接口
- 容器接口负责提供创建具体迭代器角色的接口。
- ConcreteAggregate:具体容器类
- 具体迭代器角色与该容器相关联。
- Client:客户类
迭代器类:
Iterator.class
public interface Iterator<T> {
    boolean hasNext();

    T next();
}
ConcreteIterator.class
public class ConcreteIterator<T> implements Iterator<T>{
    private List<T> list;
    private int cursor = 0;

    public ConcreteIterator(List<T> list) {
        this.list = list;
    }

    @Override
    public boolean hasNext() {
        return cursor != list.size();
    }

    @Override
    public T next() {
        T obj = null;
        if (this.hasNext()) {
            obj = this.list.get(cursor++);
        }
        return obj;
    }
}
容器类:
Aggregation.class
public interface Aggregation<T> {

    void add(T obj);

    void remove(T obj);

    Iterator<T> iterator();
}
ConcreteAggregation.class
public class ConcreteAggregation<T> implements Aggregation<T>{
    private List<T> list = new ArrayList<>();

    @Override
    public void add(T obj) {
        list.add(obj);
    }

    @Override
    public void remove(T obj) {
        list.remove(obj);
    }

    @Override
    public Iterator<T> iterator() {
        return new ConcreteIterator<>(list);
    }
}
客户端代码
public class Client {
    public static void main(String args[]) {
        Aggregation<String> a = new ConcreteAggregation<>();
        a.add("a");
        a.add("b");
        a.add("c");
        Iterator<String> iterator = a.iterator();
        while (iterator.hasNext()) {
            System.out.print(iterator.next());
        }
    }
}
最后结果就是遍历了一遍:
abc
Process finished with exit code 0
示例与源码
迭代器这个模式对于很多开发者来说几乎不会自己去实现一个迭代器,但是我们平时使用的频率不会低,在 Android 中,除了各种数据结构体,如 List、Map 等所包含的迭代器外,数据库查询的 Cursor 也是一个迭代器。
我们这里就简单分析一下 ArrayList 的 Iterator 源码:
Iterator.class
public interface Iterator<E> {
    /**
     * Returns {@code true} if the iteration has more elements.
     * (In other words, returns {@code true} if {@link #next} would
     * return an element rather than throwing an exception.)
     *
     * @return {@code true} if the iteration has more elements
     */
    boolean hasNext();

    /**
     * Returns the next element in the iteration.
     *
     * @return the next element in the iteration
     * @throws NoSuchElementException if the iteration has no more elements
     */
    E next();

    /**
     * Removes from the underlying collection the last element returned
     * by this iterator (optional operation).  This method can be called
     * only once per call to {@link #next}.  The behavior of an iterator
     * is unspecified if the underlying collection is modified while the
     * iteration is in progress in any way other than by calling this
     * method.
     *
     * @throws UnsupportedOperationException if the {@code remove}
     *         operation is not supported by this iterator
     *
     * @throws IllegalStateException if the {@code next} method has not
     *         yet been called, or the {@code remove} method has already
     *         been called after the last call to the {@code next}
     *         method
     */
    void remove();
}
ArrayList.Itr.class
private class Itr implements Iterator<E> {
    int cursor;       // index of next element to return
    int lastRet = -1; // index of last element returned; -1 if no such
    int expectedModCount = modCount;

    public boolean hasNext() {
        return cursor != size;
    }

    @SuppressWarnings("unchecked")
    public E next() {
        checkForComodification();
        int i = cursor;
        if (i >= size)
            throw new NoSuchElementException();
        Object[] elementData = ArrayList.this.elementData;
        if (i >= elementData.length)
            throw new ConcurrentModificationException();
        cursor = i + 1;
        return (E) elementData[lastRet = i];
    }

    public void remove() {
        if (lastRet < 0)
            throw new IllegalStateException();
        checkForComodification();

        try {
            ArrayList.this.remove(lastRet);
            cursor = lastRet;
            lastRet = -1;
            expectedModCount = modCount;
        } catch (IndexOutOfBoundsException ex) {
            throw new ConcurrentModificationException();
        }
    }

    final void checkForComodification() {
        if (modCount != expectedModCount)
            throw new ConcurrentModificationException();
    }
}
这就是 ArrayList 迭代器的具体实现,从源码中我们可以看到有一个 checkForComodification() 函数,抛出的异常 ConcurrentModificationException 应该很多人认识,如果 modCount 不等于 expectedModCount,则抛出 ConcurrentModificationException 异常,一般情况下出现在遍历的同时调用了 ArrayList.remove 等操作对数据集合进行了更改,例如多线程中当一个线程删除了元素,由于 modCount 是 AbstarctList 的成员变量,因此可能会导致在其他线程中modCount 和 expectedModCount 值不等。
总结
对于迭代模式来说,其自身优点很明显:
- 迭代子模式简化了聚集的接口,迭代子具备了一个遍历接口,这样聚集的接口就不必具备遍历接口;
- 每一个聚集对象都可以有一个或多个迭代子对象,每一个迭代子的迭代状态可以是彼此独立的。因此,一个聚集对象可以同时有几个迭代在进行之中;
- 由于遍历算法被封装在迭代子角色里面,因此迭代的算法可以独立于聚集角色变化。
源码下载
https://github.com/zhaozepeng/Design-Patterns/tree/master/IteratorPattern
引用
http://blog.csdn.net/jason0539/article/details/45070441
https://en.wikipedia.org/wiki/Iterator_pattern


 457
457


 被折叠的 条评论
为什么被折叠?
被折叠的 条评论
为什么被折叠?
 到【灌水乐园】发言


