区域生长算法

       图像分割是一种重要的图像处理技术,而区域生长是图像分割技术的一种。区域生长的基本思想是将具有相似性的像素集合起来构成区域。首先对每个需要分割的区域找出一个种子像素作为生长的七点,然后将种子像素周围邻域中与种子有相同或相似性质的像素(根据事先确定的生长或相似准则来确定)合并到种子像素所在的区域中。而新的像素继续作为种子向四周生长,直到再没有满足条件的像素可以包括进来,一个区域就生长而成了。


       种子区域生长(region seeds growing, RSG)算法在实践中关键的问题是种子的选取和相似区域判定准则的确定。种子的选择可以人工选择,也可以通过一些方法自动选取;灰度图的判定准则一般用灰度差值小于某个阈值来表示,不同的判定准则可能会产生不同的分割结果。


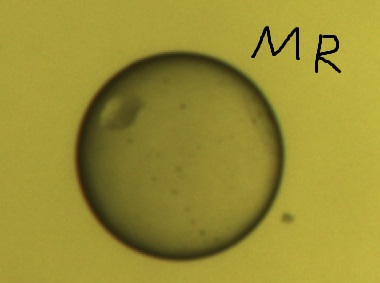
      为了说明区域是如何生长的,本文从最简单的情况出发:使用二值图像;人工选取种子;判定准则为是否是前景像素。


区域生长实现的步骤如下:
1. 对图像顺序扫描!找到第1个还没有归属的像素, 设该像素为(x0, y0);
2. 以(x0, y0)为中心, 考虑(x0, y0)的8邻域像素(x, y)如果(x0, y0)满足生长准则, 将(x, y)与(x0, y0)合并(在同一区域内), 同时将(x, y)压入堆栈;
3. 从堆栈中取出一个像素, 把它当作(x0, y0)返回到步骤2;
4. 当堆栈为空时!返回到步骤1;
5. 重复步骤1 - 4直到图像中的每个点都有归属时。生长结束。

  1. #include <iostream>  
  2. #include <stack>  
  3. #include <opencv2\opencv.hpp>  
  4.   
  5. using namespace std;  
  6. using namespace cv;  
  7.   
  8. // 8 邻域  
  9. static Point connects[8] = { Point(-1, -1), Point(0, -1), Point(1, -1), Point(1, 0), Point(1, 1), Point(0, 1), Point(-1, 1), Point(-1, 0)};  
  10.   
  11. int main()  
  12. {  
  13.     // 原图  
  14.     Mat src = imread(”img2.jpg”, 0);  
  15.     // 结果图  
  16.     Mat res = Mat::zeros(src.rows, src.cols, CV_8U);  
  17.     // 用于标记是否遍历过某点  
  18.     Mat flagMat;  
  19.     res.copyTo(flagMat);  
  20.     // 二值图像  
  21.     Mat bin;  
  22.     threshold(src, bin, 80, 255, CV_THRESH_BINARY);  
  23.   
  24.     // 初始3个种子点  
  25.     stack<Point> seeds;  
  26.     seeds.push(Point(0, 0));  
  27.     seeds.push(Point(186, 166));  
  28.     seeds.push(Point(327, 43));  
  29.     res.at<uchar>(0, 0) = 255;  
  30.     res.at<uchar>(166, 186) = 255;  
  31.     res.at<uchar>(43, 327) = 255;  
  32.       
  33.     while (!seeds.empty())  
  34.     {  
  35.         Point seed = seeds.top();  
  36.         seeds.pop();  
  37.   
  38.         // 标记为已遍历过的点  
  39.         flagMat.at<uchar>(seed.y, seed.x) = 1;  
  40.   
  41.         // 遍历8邻域  
  42.         for (size_t i = 0; i < 8; i++)  
  43.         {  
  44.             int tmpx = seed.x + connects[i].x;  
  45.             int tmpy = seed.y + connects[i].y;  
  46.   
  47.             if (tmpx < 0 || tmpy < 0 || tmpx >= src.cols || tmpy >= src.rows)  
  48.                 continue;  
  49.             // 前景点且没有被标记过的点  
  50.             if (bin.at<uchar>(tmpy, tmpx) != 0 && flagMat.at<uchar>(tmpy, tmpx) == 0)  
  51.             {  
  52.                 res.at<uchar>(tmpy, tmpx) = 255; // 生长  
  53.                 flagMat.at<uchar>(tmpy, tmpx) = 1; // 标记  
  54.                 seeds.push(Point(tmpx, tmpy)); // 种子压栈  
  55.             }  
  56.         }  
  57.     }  
  58.   
  59.     imshow(”RES”,res);  
  60.     imwrite(”res.jpg”, res);  
  61.     waitKey(0);  
  62.     return 1;  
  63. }  
#include <iostream>


#include <stack> #include <opencv2\opencv.hpp> using namespace std; using namespace cv; // 8 邻域 static Point connects[8] = { Point(-1, -1), Point(0, -1), Point(1, -1), Point(1, 0), Point(1, 1), Point(0, 1), Point(-1, 1), Point(-1, 0)}; int main() { // 原图 Mat src = imread("img2.jpg", 0); // 结果图 Mat res = Mat::zeros(src.rows, src.cols, CV_8U); // 用于标记是否遍历过某点 Mat flagMat; res.copyTo(flagMat); // 二值图像 Mat bin; threshold(src, bin, 80, 255, CV_THRESH_BINARY); // 初始3个种子点 stack<Point> seeds; seeds.push(Point(0, 0)); seeds.push(Point(186, 166)); seeds.push(Point(327, 43)); res.at<uchar>(0, 0) = 255; res.at<uchar>(166, 186) = 255; res.at<uchar>(43, 327) = 255; while (!seeds.empty()) { Point seed = seeds.top(); seeds.pop(); // 标记为已遍历过的点 flagMat.at<uchar>(seed.y, seed.x) = 1; // 遍历8邻域 for (size_t i = 0; i < 8; i++) { int tmpx = seed.x + connects[i].x; int tmpy = seed.y + connects[i].y; if (tmpx < 0 || tmpy < 0 || tmpx >= src.cols || tmpy >= src.rows) continue; // 前景点且没有被标记过的点 if (bin.at<uchar>(tmpy, tmpx) != 0 && flagMat.at<uchar>(tmpy, tmpx) == 0) { res.at<uchar>(tmpy, tmpx) = 255; // 生长 flagMat.at<uchar>(tmpy, tmpx) = 1; // 标记 seeds.push(Point(tmpx, tmpy)); // 种子压栈 } } } imshow("RES",res); imwrite("res.jpg", res); waitKey(0); return 1; }


原图:

                                                                       
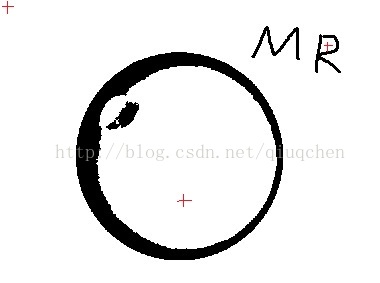
上面的代码通过人工选择了三个种子,它们在原图中的大致位置如下(红色十字中心):
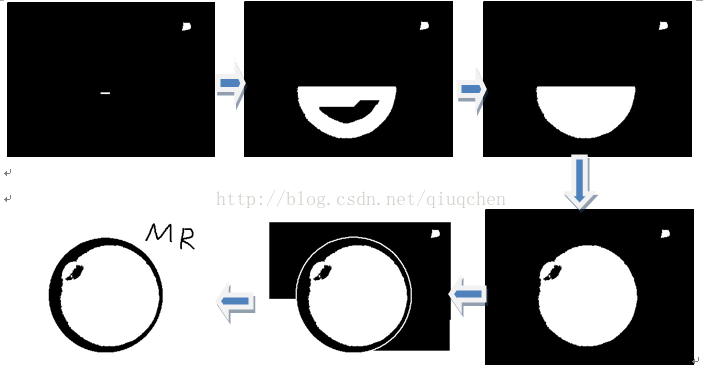
                                                                      

区域生长的过程:


工程:

点击打开链接

  • 0
    点赞
  • 2
    收藏
    觉得还不错? 一键收藏
  • 0
    评论

“相关推荐”对你有帮助么?

  • 非常没帮助
  • 没帮助
  • 一般
  • 有帮助
  • 非常有帮助
提交
评论
添加红包

请填写红包祝福语或标题

红包个数最小为10个

红包金额最低5元

当前余额3.43前往充值 >
需支付:10.00
成就一亿技术人!
领取后你会自动成为博主和红包主的粉丝 规则
hope_wisdom
发出的红包
实付
使用余额支付
点击重新获取
扫码支付
钱包余额 0

抵扣说明:

1.余额是钱包充值的虚拟货币,按照1:1的比例进行支付金额的抵扣。
2.余额无法直接购买下载,可以购买VIP、付费专栏及课程。

余额充值