


大家好,今天我为大家分享TabHost中怎样修改TabWidget样式。在很多界面美观的应用中很多都用到了TabHost,但他们要比系统默认的要漂亮得多。先看几张图:
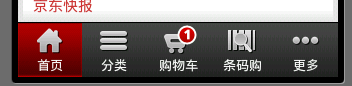
京东商城底部菜单栏
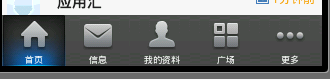
新浪微博底部菜单栏
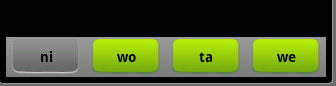
好了,看到这些漂亮的菜单栏是不是很惊讶,你可能会说用Button就可以实现啊 ,可是用Button的话控制显示的内容很麻烦,不如用TabHost控制效率更高。很想知道用TabHost是怎么实现的吧,下面就来研究如何实现这种漂亮的TabHost。先看一下效果图:
界面比较简单,要想做得漂亮换几张图片就可以了。
第一步:先在布局(这里用了main.xml创建时自动生成的)里面放上TabHost ,只要将TabHost控件托至屏幕中就可:
<?xml version="1.0" encoding="utf-8"?>
    <TabHost android:id="@+id/tabhost"
      android:layout_width="fill_parent"
      android:layout_height="fill_parent"
      xmlns:android="http://schemas.android.com/apk/res/android">
        <LinearLayout android:layout_width="fill_parent"
          android:id="@+id/linearLayout1"
          android:layout_height="fill_parent"
          android:orientation="vertical">
            <TabWidget android:layout_width="fill_parent"
              android:layout_height="wrap_content"
              android:id="@android:id/tabs"></TabWidget>
            <FrameLayout android:layout_width="fill_parent" android:layout_height="fill_parent" android:id="@android:id/tabcontent">
                <LinearLayout android:layout_width="fill_parent" android:layout_height="fill_parent" android:id="@+id/tab1"></LinearLayout>
                <LinearLayout android:layout_width="fill_parent" android:layout_height="fill_parent" android:id="@+id/tab2"></LinearLayout>
                <LinearLayout android:layout_width="fill_parent" android:layout_height="fill_parent" android:id="@+id/tab3"></LinearLayout>
            </FrameLayout>
        </LinearLayout>
    </TabHost>
这里我们已经把LinearLayout和TextView去掉了,并将“xmlns:android="……" ”添加大TabHost里了,这里要注意我们将TabHost的id定义为自己定义的id比不用android规定的id="@android:id/tabhost"。
第二步:创建显示此TabWidget的布局tabmini.xml:
<?xml version="1.0" encoding="utf-8"?>
<RelativeLayout xmlns:android="http://schemas.android.com/apk/res/android"
    android:layout_width="fill_parent"
    android:layout_height="40dp"
    android:paddingLeft="5dip"
    android:paddingRight="5dip"
    android:background="@drawable/head_bg">

    <TextView android:id="@+id/tab_label"
        android:layout_width="fill_parent"
        android:layout_height="wrap_content"
        android:layout_centerInParent="true"
        android:gravity="center"
        android:textColor="#000000"
        android:textStyle="bold"
        android:background="@drawable/tabmini"/>
</RelativeLayout>
第三步:创建一个selector在drawable里面 命名tabmini.xml,用来点击TabHost的一个tab时TextView的变化:
<?xml version="1.0" encoding="utf-8"?>
<selector
  xmlns:android="http://schemas.android.com/apk/res/android">
    <item android:state_selected="true"
        android:drawable="@drawable/add_managebg_down"/>
    <item android:state_selected="false"
        android:drawable="@drawable/add_managebg"/>
</selector>package cn.li.tabstyle;
import android.app.Activity;
import android.os.Bundle;
import android.view.LayoutInflater;
import android.view.View;
import android.widget.TabHost;
import android.widget.TextView;
public class TabHostStyleActivity extends Activity {
/** Called when the activity is first created. */
@Override
public void onCreate(Bundle savedInstanceState) {
super.onCreate(savedInstanceState);
setContentView(R.layout.main);
View niTab = (View) LayoutInflater.from(this).inflate(R.layout.tabmini, null);
TextView text0 = (TextView) niTab.findViewById(R.id.tab_label);
text0.setText("ni");
View woTab = (View) LayoutInflater.from(this).inflate(R.layout.tabmini, null);
TextView text1 = (TextView) woTab.findViewById(R.id.tab_label);
text1.setText("wo");
View taTab = (View) LayoutInflater.from(this).inflate(R.layout.tabmini, null);
TextView text2 = (TextView) taTab.findViewById(R.id.tab_label);
text2.setText("ta");
View weTab = (View) LayoutInflater.from(this).inflate(R.layout.tabmini, null);
TextView text3 = (TextView) weTab.findViewById(R.id.tab_label);
text3.setText("we");
TabHost tabHost = (TabHost)findViewById(R.id.tabhost);
tabHost.setup(); //Call setup() before adding tabs if loading TabHost using findViewById().
tabHost.addTab(tabHost.newTabSpec("nitab").setIndicator(niTab).setContent(R.id.tab1));
tabHost.addTab(tabHost.newTabSpec("wotab").setIndicator(woTab).setContent(R.id.tab2));
tabHost.addTab(tabHost.newTabSpec("tatab").setIndicator(taTab).setContent(R.id.tab3));
tabHost.addTab(tabHost.newTabSpec("wetab").setIndicator(weTab).setContent(R.id.tab4));
}
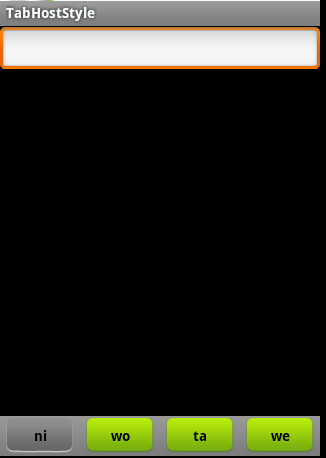
}好了,让我们来看看运行效果吧:
好了,我们自定义的TabHost算是结束了。不过看到Activity里的代码很多都是重复的我们可以这样把他们简化:
package cn.li.tabstyle;

import android.app.Activity;
import android.os.Bundle;
import android.view.LayoutInflater;
import android.view.View;
import android.widget.TabHost;
import android.widget.TextView;

public class TabHostStyleActivity extends Activity {
    /** Called when the activity is first created. */
	String[] title = new String[]{"ni","wo","ta","we"};
	View userTab,articeTab,feedTab,weTab;
	View[] tabs = new View[]{userTab,articeTab,feedTab,weTab};
	int[] tabIds = new int[]{R.id.tab1,R.id.tab2,R.id.tab3,R.id.tab4};
    @Override
    public void onCreate(Bundle savedInstanceState) {
        super.onCreate(savedInstanceState);
        setContentView(R.layout.main);

        TabHost tabHost = (TabHost)findViewById(R.id.tabhost);
        tabHost.setup();   //Call setup() before adding tabs if loading TabHost using findViewById().

        for(int i=0;i<tabs.length;i++){
        	tabs[i] = (View) LayoutInflater.from(this).inflate(R.layout.tabmini, null);
            TextView text = (TextView) tabs[i].findViewById(R.id.tab_label);
            text.setText(title[i]);
            tabHost.addTab(tabHost.newTabSpec(title[i]).setIndicator(tabs[i]).setContent(tabIds[i]));
        }
    }
}
这样是不是就简洁多了 代码质量也上来了 呵呵……


 474
474


 被折叠的 条评论
为什么被折叠?
被折叠的 条评论
为什么被折叠?
 到【灌水乐园】发言


