


以前 扫描功能 自己也写过, 也使用过第三方, 但是好久没使用几乎都快忘完了, 所以乘着自己还年轻赶紧凭着印象, 结合着资料记录下来
关于AVCapture相关属性的一些详细的说明请参考我另外一篇博客http://blog.csdn.net/zhz459880251/article/details/49307819
声明
扫描器部分ZHZCaptureViewController.h
#import <UIKit/UIKit.h>
//传值的作用
typedef void(^MyBlock)(NSString *);

@interface ZHZCaptureViewController : UIViewController

@property (nonatomic, copy) MyBlock myBlock;
//方便传值
- (void)showBlock:(MyBlock)block;

@end
实现
这个部分是比较麻烦的, 有查询了一些参数
—参数都进行了整理和备注, 这里就不啰嗦了
#import "ZHZCaptureViewController.h"
#import <AVFoundation/AVFoundation.h>
//这个类 是为了实现中间透明外周半透明效果的
#import "QRView.h"

#define kScreenW [UIScreen mainScreen].bounds.size.width
#define kScreenH [UIScreen mainScreen].bounds.size.height

@interface ZHZCaptureViewController ()<AVCaptureMetadataOutputObjectsDelegate>
{
    QRView *scanView;
}

@property (nonatomic, copy) NSString *stringValue;

///设备的抽象化
@property (strong, nonatomic)AVCaptureDevice *device;
///输入设备,它配置抽象硬件设备的ports。AVCaptureInput的子类
@property (strong, nonatomic)AVCaptureDeviceInput *input;
///它代表输出数据,管理着输出到一个movie或者图像。AVCaptureOutput的子类
@property (strong, nonatomic)AVCaptureMetadataOutput *output;
///它是input和output的桥梁。它协调着intput到output的数据传输。
@property (strong, nonatomic)AVCaptureSession *session;
///预览 显示layer层
@property (strong, nonatomic)AVCaptureVideoPreviewLayer *preView;
@end

@implementation ZHZCaptureViewController

- (void)viewDidLoad {
    [super viewDidLoad];
    self.view.backgroundColor = [UIColor whiteColor];
    //填充 半透明效果的view
    scanView = [[QRView alloc] initWithFrame:[UIScreen mainScreen].bounds];
    scanView.backgroundColor = [UIColor clearColor];
    //中间透明区域
    scanView.transparentArea = CGSizeMake(kScreenW - 20, kScreenW - 80);
    [self.view addSubview:scanView];
    [scanView startMove];

    //创建 扫描器
    [self setUpAboutCapture];

    //开始扫描
    [self.session startRunning];

    //判断是否有 相机权限(这里暂时没做实际的操作)
    [self checkAVAuthorizationStatus];


}


//判断是否有 相机权限
- (void)checkAVAuthorizationStatus {

    AVAuthorizationStatus status = [AVCaptureDevice authorizationStatusForMediaType:AVMediaTypeVideo];
    //NSString *tips = NSLocalizedString(@"AVAuthorization", @"您没有权限访问相机");
    //tips = [[NSBundle mainBundle] localizedStringForKey:@"AVAuthorization" value:@"" table:nil];

    NSLog(@"%ld", (long)status);
    /**
     *  AVAuthorizationStatusNotDetermined = 0, 用户尚未做出了选择这个应用程序的问候
     *  AVAuthorizationStatusRestricted,        此应用程序没有被授权访问的照片数据。可能是家长控制权限
     *  AVAuthorizationStatusDenied, 用户已经明确否认了这一照片数据的应用程序访问.
     *  AVAuthorizationStatusAuthorized, 用户已授权应用访问照片数据
     */

    switch (status) {
        case AVAuthorizationStatusNotDetermined:
            //do somethings
            NSLog(@"用户尚未做出了选择这个应用程序的问候");
            break;
        case AVAuthorizationStatusRestricted:
            //do somethings
            NSLog(@"此应用程序没有被授权访问的照片数据。可能是家长控制权限");
            break;
        case AVAuthorizationStatusDenied:
            //do somethings
            NSLog(@"用户已经明确否认了这一照片数据的应用程序访问");
            break;
        case AVAuthorizationStatusAuthorized:
            //do somethings
            NSLog(@"用户已授权应用访问照片数据");
            break;
        default:
            break;
    }

//    if(status == AVAuthorizationStatusAuthorized) {        // 有相机权限
//
//
//
//    } else {            //没相机权限, 提示
//        //[SVProgressHUD showWithStatus:tips];
//        NSLog(@"----%@", tips);
//    }
}


//创建对象
- (void)setUpAboutCapture {
    /*
     AVMediaTypeVideo,
     AVMediaTypeAudio,
     AVMediaTypeMuxed
     */
    self.device = [AVCaptureDevice defaultDeviceWithMediaType:AVMediaTypeVideo];

    self.input = [AVCaptureDeviceInput deviceInputWithDevice:self.device error:nil];

    self.output = [[AVCaptureMetadataOutput alloc] init];
    [self.output setMetadataObjectsDelegate:self queue:dispatch_get_main_queue()];
    //设置扫描范围
    //[self setRectOfScan];


    self.session = [[AVCaptureSession alloc] init];
    /**
     *  AVCaptureSessionPresetPhoto
     *  AVCaptureSessionPresetHigh
     *  AVCaptureSessionPresetMedium
     *  AVCaptureSessionPresetLow
     *  AVCaptureSessionPreset352x288
     *  AVCaptureSessionPreset640x480
     *  AVCaptureSessionPreset960x540
     *  AVCaptureSessionPreset1280x720
     *  AVCaptureSessionPreset1920x1080
     *  AVCaptureSessionPreset3840x2160
     *  AVCaptureSessionPresetiFrame960x540
     *  AVCaptureSessionPresetiFrame1280x720
     *  AVCaptureSessionPresetInputPriority
     */
    [self.session setSessionPreset:AVCaptureSessionPresetHigh];

    if ([self.session canAddInput:self.input]) {
        [self.session addInput:self.input];
    }else {
        NSLog(@"输入失败");
    }

    if ([self.session canAddOutput:self.output]) {
        [self.session addOutput:self.output];
    }else {
        NSLog(@"输出失败");
    }

    //设置属性

    //条码类型
    /* 上面都是7.0以上
     AVMetadataObjectTypeUPCECode
     AVMetadataObjectTypeCode39Code
     AVMetadataObjectTypeCode39Mod43Code
     AVMetadataObjectTypeEAN13Code              条形码
     AVMetadataObjectTypeEAN8Code
     AVMetadataObjectTypeCode93Code
     AVMetadataObjectTypeCode128Code
     AVMetadataObjectTypePDF417Code
     AVMetadataObjectTypeQRCode                 二维码
     AVMetadataObjectTypeAztecCode
     AVMetadataObjectTypeInterleaved2of5Code    NS_AVAILABLE(NA, 8_0);
     AVMetadataObjectTypeITF14Code              NS_AVAILABLE(NA, 8_0);
     AVMetadataObjectTypeDataMatrixCode         NS_AVAILABLE(NA, 8_0);
     */
    self.output.metadataObjectTypes = @[AVMetadataObjectTypeQRCode, AVMetadataObjectTypeEAN13Code];

    self.preView = [[AVCaptureVideoPreviewLayer alloc] initWithSession:self.session];
    /*
     AVLayerVideoGravityResize,
     AVLayerVideoGravityResizeAspect, 默认
     AVLayerVideoGravityResizeAspectFill
     */
    self.preView.videoGravity = AVLayerVideoGravityResizeAspectFill;
    self.preView.frame = [UIScreen mainScreen].bounds;
    [self.view.layer insertSublayer:self.preView atIndex:0];


}

#pragma mark - AVCaptureMetadataOutputObjectsDelegate
- (void)captureOutput:(AVCaptureOutput *)captureOutput didOutputMetadataObjects:(NSArray *)metadataObjects fromConnection:(AVCaptureConnection *)connection {

    if ([metadataObjects count] > 0) {

        //停止扫描
        [self.session stopRunning];
        [scanView stopMove];

        AVMetadataMachineReadableCodeObject *metadataObjet = metadataObjects[0];
        self.stringValue = metadataObjet.stringValue;
        //self.myBlock(self.stringValue);

        [self dismissViewControllerAnimated:YES completion:^{
            self.myBlock(self.stringValue);
        }];
        NSLog(@"扫描后数据---%@", self.stringValue);
    }

}

//传递参数
- (void)showBlock:(MyBlock)block {
    self.myBlock = block;
}

@end
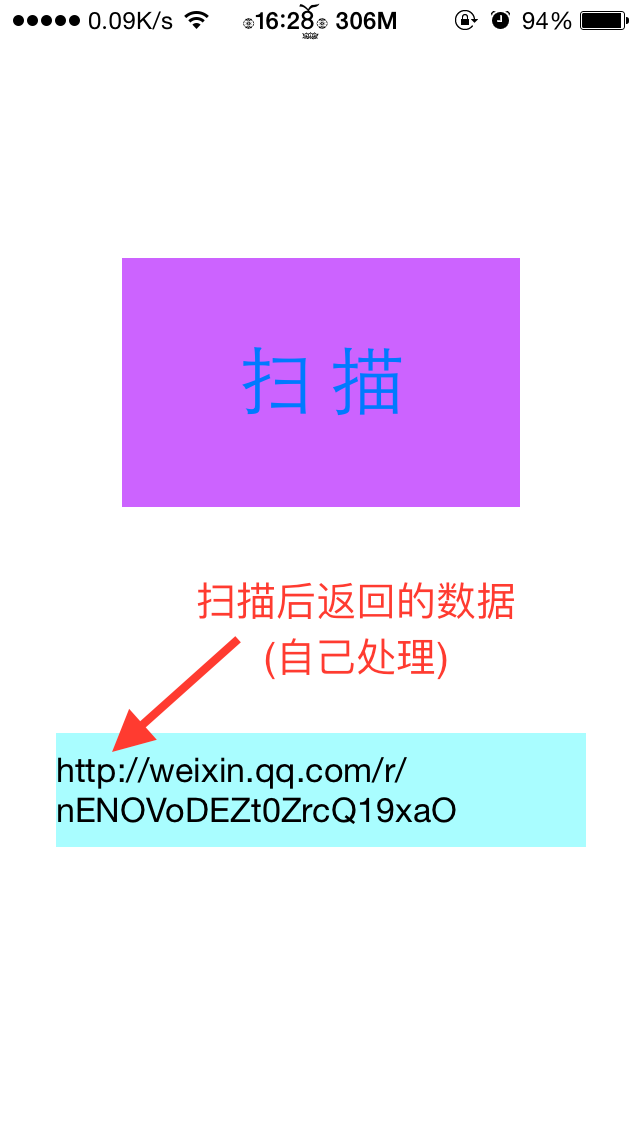
调用
这就很简单了, 只要把 扫描器 推出来就行
#import "ViewController.h"
#import "ZHZCaptureViewController.h"

@interface ViewController ()
///显示 扫描后返回的数据
@property (weak, nonatomic) IBOutlet UILabel *detailLabel;

///跳转到扫描页面
- (IBAction)capture:(id)sender;

@end

@implementation ViewController

- (void)viewDidLoad {
    [super viewDidLoad];
}

/**
 *  跳转到 扫描页
 */
- (IBAction)capture:(id)sender {
    ZHZCaptureViewController *capture = [[ZHZCaptureViewController alloc] init];

     __weak typeof(self) weakSelf = self;
    [capture showBlock:^(NSString *string) {
        if (string) {
            weakSelf.detailLabel.text = string;
        }
        NSLog(@"%@", string);
    }];

    capture.modalTransitionStyle = UIModalTransitionStylePartialCurl;
    [self presentViewController:capture animated:YES completion:nil];

}
@end进阶一(指定扫描区域)
  //设置扫描范围
  [self setRectOfScan];
/**
* 设置扫描范围
*/
- (void)setRectOfScan {
CGRect cropRect = CGRectMake((kScreenW - scanView.transparentArea.width) / 2,
(kScreenH - scanView.transparentArea.height) / 2,
scanView.transparentArea.width,
scanView.transparentArea.height);
/*注意参数, x与y, 宽和高相互对调*/
[_output setRectOfInterest:CGRectMake(cropRect.origin.y / kScreenH,
cropRect.origin.x / kScreenW,
cropRect.size.height / kScreenH,
cropRect.size.width / kScreenW)];
}
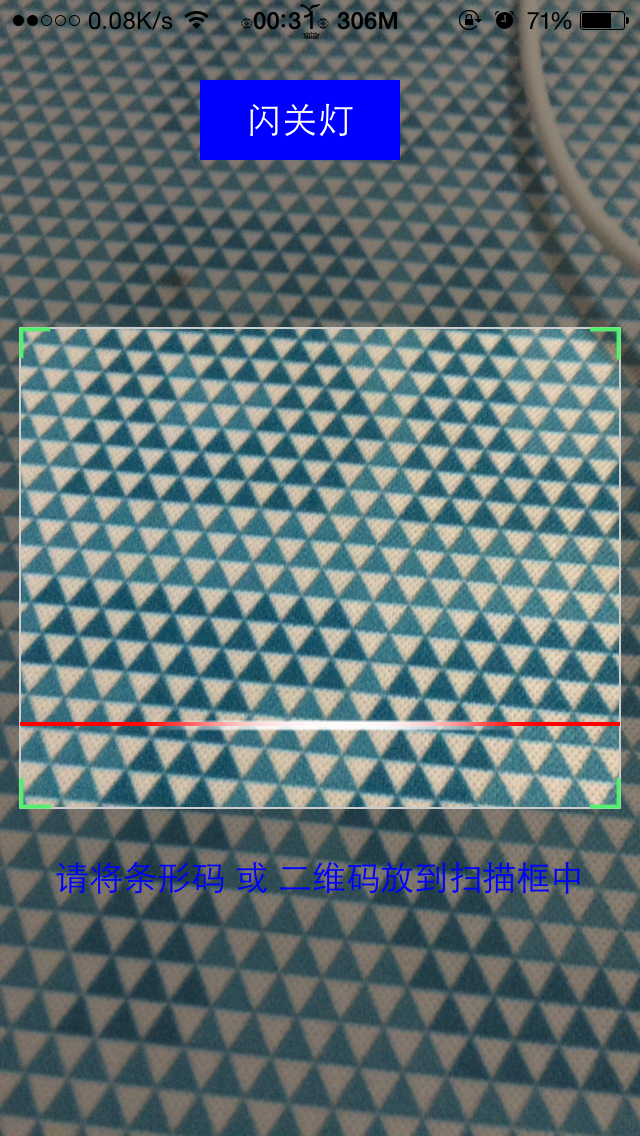
进阶二(闪光灯)
//添加闪关灯按钮
    if (![self.device hasTorch]) {
        NSLog(@"没有闪光灯功能");
    }else {
        [self setUpWidget];
    }
/**
* 闪光灯控制
*/
- (void)setUpWidget {
UIButton *button = [UIButton buttonWithType:UIButtonTypeCustom];
button.frame = CGRectMake(100, 40, 100, 40);
[button setBackgroundColor:[UIColor blueColor]];
[button setTitle:@"闪关灯" forState:UIControlStateNormal];
[button addTarget:self action:@selector(flashlight) forControlEvents:UIControlEventTouchUpInside];
[scanView addSubview:button];
}
/**
* 打开 或者 关闭闪关灯(home自动关闭闪光灯, 所以不用再做判断)
*/
- (void)flashlight {
//如果闪光灯正在使用 则关闭
if (self.device.torchMode == AVCaptureTorchModeOn) {
[self.device lockForConfiguration:nil];
[self.device setTorchMode:AVCaptureTorchModeOff];
[self.device unlockForConfiguration];
}else if (self.device.torchMode == AVCaptureTorchModeOff){
//锁定闪光灯
[self.device lockForConfiguration:nil];
//打开闪光灯
/**
AVCaptureTorchModeOff = 0,
AVCaptureTorchModeOn = 1,
AVCaptureTorchModeAuto
*/
[self.device setTorchMode:AVCaptureTorchModeOn];
//解除锁定
[self.device unlockForConfiguration];
}
}进阶三(中间区域透明)
#import <UIKit/UIKit.h>

@interface QRView : UIView
/**
 *  透明的区域 size
 */
@property (nonatomic, assign) CGSize transparentArea;

//开始 移动
- (void)startMove;

//停止 移动
- (void)stopMove;
@end
#import "QRView.h"
#define kQrLineanimateDuration 0.01
#define kScreenW [UIScreen mainScreen].bounds.size.width
#define kScreenH [UIScreen mainScreen].bounds.size.height
@interface QRView (){
NSTimer *timer;
}
@property (nonatomic, assign) NSInteger qrLineY;
@property (nonatomic, strong) UIImageView *qrLine;
@end
@implementation QRView
- (instancetype)initWithFrame:(CGRect)frame {
self = [super initWithFrame:frame];
if (self) {
}
return self;
}
- (void)initQRLine {
//添加 扫描滚动的线条
self.qrLine = [[UIImageView alloc] initWithFrame:CGRectMake(kScreenW / 2 - self.transparentArea.width / 2, kScreenH / 2 - self.transparentArea.height / 2, self.transparentArea.width, 2)];
self.qrLine.image = [UIImage imageNamed:@"qr_scan_line"];
self.qrLine.contentMode = UIViewContentModeScaleAspectFill;
[self addSubview:self.qrLine];
self.qrLineY = self.qrLine.frame.origin.y;
self.qrLine.backgroundColor = [UIColor redColor];
//显示 下方的提示
CGFloat labelX = 20;
CGFloat labelY = self.transparentArea.height / 2 + kScreenH / 2 + 20;
UILabel *showLabel = [[UILabel alloc] initWithFrame:CGRectMake(labelX, labelY, kScreenW - 20*2, 30)];
showLabel.text = @"请将条形码 或 二维码放到扫描框中";
showLabel.textColor = [UIColor blueColor];
showLabel.textAlignment = NSTextAlignmentCenter;
[self addSubview:showLabel];
}
//显示 扫描线 移动
- (void)show {
[UIView animateWithDuration:kQrLineanimateDuration animations:^{
CGRect rect = self.qrLine.frame;
rect.origin.y = self.qrLineY;
self.qrLine.frame = rect;
} completion:^(BOOL finished) {
CGFloat maxBorder = kScreenH / 2 + self.transparentArea.height / 2 - 4;
if (self.qrLineY > maxBorder) {
self.qrLineY = kScreenH / 2 - self.transparentArea.height /2;
}
self.qrLineY++;
}];
}
- (void)drawRect:(CGRect)rect {
//整个二维码扫描界面的颜色
CGSize screenSize =self.bounds.size;
CGRect screenDrawRect =CGRectMake(0, 0, screenSize.width, screenSize.height);
//中间清空的矩形框
CGRect clearDrawRect = CGRectMake(screenDrawRect.size.width / 2 - self.transparentArea.width / 2,
screenDrawRect.size.height / 2 - self.transparentArea.height / 2,
self.transparentArea.width,self.transparentArea.height);
//获取图形上下文
CGContextRef ctx = UIGraphicsGetCurrentContext();
//画 屏幕矩形框
[self addScreenFillRect:ctx rect:screenDrawRect];
//画 中间透明框
[self addCenterClearRect:ctx rect:clearDrawRect];
[self addWhiteRect:ctx rect:clearDrawRect];
[self addCornerLineWithContext:ctx rect:clearDrawRect];
}
- (void)addScreenFillRect:(CGContextRef)ctx rect:(CGRect)rect {
CGContextSetRGBFillColor(ctx, 40 / 255.0,40 / 255.0,40 / 255.0,0.5);
CGContextFillRect(ctx, rect); //draw the transparent layer
}
- (void)addCenterClearRect :(CGContextRef)ctx rect:(CGRect)rect {
CGContextClearRect(ctx, rect); //clear the center rect of the layer
}
- (void)addWhiteRect:(CGContextRef)ctx rect:(CGRect)rect {
CGContextStrokeRect(ctx, rect);
CGContextSetRGBStrokeColor(ctx, 1, 1, 1, 1);
CGContextSetLineWidth(ctx, 0.8);
CGContextAddRect(ctx, rect);
CGContextStrokePath(ctx);
}
- (void)addCornerLineWithContext:(CGContextRef)ctx rect:(CGRect)rect{
//画四个边角
CGContextSetLineWidth(ctx, 2);
CGContextSetRGBStrokeColor(ctx, 83 /255.0, 239/255.0, 111/255.0, 1);//绿色
//左上角
CGPoint poinsTopLeftA[] = {
CGPointMake(rect.origin.x+0.7, rect.origin.y),
CGPointMake(rect.origin.x+0.7 , rect.origin.y + 15)
};
CGPoint poinsTopLeftB[] = {CGPointMake(rect.origin.x, rect.origin.y +0.7),CGPointMake(rect.origin.x + 15, rect.origin.y+0.7)};
[self addLine:poinsTopLeftA pointB:poinsTopLeftB ctx:ctx];
//左下角
CGPoint poinsBottomLeftA[] = {CGPointMake(rect.origin.x+ 0.7, rect.origin.y + rect.size.height - 15),CGPointMake(rect.origin.x +0.7,rect.origin.y + rect.size.height)};
CGPoint poinsBottomLeftB[] = {CGPointMake(rect.origin.x , rect.origin.y + rect.size.height - 0.7) ,CGPointMake(rect.origin.x+0.7 +15, rect.origin.y + rect.size.height - 0.7)};
[self addLine:poinsBottomLeftA pointB:poinsBottomLeftB ctx:ctx];
//右上角
CGPoint poinsTopRightA[] = {CGPointMake(rect.origin.x+ rect.size.width - 15, rect.origin.y+0.7),CGPointMake(rect.origin.x + rect.size.width,rect.origin.y +0.7 )};
CGPoint poinsTopRightB[] = {CGPointMake(rect.origin.x+ rect.size.width-0.7, rect.origin.y),CGPointMake(rect.origin.x + rect.size.width-0.7,rect.origin.y + 15 +0.7 )};
[self addLine:poinsTopRightA pointB:poinsTopRightB ctx:ctx];
CGPoint poinsBottomRightA[] = {CGPointMake(rect.origin.x+ rect.size.width -0.7 , rect.origin.y+rect.size.height+ -15),CGPointMake(rect.origin.x-0.7 + rect.size.width,rect.origin.y +rect.size.height )};
CGPoint poinsBottomRightB[] = {CGPointMake(rect.origin.x+ rect.size.width - 15 , rect.origin.y + rect.size.height-0.7),CGPointMake(rect.origin.x + rect.size.width,rect.origin.y + rect.size.height - 0.7 )};
[self addLine:poinsBottomRightA pointB:poinsBottomRightB ctx:ctx];
CGContextStrokePath(ctx);
}
- (void)addLine:(CGPoint[])pointA pointB:(CGPoint[])pointB ctx:(CGContextRef)ctx {
CGContextAddLines(ctx, pointA, 2);
CGContextAddLines(ctx, pointB, 2);
}
#pragma mark -moveLine
- (void)startMove {
//首先 调用这个方法时 判断扫描线是否存在, 不存在就加载
if (!self.qrLine) {
[self initQRLine];
}
//判断定时器是否存在, 不存在就创建
if (!timer) {
timer = [NSTimer scheduledTimerWithTimeInterval:kQrLineanimateDuration target:self selector:@selector(show) userInfo:nil repeats:YES];
}
}
- (void)stopMove {
//定时器存在是 设置其无效
if (timer) {
[timer invalidate];
}
}
@end截图
注意事项
说多了都是泪, 满满的全是算计啊
话说 还是吃一堑长一智的
1. 开始写习惯了, 直接解释alloc init, 运行的好几次都是黑屏, 后来检查才发现还要设置这个layer 和 session的关系
self.preView = [[AVCaptureVideoPreviewLayer alloc] initWithSession:self.session];
2. 闪光灯打开或者关闭是都要 先锁定再设置设置属性后解锁
[self.device lockForConfiguration:nil];
            [self.device setTorchMode:AVCaptureTorchModeOff];
            [self.device unlockForConfiguration];
不然 , 嘿嘿…..
3. AVCaptureMetadataOutput设置时也要注意, 设置metadataObjectTypes扫描类型之前一定要添加 addOutput:输出设备
 if ([_session canAddOutput:output]){
 [_session addOutput:output];
 }
 // 条码类型 AVMetadataObjectTypeQRCode
 output.metadataObjectTypes =@[AVMetadataObjectTypeQRCode];
参考
1.原生二维码扫描: http ://blog.csdn.net/lc_obj/article/details/41549469?utm_source=tuicool&utm_medium=referral;
2.仿微信扫描: https ://github.com/lcddhr/QRWeiXinDemo


 950
950


 被折叠的 条评论
为什么被折叠?
被折叠的 条评论
为什么被折叠?
 到【灌水乐园】发言


