


本文使用springboot+mybatis+SpringSecurity 实现用户权限数据库管理
实现用户和角色用数据库存储,而资源(url)和权限的对应采用硬编码配置。 也就是角色可以访问的权限通过硬编码控制。角色和用户的关系通过数据库配置控制
本文用户和角色的关系是多对多的关系。
SpringSecurity 验证帐号密码
首先在usernamePasswordAuthenticationFilter中来拦截登录请求,并调用AuthenticationManager。
AuthenticationManager调用Provider,provider调用userDetaisService来根据username获取真实的数据库信息。
最终验证帐号密码的类是org.springframework.security.authentication.dao.DaoAuthenticationProvider这个流程虽然没多么复杂,但是花费我不少时间给理解到了。。。
本文结构:
1:数据库表设计
2:springboot+mybatis 配置
3:业务实现
4:springSecurity整合
5:页面实现
6:测试验证
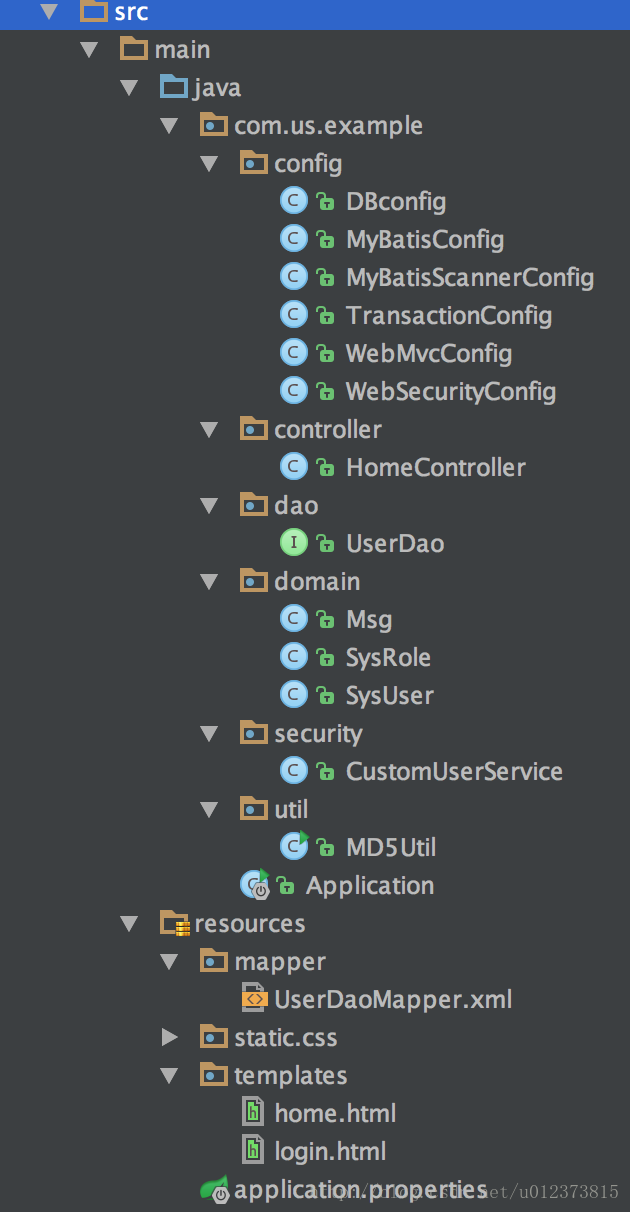
完整目录结构如下:
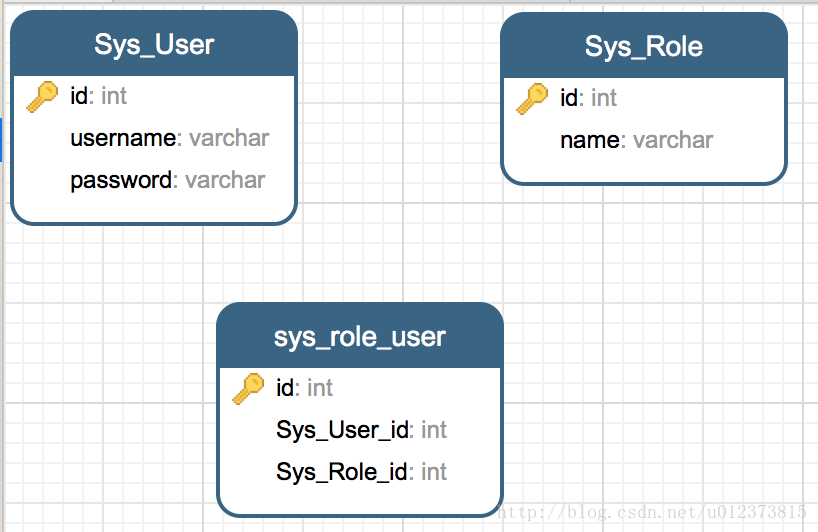
1:数据库表设计
数据库表有 用户表,角色表,用户角色关系表三张表:
插入数据
insert into SYS_USER (id,username, password) values (1,'admin', 'admin');
insert into SYS_USER (id,username, password) values (2,'abel', 'abel');

insert into SYS_ROLE(id,name) values(1,'ROLE_ADMIN');
insert into SYS_ROLE(id,name) values(2,'ROLE_USER');

insert into SYS_ROLE_USER(SYS_USER_ID,ROLES_ID) values(1,1);
insert into SYS_ROLE_USER(SYS_USER_ID,ROLES_ID) values(2,2);
2:springboot+mybatis 配置
2.1 springboot 配置
新建maven 工程,pom.xml 内容如下:
<?xml version="1.0" encoding="UTF-8"?>
<project xmlns="http://maven.apache.org/POM/4.0.0"
         xmlns:xsi="http://www.w3.org/2001/XMLSchema-instance"
         xsi:schemaLocation="http://maven.apache.org/POM/4.0.0 http://maven.apache.org/xsd/maven-4.0.0.xsd">
    <modelVersion>4.0.0</modelVersion>

    <groupId>com.us</groupId>
    <artifactId>springboot-security</artifactId>
    <version>1.0-SNAPSHOT</version>

    <parent>
        <groupId>org.springframework.boot</groupId>
        <artifactId>spring-boot-starter-parent</artifactId>
        <version>1.3.0.RELEASE</version>
    </parent>

    <properties>
        <start-class>com.us.Application</start-class>
        <maven.compiler.target>1.8</maven.compiler.target>
        <maven.compiler.source>1.8</maven.compiler.source>
        <mybatis.version>3.2.7</mybatis.version>
        <mybatis-spring.version>1.2.2</mybatis-spring.version>
    </properties>
    <dependencies>
        <!--springboot-->
        <dependency>
            <groupId>org.springframework.boot</groupId>
            <artifactId>spring-boot-starter-security</artifactId>
        </dependency>
        <dependency>
            <groupId>org.springframework.boot</groupId>
            <artifactId>spring-boot-starter-thymeleaf</artifactId>
        </dependency>
        <dependency>
            <groupId>org.thymeleaf.extras</groupId>
            <artifactId>thymeleaf-extras-springsecurity4</artifactId>
        </dependency>
        <!--db-->
        <dependency>
            <groupId>mysql</groupId>
            <artifactId>mysql-connector-java</artifactId>
            <version>6.0.5</version>
        </dependency>
        <dependency>
            <groupId>com.mchange</groupId>
            <artifactId>c3p0</artifactId>
            <version>0.9.5.2</version>
            <exclusions>
                <exclusion>
                    <groupId>commons-logging</groupId>
                    <artifactId>commons-logging</artifactId>
                </exclusion>
            </exclusions>
        </dependency>

        <!--mybatis-->
        <dependency>
            <groupId>org.springframework</groupId>
            <artifactId>spring-jdbc</artifactId>
        </dependency>
        <dependency>
            <groupId>org.mybatis</groupId>
            <artifactId>mybatis</artifactId>
            <version>${mybatis.version}</version>
        </dependency>
        <dependency>
            <groupId>org.mybatis</groupId>
            <artifactId>mybatis-spring</artifactId>
            <version>${mybatis-spring.version}</version>
        </dependency>
    </dependencies>

</project>
在com.us.example 目录下新建 Application.Java 启动入口
package com.us.example;

import org.springframework.boot.autoconfigure.SpringBootApplication;
import org.springframework.context.ConfigurableApplicationContext;
import org.springframework.context.annotation.ComponentScan;

import static org.springframework.boot.SpringApplication.run;

/**
 * Created by yangyibo on 17/1/17.
 */

@ComponentScan(basePackages ="com.us.example")
@SpringBootApplication
public class Application {
    public static void main(String[] args) {
        ConfigurableApplicationContext run = run(Application.class, args);
    }
}
在src/resource/目录下新建application.properties 配置文件,配置spingboot 的配置信息:
ms.db.driverClassName=com.mysql.jdbc.Driver
ms.db.url=jdbc:mysql://localhost:3306/cache?characterEncoding=utf-8&useSSL=false
ms.db.username=root
ms.db.password=admin
ms.db.maxActive=500

logging.level.org.springframework.security= INFO
spring.thymeleaf.cache=false
2.2 mybatis 配置
在com.us.example.config 包下新建 以下配置文件,
package com.us.example.config;

import java.beans.PropertyVetoException;

import org.springframework.beans.factory.annotation.Autowired;
import org.springframework.context.annotation.Bean;
import org.springframework.context.annotation.Configuration;
import org.springframework.core.env.Environment;
import com.mchange.v2.c3p0.ComboPooledDataSource;
/**
 * Created by yangyibo on 17/1/18.
 */
@Configuration
public class DBconfig {
    @Autowired
    private Environment env;

    @Bean(name="dataSource")
    public ComboPooledDataSource dataSource() throws PropertyVetoException {
        ComboPooledDataSource dataSource = new ComboPooledDataSource();
        dataSource.setDriverClass(env.getProperty("ms.db.driverClassName"));
        dataSource.setJdbcUrl(env.getProperty("ms.db.url"));
        dataSource.setUser(env.getProperty("ms.db.username"));
        dataSource.setPassword(env.getProperty("ms.db.password"));
        dataSource.setMaxPoolSize(20);
        dataSource.setMinPoolSize(5);
        dataSource.setInitialPoolSize(10);
        dataSource.setMaxIdleTime(300);
        dataSource.setAcquireIncrement(5);
        dataSource.setIdleConnectionTestPeriod(60);
        return dataSource;
    }
}
MyBatisConfig.java (扫描mapper.xml文件)
package com.us.example.config;

import org.mybatis.spring.SqlSessionFactoryBean;
import org.springframework.beans.factory.annotation.Autowired;
import org.springframework.context.ApplicationContext;
import org.springframework.context.annotation.Bean;
import org.springframework.context.annotation.ComponentScan;
import org.springframework.context.annotation.Configuration;

import javax.sql.DataSource;

@Configuration
@ComponentScan
public class MyBatisConfig {

    @Autowired
    private DataSource dataSource;

    @Bean(name = "sqlSessionFactory")
    public SqlSessionFactoryBean sqlSessionFactory(ApplicationContext applicationContext) throws Exception {
        SqlSessionFactoryBean sessionFactory = new SqlSessionFactoryBean();
        sessionFactory.setDataSource(dataSource);
        // sessionFactory.setPlugins(new Interceptor[]{new PageInterceptor()});
        sessionFactory.setMapperLocations(applicationContext.getResources("classpath*:mapper/*.xml"));
        return sessionFactory;
    }
}
MyBatisScannerConfig.java (dao 扫描器)
package com.us.example.config;

import org.mybatis.spring.mapper.MapperScannerConfigurer;
import org.springframework.context.annotation.Bean;
import org.springframework.context.annotation.Configuration;

@Configuration
public class MyBatisScannerConfig {
    @Bean
    public MapperScannerConfigurer MapperScannerConfigurer() {
        MapperScannerConfigurer mapperScannerConfigurer = new MapperScannerConfigurer();
        mapperScannerConfigurer.setBasePackage("com.us.example.dao");
        mapperScannerConfigurer.setSqlSessionFactoryBeanName("sqlSessionFactory");
        return mapperScannerConfigurer;
    }
}
TransactionConfig.java (开启事物管理)
package com.us.example.config;

import org.springframework.beans.factory.annotation.Autowired;
import org.springframework.context.annotation.Bean;
import org.springframework.context.annotation.ComponentScan;
import org.springframework.context.annotation.Configuration;
import org.springframework.jdbc.datasource.DataSourceTransactionManager;
import org.springframework.transaction.PlatformTransactionManager;
import org.springframework.transaction.annotation.TransactionManagementConfigurer;

import javax.sql.DataSource;

@Configuration
@ComponentScan
public class TransactionConfig implements TransactionManagementConfigurer{
    @Autowired
    private DataSource dataSource;

    @Bean(name = "transactionManager")
    @Override
    public PlatformTransactionManager annotationDrivenTransactionManager() {
        return new DataSourceTransactionManager(dataSource);
    }

}
3:业务实现
3.1 java bean
有三个bean ,sysuser(用户),sysrole(角色)msg(信息,用于和页面传递信息使用)
package com.us.example.domain;

import java.util.List;

/**
 * Created by yangyibo on 17/1/17.
 */

public class SysUser {
    private Integer id;
    private String username;
    private String password;

    private List<SysRole> roles;

    public Integer getId() {
        return id;
    }

    public void setId(Integer id) {
        this.id = id;
    }

    public String getUsername() {
        return username;
    }

    public void setUsername(String username) {
        this.username = username;
    }

    public String getPassword() {
        return password;
    }

    public void setPassword(String password) {
        this.password = password;
    }

    public List<SysRole> getRoles() {
        return roles;
    }

    public void setRoles(List<SysRole> roles) {
        this.roles = roles;
    }
}
package com.us.example.domain;

/**
 * Created by yangyibo on 17/1/17.
 */

public class SysRole {

    private Integer id;
    private String name;
    public Integer getId() {
        return id;
    }
    public void setId(Integer id) {
        this.id = id;
    }
    public String getName() {
        return name;
    }
    public void setName(String name) {
        this.name = name;
    }
}
package com.us.example.domain;

/**
 * Created by yangyibo on 17/1/17.
 */

    public class Msg {
        private String title;
        private String content;
        private String etraInfo;

        public Msg(String title, String content, String etraInfo) {
            super();
            this.title = title;
            this.content = content;
            this.etraInfo = etraInfo;
        }
        public String getTitle() {
            return title;
        }
        public void setTitle(String title) {
            this.title = title;
        }
        public String getContent() {
            return content;
        }
        public void setContent(String content) {
            this.content = content;
        }
        public String getEtraInfo() {
            return etraInfo;
        }
        public void setEtraInfo(String etraInfo) {
            this.etraInfo = etraInfo;
        }

    }
3.2 dao 层实现
UserDao.java
package com.us.example.dao;

import com.us.example.config.MyBatisRepository;
import com.us.example.domain.SysUser;

public interface UserDao {
    public SysUser findByUserName(String username);
}
在src/resource目录下新建 mapper 文件夹,在mapper文件夹下新建UserDaomapper.xml文件内容如下;
<?xml version="1.0" encoding="UTF-8" ?>
<!DOCTYPE mapper PUBLIC "-//mybatis.org//DTD Mapper 3.0//EN" "http://mybatis.org/dtd/mybatis-3-mapper.dtd">
<mapper namespace="com.us.example.dao.UserDao">
    <resultMap id="userMap" type="com.us.example.domain.SysUser">
        <id property="id" column="ID"/>
        <result property="username" column="username"/>
        <result property="password" column="PASSWORD"/>
        <collection property="roles" ofType="com.us.example.domain.SysRole">
            <result column="name" property="name"/>
        </collection>

    </resultMap>
    <select id="findByUserName" parameterType="String" resultMap="userMap">
        select u.*
        ,r.name
        from Sys_User u
        LEFT JOIN sys_role_user sru on u.id= sru.Sys_User_id
        LEFT JOIN Sys_Role r on sru.Sys_Role_id=r.id
        where username= #{username}
    </select>
</mapper>
由于本例较为简单,所以就去掉了service 层。
4:springSecurity整合
添加springSecurity 配置,在com.us.example.config 包下,新建
WebSecurityConfig.java 配置文件,用于管控登录访问权限
可以在WebSecurityConfig 中 使用 .antMatchers("/admin/**").hasRole("ROLE_ADMIN")
将url 权限分配给角色
package com.us.example.config;

import com.us.example.security.CustomUserService;
import org.springframework.context.annotation.Bean;
import org.springframework.context.annotation.Configuration;
import org.springframework.security.config.annotation.authentication.builders.AuthenticationManagerBuilder;
import org.springframework.security.config.annotation.web.builders.HttpSecurity;
import org.springframework.security.config.annotation.web.configuration.WebSecurityConfigurerAdapter;
import org.springframework.security.core.userdetails.UserDetailsService;
/**
 * Created by yangyibo on 17/1/18.
 */
@Configuration
@EnableWebSecurity
public class WebSecurityConfig extends WebSecurityConfigurerAdapter {

    @Bean
    UserDetailsService customUserService(){ //注册UserDetailsService 的bean
        return new CustomUserService();
    }
    @Override
    protected void configure(AuthenticationManagerBuilder auth) throws Exception {
        auth.userDetailsService(customUserService()); //user Details Service验证

    }
    @Override
    protected void configure(HttpSecurity http) throws Exception {
        http.authorizeRequests()
                .anyRequest().authenticated() //任何请求,登录后可以访问
                .and()
                .formLogin()
                .loginPage("/login")
                .failureUrl("/login?error")
                .permitAll() //登录页面用户任意访问
                .and()
                .logout().permitAll(); //注销行为任意访问


    }
}
新建 CustomUserService 用于将用户权限交给 springsecurity 进行管控;
package com.us.example.security;

import com.us.example.dao.UserDao;
import com.us.example.domain.SysRole;
import com.us.example.domain.SysUser;
import org.springframework.beans.factory.annotation.Autowired;
import org.springframework.security.core.authority.SimpleGrantedAuthority;
import org.springframework.security.core.userdetails.UserDetails;
import org.springframework.security.core.userdetails.UserDetailsService;
import org.springframework.security.core.userdetails.UsernameNotFoundException;
import org.springframework.stereotype.Service;

import java.util.ArrayList;
import java.util.List;

/**
 * Created by yangyibo on 17/1/18.
 */
@Service
public class CustomUserService implements UserDetailsService { //自定义UserDetailsService 接口

    @Autowired
    UserDao userDao;

    @Override
    public UserDetails loadUserByUsername(String username) { //重写loadUserByUsername 方法获得 userdetails 类型用户

        SysUser user = userDao.findByUserName(username);
        if(user == null){
            throw new UsernameNotFoundException("用户名不存在");
        }
        List<SimpleGrantedAuthority> authorities = new ArrayList<>();
        //用于添加用户的权限。只要把用户权限添加到authorities 就万事大吉。
        for(SysRole role:user.getRoles())
        {
            authorities.add(new SimpleGrantedAuthority(role.getName()));
            System.out.println(role.getName());
        }
        return new org.springframework.security.core.userdetails.User(user.getUsername(),
                user.getPassword(), authorities);
    }
}
5:页面实现
在src/resource 目录下新建static/css 目录,并放入js 文件 bootstrap.min.css (此文件在本文源码里有, 源码地址在文章底端)
在src/resource目录下新建 templates 文件夹,里面编写静态页面
<!DOCTYPE html>
<html xmlns:th="http://www.thymeleaf.org">
<head>
<meta content="text/html;charset=UTF-8"/>
<title>登录页面</title>
<link rel="stylesheet" th:href="@{css/bootstrap.min.css}"/>
<style type="text/css">
    body {
  padding-top: 50px;
}
.starter-template {
  padding: 40px 15px;
  text-align: center;
}
</style>
</head>
<body>

     <nav class="navbar navbar-inverse navbar-fixed-top">
      <div class="container">
        <div class="navbar-header">
          <a class="navbar-brand" href="#">Spring Security演示</a>
        </div>
        <div id="navbar" class="collapse navbar-collapse">
          <ul class="nav navbar-nav">
           <li><a th:href="@{/}"> 首页 </a></li>

          </ul>
        </div><!--/.nav-collapse -->
      </div>
    </nav>
     <div class="container">

      <div class="starter-template">
       <p th:if="${param.logout}" class="bg-warning">已成功注销</p><!-- 1 -->
            <p th:if="${param.error}" class="bg-danger">有错误,请重试</p> <!-- 2 -->
            <h2>使用账号密码登录</h2>
            <form name="form" th:action="@{/login}" action="/login" method="POST"> <!-- 3 -->
                <div class="form-group">
                    <label for="username">账号</label>
                    <input type="text" class="form-control" name="username" value="" placeholder="账号" />
                </div>
                <div class="form-group">
                    <label for="password">密码</label>
                    <input type="password" class="form-control" name="password" placeholder="密码" />
                </div>
                <input type="submit" id="login" value="Login" class="btn btn-primary" />
            </form>
      </div>
    </div>
</body>
</html>
注意:本文是通过home.html 的sec:authorize="hasRole('ROLE_ADMIN') 实现角色权限管理
<!DOCTYPE html>
<html xmlns:th="http://www.thymeleaf.org"
xmlns:sec="http://www.thymeleaf.org/thymeleaf-extras-springsecurity4">
<head>
<meta content="text/html;charset=UTF-8"/>
<title sec:authentication="name"></title>
<link rel="stylesheet" th:href="@{css/bootstrap.min.css}" />
<style type="text/css">
body {
padding-top: 50px;
}
.starter-template {
padding: 40px 15px;
text-align: center;
}
</style>
</head>
<body>
<nav class="navbar navbar-inverse navbar-fixed-top">
<div class="container">
<div class="navbar-header">
<a class="navbar-brand" href="#">Spring Security演示</a>
</div>
<div id="navbar" class="collapse navbar-collapse">
<ul class="nav navbar-nav">
<li><a th:href="@{/}"> 首页 </a></li>
</ul>
</div><!--/.nav-collapse -->
</div>
</nav>
<div class="container">
<div class="starter-template">
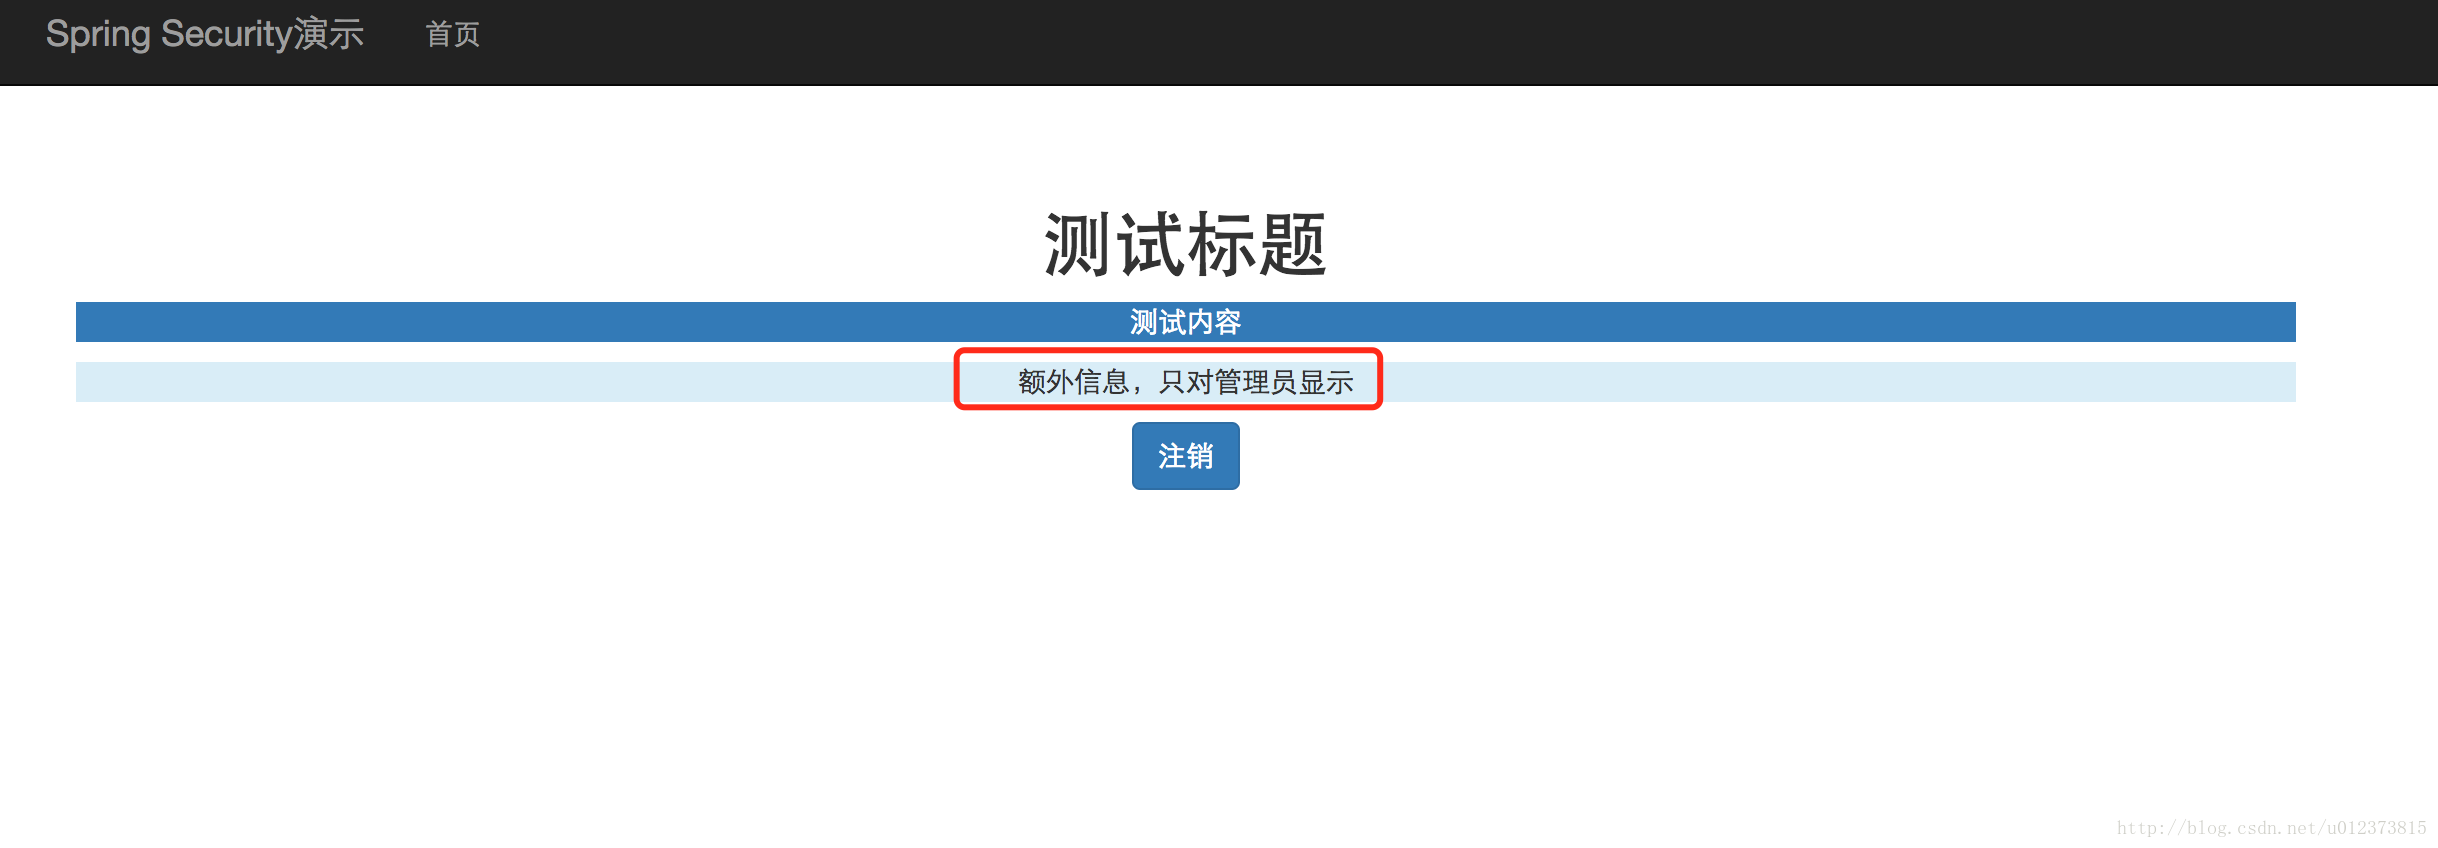
<h1 th:text="${msg.title}"></h1>
<p class="bg-primary" th:text="${msg.content}"></p>
<div sec:authorize="hasRole('ROLE_ADMIN')"> <!-- 用户类型为ROLE_ADMIN 显示 -->
<p class="bg-info" th:text="${msg.etraInfo}"></p>
</div>
<div sec:authorize="hasRole('ROLE_USER')"> <!-- 用户类型为 ROLE_USER 显示 -->
<p class="bg-info">无更多信息显示</p>
</div>
<form th:action="@{/logout}" method="post">
<input type="submit" class="btn btn-primary" value="注销"/>
</form>
</div>
</div>
</body>
</html>
6. controller
在com.us.example.controller 包下 编写控制器 HomeController.java
package com.us.example.controller;

import com.us.example.domain.Msg;
import org.springframework.stereotype.Controller;
import org.springframework.ui.Model;
import org.springframework.web.bind.annotation.RequestMapping;

/**
 * Created by yangyibo on 17/1/18.
 */
@Controller
public class HomeController {

    @RequestMapping("/")
    public String index(Model model){
        Msg msg =  new Msg("测试标题","测试内容","额外信息,只对管理员显示");
        model.addAttribute("msg", msg);
        return "home";
    }
}
springMVC 配置,注册访问 /login 转向 login.html 页面
package com.us.example.config;

import org.springframework.context.annotation.Configuration;
import org.springframework.web.servlet.config.annotation.ViewControllerRegistry;
import org.springframework.web.servlet.config.annotation.WebMvcConfigurerAdapter;
/**
 * Created by yangyibo on 17/1/18.
 */
@Configuration

public class WebMvcConfig extends WebMvcConfigurerAdapter{

    @Override
    public void addViewControllers(ViewControllerRegistry registry) {
        registry.addViewController("/login").setViewName("login");
    }
}
7:测试验证
启动项目 在浏览器输入 http://localhost:8080/ 进行测试:
首先使用 admin 帐号登录
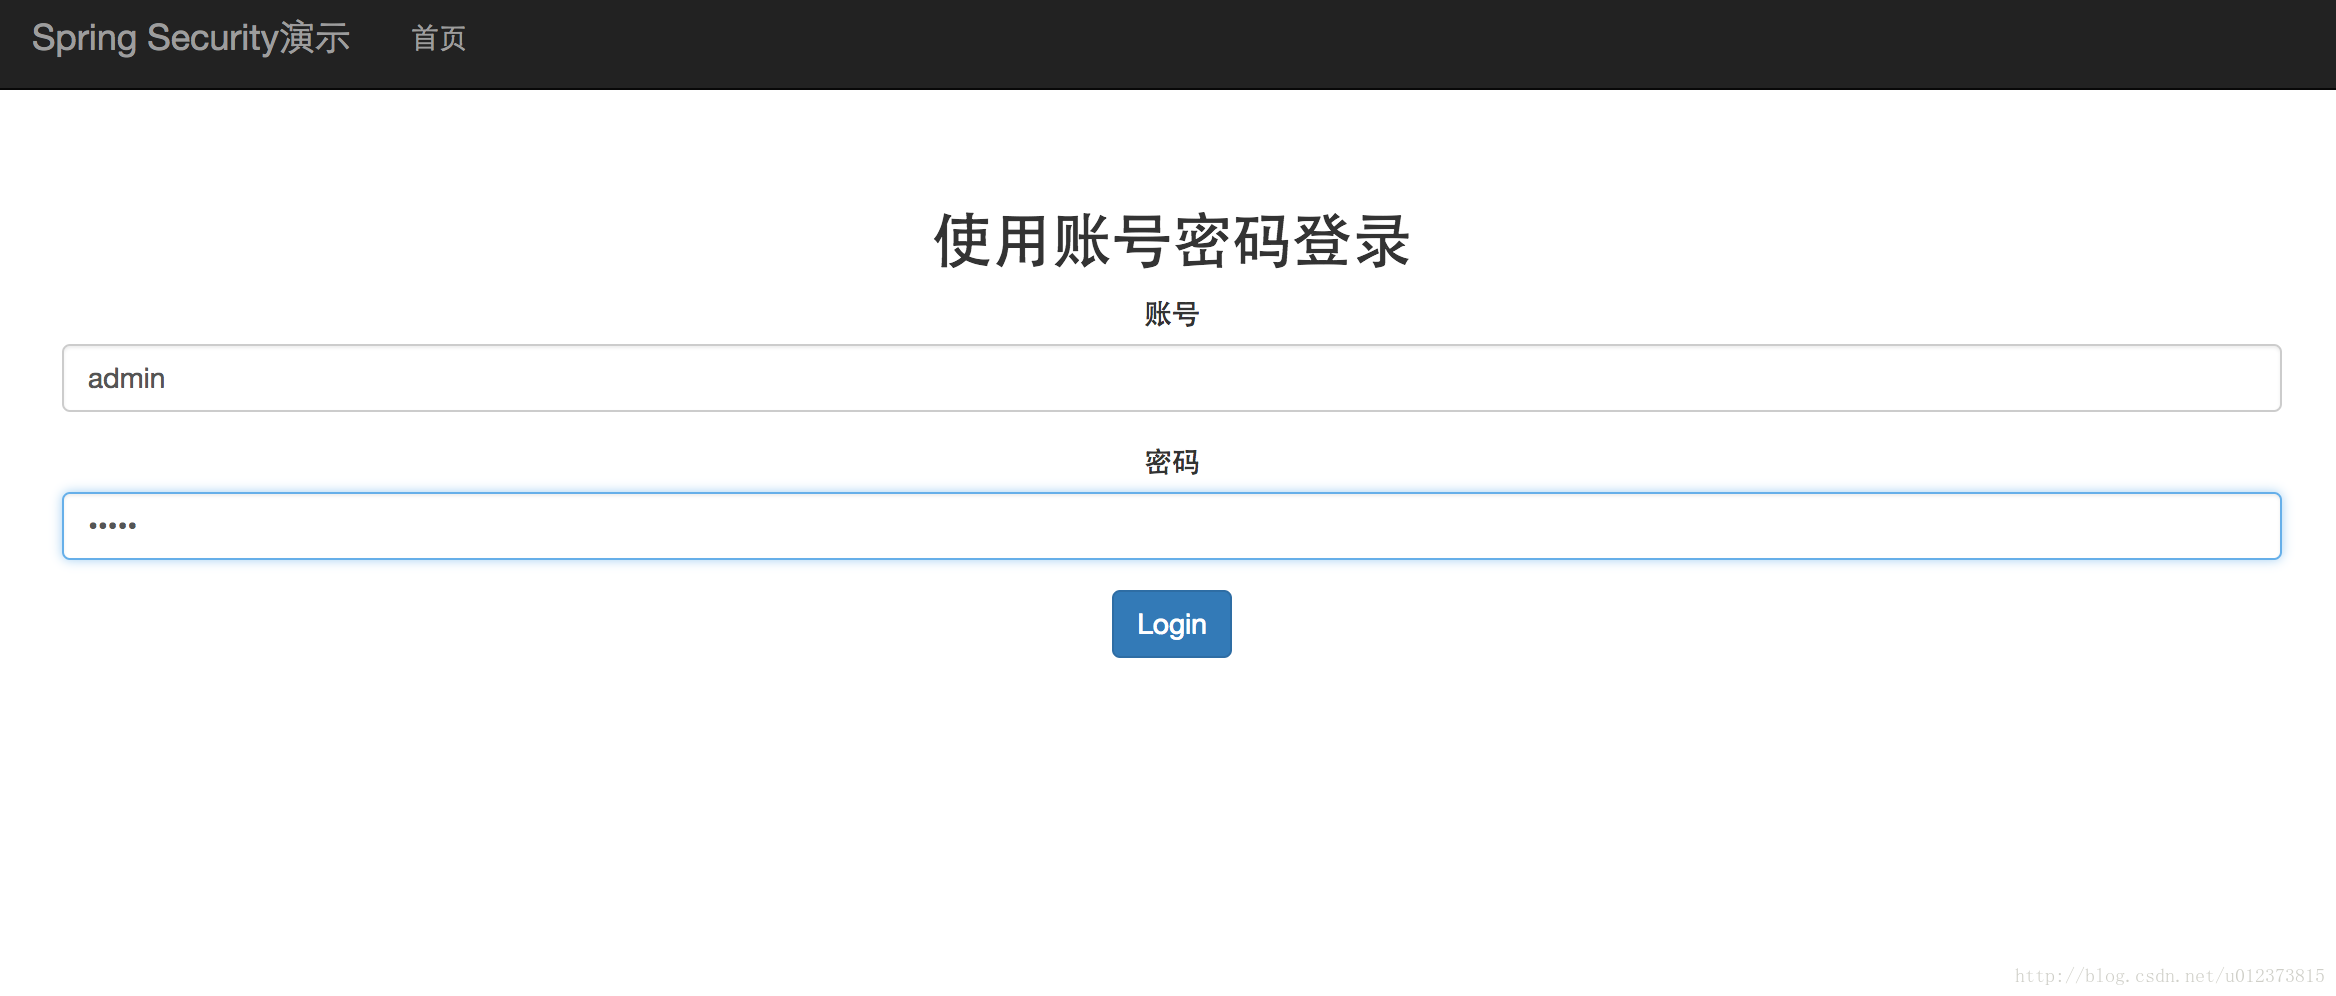
结果:
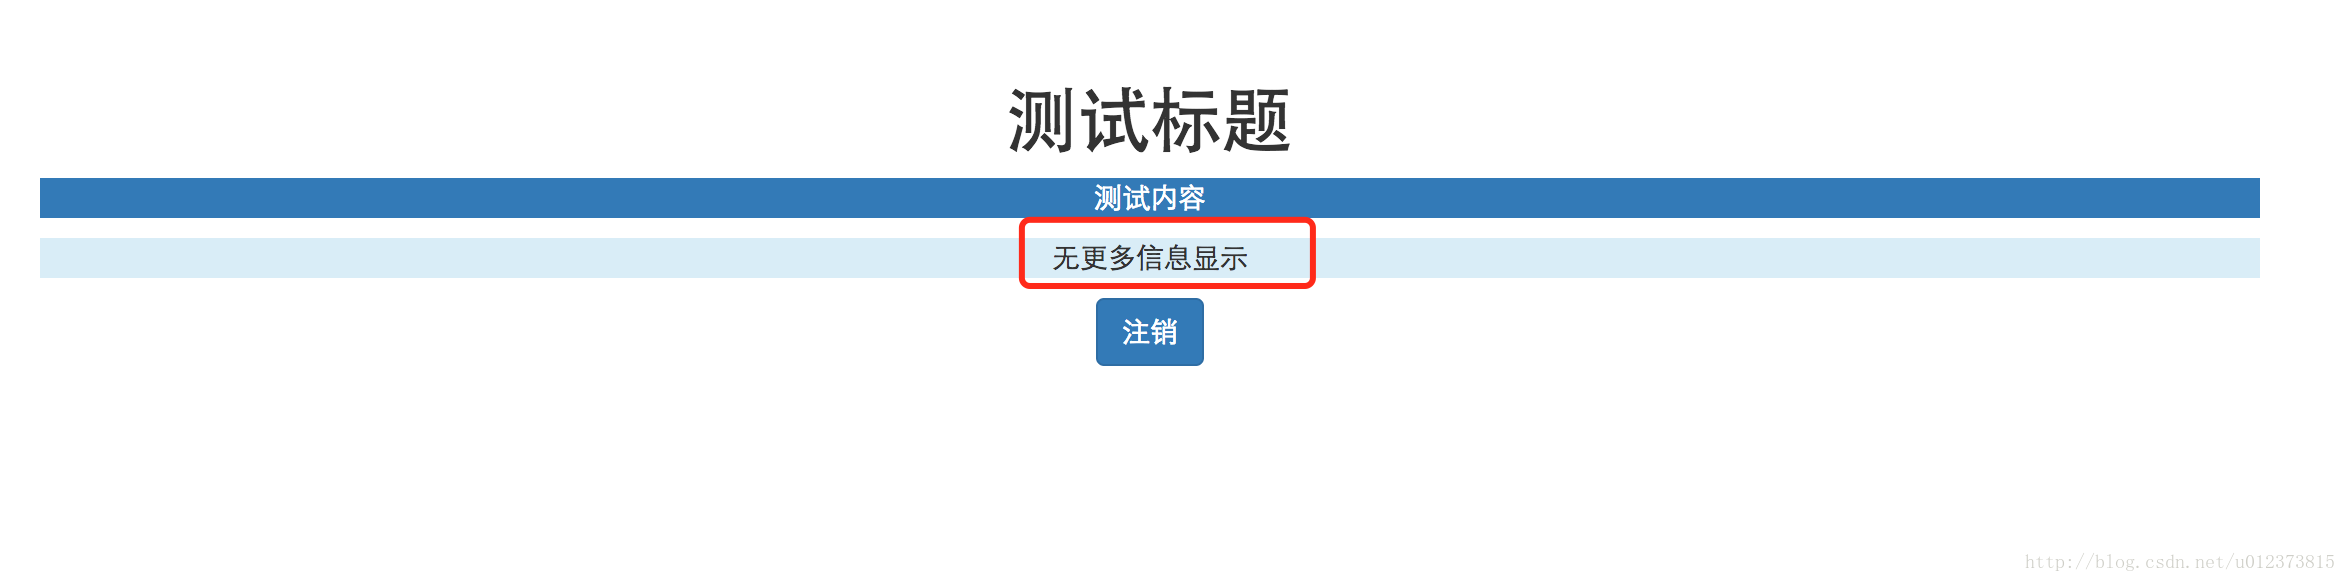
然后注销,使用 abel 普通用户登录结果如下:
本文参考:《JavaEE开发的颠覆者:spring Boot实战 》
本文源码地址:https://github.com/527515025/springBoot
关于springboot 系列不定期更新。


 6363
6363


 被折叠的 条评论
为什么被折叠?
被折叠的 条评论
为什么被折叠?
 到【灌水乐园】发言


