


Windows10 API允许开发者对应用窗体和应用标题栏做修改。
应用标题栏
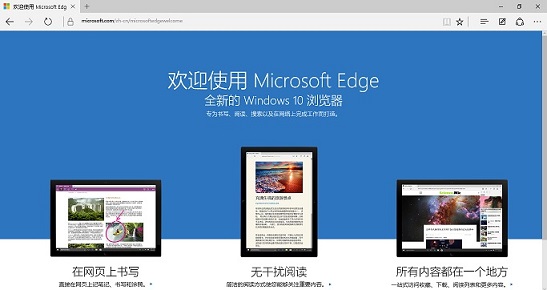
先说应用标题栏吧,什么是应用标题栏?比如Groove音乐的应用标题栏就是下面这样:

什么,你说看不清楚。因为它是白色的,是微软设计的,这锅我不背。
你不喜欢怎么办?改呗!
Windows10 API提供解决方案,可以更改应用标题栏、右上方三个按钮、鼠标经过时按钮、鼠标按下时按钮、标题栏Inactive时、三个按钮Inactive时的前景色和背景色共12种属性颜色。(这里解释下Inactive,不知道怎么翻译合适,当应用置于你的眼前,在任务栏的应用图标上按住鼠标左键不放时就是Inactive状态,貌似是不可用的状态)
关于标题栏的MSDN看这:链接
什么,你说Edge浏览器的标题栏好像不太一样。没错,因为Edge把应用界面扩展至 Titlebar 的区域,所以看起来不一样。
下面简单的代码实现更改12种属性的颜色值:
  var titleBar = ApplicationView.GetForCurrentView().TitleBar;
            if (titleBar != null)
            {
                titleBar.BackgroundColor = Colors.Black;
                titleBar.ForegroundColor = Colors.White;
                titleBar.ButtonBackgroundColor = Colors.Brown;
                titleBar.ButtonForegroundColor = Colors.RoyalBlue;
                titleBar.ButtonPressedBackgroundColor = Colors.Green;
                titleBar.ButtonPressedForegroundColor = Colors.Orange;
                titleBar.ButtonHoverForegroundColor = Colors.Salmon;
                titleBar.ButtonHoverBackgroundColor = Colors.Blue;
                titleBar.InactiveForegroundColor = Colors.SpringGreen;
                titleBar.InactiveBackgroundColor = Colors.Red;
                titleBar.ButtonInactiveBackgroundColor = Colors.Tan;
                titleBar.ButtonInactiveForegroundColor = Colors.Violet;
}正常时:

鼠标滑过最大化按钮时:

鼠标按下最大化按钮时:

Inactive状态时:

如果要实现Edge浏览器的效果将应用界面扩展至 Titlebar 区域:
CoreApplication.GetCurrentView().TitleBar.ExtendViewIntoTitleBar = true;如果以上的修改你还不满意怎么办?不好意思你自己设计吧...
Windows 10允许开发者自定义标题栏控件,可以将界面中任意控件指定为标题栏,使用下面的函数
Window.Current.SetTitleBar(UIElement value);官方的Demo(修改):自定义应用标题栏
首先需要自定义一个用户控件,也就是自定义的TtitleBar控件
XAML:
<Grid x:Name="RootGrid">
<Grid.RowDefinitions>
<RowDefinition Height="Auto" />
<RowDefinition Height="*" />
</Grid.RowDefinitions>
<Grid x:Name="TitleBar" VerticalAlignment="Top" Height="{x:Bind CoreTitleBarHeight, Mode=OneWay}" Canvas.ZIndex="3">
<Rectangle x:Name="BackgroundElement" Fill="Green" />
<Grid Padding="{x:Bind CoreTitleBarPadding, Mode=OneWay}">
<Grid.ColumnDefinitions>
<ColumnDefinition Width="*"/>
<ColumnDefinition Width="Auto"/>
</Grid.ColumnDefinitions>
<TextBlock Grid.Column="0" Text="TextBlock in Custom TitleBar"/>
<CheckBox Grid.Column="1" Content="CheckBox in Custom TitleBar"/>
</Grid>
</Grid>
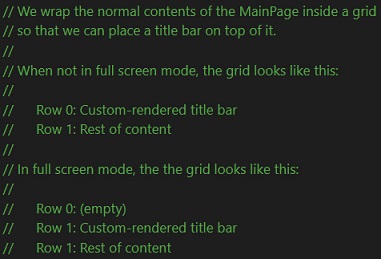
</Grid>最外层Grid分为两行是为了布局需要,Demo给了注释说明其作用:
C#代码部分稍微有点多,但都是逻辑很清晰的:
  public sealed partial class CustomTitleBar : UserControl, INotifyPropertyChanged
    {
        private CoreApplicationViewTitleBar coreTitleBar = CoreApplication.GetCurrentView().TitleBar;

        public CustomTitleBar()
        {
            this.InitializeComponent();
            Loaded += CustomTitleBar_Loaded;
            Unloaded += CustomTitleBar_Unloaded;
        }

        void CustomTitleBar_Loaded(object sender, RoutedEventArgs e)
        {
            coreTitleBar.LayoutMetricsChanged += OnLayoutMetricsChanged;
            coreTitleBar.IsVisibleChanged += OnIsVisibleChanged;

            // The SizeChanged event is raised when the view enters or exits full screen mode.
            Window.Current.SizeChanged += OnWindowSizeChanged;

            UpdateLayoutMetrics();
            UpdatePositionAndVisibility();
        }

        void CustomTitleBar_Unloaded(object sender, RoutedEventArgs e)
        {
            coreTitleBar.LayoutMetricsChanged -= OnLayoutMetricsChanged;
            coreTitleBar.IsVisibleChanged -= OnIsVisibleChanged;
            Window.Current.SizeChanged -= OnWindowSizeChanged;
        }

        void OnLayoutMetricsChanged(CoreApplicationViewTitleBar sender, object e)
        {
            UpdateLayoutMetrics();
        }

        void UpdateLayoutMetrics()
        {
            if (PropertyChanged != null)
            {
                PropertyChanged(this, new PropertyChangedEventArgs("CoreTitleBarHeight"));
                PropertyChanged(this, new PropertyChangedEventArgs("CoreTitleBarPadding"));
            }
        }

        void OnIsVisibleChanged(CoreApplicationViewTitleBar sender, object e)
        {
            UpdatePositionAndVisibility();
        }

        void OnWindowSizeChanged(object sender, WindowSizeChangedEventArgs e)
        {
            UpdatePositionAndVisibility();
        }

        void UpdatePositionAndVisibility()
        {
            if (ApplicationView.GetForCurrentView().IsFullScreenMode)
            {
                // In full screen mode, the title bar overlays the content. and might or might not be visible.
                TitleBar.Visibility = coreTitleBar.IsVisible ? Visibility.Visible : Visibility.Collapsed;
                Grid.SetRow(TitleBar, 1);
            }
            else
            {
                // When not in full screen mode, the title bar is visible and does not overlay content.
                TitleBar.Visibility = Visibility.Visible;
                Grid.SetRow(TitleBar, 0);
            }
        }

        UIElement pageContent = null;
        public UIElement SetPageContent(UIElement newContent)
        {
            UIElement oldContent = pageContent;
            if (oldContent != null)
            {
                pageContent = null;
                RootGrid.Children.Remove(oldContent);
            }
            pageContent = newContent;
            if (newContent != null)
            {
                RootGrid.Children.Add(newContent);
                // The page content is row 1 in our grid. (See diagram above.)
                Grid.SetRow((FrameworkElement)pageContent, 1);
            }
            return oldContent;
        }

        #region Data binding
        public event PropertyChangedEventHandler PropertyChanged;

        public Thickness CoreTitleBarPadding
        {
            get
            {
                // The SystemOverlayLeftInset and SystemOverlayRightInset values are
                // in terms of physical left and right. Therefore, we need to flip
                // then when our flow direction is RTL.
                if (FlowDirection == FlowDirection.LeftToRight)
                {
                    return new Thickness() { Left = coreTitleBar.SystemOverlayLeftInset, Right = coreTitleBar.SystemOverlayRightInset };
                }
                else
                {
                    return new Thickness() { Left = coreTitleBar.SystemOverlayRightInset, Right = coreTitleBar.SystemOverlayLeftInset };
                }
            }
        }

        public double CoreTitleBarHeight
        {
            get
            {
                return coreTitleBar.Height;
            }
        }
        #endregion

        public void EnableControlsInTitleBar(bool enable)
        {
            if (enable)
            {
                Window.Current.SetTitleBar(BackgroundElement);
            }
            else
            {
                Window.Current.SetTitleBar(null);
            }
        }
}首先需要声明:
CustomTitleBar customTitleBar = null;public void AddCustomTitleBar()
{
CoreApplication.GetCurrentView().TitleBar.ExtendViewIntoTitleBar = true;
if (customTitleBar == null)
{
customTitleBar = new CustomTitleBar();
// customTitleBar.EnableControlsInTitleBar(true);
// Make the main page's content a child of the title bar,
// and make the title bar the new page content.
UIElement mainContent = this.Content;
this.Content = null;
customTitleBar.SetPageContent(mainContent);
this.Content = customTitleBar;
}
} public void RemoveCustomTitleBar()
{
CoreApplication.GetCurrentView().TitleBar.ExtendViewIntoTitleBar = false;
if (customTitleBar != null)
{
// Take the title bar's page content and make it
// the window content.
this.Content = customTitleBar.SetPageContent(null);
customTitleBar = null;
}
}官方示例在此:https://github.com/Microsoft/Windows-universal-samples/tree/master/Samples/TitleBar/cs
注意:在Mobie上,应用是没有TitleBar的说法的,同时也是全屏的,因此不存在以上操作
说明一下,上述代码出自官方Demo,注释给的挺清楚,真的可以学到很多
关于自定义TitleBar,stackoverflow上有人提问如何在窗口右上方的三个键旁放一个全屏键(链接:stackoverflow),微博上的@JustinAndDesign 在回答中给出了解决方案,在这里暂不做讲解
应用窗体
到此,TitleBar的基本知识讲解差不多了。
接着说说应用窗体,其实所涉及到的东西前面已经出现过了,主要通过下面的方法获取到当前应用窗体:
var view = ApplicationView.GetForCurrentView();view有几个主要的属性和方法:
Title:窗体的标题,区别于应用标题栏的标题
TitleBar:当前窗体对应的应用标题栏
Orientation:获取当前窗体的方向,值为Landscape或Portrait
IsFullScreen:布尔值,获取当前窗体是否是最大化
IsFullScreenMode:布尔值,获取当前窗体是否是满屏
IsOnLockScreen:布尔值,获取当前窗体是否位于Windows锁定屏幕上
IsScreenCaptureEnabled:获取或设置窗体是否启用窗体捕获
ExitFullScreenMode():方法,无返回值。退出全屏模式
TryEnterFullScreenMode():方法,返回值布尔值,进入全屏模式是否成功
Demo:切换窗体满屏显示
  private void ToggleFullScreenMode(object sender, RoutedEventArgs e)
        {
            var view = ApplicationView.GetForCurrentView();
            view.Title = "我是窗体标题";
            if (view.IsFullScreenMode)
            {
                //退出满屏模式
                view.ExitFullScreenMode();
            }
            else
            {
                if (view.TryEnterFullScreenMode())
                {
                    //进入满屏模式成功
                }
                else
                {
                    //进入全屏模式失败
                }
            }
        }


 294
294


 被折叠的 条评论
为什么被折叠?
被折叠的 条评论
为什么被折叠?
 到【灌水乐园】发言


