


前言:
Volley 是 Google 推出的 Android 异步网络请求框架和图片加载框架。在 Google I/O 2013 大会上发布。

Github上面已经有大神做了镜像,使用Gradle更方便。Volley On Github
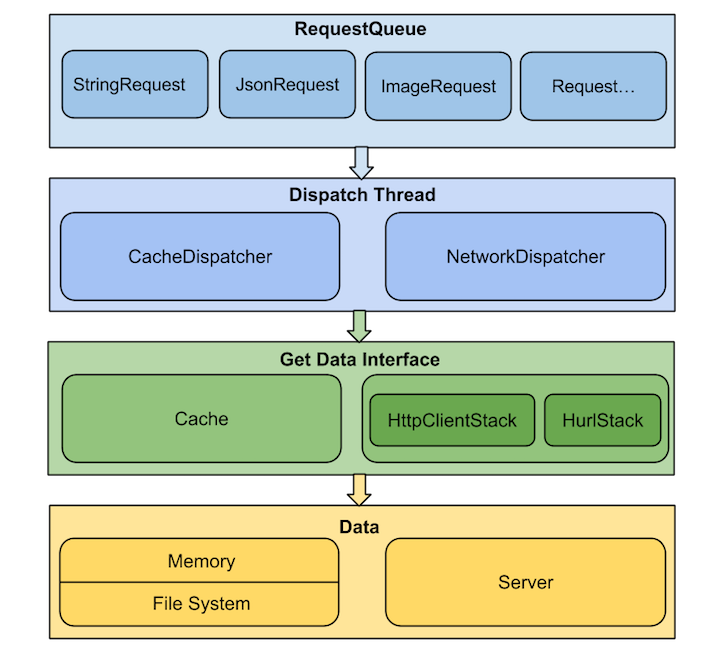
Volley的总体设计图如下所示:
Volley使用
(1)首先就是构造一个RequestQueue 的请求队列, 它可以缓存所有的Http请求, 内部处理的非常完善, 通常我们整个应用只需要一个RequestQueue对象即可。
(2) 创建StringRequest 对象, 并且传入相应的请求地址以及添加请求成功和失败的回调方法, 这一步的意思就是创建一个新的网络请求
(3) 将刚才心创建的StingRequest 对象加入到RequestQueue队列中, 这样就相当于会去执行该请求, 等到执行成功之后就会在StringRequest中设置回调方法里面获取到相应的结果。
(4) 在Android Studio 添加
compile 'com.mcxiaoke.volley:library:1.0.19'(5)简单的将GET ,POST方法做一个简单的封装。
public class HttpUtil {

    private static HttpUtil instance;
    private RequestQueue mQueue;

    private HttpUtil(Context context) {
        mQueue = Volley.newRequestQueue(context);
    }

    public static synchronized HttpUtil getInstance(Context context) {
        if (instance == null) {
            instance = new HttpUtil(context.getApplicationContext());
        }
        return instance;
    }

    //设置Get请求
    public Request sendGetRequest(String url, final HttpListener listener) {
        StringRequest stringRequest = new StringRequest(url, new Response.Listener<String>() {
            @Override
            public void onResponse(String response) {
                if (listener != null) {
                    listener.onResponse(response);
                }
            }
        }, new Response.ErrorListener() {
            @Override
            public void onErrorResponse(VolleyError error) {
                if (listener != null) {
                    listener.onErrorResponse(error);
                }
            }
        });
        mQueue.add(stringRequest);
        return stringRequest;
    }

    //设置POST请求
    public Request sendPostRequest(String url, final Map<String, String> map, final HttpListener listener) {
        final StringRequest stringRequest = new StringRequest(Request.Method.POST, url, new Response.Listener<String>() {
            @Override
            public void onResponse(String response) {
                if (listener != null) {
                    listener.onResponse(response);
                }

            }
        }, new Response.ErrorListener() {
            @Override
            public void onErrorResponse(VolleyError error) {
                if (listener != null) {
                    listener.onErrorResponse(error);
                }
            }
        }) {
            @Override
            protected Map<String, String> getParams() throws AuthFailureError {
                return map;
            }
        };
        mQueue.add(stringRequest);
        return stringRequest;
    }

    public interface HttpListener {

        void onResponse(String response);

        void onErrorResponse(VolleyError error);
    }
}
简单的介绍了如何使用Volley的 网络请求 ,类似的Request对象还有 JsonRequest,ImageRequest ,StringRequest 等等~ 使用的方法都是大同小异的。
请求示列:
 HttpUtil httpUtil = getInstance(getApplicationContext()) ;
        httpUtil.sendGetRequest("https://www.baidu.com/", new HttpListener() {
            @Override
            public void onResponse(String response) {
                Log.d("请求百度首页:" , response.toString()) ;

            }

            @Override
            public void onErrorResponse(VolleyError error) {
                Log.d("error" , error.toString()) ;
            }
        }) ;
Volley 库中还自带了NetworkImageView 类,这个Imageview控件是可以自动使用volley下载图片,也可以使用NetworkImageView 加载图片
加载图片的原理:
NetworkImageView加载图片需要一个ImageLoader和一个图片URL,这个ImageLoader对象需要一个请求队列对象和ImageCahe对象。调用NetworkImageView的setUrl方法后,首先会判断当前ImageView的URL和新传入的URL是否一致,如果相同,就不用再发送http请求了,如果不同,那么就使用ImageLoader对象来发送http请求获取图片。ImageLoader imageLoader = AppController.getInstance().getImageLoader();
// If you are using NetworkImageView
imgNetWorkView.setImageUrl(Const.URL_IMAGE, imageLoader);用ImageView来加载图片 ,这个过程和NetworkImageView类似 :
ImageLoader imageLoader = AppController.getInstance().getImageLoader();

// If you are using normal ImageView
imageLoader.get(Const.URL_IMAGE, new ImageListener() {

    @Override
    public void onErrorResponse(VolleyError error) {
        Log.e(TAG, "Image Load Error: " + error.getMessage());
    }

    @Override
    public void onResponse(ImageContainer response, boolean arg1) {
        if (response.getBitmap() != null) {
            // load image into imageview
            imageView.setImageBitmap(response.getBitmap());
        }
    }
});
可以再简单一点:
// Loading image with placeholder and error image
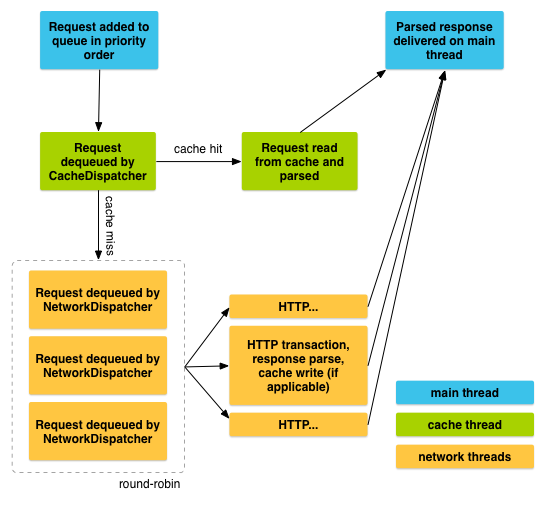
imageLoader.get(Const.URL_IMAGE, ImageLoader.getImageListener(imageView, R.drawable.ico_loading, R.drawable.ico_error));Volley 请求流程图 :
Volley 源码解析可以查阅这个网站。
使用的时候最新要初始化一个RequestQueue ,首先看一下Volley.newRequestQueue方法
public class Volley {

    /** Default on-disk cache directory. */
    private static final String DEFAULT_CACHE_DIR = "volley";

    /**
     * Creates a default instance of the worker pool and calls {@link RequestQueue#start()} on it.
     * You may set a maximum size of the disk cache in bytes.
     *
     * @param context A {@link Context} to use for creating the cache dir.
     * @param stack An {@link HttpStack} to use for the network, or null for default.
     * @param maxDiskCacheBytes the maximum size of the disk cache, in bytes. Use -1 for default size.
     * @return A started {@link RequestQueue} instance.
     */
    public static RequestQueue newRequestQueue(Context context, HttpStack stack, int maxDiskCacheBytes) {
        File cacheDir = new File(context.getCacheDir(), DEFAULT_CACHE_DIR);

        String userAgent = "volley/0";
        try {
            String packageName = context.getPackageName();
            PackageInfo info = context.getPackageManager().getPackageInfo(packageName, 0);
            // 使用包名和versionCode作为userAgent
            userAgent = packageName + "/" + info.versionCode;
        } catch (NameNotFoundException e) {
        }

        if (stack == null) {
            if (Build.VERSION.SDK_INT >= 9) {
                // 在9及以上Volleys使用HttpURLConnection,9一下使用HttpClient。这里是有原因的,因为在9之前HttpURLConnection有Bug。
                // 那HttpClient那么好为什么不一直使用它,要在9及以后使用HttpURLConnection呢?这里也是有原因的。从9开始HttpURLConnection
                // 将自动添加`Accept-Encoding:gzip`头字段到`request`请求中,并做相应处理,一般我们请求都是字符串,所以压缩可以使数据大小大幅降低。
                // 但是这也会带来问题的,之前开发中就遇到过。因为启用了压缩,所以`Content-Lenght`字段返回的是压缩后的大小。使用`getContentLength()`
                // 方法去分配解压缩后数据大小是错误的。应该从response中读取字节直到`InputStream.read()`返回-1为止。当时我们在开发下载时就遇到过这个
                // 问题,在下载视频时没有问题,但是在下载小说的时候就会发现`content-length`返回值不对。
                // 总结一下就是在9之前HttpClient的bug更少,而HttpURLConnection存在严重的Bug。但是从9开始HttpURLConnection更小巧,API更简单,压缩以及
                // response cache的使用减少了网络流量,提高了网络速度,也就更省电,所以更适合在Android中使用
                stack = new HurlStack();
            } else {
                // Prior to Gingerbread, HttpUrlConnection was unreliable.
                // See: http://android-developers.blogspot.com/2011/09/androids-http-clients.html
                stack = new HttpClientStack(AndroidHttpClient.newInstance(userAgent));
            }
        }
        // 创建BasicNetwork对象,下面会介绍BasicNetwork(HttpStack)方法的内部实现
        Network network = new BasicNetwork(stack);

        RequestQueue queue;
        if (maxDiskCacheBytes <= -1)
        {
                // 如果不指定大小的话,默认大小为5M
            // No maximum size specified
            queue = new RequestQueue(new DiskBasedCache(cacheDir), network);
        }
        else
        {
            // Disk cache size specified
            queue = new RequestQueue(new DiskBasedCache(cacheDir, maxDiskCacheBytes), network);
        }

        queue.start();

        return queue;
    }

    /**
     * Creates a default instance of the worker pool and calls {@link RequestQueue#start()} on it.
     * You may set a maximum size of the disk cache in bytes.
     *
     * @param context A {@link Context} to use for creating the cache dir.
     * @param maxDiskCacheBytes the maximum size of the disk cache, in bytes. Use -1 for default size.
     * @return A started {@link RequestQueue} instance.
     */
    public static RequestQueue newRequestQueue(Context context, int maxDiskCacheBytes) {
        return newRequestQueue(context, null, maxDiskCacheBytes);
    }

    /**
     * Creates a default instance of the worker pool and calls {@link RequestQueue#start()} on it.
     *
     * @param context A {@link Context} to use for creating the cache dir.
     * @param stack An {@link HttpStack} to use for the network, or null for default.
     * @return A started {@link RequestQueue} instance.
     */
    public static RequestQueue newRequestQueue(Context context, HttpStack stack)
    {
        return newRequestQueue(context, stack, -1);
    }

    /**
     * Creates a default instance of the worker pool and calls {@link RequestQueue#start()} on it.
     *
     * @param context A {@link Context} to use for creating the cache dir.
     * @return A started {@link RequestQueue} instance.
     */
    public static RequestQueue newRequestQueue(Context context) {
        return newRequestQueue(context, null);
    }

}
分析一下RequestQueue的构造方法以及start()方法:
/**
 * A request dispatch queue with a thread pool of dispatchers.
 *
 * Calling {@link #add(Request)} will enqueue the given Request for dispatch,
 * resolving from either cache or network on a worker thread, and then delivering
 * a parsed response on the main thread.
 *//**
 * A request dispatch queue with a thread pool of dispatchers.
 *
 * Calling {@link #add(Request)} will enqueue the given Request for dispatch,
 * resolving from either cache or network on a worker thread, and then delivering
 * a parsed response on the main thread.
 */
public class RequestQueue {

    /** Used for generating monotonically-increasing sequence numbers for requests. */
    private AtomicInteger mSequenceGenerator = new AtomicInteger();

    /**
     * Staging area for requests that already have a duplicate request in flight.
     *
     * <ul>
     *     <li>containsKey(cacheKey) indicates that there is a request in flight for the given cache
     *          key.</li>
     *     <li>get(cacheKey) returns waiting requests for the given cache key. The in flight request
     *          is <em>not</em> contained in that list. Is null if no requests are staged.</li>
     * </ul>
     */
    private final Map<String, Queue<Request<?>>> mWaitingRequests =
            new HashMap<String, Queue<Request<?>>>();

    /**
     * The set of all requests currently being processed by this RequestQueue. A Request
     * will be in this set if it is waiting in any queue or currently being processed by
     * any dispatcher.
     */
    private final Set<Request<?>> mCurrentRequests = new HashSet<Request<?>>();

    // cache队列
    /** The cache triage queue. */
    private final PriorityBlockingQueue<Request<?>> mCacheQueue =
        new PriorityBlockingQueue<Request<?>>();

    // 网络请求队列
    /** The queue of requests that are actually going out to the network. */
    private final PriorityBlockingQueue<Request<?>> mNetworkQueue =
        new PriorityBlockingQueue<Request<?>>();

    /** Number of network request dispatcher threads to start. */
    private static final int DEFAULT_NETWORK_THREAD_POOL_SIZE = 4;

    /** Cache interface for retrieving and storing responses. */
    private final Cache mCache;

    /** Network interface for performing requests. */
    private final Network mNetwork;

    /** Response delivery mechanism. */
    private final ResponseDelivery mDelivery;

    /** The network dispatchers. */
    private NetworkDispatcher[] mDispatchers;

    /** The cache dispatcher. */
    private CacheDispatcher mCacheDispatcher;

    /**
     * Creates the worker pool. Processing will not begin until {@link #start()} is called.
     *
     * @param cache A Cache to use for persisting responses to disk
     * @param network A Network interface for performing HTTP requests
     * @param threadPoolSize Number of network dispatcher threads to create
     * @param delivery A ResponseDelivery interface for posting responses and errors
     */
    public RequestQueue(Cache cache, Network network, int threadPoolSize,
            ResponseDelivery delivery) {
        mCache = cache;
        mNetwork = network;
        mDispatchers = new NetworkDispatcher[threadPoolSize];
        mDelivery = delivery;
    }

    /**
     * Creates the worker pool. Processing will not begin until {@link #start()} is called.
     *
     * @param cache A Cache to use for persisting responses to disk
     * @param network A Network interface for performing HTTP requests
     * @param threadPoolSize Number of network dispatcher threads to create
     */
    public RequestQueue(Cache cache, Network network, int threadPoolSize) {
        this(cache, network, threadPoolSize,
                new ExecutorDelivery(new Handler(Looper.getMainLooper())));
    }

    /**
     * Creates the worker pool. Processing will not begin until {@link #start()} is called.
     *
     * @param cache A Cache to use for persisting responses to disk
     * @param network A Network interface for performing HTTP requests
     */
    public RequestQueue(Cache cache, Network network) {
        // 默认大小为4
        this(cache, network, DEFAULT_NETWORK_THREAD_POOL_SIZE);
    }

    /**
     * Starts the dispatchers in this queue.
     */
    public void start() {
        stop();  // Make sure any currently running dispatchers are stopped.
        // Create the cache dispatcher and start it.
        // 初始化RequestQueue之后就会调用start方法,内部会开启CacheDispatcher,也是Thread的子类,后面再看里面具体的run方法
        mCacheDispatcher = new CacheDispatcher(mCacheQueue, mNetworkQueue, mCache, mDelivery);
        mCacheDispatcher.start();

        // Create network dispatchers (and corresponding threads) up to the pool size.
        for (int i = 0; i < mDispatchers.length; i++) {
            // 创建4个(默认是4个)NetworkDispatcher一直去执行, NetworkDispatcher是Thread的子类,他会不断的去从mNetworkQueue中取出Requet并用
            // 并用mNetwork去执行,执行完成后再使用mDelivery去分发相应的结果
            NetworkDispatcher networkDispatcher = new NetworkDispatcher(mNetworkQueue, mNetwork,
                    mCache, mDelivery);
            mDispatchers[i] = networkDispatcher;
            networkDispatcher.start();
        }
        // 就好像一个工厂一启动,里面就分配了5个搬运工,一个负责搬运cache里面的的请求,4个负责搬运network中的。启动后他们就开始待命
        // 一旦有活来了,就开始去取出活开始干。

    }

    /**
     * Stops the cache and network dispatchers.
     */
    public void stop() {
        if (mCacheDispatcher != null) {
            mCacheDispatcher.quit();
        }
        for (int i = 0; i < mDispatchers.length; i++) {
            if (mDispatchers[i] != null) {
                mDispatchers[i].quit();
            }
        }
    }

    /**
     * Gets a sequence number.
     */
    public int getSequenceNumber() {
        return mSequenceGenerator.incrementAndGet();
    }

    /**
     * Gets the {@link Cache} instance being used.
     */
    public Cache getCache() {
        return mCache;
    }

    /**
     * A simple predicate or filter interface for Requests, for use by
     * {@link RequestQueue#cancelAll(RequestFilter)}.
     */
    public interface RequestFilter {
        public boolean apply(Request<?> request);
    }

    /**
     * Cancels all requests in this queue for which the given filter applies.
     * @param filter The filtering function to use
     */
    public void cancelAll(RequestFilter filter) {
        synchronized (mCurrentRequests) {
            for (Request<?> request : mCurrentRequests) {
                if (filter.apply(request)) {
                    request.cancel();
                }
            }
        }
    }

    /**
     * Cancels all requests in this queue with the given tag. Tag must be non-null
     * and equality is by identity.
     */
    public void cancelAll(final Object tag) {
        if (tag == null) {
            throw new IllegalArgumentException("Cannot cancelAll with a null tag");
        }
        cancelAll(new RequestFilter() {
            @Override
            public boolean apply(Request<?> request) {
                return request.getTag() == tag;
            }
        });
    }

    /**
     * Adds a Request to the dispatch queue.
     * @param request The request to service
     * @return The passed-in request
     */
    public <T> Request<T> add(Request<T> request) {
        // Tag the request as belonging to this queue and add it to the set of current requests.
        request.setRequestQueue(this);
        synchronized (mCurrentRequests) {
            // 添加到mCurrentRequests中,在执行完后的finish方法中会去移除该请求。
            mCurrentRequests.add(request);
        }

        // Process requests in the order they are added.
        request.setSequence(getSequenceNumber());
        request.addMarker("add-to-queue");

        // 判断一下该请求能否进行缓存,如果不能缓存就直接添加到网络请求的队列中。这个能不能缓存是怎么判断的?其实就是根据Request中的一个变量来判断。
    // 默认情况下所有的请求都是可以缓存的,可以通过Request.setShouldCache(false)方法,来将其设置为不可缓存状态。
        // If the request is uncacheable, skip the cache queue and go straight to the network.
        if (!request.shouldCache()) {
            mNetworkQueue.add(request);
            return request;
        }

        // Insert request into stage if there's already a request with the same cache key in flight.
        synchronized (mWaitingRequests) {
            String cacheKey = request.getCacheKey();
            if (mWaitingRequests.containsKey(cacheKey)) {
                // There is already a request in flight. Queue up.
                Queue<Request<?>> stagedRequests = mWaitingRequests.get(cacheKey);
                if (stagedRequests == null) {
                    stagedRequests = new LinkedList<Request<?>>();
                }
                stagedRequests.add(request);
                mWaitingRequests.put(cacheKey, stagedRequests);
                if (VolleyLog.DEBUG) {
                    VolleyLog.v("Request for cacheKey=%s is in flight, putting on hold.", cacheKey);
                }
            } else {
                // 如果能缓存,并且缓存线程中没有的时候就讲该请求添加到缓存队列中
                // Insert 'null' queue for this cacheKey, indicating there is now a request in
                // flight.
                mWaitingRequests.put(cacheKey, null);
                mCacheQueue.add(request);
            }
            return request;
        }
    }

    /**
     * Called from {@link Request#finish(String)}, indicating that processing of the given request
     * has finished.
     *
     * <p>Releases waiting requests for <code>request.getCacheKey()</code> if
     *      <code>request.shouldCache()</code>.</p>
     */
    void finish(Request<?> request) {
        // Remove from the set of requests currently being processed.
        synchronized (mCurrentRequests) {
            mCurrentRequests.remove(request);
        }

        if (request.shouldCache()) {
            synchronized (mWaitingRequests) {
                String cacheKey = request.getCacheKey();
                Queue<Request<?>> waitingRequests = mWaitingRequests.remove(cacheKey);
                if (waitingRequests != null) {
                    if (VolleyLog.DEBUG) {
                        VolleyLog.v("Releasing %d waiting requests for cacheKey=%s.",
                                waitingRequests.size(), cacheKey);
                    }
                    // Process all queued up requests. They won't be considered as in flight, but
                    // that's not a problem as the cache has been primed by 'request'.
                    mCacheQueue.addAll(waitingRequests);
                }
            }
        }
    }
}


 4995
4995


 被折叠的 条评论
为什么被折叠?
被折叠的 条评论
为什么被折叠?
 到【灌水乐园】发言


