Android 搜索页-搜索历史条目动态添加(LinearLayout动态添加条目)

一、需求:

要记录用户的搜索历史,并动态的展现出来,每行展示两个条目,最多十条条目。效果图如下:


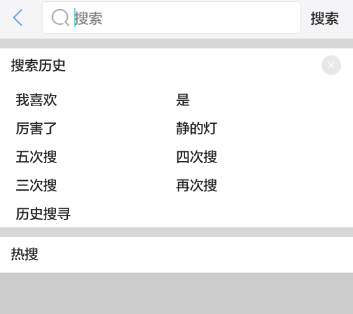
大概的效果展示一下,其他优化的地方这里暂不做处理(如:单个条目的背景优化,条目的选择状态UI优化等)


二、思路:

布局中维护一个LinearLayout,根据条目个数判断行数,根据行数动态添加子LinearLayout,每行显示两个TextView,最后根据行数和每行条目显示位置来确定显示的数据。


三、布局:

01、布局

<LinearLayout
        android:id="@+id/ll_search_history_item"
        android:layout_width="match_parent"
        android:layout_height="wrap_content"
        android:background="@color/white"
        android:orientation="vertical"
        android:visibility="gone">

        <RelativeLayout
            android:layout_width="match_parent"
            android:layout_height="wrap_content"
            android:layout_marginTop="7dp"
            android:layout_marginBottom="10dp">

            <TextView
                android:layout_width="wrap_content"
                android:layout_height="wrap_content"
                android:layout_marginLeft="12dp"
                android:text="搜索历史"
                android:textColor="#222222"
                android:textSize="@dimen/text_size_14" />

            <ImageView
                android:id="@+id/iv_delete_history"
                android:layout_width="20dp"
                android:layout_height="20dp"
                android:layout_alignParentRight="true"
                android:layout_marginRight="12dp"
                android:background="@drawable/wrong" />
        </RelativeLayout>

        <LinearLayout
            android:id="@+id/ll_search_history"
            android:layout_width="match_parent"
            android:layout_height="wrap_content"
            android:layout_marginLeft="12dp"
            android:layout_marginRight="12dp"
            android:orientation="vertical" />

    </LinearLayout>


02、activity_search_item条目布局

<?xml version="1.0" encoding="utf-8"?>
<LinearLayout xmlns:android="http://schemas.android.com/apk/res/android"
    android:layout_width="match_parent"
    android:layout_height="wrap_content"
    android:orientation="horizontal"
    android:padding="5dp">

    <LinearLayout
        android:layout_width="0dp"
        android:layout_height="wrap_content"
        android:layout_weight="1"
        android:orientation="horizontal">

        <TextView
            android:id="@+id/tv_search_text_one"
            android:layout_width="wrap_content"
            android:layout_height="wrap_content"
            android:textColor="#222222"
            android:textSize="@dimen/text_size_14" />
    </LinearLayout>

    <LinearLayout
        android:layout_width="0dp"
        android:layout_height="wrap_content"
        android:layout_weight="1"
        android:orientation="horizontal">

        <TextView
            android:id="@+id/tv_search_text_two"
            android:layout_width="wrap_content"
            android:layout_height="wrap_content"
            android:textColor="#222222"
            android:textSize="@dimen/text_size_14" />
    </LinearLayout>

</LinearLayout>

四、代码实现:

 /**
     * 搜索历史动态添加行,条目
     * @param searchLayout  父LinearLayout
     * @param list          搜索历史数据
     */
    private void setSearchDataLine(LinearLayout searchLayout, ArrayList<String> list) {
        searchLayout.removeAllViews();
        // 根据list大小判断显示的行数
        int lineNum = 0;
        if (list != null && list.size() > 0) {
            if (list.size() % 2 == 0) {
                lineNum = list.size() / 2;
            } else {
                lineNum = list.size() / 2 + 1;
            }
            // 遍历动态添加行LinearLayout
            for (int i = 0; i < lineNum; i++) {
                LinearLayout linearLayout = new LinearLayout(this);
                LinearLayout.LayoutParams params = new LinearLayout.LayoutParams(ViewGroup.LayoutParams.MATCH_PARENT, ViewGroup.LayoutParams.WRAP_CONTENT);
                linearLayout.setLayoutParams(params);
                // 添加每行的数据
                setSearchData(linearLayout, list, i);
                // 每行的LinearLayout添加到父LinearLayout
                searchLayout.addView(linearLayout);
            }
        }
    }

    /**
     * 添加每行数据
     * @param linearLayout  行LinearLayout
     * @param list          搜索历史数据集合
     * @param line          行号
     */
    private void setSearchData(LinearLayout linearLayout, final ArrayList<String> list, final int line) {
        linearLayout.removeAllViews();
        // 设置每行显示的条目个数,偶数时显示两个条目,奇数时只显示左侧条目
        int num = 0;
        if (list.size() % 2 == 0) {
            num = 2;
        } else {
            if (line == list.size() / 2) {
                num = 1;
            } else {
                num = 2;
            }
        }
        // 行显示view
        View view = LayoutInflater.from(this).inflate(R.layout.activity_search_item, null);
        TextView textOne = (TextView) view.findViewById(R.id.tv_search_text_one);
        TextView textTwo = (TextView) view.findViewById(R.id.tv_search_text_two);
        // 设置单个条目数据
        textOne.setText(list.get(line * 2));
        if (num == 2) {
            textTwo.setText(list.get(line * 2 + num - 1));
        }
        // 每个条目的点击事件
        textOne.setOnClickListener(new View.OnClickListener() {
            @Override
            public void onClick(View view) {
                Toast.makeText(SearchActivity.this, "====" + list.get(line * 2), Toast.LENGTH_SHORT).show();
            }
        });
        textTwo.setOnClickListener(new View.OnClickListener() {
            @Override
            public void onClick(View view) {
                Toast.makeText(SearchActivity.this, "====" + list.get(line * 2 + 1), Toast.LENGTH_SHORT).show();
            }
        });

        LinearLayout.LayoutParams params = new LinearLayout.LayoutParams(ViewGroup.LayoutParams.MATCH_PARENT, ViewGroup.LayoutParams.WRAP_CONTENT);
        view.setLayoutParams(params);
        // view添加到行LinearLayout
        linearLayout.addView(view);
    }

五、留言:


功能实现逻辑比较好理解,就不做过多的解释,关键位置有相应的代码注释。看了其他app的搜索页面,对搜索历史的展示不尽相同,各有各的方式,大致的功能实现个人感觉都是通过LinearLayout的动态添加条目实现的。这是一种方式相对来说是比较简单的。


飞牛网App搜索历史的实现方式是每行动态添加条目,根据条目的长度来判断,每行的条目总长度大于屏幕宽度的时候另起一行添加数据。这种实现方式介绍的也挺多的,下面会介绍一下自己的实现方式。


  • 0
    点赞
  • 1
    收藏
    觉得还不错? 一键收藏
  • 0
    评论
以下是使用 Kotlin 在 Android 中创建一个中间为突出的圆形图标,并且可以动态添加或减少两边的条目的底部导航栏的示例代码: 1. 首先,在您的布局文件中添加底部导航栏的代码: ```xml <LinearLayout android:id="@+id/bottomNavigationLayout" android:layout_width="match_parent" android:layout_height="wrap_content" android:orientation="horizontal" android:background="@android:color/darker_gray"> <!-- 左侧导航项 --> <TextView android:id="@+id/leftNavItem" android:layout_width="0dp" android:layout_height="wrap_content" android:layout_weight="1" android:text="Left" android:gravity="center" android:textColor="@android:color/white" android:background="@drawable/bottom_nav_item_background" /> <!-- 中间圆形图标 --> <ImageView android:id="@+id/centerNavIcon" android:layout_width="48dp" android:layout_height="48dp" android:src="@drawable/ic_center_icon" android:layout_marginTop="-24dp" /> <!-- 右侧导航项 --> <TextView android:id="@+id/rightNavItem" android:layout_width="0dp" android:layout_height="wrap_content" android:layout_weight="1" android:text="Right" android:gravity="center" android:textColor="@android:color/white" android:background="@drawable/bottom_nav_item_background" /> </LinearLayout> ``` 2. 在 `res/drawable` 目录下创建 `bottom_nav_item_background.xml` 文件,定义底部导航栏项的背景: ```xml <selector xmlns:android="http://schemas.android.com/apk/res/android"> <item android:state_pressed="true" android:drawable="@color/colorAccent" /> <item android:state_focused="true" android:drawable="@color/colorAccent" /> <item android:drawable="@android:color/transparent" /> </selector> ``` 3. 在 `res/drawable` 目录下添加 `ic_center_icon.xml` 文件,定义中间圆形图标的资源: ```xml <shape xmlns:android="http://schemas.android.com/apk/res/android" android:shape="oval"> <solid android:color="@color/colorPrimary" /> </shape> ``` 4. 在您的 Activity 或 Fragment 中,使用以下代码来动态添加或减少两边的导航项: ```kotlin val leftNavItem = findViewById<TextView>(R.id.leftNavItem) val rightNavItem = findViewById<TextView>(R.id.rightNavItem) val bottomNavigationLayout = findViewById<LinearLayout>(R.id.bottomNavigationLayout) // 添加左侧导航项 val newLeftNavItem = TextView(this) newLeftNavItem.layoutParams = LinearLayout.LayoutParams(0, LinearLayout.LayoutParams.WRAP_CONTENT, 1f) newLeftNavItem.text = "New Left" newLeftNavItem.gravity = Gravity.CENTER newLeftNavItem.setTextColor(Color.WHITE) newLeftNavItem.setBackgroundResource(R.drawable.bottom_nav_item_background) bottomNavigationLayout.addView(newLeftNavItem, 0) // 添加右侧导航项 val newRightNavItem = TextView(this) newRightNavItem.layoutParams = LinearLayout.LayoutParams(0, LinearLayout.LayoutParams.WRAP_CONTENT, 1f) newRightNavItem.text = "New Right" newRightNavItem.gravity = Gravity.CENTER newRightNavItem.setTextColor(Color.WHITE) newRightNavItem.setBackgroundResource(R.drawable.bottom_nav_item_background) bottomNavigationLayout.addView(newRightNavItem) // 移除左侧导航项 bottomNavigationLayout.removeView(leftNavItem) // 移除右侧导航项 bottomNavigationLayout.removeView(rightNavItem) ``` 注意,上述代码中的 `R.id.leftNavItem`、`R.id.rightNavItem` 和 `R.id.bottomNavigationLayout` 分别是对应布局文件中导航项和底部导航栏的视图的 ID。 这样,您就可以通过动态添加或减少两边的导航项来实现底部导航栏的需求,并且使用中间的圆形图标突出显示。您可以根据自己的需求进行样式和布局的调整。

“相关推荐”对你有帮助么?

  • 非常没帮助
  • 没帮助
  • 一般
  • 有帮助
  • 非常有帮助
提交
评论
添加红包

请填写红包祝福语或标题

红包个数最小为10个

红包金额最低5元

当前余额3.43前往充值 >
需支付:10.00
成就一亿技术人!
领取后你会自动成为博主和红包主的粉丝 规则
hope_wisdom
发出的红包
实付
使用余额支付
点击重新获取
扫码支付
钱包余额 0

抵扣说明:

1.余额是钱包充值的虚拟货币,按照1:1的比例进行支付金额的抵扣。
2.余额无法直接购买下载,可以购买VIP、付费专栏及课程。

余额充值