


如果你只是简单的实现应用内的窗口,实现的思路很多,有一个现成的思路就是使用PopupWindow.但是我们今天并不使用PopupWindow,我们使用WindowManager来创建一个窗口。如果不了解WindowManager,建议先去阅读一下我的上一篇文章:WindowManager源码解析。
我们创建应用内的窗口是不需要弹窗权限的,也就是说我们不需要在注册清单中使用:
<uses-permissionandroid:name="android.permission.SYSTEM_ALERT_WINDOW" />权限。
一、下面我们说一下我们的功能需求:
1>在屏幕中的指定位置弹窗;
2>弹窗可以在屏幕中进行随意拖动;
3>释放时,弹窗可以自动贴边;
4>弹窗后的界面可以接受相应的事件;
我们看一下运行效果:
二、功能分析:
1>实现弹窗功能,我们需要用到WindowManager;
2>实现控件的拖动我们需要用到手势的触摸事件,也就是View中的View.OnTouchListener
3>实现自动贴边功能,我们需要用到动画的相关技术;
三、功能实现:
1.初始化工作:
- 初始化WindowManager:context.getSystemService(Context.WINDOW_SERVICE);
- 控件的属性配置:
1>确定显示位置:
//init initial position
mLayoutParams.x =mInitialX;
mLayoutParams.y =mInitialY;
2>设置悬浮窗的对齐方式:
//set gravity left|top
mLayoutParams.gravity =Gravity.LEFT | Gravity.TOP;
3>设置悬浮窗的行为标识:
//set flag
mLayoutParams.flags =WindowManager.LayoutParams.FLAG_NOT_TOUCH_MODAL |
WindowManager.LayoutParams.FLAG_NOT_FOCUSABLE;
4>设置窗口的尺寸:
//set window size
mLayoutParams.width =WindowManager.LayoutParams.WRAP_CONTENT;
mLayoutParams.height =WindowManager.LayoutParams.WRAP_CONTENT;
5>设置悬浮窗期望的位图格式:
//The desired bitmapformat
mLayoutParams.format =PixelFormat.RGBA_8888;
6>窗口中添加布局:
mWindowManager.addView(mRootView,mLayoutParams);
2.触摸事件的监听:
- 在初始化控件的时候,悬浮窗根布局添加触摸事件的监听:
mRootView.setOnTouchListener(this);
- 当手指按下的时候:记录当前触摸点相对于window的距离,也就是触摸点相对于父控件的坐标位置。
- 当手指移动时,也就是触发MotionEvent.ACTION_MOVE时。获得窗口相对于屏幕的坐标位置,并对窗口的位置属性进行更新。
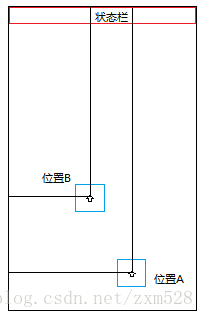
- 当手指抬起时,也就是触发MotionEvent.ACTION_UP时。需要实现贴边功能。实现这个功能使用属性动画实现,重要的是向左贴边还是向右贴边的判断,如果向左贴边设置窗口的X位置属性为0即可;向右贴边设置窗口的X位置属性为(屏幕宽度-窗口宽度)即可。
项目地址:FloatWindowDemo
三、注意事项:
1.悬浮窗的添加和移除:
需要成对存在,也不要重复的添加和移除,否则会报异常。
2.窗口类型的设置:也就是type的设置,这里不需要,这个处理也很复杂。主要是因为国内的各大手机厂商都自己定制系统导致不好适配。这里不再论述。
3.悬浮窗的位置追踪功能:状态栏高度?
4.思考:应用内悬浮窗和AlertDialog,Toast视图层级的问题?
(1)先说AlertDialog,弹窗再我们的应用中是比较常见的,我感觉我们有必要分析一下,他到底属于哪种类型的弹窗。
我们怎么查看AlertDialog的类型呢?很简单嘛,看源码啊。
我们找到AlertDialog的基类android.app.Dialog,然后我们看到它的构造器代码如下:
Dialog(@NonNull Contextcontext, @StyleRes int themeResId, boolean createContextThemeWrapper) {

        if (createContextThemeWrapper) {

            if (themeResId ==ResourceId.ID_NULL) {

                final TypedValue outValue = newTypedValue();

               context.getTheme().resolveAttribute(R.attr.dialogTheme, outValue, true);

                themeResId =outValue.resourceId;

            }

            mContext = newContextThemeWrapper(context, themeResId);

        } else {

            mContext = context;

        }


        mWindowManager= (WindowManager) context.getSystemService(Context.WINDOW_SERVICE);


        final Window w = newPhoneWindow(mContext);

        mWindow = w;

        w.setCallback(this);

        w.setOnWindowDismissedCallback(this);

        w.setOnWindowSwipeDismissedCallback(()-> {

            if (mCancelable) {

                cancel();

            }

        });

        w.setWindowManager(mWindowManager,null, null);

        w.setGravity(Gravity.CENTER);


        mListenersHandler = newListenersHandler(this);

    }
原来它的载体也是WindowManager,看到这我们是不是有点恍然大悟的感觉。我们再根据WindowManager的线索看一下是否设置过type这个字段。
我们再来看一下弹窗的show方法。代码如下:
public void show() {

        if (mShowing) {

            if (mDecor != null) {

                if(mWindow.hasFeature(Window.FEATURE_ACTION_BAR)) {

                   mWindow.invalidatePanelMenu(Window.FEATURE_ACTION_BAR);

                }

               mDecor.setVisibility(View.VISIBLE);

            }

            return;

        }


        mCanceled = false;


        if (!mCreated) {

            dispatchOnCreate(null);

        } else {

            // Fill the DecorView in on anyconfiguration changes that

            // may have occured while it wasremoved from the WindowManager.

            final Configuration config =mContext.getResources().getConfiguration();

           mWindow.getDecorView().dispatchConfigurationChanged(config);

        }


        onStart();

        mDecor = mWindow.getDecorView();


        if (mActionBar == null &&mWindow.hasFeature(Window.FEATURE_ACTION_BAR)) {

            final ApplicationInfo info =mContext.getApplicationInfo();

            mWindow.setDefaultIcon(info.icon);

            mWindow.setDefaultLogo(info.logo);

            mActionBar = newWindowDecorActionBar(this);

        }


        WindowManager.LayoutParams l =mWindow.getAttributes();

        if ((l.softInputMode

                &WindowManager.LayoutParams.SOFT_INPUT_IS_FORWARD_NAVIGATION) == 0) {

            WindowManager.LayoutParamsnl = new WindowManager.LayoutParams();

            nl.copyFrom(l);

            nl.softInputMode |=

                   WindowManager.LayoutParams.SOFT_INPUT_IS_FORWARD_NAVIGATION;

            l = nl;

        }


        mWindowManager.addView(mDecor, l);

        mShowing = true;


        sendShowMessage();

    }
通过上面的代码我们看到在弹窗显示的过程中,都没有进行过type的设置。原来它属于应用内弹窗啊,其实不用想也是啊。我们使用AlertDialog要依赖Activity的,肯定是系统弹窗啊!这时候我们应该就能理解为什么有些Activity即将消失的时候创建并弹出AlertDialog的时候会报BadTokenException了。
(2)那么我们经常用的Toast呢?当然它是不同于AlertDialog的,因为我们通过翻译WindowManager的源码我们已经知道,在系统弹窗(System windows)下面存在
public static final intTYPE_TOAST = FIRST_SYSTEM_WINDOW+5;
这个类型,那我们就去验证一下:Toast是不是使用WindowManager进行实现的。其他的逻辑就不进行分析了,我们只看怎么使用WindowManager进行实现的就可以了。
我们找到它内部的静态私有类:TN。
我们看一下它的构造器代码:
TN(String packageName,@Nullable Looper looper) {

            // XXX This should be changed touse a Dialog, with a Theme.Toast

            // defined that sets up the layoutparams appropriately.

            final WindowManager.LayoutParams params =mParams;

            params.height =WindowManager.LayoutParams.WRAP_CONTENT;

            params.width =WindowManager.LayoutParams.WRAP_CONTENT;

            params.format =PixelFormat.TRANSLUCENT;

            params.windowAnimations =com.android.internal.R.style.Animation_Toast;

            params.type =WindowManager.LayoutParams.TYPE_TOAST;

            params.setTitle("Toast");

            params.flags =WindowManager.LayoutParams.FLAG_KEEP_SCREEN_ON

                    |WindowManager.LayoutParams.FLAG_NOT_FOCUSABLE

                    |WindowManager.LayoutParams.FLAG_NOT_TOUCHABLE;


            mPackageName = packageName;


            if (looper == null) {

                // Use Looper.myLooper() iflooper is not specified.

                looper = Looper.myLooper();

                if (looper == null) {

                    throw new RuntimeException(

                            "Can't toaston a thread that has not called Looper.prepare()");

                }

            }

            mHandler = new Handler(looper,null) {

                @Override

                public voidhandleMessage(Message msg) {

                    switch (msg.what) {

                        case SHOW: {

                            IBinder token =(IBinder) msg.obj;

                            handleShow(token);

                            break;

                        }

                        case HIDE: {

                            handleHide();

                            // Don't do this inhandleHide() because it is also invoked by

                            // handleShow()

                            mNextView = null;

                            break;

                        }

                        case CANCEL: {

                            handleHide();

                            // Don't do this inhandleHide() because it is also invoked by

                            // handleShow()

                            mNextView = null;

                            try {

                               getService().cancelToast(mPackageName, TN.this);

                            } catch(RemoteException e) {

                            }

                            break;

                        }

                    }

                }

            };

        }
正如我们猜想的那样,Toast使用的系统层级的弹窗。


 304
304


 被折叠的 条评论
为什么被折叠?
被折叠的 条评论
为什么被折叠?
 到【灌水乐园】发言


