


网上学习资料一大堆,但如果学到的知识不成体系,遇到问题时只是浅尝辄止,不再深入研究,那么很难做到真正的技术提升。
一个人可以走的很快,但一群人才能走的更远!不论你是正从事IT行业的老鸟或是对IT行业感兴趣的新人,都欢迎加入我们的的圈子(技术交流、学习资源、职场吐槽、大厂内推、面试辅导),让我们一起学习成长!
Name the components on this agent
a1.sources = r1
a1.channels = c1
a1.sinkgroups = g1
a1.sinks = k1 k2
Describe/configure the source
a1.sources.r1.type = netcat
a1.sources.r1.bind = localhost
a1.sources.r1.port = 44444
a1.sinkgroups.g1.processor.type = failover
a1.sinkgroups.g1.processor.priority.k1 = 5
a1.sinkgroups.g1.processor.priority.k2 = 10
a1.sinkgroups.g1.processor.maxpenalty = 10000
Describe the sink
a1.sinks.k1.type = avro
a1.sinks.k1.hostname = hadoop102
a1.sinks.k1.port = 4141
a1.sinks.k2.type = avro
a1.sinks.k2.hostname = hadoop102
a1.sinks.k2.port = 4142
Describe the channel
a1.channels.c1.type = memory
a1.channels.c1.capacity = 1000
a1.channels.c1.transactionCapacity = 100
Bind the source and sink to the channel
a1.sources.r1.channels = c1
a1.sinkgroups.g1.sinks = k1 k2
a1.sinks.k1.channel = c1
a1.sinks.k2.channel = c1
2.创建 flume-flume-console1.conf


配置上级 Flume 输出的 Source,输出是到本地控制台。


编辑配置文件
[atguigu@hadoop102 group2]$ vim flume-flume-console1.conf
添加如下内容
Name the components on this agent
a2.sources = r1
a2.sinks = k1
a2.channels = c1
Describe/configure the source
a2.sources.r1.type = avro
a2.sources.r1.bind = hadoop102
a2.sources.r1.port = 4141
Describe the sink
a2.sinks.k1.type = logger
Describe the channel
a2.channels.c1.type = memory
a2.channels.c1.capacity = 1000
a2.channels.c1.transactionCapacity = 100
Bind the source and sink to the channel
a2.sources.r1.channels = c1
a2.sinks.k1.channel = c1
3.创建 flume-flume-console2.conf


配置上级 Flume 输出的 Source,输出是到本地控制台。


编辑配置文件
[atguigu@hadoop102 group2]$ vim flume-flume-console2.conf
添加如下内容
Name the components on this agent
a3.sources = r1
a3.sinks = k1
a3.channels = c2
Describe/configure the source
a3.sources.r1.type = avro
a3.sources.r1.bind = hadoop102
a3.sources.r1.port = 4142
Describe the sink
a3.sinks.k1.type = logger
Describe the channel
a3.channels.c2.type = memory
a3.channels.c2.capacity = 1000
a3.channels.c2.transactionCapacity = 100
Bind the source and sink to the channel
a3.sources.r1.channels = c2
a3.sinks.k1.channel = c2
4.执行配置文件


分别开启对应配置文件:flume-flume-console2,flume-flume-console1,flume-netcat-flume。
[atguigu@hadoop102 flume]$ bin/flume-ng agent --conf conf/ --name
a3 --conf-file job/group2/flume-flume-console2.conf -
Dflume.root.logger=INFO,console
[atguigu@hadoop102 flume]$ bin/flume-ng agent --conf conf/ --name
a2 --conf-file job/group2/flume-flume-console1.conf -
Dflume.root.logger=INFO,console
[atguigu@hadoop102 flume]$ bin/flume-ng agent --conf conf/ --name
a1 --conf-file job/group2/flume-netcat-flume.conf
5.使用 netcat 工具向本机的 44444 端口发送内容
$ nc localhost 44444
6.查看 Flume2 及 Flume3 的控制台打印日志
7.将 Flume2 kill,观察 Flume3 的控制台打印情况。
**注:使用 jps -ml 查看 Flume 进程。**
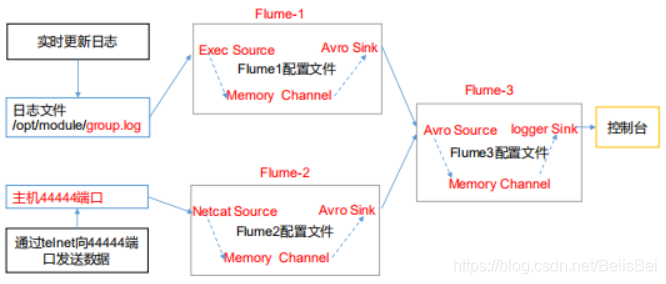
### 三、聚合
1)案例需求
hadoop102 上的 Flume-1 监控文件/opt/module/data/group.log,hadoop103 上的 Flume-2 监控某一个端口的数据流,Flume-1 与 Flume-2 将数据发送给 hadoop104 上的 Flume-3,Flume-3 将最终数据打印到控制台。
2)需求分析
**多数据源汇总**
3)实现步骤:
0.准备工作
分发 Flume
[atguigu@hadoop102 module]$ xsync flume
在 hadoop102、hadoop103 以及 hadoop104 的/opt/module/flume/job目录下创建一个 group3文件夹。
[atguigu@hadoop102 job]$ mkdir group3
[atguigu@hadoop103 job]$ mkdir group3
[atguigu@hadoop104 job]$ mkdir group3
1.创建 flume1-logger-flume.conf


配置 Source 用于监控 hive.log 文件,配置 Sink 输出数据到下一级 Flume。 在 hadoop102 上编辑配置文件
[atguigu@hadoop102 group3]$ vim flume1-logger-flume.conf
添加如下内容
Name the components on this agent
a1.sources = r1
a1.sinks = k1
a1.channels = c1
Describe/configure the source
a1.sources.r1.type = exec
a1.sources.r1.command = tail -F /opt/module/group.log
a1.sources.r1.shell = /bin/bash -c
Describe the sink
a1.sinks.k1.type = avro
a1.sinks.k1.hostname = hadoop104
a1.sinks.k1.port = 4141
Describe the channel
a1.channels.c1.type = memory
a1.channels.c1.capacity = 1000
a1.channels.c1.transactionCapacity = 100
Bind the source and sink to the channel
a1.sources.r1.channels = c1
a1.sinks.k1.channel = c1
2.创建 flume2-netcat-flume.conf


配置 Source 监控端口 44444 数据流,配置 Sink 数据到下一级 Flume: 在 hadoop103 上编辑配置文件
[atguigu@hadoop102 group3]$ vim flume2-netcat-flume.conf
添加如下内容
Name the components on this agent
a2.sources = r1
a2.sinks = k1
a2.channels = c1
Describe/configure the source
a2.sources.r1.type = netcat
a2.sources.r1.bind = hadoop103
a2.sources.r1.port = 44444
Describe the sink
a2.sinks.k1.type = avro
a2.sinks.k1.hostname = hadoop104
a2.sinks.k1.port = 4141
Use a channel which buffers events in memory
a2.channels.c1.type = memory
a2.channels.c1.capacity = 1000
a2.channels.c1.transactionCapacity = 100
Bind the source and sink to the channel
a2.sources.r1.channels = c1
a2.sinks.k1.channel = c1
3.创建 flume3-flume-logger.conf


配置 source 用于接收 flume1 与 flume2 发送过来的数据流,最终合并后 sink 到控制台。
 在 hadoop104 上编辑配置文件
[atguigu@hadoop104 group3]$ touch flume3-flume-logger.conf
[atguigu@hadoop104 group3]$ vim flume3-flume-logger.conf
添加如下内容
Name the components on this agent
a3.sources = r1
a3.sinks = k1
a3.channels = c1
Describe/configure the source
a3.sources.r1.type = avro
a3.sources.r1.bind = hadoop104
a3.sources.r1.port = 4141
Describe the sink
Describe the sink
a3.sinks.k1.type = logger
Describe the channel
a3.channels.c1.type = memory
a3.channels.c1.capacity = 1000
a3.channels.c1.transactionCapacity = 100
Bind the source and sink to the channel
a3.sources.r1.channels = c1
a3.sinks.k1.channel = c1
4.执行配置文件


分别开启对应配置文件:flume3-flume-logger.conf,flume2-netcat-flume.conf,flume1-logger-flume.conf。
[atguigu@hadoop104 flume]$ bin/flume-ng agent --conf conf/ --name
a3 --conf-file job/group3/flume3-flume-logger.conf -
Dflume.root.logger=INFO,console
[atguigu@hadoop102 flume]$ bin/flume-ng agent --conf conf/ --name
a2 --conf-file job/group3/flume1-logger-flume.conf
[atguigu@hadoop103 flume]$ bin/flume-ng agent --conf conf/ --name
a1 --conf-file job/group3/flume2-netcat-flume.conf
5.在 hadoop103 上向/opt/module 目录下的 group.log 追加内容
[atguigu@hadoop103 module]$ echo ‘hello’ > group.log
6.在 hadoop102 上向 44444 端口发送数据
[atguigu@hadoop102 flume]$ telnet hadoop102 44444
7.检查 hadoop104 上数据
### 四、自定义 Interceptor
1)案例需求
使用 Flume 采集服务器本地日志,需要按照日志类型的不同,将不同种类的日志发往不同的分析系统。
2)需求分析
在实际的开发中,**一台服务器产生的日志类型可能有很多种,不同类型的日志可能需要发送到不同的分析系统**。此时会用到 Flume 拓扑结构中的Multiplexing 结构,Multiplexing的原理是,根据 event 中 Header 的某个 key 的值,将不同的 event 发送到不同的 Channel中,**所以我们需要自定义一个 Interceptor,为不同类型的 event 的 Header 中的 key 赋予不同的值**。
**在该案例中,我们以端口数据模拟日志,以数字(单个)和字母(单个)模拟不同类型的日志,我们需要自定义 interceptor 区分数字和字母,将其分别发往不同的分析系统(Channel)。**
3)实现步骤
1.创建一个 maven 项目,并引入以下依赖。
2.定义 CustomInterceptor 类并实现 Interceptor 接口。
package com.atguigu.flume.interceptor;
import org.apache.flume.Context;
import org.apache.flume.Event;
import org.apache.flume.interceptor.Interceptor;
import java.util.List;
public class CustomInterceptor implements Interceptor {
@Override
public void initialize() {
}
@Override
public Event intercept(Event event) {
byte[] body = event.getBody();
if (body[0] < ‘z’ && body[0] > ‘a’) {
event.getHeaders().put(“type”, “letter”);
} else if (body[0] > ‘0’ && body[0] < ‘9’) {
event.getHeaders().put(“type”, “number”);
}
return event;
}
@Override
public List intercept(List events) {
for (Event event : events) {
intercept(event);
}
return events;
}
@Override
public void close() {
}
public static class Builder implements Interceptor.Builder {
@Override
public Interceptor build() {
return new CustomInterceptor();
}
@Override
public void configure(Context context) {
}
} }
3.编辑 flume 配置文件
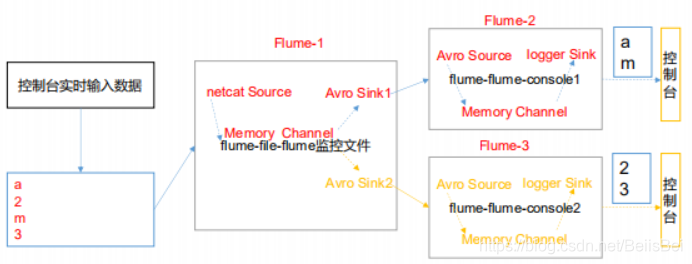
为 hadoop102 上的 Flume1 配置 1 个 netcat source,1 个 sink group(2 个 avro sink),
并配置相应的 ChannelSelector 和 interceptor。
Name the components on this agent
a1.sources = r1
a1.sinks = k1 k2
a1.channels = c1 c2
Describe/configure the source
a1.sources.r1.type = netcat
a1.sources.r1.bind = localhost
a1.sources.r1.port = 44444
a1.sources.r1.interceptors = i1
a1.sources.r1.interceptors.i1.type =
com.atguigu.flume.interceptor.CustomInterceptor$Builder
a1.sources.r1.selector.type = multiplexing
a1.sources.r1.selector.header = type
a1.sources.r1.selector.mapping.letter = c1
a1.sources.r1.selector.mapping.number = c2
Describe the sink
a1.sinks.k1.type = avro
a1.sinks.k1.hostname = hadoop103
a1.sinks.k1.port = 4141
a1.sinks.k2.type=avro
a1.sinks.k2.hostname = hadoop104
a1.sinks.k2.port = 4242
Use a channel which buffers events in memory
a1.channels.c1.type = memory
a1.channels.c1.capacity = 1000
a1.channels.c1.transactionCapacity = 100
Use a channel which buffers events in memory
a1.channels.c2.type = memory
a1.channels.c2.capacity = 1000
a1.channels.c2.transactionCapacity = 100
Bind the source and sink to the channel
a1.sources.r1.channels = c1 c2
a1.sinks.k1.channel = c1
a1.sinks.k2.channel = c2
为 hadoop103 上的 Flume2 配置一个 avro source 和一个 logger sink。
a1.sources = r1
a1.sinks = k1
a1.channels = c1
a1.sources.r1.type = avro
a1.sources.r1.bind = hadoop103
a1.sources.r1.port = 4141
a1.sinks.k1.type = logger
a1.channels.c1.type = memory
a1.channels.c1.capacity = 1000
a1.channels.c1.transactionCapacity = 100
a1.sinks.k1.channel = c1
a1.sources.r1.channels = c1
为 hadoop104 上的 Flume3 配置一个 avro source 和一个 logger sink。
a1.sources = r1
a1.sinks = k1
a1.channels = c1
a1.sources.r1.type = avro
a1.sources.r1.bind = hadoop104
a1.sources.r1.port = 4242
a1.sinks.k1.type = logger
a1.channels.c1.type = memory
a1.channels.c1.capacity = 1000
a1.channels.c1.transactionCapacity = 100
a1.sinks.k1.channel = c1
a1.sources.r1.channels = c1
4.分别在 hadoop102,hadoop103,hadoop104 上启动 flume 进程,注意先后顺序。
5.在 hadoop102 使用 netcat 向 localhost:44444 发送字母和数字。
6.观察 hadoop103 和 hadoop104 打印的日志。
### 五、自定义 Source
1)介绍
Source 是负责接收数据到 Flume Agent 的组件。Source 组件可以处理各种类型、各种格式的日志数据,包括 avro、thrift、exec、jms、spooling directory、netcat、sequence generator、syslog、http、legacy。官方提供的 source 类型已经很多,但是有时候并不能满足实际开发当中的需求,此时我们就需要根据实际需求自定义某些 source。
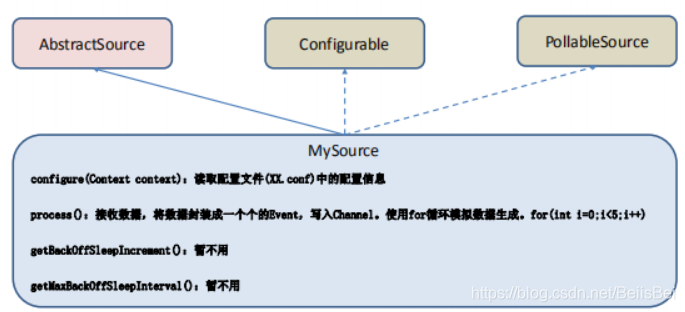
官方也提供了自定义 source 的接口:
<https://flume.apache.org/FlumeDeveloperGuide.html#source> 根据官方说明自定义MySource 需要继承 AbstractSource 类并实现 Configurable 和PollableSource 接口。
实现相应方法:
getBackOffSleepIncrement()//暂不用
getMaxBackOffSleepInterval()//暂不用
configure(Context context)//初始化 context(读取配置文件内容)
process()//获取数据封装成 event 并写入 channel,这个方法将被循环调用。
使用场景:读取 MySQL 数据或者其他文件系统。
2)需求
使用 flume 接收数据,并给每条数据添加前缀,输出到控制台。前缀可从 flume 配置文件中配置。
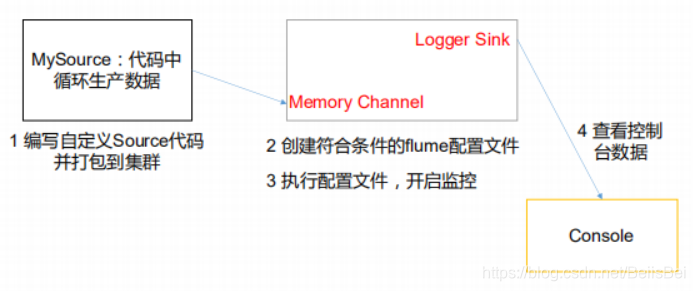
3)分析
4)编码
导入 pom 依赖
编写代码
import org.apache.flume.Context;
import org.apache.flume.EventDeliveryException;
import org.apache.flume.PollableSource;
import org.apache.flume.conf.Configurable;
import org.apache.flume.event.SimpleEvent;
import org.apache.flume.source.AbstractSource;
import java.util.HashMap;
public class MySource extends AbstractSource implements
Configurable, PollableSource {
//定义配置文件将来要读取的字段
private Long delay;
private String field;
//初始化配置信息
@Override
public void configure(Context context) {
delay = context.getLong(“delay”);
field = context.getString(“field”, “Hello!”);
}
@Override
public Status process() throws EventDeliveryException {
try {
//创建事件头信息
HashMap<String, String> hearderMap = new HashMap<>();
//创建事件
SimpleEvent event = new SimpleEvent();
//循环封装事件
for (int i = 0; i < 5; i++) {
//给事件设置头信息
event.setHeaders(hearderMap);
//给事件设置内容
event.setBody((field + i).getBytes());
//将事件写入 channel
getChannelProcessor().processEvent(event);
Thread.sleep(delay);
}
} catch (Exception e) {
e.printStackTrace();
return Status.BACKOFF;
}
return Status.READY;
}
@Override
public long getBackOffSleepIncrement() {
return 0;
}
@Override
public long getMaxBackOffSleepInterval() {
return 0;
} }
5)测试


1.打包
 将写好的代码打包,并放到 flume 的 lib 目录(/opt/module/flume)下。


2.配置文件
Name the components on this agent
a1.sources = r1
a1.sinks = k1
a1.channels = c1
Describe/configure the source
a1.sources.r1.type = com.atguigu.MySource
a1.sources.r1.delay = 1000
#a1.sources.r1.field = atguigu
Describe the sink
a1.sinks.k1.type = logger
Use a channel which buffers events in memory
a1.channels.c1.type = memory
a1.channels.c1.capacity = 1000
a1.channels.c1.transactionCapacity = 100
Bind the source and sink to the channel
a1.sources.r1.channels = c1
a1.sinks.k1.channel = c1
3.开启任务
[atguigu@hadoop102 flume]$ pwd
/opt/module/flume
[atguigu@hadoop102 flume]$ bin/flume-ng agent -c conf/ -f
job/mysource.conf -n a1 -Dflume.root.logger=INFO,console


既有适合小白学习的零基础资料,也有适合3年以上经验的小伙伴深入学习提升的进阶课程,涵盖了95%以上大数据知识点,真正体系化!
由于文件比较多,这里只是将部分目录截图出来,全套包含大厂面经、学习笔记、源码讲义、实战项目、大纲路线、讲解视频,并且后续会持续更新
.c1.capacity = 1000
a1.channels.c1.transactionCapacity = 100
Bind the source and sink to the channel
a1.sources.r1.channels = c1
a1.sinks.k1.channel = c1
3.开启任务
[atguigu@hadoop102 flume]$ pwd
/opt/module/flume
[atguigu@hadoop102 flume]$ bin/flume-ng agent -c conf/ -f
job/mysource.conf -n a1 -Dflume.root.logger=INFO,console
[外链图片转存中…(img-DeiEgwtr-1715095202548)]
[外链图片转存中…(img-2FiNC5xP-1715095202548)]
[外链图片转存中…(img-4Fe0gyk5-1715095202549)]
既有适合小白学习的零基础资料,也有适合3年以上经验的小伙伴深入学习提升的进阶课程,涵盖了95%以上大数据知识点,真正体系化!
由于文件比较多,这里只是将部分目录截图出来,全套包含大厂面经、学习笔记、源码讲义、实战项目、大纲路线、讲解视频,并且后续会持续更新


 313
313

 被折叠的 条评论
为什么被折叠?
被折叠的 条评论
为什么被折叠?
 到【灌水乐园】发言


