


//......
try {
    //启动一些系统引导服务
    startBootstrapServices(t);
    startCoreServices(t);
    startOtherServices(t);
} catch (Throwable ex) {
    Slog.e("System", "******************************************");
    Slog.e("System", "************ Failure starting system services", ex);
    throw ex;
} finally {
    t.traceEnd(); // StartServices
}
//......
// Loop forever.
Looper.loop();
throw new RuntimeException("Main thread loop unexpectedly exited");
}
在run方法中,调用了startBootstrapServices,启动一些系统的引导服务
private void startBootstrapServices(@NonNull TimingsTraceAndSlog t) {
// TODO: Might need to move after migration to WM.
ActivityTaskManagerService atm = mSystemServiceManager.startService(
        ActivityTaskManagerService.Lifecycle.class).getService();
mActivityManagerService = ActivityManagerService.Lifecycle.startService(
        mSystemServiceManager, atm);
mActivityManagerService.setSystemServiceManager(mSystemServiceManager);
mActivityManagerService.setInstaller(installer);
mWindowManagerGlobalLock = atm.getGlobalLock();
t.traceEnd();

// Set up the Application instance for the system process and get started.
t.traceBegin("SetSystemProcess");
mActivityManagerService.setSystemProcess();
t.traceEnd();
}
如果有看过之前插件化的伙伴们应该知道,ActivityTaskManagerService就是我们说的AMS,在这里就是将AMS服务启动了;在服务启动之后,调用setSystemProcess方法
public void setSystemProcess() {
try {
ServiceManager.addService(Context.ACTIVITY_SERVICE, this, /* allowIsolated= / true,
DUMP_FLAG_PRIORITY_CRITICAL | DUMP_FLAG_PRIORITY_NORMAL | DUMP_FLAG_PROTO);
ServiceManager.addService(ProcessStats.SERVICE_NAME, mProcessStats);
ServiceManager.addService(“meminfo”, new MemBinder(this), / allowIsolated= */ false,
DUMP_FLAG_PRIORITY_HIGH);
ServiceManager.addService(“gfxinfo”, new GraphicsBinder(this));
ServiceManager.addService(“dbinfo”, new DbBinder(this));
mAppProfiler.setCpuInfoService();
ServiceManager.addService(“permission”, new PermissionController(this));
ServiceManager.addService(“processinfo”, new ProcessInfoService(this));
ServiceManager.addService(“cacheinfo”, new CacheBinder(this));
    ApplicationInfo info = mContext.getPackageManager().getApplicationInfo(
            "android", STOCK_PM_FLAGS | MATCH_SYSTEM_ONLY);
    mSystemThread.installSystemApplicationInfo(info, getClass().getClassLoader());

    synchronized (this) {
        ProcessRecord app = mProcessList.newProcessRecordLocked(info, info.processName,
                false,
                0,
                new HostingRecord("system"));
        app.setPersistent(true);
        app.setPid(MY_PID);
        app.mState.setMaxAdj(ProcessList.SYSTEM_ADJ);
        app.makeActive(mSystemThread.getApplicationThread(), mProcessStats);
        addPidLocked(app);
        updateLruProcessLocked(app, false, null);
        updateOomAdjLocked(OomAdjuster.OOM_ADJ_REASON_NONE);
    }
} catch (PackageManager.NameNotFoundException e) {
    throw new RuntimeException(
            "Unable to find android system package", e);
}

// Start watching app ops after we and the package manager are up and running.
mAppOpsService.startWatchingMode(AppOpsManager.OP_RUN_IN_BACKGROUND, null,
        new IAppOpsCallback.Stub() {
            @Override public void opChanged(int op, int uid, String packageName) {
                if (op == AppOpsManager.OP_RUN_IN_BACKGROUND && packageName != null) {
                    if (getAppOpsManager().checkOpNoThrow(op, uid, packageName)
                            != AppOpsManager.MODE_ALLOWED) {
                        runInBackgroundDisabled(uid);
                    }
                }
            }
        });

final int[] cameraOp = {AppOpsManager.OP_CAMERA};
mAppOpsService.startWatchingActive(cameraOp, new IAppOpsActiveCallback.Stub() {
    @Override
    public void opActiveChanged(int op, int uid, String packageName, String attributionTag,
            boolean active, @AttributionFlags int attributionFlags,
            int attributionChainId) {
        cameraActiveChanged(uid, active);
    }
});
}
在这个方法中,调用了ServiceManager的addService方法,我们看下这个方法
public static void addService(String name, IBinder service, boolean allowIsolated,
int dumpPriority) {
try {
getIServiceManager().addService(name, service, allowIsolated, dumpPriority);
} catch (RemoteException e) {
Log.e(TAG, “error in addService”, e);
}
}
在这个方法中,会调用getIServiceManager方法,应该是获取一个service\_manager在Java层的实现。


### 1.2 Java层获取service\_manager对象


这个方法同样是一个单例,从这里开始的源码,我们需要跟native层的做联系了,因为它们实在是太像了!
private static IServiceManager getIServiceManager() {
if (sServiceManager != null) {
return sServiceManager;
}
// Find the service manager
sServiceManager = ServiceManagerNative
        .asInterface(Binder.allowBlocking(BinderInternal.getContextObject()));
return sServiceManager;
}
如果sServiceManager是空的,那么会调用ServiceManagerNative(service\_manager在native层的实现类)的asInterface方法


#### 1.2.1 BinderInternal.getContextObject()


首先我们先看入参BinderInternal.getContextObject(),是不是有点像native层的ProcessState中的getContextObject方法,native层最终返回了BpBinder对象,那么在Java层我们看下源码:
public static final native IBinder getContextObject();
我们发现这是个native方法,在jni层对应的方法为android\_os\_BinderInternal\_getContextObject
//http://androidxref.com/9.0.0_r3/xref/frameworks/base/core/jni/android_util_Binder.cpp
static jobject android_os_BinderInternal_getContextObject(JNIEnv* env, jobject clazz)
{
sp b = ProcessState::self()->getContextObject(NULL);//得到BpBinder对象
return javaObjectForIBinder(env, b);
}
首先调用了ProcessState中的getContextObject方法,返回了一个BpBinder对象;将其作为参数,传入javaObjectForIBinder方法中;
jobject javaObjectForIBinder(JNIEnv* env, const sp& val)
{
//…
BinderProxyNativeData* nativeData = gNativeDataCache;
if (nativeData == nullptr) {
    nativeData = new BinderProxyNativeData();
}
// gNativeDataCache is now logically empty.
jobject object = env->CallStaticObjectMethod(gBinderProxyOffsets.mClass,
        gBinderProxyOffsets.mGetInstance, (jlong) nativeData, (jlong) val.get());
if (env->ExceptionCheck()) {
    // In the exception case, getInstance still took ownership of nativeData.
    gNativeDataCache = nullptr;
    return NULL;
}
BinderProxyNativeData* actualNativeData = getBPNativeData(env, object);
if (actualNativeData == nativeData) {
    // New BinderProxy; we still have exclusive access.
    nativeData->mOrgue = new DeathRecipientList;
    nativeData->mObject = val;
    gNativeDataCache = nullptr;
    ++gNumProxies;
    if (gNumProxies >= gProxiesWarned + PROXY_WARN_INTERVAL) {
        ALOGW("Unexpectedly many live BinderProxies: %d\n", gNumProxies);
        gProxiesWarned = gNumProxies;
    }
} else {
    // nativeData wasn't used. Reuse it the next time.
    gNativeDataCache = nativeData;
}

return object;
}
在javaObjectForIBinder中,其实就是**创建了一个BinderProxy对象,并与BpBinder对象做了绑定**。


#### 1.2.2 ServiceManagerNative .asInterface
//--------ServiceManagerNative asInterface------------//
static public IServiceManager asInterface(IBinder obj)
{
if (obj == null) {
return null;
}
//这里返回的是空
IServiceManager in =
(IServiceManager)obj.queryLocalInterface(descriptor);
if (in != null) {
return in;
}
return new ServiceManagerProxy(obj);
}
其实asInterface方法跟我们之前介绍aidl一样,因为system\_server和service\_manager不是一个进程,要获取service\_manager肯定涉及到跨进程通信,因此调用queryLocalInterface返回就是null,因此asInterface返回的就是一个ServiceManagerProxy(BinderProxy)对象。
所以在Java层,调用getIServiceManager得到的就是ServiceManagerProxy对象,调用它的addService方法。
### 1.3 AMS注册服务
在Java层获取到service\_manager服务之后,我们就需要向sm注册服务,因此需要调用ServiceManagerProxy的addService方法,看源码:
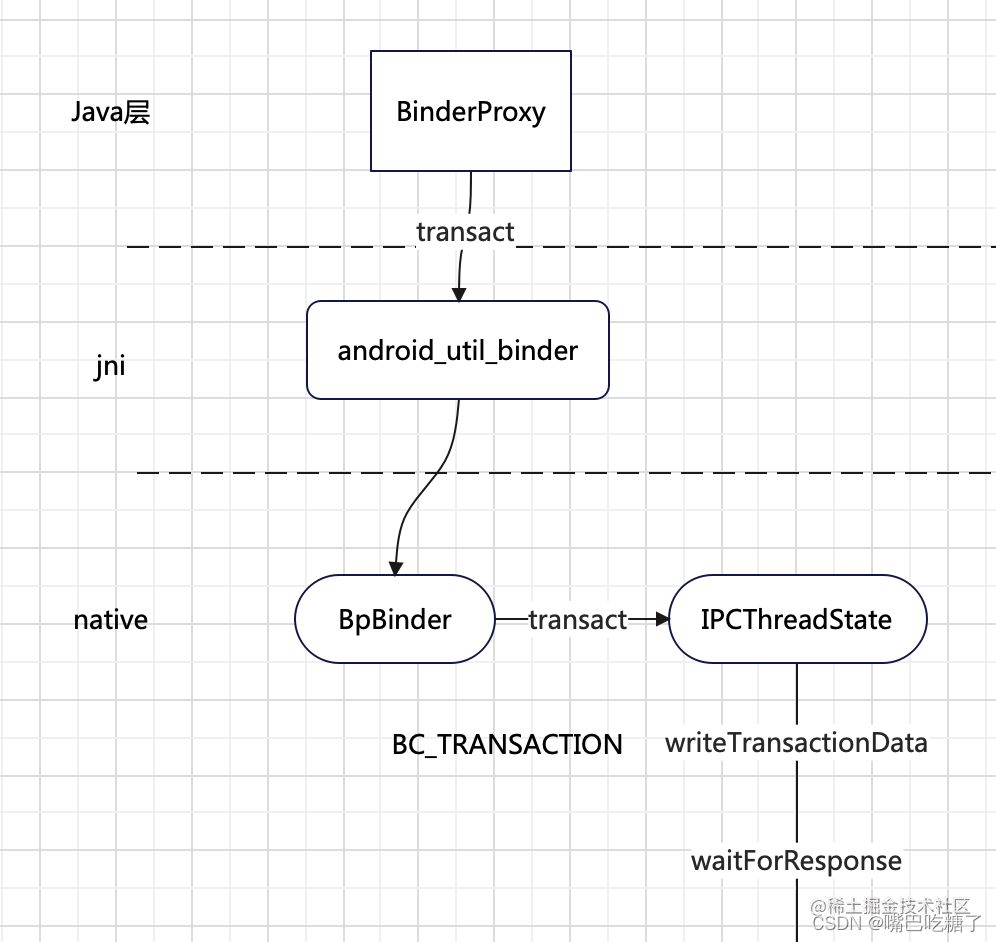
#### 1.3.1 BinderProxy – transact
public ServiceManagerProxy(IBinder remote) {
mRemote = remote;
}
public void addService(String name, IBinder service, boolean allowIsolated, int dumpPriority)
throws RemoteException {
Parcel data = Parcel.obtain();
Parcel reply = Parcel.obtain();
data.writeInterfaceToken(IServiceManager.descriptor);
data.writeString(name);
//将ams添加到data中打包
data.writeStrongBinder(service);
data.writeInt(allowIsolated ? 1 : 0);
data.writeInt(dumpPriority);
//核心代码
mRemote.transact(ADD_SERVICE_TRANSACTION, data, reply, 0);
reply.recycle();
data.recycle();
}
所以调用addService就是调用ServiceManagerProxy的addService方法,核心就是调用mRemote.transact,发送了一个指令ADD\_SERVICE\_TRANSACTION;mRemote就是BinderProxy,看下transact源码:
//-------BinderProxy transact----------//
public boolean transact(int code, Parcel data, Parcel reply, int flags) throws RemoteException {
//…
try {
return transactNative(code, data, reply, flags);
} finally {
}
}
核心就是调用了transactNative方法,这个方法是native方法,看下jni层是如何实现的
static jboolean android_os_BinderProxy_transact(JNIEnv* env, jobject obj,
jint code, jobject dataObj, jobject replyObj, jint flags) // throws RemoteException
{
//…
//获取到BpBinder对象
IBinder* target = getBPNativeData(env, obj)->mObject.get();
if (target == NULL) {
    jniThrowException(env, "java/lang/IllegalStateException", "Binder has been finalized!");
    return JNI_FALSE;
}
//调用BpBinder的transact方法
status_t err = target->transact(code, *data, reply, flags);
//if (reply) printf("Transact from Java code to %p received: ", target); reply->print();

if (kEnableBinderSample) {
    if (time_binder_calls) {
        conditionally_log_binder_call(start_millis, target, code);
    }
}

if (err == NO_ERROR) {
    return JNI_TRUE;
} else if (err == UNKNOWN_TRANSACTION) {
    return JNI_FALSE;
}

signalExceptionForError(env, obj, err, true /*canThrowRemoteException*/, data->dataSize());
return JNI_FALSE;
}
因为在创建BinderProxy的时候,将BpBinder保存在了mObject属性中,所以在jni层首先获取了BpBinder对象,然后调用了transact方法;
//--------BpBinder transact-------//
status_t BpBinder::transact(
uint32_t code, const Parcel& data, Parcel* reply, uint32_t flags)
{
// Once a binder has died, it will never come back to life.
if (mAlive) {
status_t status = IPCThreadState::self()->transact(
mHandle, code, data, reply, flags);
if (status == DEAD_OBJECT) mAlive = 0;
return status;
}
return DEAD_OBJECT;
}
在BpBinder的transact方法中,其实是调用了IPCThreadState的transact方法,在这个方法中,调用了writeTransactionData方法,写入传递的数据。
status_t IPCThreadState::transact(int32_t handle,
uint32_t code, const Parcel& data,
Parcel* reply, uint32_t flags)
{
status_t err;
flags |= TF_ACCEPT_FDS;

IF_LOG_TRANSACTIONS() {
    TextOutput::Bundle _b(alog);
    alog << "BC_TRANSACTION thr " << (void*)pthread_self() << " / hand "
        << handle << " / code " << TypeCode(code) << ": "
        << indent << data << dedent << endl;
}

LOG_ONEWAY(">>>> SEND from pid %d uid %d %s", getpid(), getuid(),
    (flags & TF_ONE_WAY) == 0 ? "READ REPLY" : "ONE WAY");
    //核心代码
err = writeTransactionData(BC_TRANSACTION, flags, handle, code, data, NULL);
//......
if (reply) {
    err = waitForResponse(reply);
} else {
    Parcel fakeReply;
    err = waitForResponse(&fakeReply);
}

return err;
}
注意这里传入的cmd命令是BC\_TRANSACTION,然后将命令写入了mOut;
status_t IPCThreadState::writeTransactionData(int32_t cmd, uint32_t binderFlags,
int32_t handle, uint32_t code, const Parcel& data, status_t* statusBuffer)
{
binder_transaction_data tr;
tr.target.ptr = 0; /* Don't pass uninitialized stack data to a remote process */
tr.target.handle = handle;
tr.code = code;
tr.flags = binderFlags;
tr.cookie = 0;
tr.sender_pid = 0;
tr.sender_euid = 0;

const status_t err = data.errorCheck();
if (err == NO_ERROR) {
    tr.data_size = data.ipcDataSize();
    tr.data.ptr.buffer = data.ipcData();
    tr.offsets_size = data.ipcObjectsCount()*sizeof(binder_size_t);
    tr.data.ptr.offsets = data.ipcObjects();
} else if (statusBuffer) {
    tr.flags |= TF_STATUS_CODE;
    *statusBuffer = err;
    tr.data_size = sizeof(status_t);
    tr.data.ptr.buffer = reinterpret_cast<uintptr_t>(statusBuffer);
    tr.offsets_size = 0;
    tr.data.ptr.offsets = 0;
} else {
    return (mLastError = err);
}

mOut.writeInt32(cmd);
mOut.write(&tr, sizeof(tr));

return NO_ERROR;
}
#### 1.3.2 talkWithDriver
在写入命令之后,调用了waitForResponse方法,等待响应,在这个方法中,首先调用了talkWithDriver方法
status_t IPCThreadState::waitForResponse(Parcel *reply, status_t *acquireResult)
{
uint32_t cmd;
int32_t err;
while (1) {
    if ((err=talkWithDriver()) < NO_ERROR) break;
    err = mIn.errorCheck();
    if (err < NO_ERROR) break;
    if (mIn.dataAvail() == 0) continue;

    cmd = (uint32_t)mIn.readInt32();

    IF_LOG_COMMANDS() {
        alog << "Processing waitForResponse Command: "
            << getReturnString(cmd) << endl;
    }

    switch (cmd) {
    case BR_TRANSACTION_COMPLETE:
        if (!reply && !acquireResult) goto finish;
        break;

    case BR_DEAD_REPLY:
        err = DEAD_OBJECT;
        goto finish;

    case BR_FAILED_REPLY:
        err = FAILED_TRANSACTION;
        goto finish;

    case BR_ACQUIRE_RESULT:
        {
            ALOG_ASSERT(acquireResult != NULL, "Unexpected brACQUIRE_RESULT");
            const int32_t result = mIn.readInt32();
            if (!acquireResult) continue;
            *acquireResult = result ? NO_ERROR : INVALID_OPERATION;
        }
        goto finish;

    case BR_REPLY:
        {
            binder_transaction_data tr;
            err = mIn.read(&tr, sizeof(tr));
            ALOG_ASSERT(err == NO_ERROR, "Not enough command data for brREPLY");
            if (err != NO_ERROR) goto finish;

            if (reply) {
                if ((tr.flags & TF_STATUS_CODE) == 0) {
                    reply->ipcSetDataReference(
                        reinterpret_cast<const uint8_t*>(tr.data.ptr.buffer),
                        tr.data_size,
                        reinterpret_cast<const binder_size_t*>(tr.data.ptr.offsets),
                        tr.offsets_size/sizeof(binder_size_t),
                        freeBuffer, this);
                } else {
                    err = *reinterpret_cast<const status_t*>(tr.data.ptr.buffer);
                    freeBuffer(NULL,
                        reinterpret_cast<const uint8_t*>(tr.data.ptr.buffer),
                        tr.data_size,
                        reinterpret_cast<const binder_size_t*>(tr.data.ptr.offsets),
                        tr.offsets_size/sizeof(binder_size_t), this);
                }
            } else {
                freeBuffer(NULL,
                    reinterpret_cast<const uint8_t*>(tr.data.ptr.buffer),
                    tr.data_size,
                    reinterpret_cast<const binder_size_t*>(tr.data.ptr.offsets),
                    tr.offsets_size/sizeof(binder_size_t), this);
                continue;
            }
        }
        goto finish;

    default:
        err = executeCommand(cmd);
        if (err != NO_ERROR) goto finish;
        break;
    }
}
finish:
if (err != NO_ERROR) {
if (acquireResult) *acquireResult = err;
if (reply) reply->setError(err);
mLastError = err;
}
return err;
}
既然方法名叫做talkWithDriver,那么肯定是要和binder驱动打交道了
status_t IPCThreadState::talkWithDriver(bool doReceive)
{
binder_write_read bwr;

// Is the read buffer empty?
const bool needRead = mIn.dataPosition() >= mIn.dataSize();

const size_t outAvail = (!doReceive || needRead) ? mOut.dataSize() : 0;

bwr.write_size = outAvail;
bwr.write_buffer = (uintptr_t)mOut.data();

// This is what we'll read.
if (doReceive && needRead) {
    bwr.read_size = mIn.dataCapacity();
    bwr.read_buffer = (uintptr_t)mIn.data();
} else {
    bwr.read_size = 0;
    bwr.read_buffer = 0;
}

// Return immediately if there is nothing to do.
if ((bwr.write_size == 0) && (bwr.read_size == 0)) return NO_ERROR;

bwr.write_consumed = 0;
bwr.read_consumed = 0;
status_t err;
do {
    IF_LOG_COMMANDS() {
        alog << "About to read/write, write size = " << mOut.dataSize() << endl;
    }
#if defined(ANDROID)
//①
if (ioctl(mProcess->mDriverFD, BINDER_WRITE_READ, &bwr) >= 0)
err = NO_ERROR;
else
err = -errno;
#else
err = INVALID_OPERATION;
#endif
if (mProcess->mDriverFD <= 0) {
err = -EBADF;
}
IF_LOG_COMMANDS() {
alog << "Finished read/write, write size = " << mOut.dataSize() << endl;
}
} while (err == -EINTR);


 883
883

 被折叠的 条评论
为什么被折叠?
被折叠的 条评论
为什么被折叠?
 到【灌水乐园】发言


