


在实际开发中,本地开发、测试服务、正式服务的配置信息有的地方是不一样的;比如本地测试log级别可能是debug,而正式环境下则为info;再比如数据库的配置,正式环境下和测试环境下是不一样的。以前我们通过手动更改这些配置来完成测试到正式的转移,但这样做还是有一定的风险,如果手动配置错误,则会导致很多错误。
Springboot给我们提供了一种方式,能够自动的切换正式环境配置及测试环境配置,下面就用一个小例子来演示一下如何进行配置信息的切换。
1、项目结构
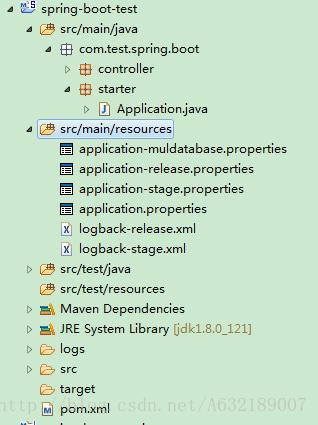
上面这张图是这个小例子项目的结构,通过Maven来构架出一个Springboot项目:
1. Application.java : 这个文件是Springboot的启动类,项目的启动是执行这个文件中的main方法。
2. HelloController.java : 这个文件是我们测试的一个请求Controller。
3. application.properties : Springboot项目启动读取的配置信息文件。
4. application-release.properties : 正式环境下使用的配置信息文件。
5. application-stage.properties : 测试环境下使用的配置信息文件。
6. logback-dev.xml : 正式环境下的log配置文件。
7. logback-stage.xml : 测试环境下的log配置文件。
2、配置文件
2.1 application.properties
# 服务端口
server.port=8081
# 激活哪个环境下的配置
spring.profiles.active=stageSpringboot的启动文件中这里我们只放置了两项配置,在实际使用中,该文件放置一些正式环境、测试环境都会用到的共同配置信息即可;这里着重讲解一下spring.profiles.active,这个配置项主要用于告诉服务使用哪个环境的配置,值为application-{profile}.properties 格式文件中的profile值,我们这个项目中值为:release、stage。
2.2 application-dev.properties
# 日志配置
logging.config=classpath:logback-release.xml

# 正式数据库配置
spring.datasource.url = jdbc:mysql://localhost:3306/test
spring.datasource.username = root
spring.datasource.password = 000000
spring.datasource.driverClassName = com.mysql.jdbc.Driver
spring.datasource.max-active=20
spring.datasource.max-idle=8
spring.datasource.min-idle=8
spring.datasource.initial-size=10
该文件是正式环境下使用的配置信息文件,这里我们配置了使用的log日志配置文件、数据库配置。
2.3 application-stage.properties
# 日志配置
logging.config=classpath:logback-stage.xml

# stage数据库配置
spring.datasource.url = jdbc:mysql://localhost:3306/test_2
spring.datasource.username = root
spring.datasource.password = 000000
spring.datasource.driverClassName = com.mysql.jdbc.Driver
spring.datasource.max-active=20
spring.datasource.max-idle=8
spring.datasource.min-idle=8
spring.datasource.initial-size=10
该文件是测试环境下使用的配置信息文件,这里我们配置了使用的log日志配置文件、数据库配置。
3、启动类
@SpringBootApplication
@Controller
@ComponentScan(basePackages={"com.test.spring.boot.controller"})    //自定义自动扫描
public class Application {

    public static void main(String[] args) {
        SpringApplication.run(Application.class, args);
    }
}
@ComponentScan(basePackages={“com.test.spring.boot.controller”}) 这行配置信息含义是:设置了自动扫描的包路径,即会扫描controller包下的bean,若有多个扫描包路径,可以以逗号分隔。
4、测试
4.1 HelloController
@RestController
public class HelloController {

    @Autowired
    private JdbcTemplate jdbcTemplate;

    @RequestMapping("/hello")
    @ResponseBody
    public String hello() {
        return "Hello " + getUsername();
    }

    private String getUsername() {
        String url = "select * from tb_user where id = ?";
        UserBean userBean = jdbcTemplate.query(url, new Object[]{1}, new ResultSetExtractor<UserBean>(){
            @Override
            public UserBean extractData(ResultSet resultSet) throws SQLException, DataAccessException {
                UserBean bean = new UserBean();
                while(resultSet.next()) {
                    bean.setId(resultSet.getInt("id"));
                    bean.setUsername(resultSet.getString("username"));
                    bean.setPhone(resultSet.getString("phone"));
                }
                return bean;
            }
        });
        return userBean.getUsername();
    }
}
这个Controller实现了一个REST的请求,访问 http://localhost:8081/hello可以请求到该Controller中,并访问数据库,查询到用户名,返回到客户端。
我们通过修改spring.profiles.active参数,访问测试数据库、正式数据库,以此来验证是否切换了不同的环境配置文件。
4.2 开始测试
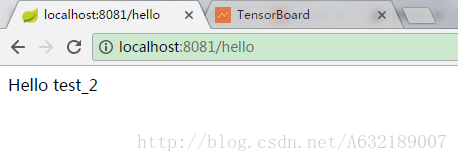
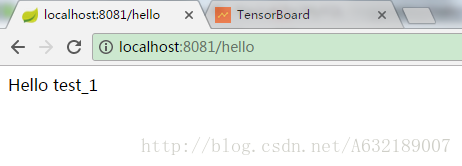
正式数据库中用户名为:test_1,测试数据库中用户名为:test_2
1、当spring.profiles.active配置为stage,访问http://localhost:8081/hello:
2、当spring.profiles.active配置为release,访问http://localhost:8081/hello:
大家可以动手测试测试,spring.profiles.active这个配置项不仅可以在application.properties文件中进行配置,还可以通过 java -jar 启动服务时添加到后面作为启动参数;这样也能够告诉服务使用哪个配置文件。


 5812
5812


 被折叠的 条评论
为什么被折叠?
被折叠的 条评论
为什么被折叠?
 到【灌水乐园】发言


