


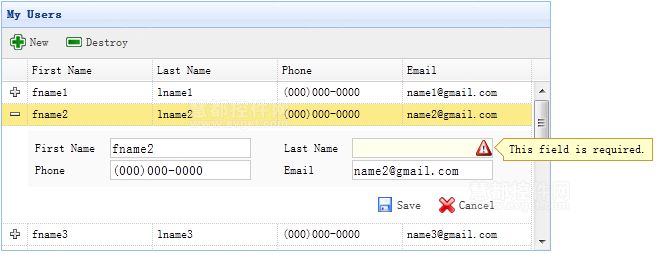
当切换datagrid视图到"detailview"时,用户可以展开一行来显示该行下面的任何详细信息。此功能允许用户为放置在行详细信息面板中的编辑表单提供恰当的布局。在本教程中,我们使用DataGrid组件来减少编辑表单所占用的空间。
Step 1:在HTML标记中创建DataGrid
|
1
2
3
4
5
6
7
8
9
10
11
12
13
14
15
16
17
|
<
table
id
=
"dg"
title
=
"My Users"
style
=
"width:550px;height:250px"
url
=
"get_users.php"
toolbar
=
"#toolbar"
fitColumns
=
"true"
singleSelect
=
"true"
>
<
thead
>
<
tr
>
<
th
field
=
"firstname"
width
=
"50"
>First Name</
th
>
<
th
field
=
"lastname"
width
=
"50"
>Last Name</
th
>
<
th
field
=
"phone"
width
=
"50"
>Phone</
th
>
<
th
field
=
"email"
width
=
"50"
>Email</
th
>
</
tr
>
</
thead
>
</
table
>
<
div
id
=
"toolbar"
>
<
a
href
=
"#"
class
=
"easyui-linkbutton"
iconCls
=
"icon-add"
plain
=
"true"
onclick
=
"newItem()"
>New</
a
>
<
a
href
=
"#"
class
=
"easyui-linkbutton"
iconCls
=
"icon-remove"
plain
=
"true"
onclick
=
"destroyItem()"
>Destroy</
a
>
</
div
>
|
Step 2:为DataGrid应用详细视图
|
1
2
3
4
5
6
7
8
9
10
11
12
13
14
15
16
17
18
19
20
|
$(
'#dg'
).datagrid({
view: detailview,
detailFormatter:
function
(index,row){
return
'<div class="ddv"></div>'
;
},
onExpandRow:
function
(index,row){
var
ddv = $(
this
).datagrid(
'getRowDetail'
,index).find(
'div.ddv'
);
ddv.panel({
border:
false
,
cache:
true
,
href:
'show_form.php?index='
+index,
onLoad:
function
(){
$(
'#dg'
).datagrid(
'fixDetailRowHeight'
,index);
$(
'#dg'
).datagrid(
'selectRow'
,index);
$(
'#dg'
).datagrid(
'getRowDetail'
,index).find(
'form'
).form(
'load'
,row);
}
});
$(
'#dg'
).datagrid(
'fixDetailRowHeight'
,index);
}
});
|
若要使用DataGrid的详细视图,那么就在html 页面头部引入"datagrid-detailview.js"文件。
我们使用"detailFormatter"函数来生成行详细信息内容。在这种情况下,我们返回一个用于放置编辑表单的空的 。当用户点击该行展开按钮("+")时,"onExpandRow"事件将被触发,我们可以通过AJAX加载编辑表单。使用getRowDetail方法可以获得该行的详细信息容器,因此我们能够查找到该行的详细信息面板。在行详细信息中创建面板,并从"show_form.php"中加载返回的编辑表单。
Step 3:创建编辑表单
从服务器中加载编辑表单。
show_form.php
|
1
2
3
4
5
6
7
8
9
10
11
12
13
14
15
16
17
18
19
20
|
<form method=
"post"
>
<table
class
=
"dv-table"
style=
"width:100%;background:#fafafa;padding:5px;margin-top:5px;"
>
<tr>
<td>First Name</td>
<td><input name=
"firstname"
class
=
"easyui-validatebox"
required=
"true"
></input></td>
<td>Last Name</td>
<td><input name=
"lastname"
class
=
"easyui-validatebox"
required=
"true"
></input></td>
</tr>
<tr>
<td>Phone</td>
<td><input name=
"phone"
></input></td>
<td>Email</td>
<td><input name=
"email"
class
=
"easyui-validatebox"
validType=
"email"
></input></td>
</tr>
</table>
<div style=
"padding:5px 0;text-align:right;padding-right:30px"
>
<a href=
"#"
class
=
"easyui-linkbutton"
iconCls=
"icon-save"
plain=
"true"
onclick=
"saveItem(<?php echo $_REQUEST['index'];?>)"
>Save</a>
<a href=
"#"
class
=
"easyui-linkbutton"
iconCls=
"icon-cancel"
plain=
"true"
onclick=
"cancelItem(<?php echo $_REQUEST['index'];?>)"
>Cancel</a>
</div>
</form>
|
Step 4:保存或取消编辑
调用"saveItem"函数来保存用户,或调用"cancelItem"函数来取消编辑。
|
1
2
3
4
5
6
7
8
9
10
11
12
13
14
15
16
17
18
19
|
function
saveItem(index){
var
row = $(
'#dg'
).datagrid(
'getRows'
)[index];
var
url = row.isNewRecord ?
'save_user.php'
:
'update_user.php?id='
+row.id;
$(
'#dg'
).datagrid(
'getRowDetail'
,index).find(
'form'
).form(
'submit'
,{
url: url,
onSubmit:
function
(){
return
$(
this
).form(
'validate'
);
},
success:
function
(data){
data = eval(
'('
+data+
')'
);
data.isNewRecord =
false
;
$(
'#dg'
).datagrid(
'collapseRow'
,index);
$(
'#dg'
).datagrid(
'updateRow'
,{
index: index,
row: data
});
}
});
}
|
确定首先要发布哪一个URL,然后查找表单对象,并调用"submit"方法来提交表单数据。当数据保存成功后,收起并更新行数据。
|
1
2
3
4
5
6
7
8
|
function
cancelItem(index){
var
row = $(
'#dg'
).datagrid(
'getRows'
)[index];
if
(row.isNewRecord){
$(
'#dg'
).datagrid(
'deleteRow'
,index);
}
else
{
$(
'#dg'
).datagrid(
'collapseRow'
,index);
}
}
|
当取消编辑操作时,如果该行是新行而且还没有保存,那么直接删除该行,否则收起该行。
下载EasyUI示例:easyui-crud-demo.zip


 1014
1014

 被折叠的 条评论
为什么被折叠?
被折叠的 条评论
为什么被折叠?
 到【灌水乐园】发言


