前面的文章分析记录了Android系统启动从最初的init内核加载到native方式的zygote即app_process的启动。之前深入理解Android一书说过“zygote本身是一个Native的应用程序,与驱动,内核等均无关系”,“zygote是在Android系统中创建了Java世界”。可以说zygote把东西从内核引渡到了framework层。zygote本身实现了appRuntime里面的几个函数,创建启动了Dalvik虚拟机,注册套接字响应请求,进行预装载类和资源,fork了一个SystemServer而后将线索引入到了Java地界。
下面就SystemServer流程进行整理记录。首先回到起始点,ZygoteInit中的主函数。
// 完成初始化.
            SamplingProfilerIntegration.writeZygoteSnapshot();

            // 初始化垃圾回收GC
            gc();

            //不再继续跟踪监测.
            Trace.setTracingEnabled(false);
//调用startSystemServer函数
            if (startSystemServer) {
                startSystemServer(abiList, socketName);
            }
//日志输出
            Log.i(TAG, "Accepting command socket connections");

/////////////////////////////////////
//函数如下
//其中参数abilist作用在fork的子进程上
 private static boolean startSystemServer(String abiList, String socketName)
            throws MethodAndArgsCaller, RuntimeException {
        long capabilities = posixCapabilitiesAsBits(
            OsConstants.CAP_BLOCK_SUSPEND,
            OsConstants.CAP_KILL,
            OsConstants.CAP_NET_ADMIN,
            OsConstants.CAP_NET_BIND_SERVICE,
            OsConstants.CAP_NET_BROADCAST,
            OsConstants.CAP_NET_RAW,
            OsConstants.CAP_SYS_MODULE,
            OsConstants.CAP_SYS_NICE,
            OsConstants.CAP_SYS_RESOURCE,
            OsConstants.CAP_SYS_TIME,
            OsConstants.CAP_SYS_TTY_CONFIG
        );
        /* 装载各种参数来启动system server,uid为1000,groups里面1001,1002。。。 */
        String args[] = {
            "--setuid=1000",
            "--setgid=1000",
            "--setgroups=1001,1002,1003,1004,1005,1006,1007,1008,1009,1010,1018,1032,3001,3002,3003,3006,3007",
            "--capabilities=" + capabilities + "," + capabilities,
            "--runtime-init",
            "--nice-name=system_server",
            "com.android.server.SystemServer",
        };
        ZygoteConnection.Arguments parsedArgs = null;
//进程的id,返回判断用
        int pid;

        try {
            parsedArgs = new ZygoteConnection.Arguments(args);
            ZygoteConnection.applyDebuggerSystemProperty(parsedArgs);
            ZygoteConnection.applyInvokeWithSystemProperty(parsedArgs);

            /* 调用Zygoted的函数fork system server */
            pid = Zygote.forkSystemServer(
                    parsedArgs.uid, parsedArgs.gid,
                    parsedArgs.gids,
                    parsedArgs.debugFlags,
                    null,
                    parsedArgs.permittedCapabilities,
                    parsedArgs.effectiveCapabilities);
        }
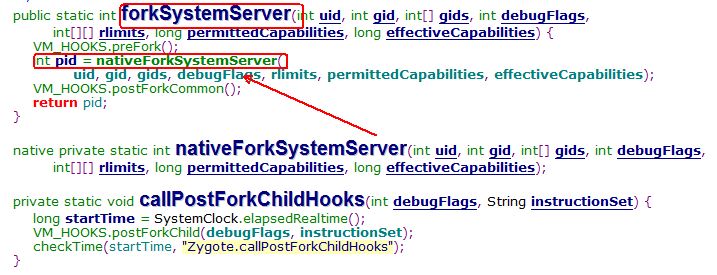
startSystemServer装填好各种参数后调用了Zygote类的forkSystemServer。在Zygote.java中看到如图:

在native的函数的前后,存在着VM_HOOKS的两个函数。这两个函数主要是前面清理障碍,后面进行善后,去寻找代码。如下:
//停止各个daemon,等待所有线程停止,native层调用fork
public void preFork() {
        Daemons.stop();
        waitUntilAllThreadsStopped();
        token = nativePreFork();
    }

    //启动,子进程启动daemons,即SystemServer
    public void postForkCommon() {
        Daemons.start();
    }
当fork后的进程pid为0时,即为子进程SystemServer时,对其要干个活进行分工。
/* For child process */
        if (pid == 0) {
            if (hasSecondZygote(abiList)) {
                waitForSecondaryZygote(socketName);
            }
/*SystemServer进程开始准备干活*/
            handleSystemServerProcess(parsedArgs);
        }
干活前准备分为几部分。
1,关闭从zygote过来的套接字。
2,设置参数,配置好启动路径。
3,根据参数启动RuntimeInit。
RuntimeInit中都干了什么,如下代码所示:
  public static final void zygoteInit(int targetSdkVersion, String[] argv, ClassLoader classLoader)
            throws ZygoteInit.MethodAndArgsCaller {
        if (DEBUG) Slog.d(TAG, "RuntimeInit: Starting application from zygote");
//重定向log流
        redirectLogStreams();
//常规的初始化,主要是soket,http网络初始化
        commonInit();
//native层初始化
        nativeZygoteInit();
//应用层初始化,虚拟机堆的大小,目标SDK版本,以及......        applicationInit(targetSdkVersion, argv, classLoader);
    }
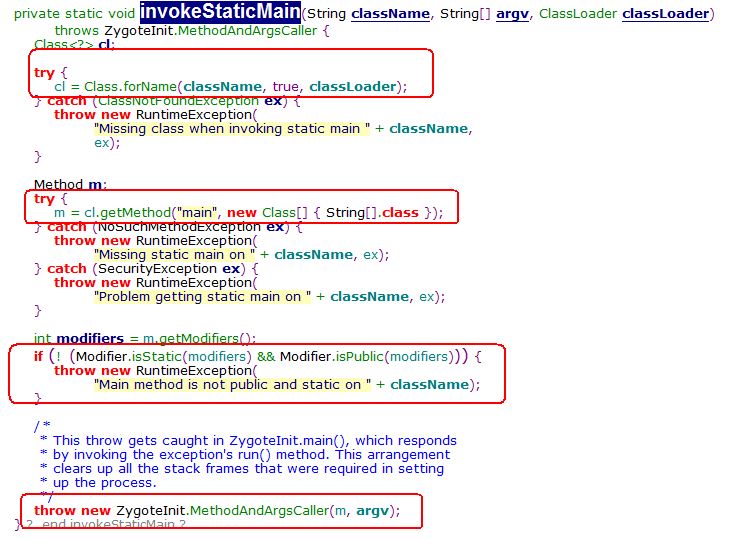
对application的初始化最重要的就是最后要调用的invokeStaticMain(class,args)。因为通过它,就可以找到启动SystemServer的主函数。
第一个框是利用java反射机制去寻找main函数,第二个框则是调用找到符合的那个main函数。第三个框是方法的一些条件判断。第四个框则为抛出异常,异常将会在ZygoteInit的main函数里被捕获。
书中说抛出这个异常将导致SystemServer类的main函数被调用,而不是直接在invokeStaticMian函数里调用,而采取抛异常方法。作者对这个问题的看法为:”调用发生在ZygoteInit的main函数中,即入口函数,位于栈的顶层。如果不采用抛异常的方式,而是在invokeStaticMain那里调用,则会浪费之前函数调用所占用的一些调用堆栈。“
相比较Android5.0的源码,SystemServer的启动则简化了没有以前那么曲折了,main函数如下:
 public static void main(String[] args) {
        new SystemServer().run();
    }
其余操作都封装在构造函数以及调用的run函数上。run函数里面要写入一些虚拟机的设置,binder通信有没有建立的监测,准备main looper 线程、初始化native服务(即导入native的lib库),初始化系统环境,创建SystemServiceManager,开启各项服务,进行消息循环并处理消息。
代码如下:
    /**
     * The main entry point from zygote.
     * 主入口
     */
    public static void main(String[] args) {
        new SystemServer().run();
    }

 private void run() {
    //检测系统时间
        // If a device's clock is before 1970 (before 0), a lot of
        // APIs crash dealing with negative numbers, notably
        // java.io.File#setLastModified, so instead we fake it and
        // hope that time from cell towers or NTP fixes it shortly.
        if (System.currentTimeMillis() < EARLIEST_SUPPORTED_TIME) {
            Slog.w(TAG, "System clock is before 1970; setting to 1970.");
            SystemClock.setCurrentTimeMillis(EARLIEST_SUPPORTED_TIME);
        }
        Slog.i(TAG, "Entered the Android system server!");
        EventLog.writeEvent(EventLogTags.BOOT_PROGRESS_SYSTEM_RUN, SystemClock.uptimeMillis());
SystemProperties.set("persist.sys.dalvik.vm.lib.2", VMRuntime.getRuntime().vmLibrary());
//启动分析设备
        // Enable the sampling profiler.
        if (SamplingProfilerIntegration.isEnabled()) {
            SamplingProfilerIntegration.start();
            mProfilerSnapshotTimer = new Timer();
            mProfilerSnapshotTimer.schedule(new TimerTask() {
                @Override
                public void run() {
                    SamplingProfilerIntegration.writeSnapshot("system_server", null);
                }
            }, SNAPSHOT_INTERVAL, SNAPSHOT_INTERVAL);
        }
//获取更多内存
        // Mmmmmm... more memory!
        VMRuntime.getRuntime().clearGrowthLimit();

        // The system server has to run all of the time, so it needs to be
        // as efficient as possible with its memory usage.
        VMRuntime.getRuntime().setTargetHeapUtilization(0.8f);
//系统的属性配置Fingerprint
        // Some devices rely on runtime fingerprint generation, so make sure
        // we've defined it before booting further.
        Build.ensureFingerprintProperty();
//设置用户环境需求
        // Within the system server, it is an error to access Environment paths without
        // explicitly specifying a user.
        Environment.setUserRequired(true);
//保证binder具有高优先级
        // Ensure binder calls into the system always run at foreground priority.
        BinderInternal.disableBackgroundScheduling(true);
//开启looper的主线程
        // Prepare the main looper thread (this thread).
        android.os.Process.setThreadPriority(
                android.os.Process.THREAD_PRIORITY_FOREGROUND);
        android.os.Process.setCanSelfBackground(false);
        Looper.prepareMainLooper();
//加载libandroid_servers.so库
        // Initialize native services.
        System.loadLibrary("android_servers");
//native层初始化
        nativeInit();

        // Check whether we failed to shut down last time we tried.
        // This call may not return.
        performPendingShutdown();
//初始化系统上下文环境
        // Initialize the system context.
        createSystemContext();
//创建系统服务管理者
        // Create the system service manager.
        mSystemServiceManager = new SystemServiceManager(mSystemContext);
        LocalServices.addService(SystemServiceManager.class, mSystemServiceManager);
//启动各项服务
        // Start services.
        try {
        //开启activity 服务,power服务等
            startBootstrapServices();
                //开启屏幕服务,电池服务,application状态服务
            startCoreServices();
        //开启电话注册服务,输入管理者,窗口管理者
            startOtherServices();
        } catch (Throwable ex) {
            Slog.e("System", "******************************************");
            Slog.e("System", "************ Failure starting system services", ex);
            throw ex;
        }
//日志信息供分析使用
        // For debug builds, log event loop stalls to dropbox for analysis.
        if (StrictMode.conditionallyEnableDebugLogging()) {
            Slog.i(TAG, "Enabled StrictMode for system server main thread.");
        }
        // Loop forever.
//进行消息循环,处理消息。
        Looper.loop();
        throw new RuntimeException("Main thread loop unexpectedly exited");
    }
System Service Manager的成功创建将会引领系统走向成功。即home activity。整个系统流程也就完成了。


 1656
1656

 被折叠的 条评论
为什么被折叠?


