


尽量用相对布局和线性布局
最好不要用相对布局
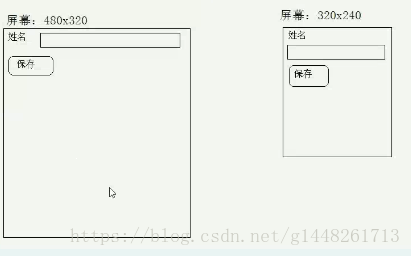
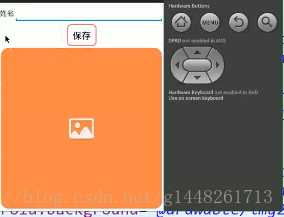
为了更好地适配我们用九图 画图
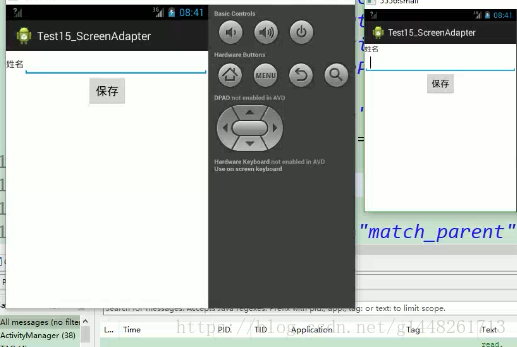
列如:480x320 和 320x240
<LinearLayout xmlns:android="http://schemas.android.com/apk/res/android"
xmlns:tools="http://schemas.android.com/tools"
android:layout_width="match_parent"
android:layout_height="match_parent"
android:orientation="vertical"
tools:context="${relativePackage}.${activityClass}" >
<LinearLayout
android:layout_width="match_parent"
android:layout_height="wrap_content"
android:orientation="horizontal"
>
<TextView
android:layout_width="@dimen/x160"
android:layout_height="wrap_content"
android:text="姓名"
android:textSize="20sp"
/>
<EditText
android:layout_width="match_parent"
android:layout_height="wrap_content"
        />
</LinearLayout>
<Button
    android:layout_width="wrap_content"
    android:layout_height="wrap_content"
    android:text="保存"
   android:background="@drawable/img1"
    android:layout_gravity="center_horizontal"
    />
 <ImageView
    android:layout_width="match_parent"
    android:layout_height="match_parent"
    android:background="@drawable/img2"
     />
</LinearLayout>
···
320x240 的代码
···
<LinearLayout xmlns:android="http://schemas.android.com/apk/res/android"
xmlns:tools="http://schemas.android.com/tools"
android:layout_width="match_parent"
android:layout_height="match_parent"
android:orientation="vertical"
tools:context="${relativePackage}.${activityClass}" >
<TextView
    android:layout_width="@dimen/x160"
    android:layout_height="wrap_content"
    android:text="姓名"
    android:textSize="20sp"
    android:background="#00ff00"
    />

<EditText
    android:layout_width="match_parent"
    android:layout_height="wrap_content" />

<Button
    android:layout_width="wrap_content"
    android:layout_height="wrap_content"
    android:layout_gravity="center_horizontal"
    android:text="保存"
    android:background="@drawable/img1"
    />
<ImageView
    android:layout_width="match_parent"
    android:layout_height="match_parent"
    android:background="@drawable/img2"

    />
</LinearLayout>
————————————————————————————————————————————————————————
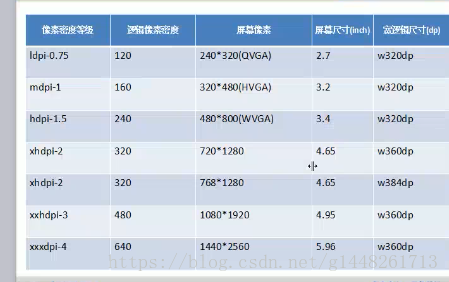
手机屏幕分类和像素密度的对应关系:
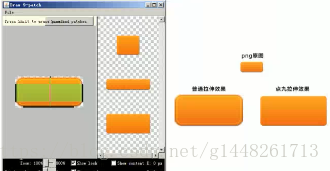
点九 自动拉伸图:
————————————————————————————————————————————————————————
总结:
1、 IP拨号器
写一个类继承BroadcastReceiver,重写onReceive方法
清单文件中注册receiver节点,通过intent-filter指定当前广播接收者要处理的广播事件
2、 SD卡状态监听
需要监听挂载和卸载的action
SD卡状态变化的广播还需要加一个data,scheme是file,否则收不到广播
同一个广播接收者接收了多个广播事件,可以通过action来区分
3、 短信监听
1.需要监听的action:
<action android:name="android.provider.Telephony.SMS_RECEIVED"/>
广播接收者按例:
1.卸载安装
2.开机启动
***应用安装卸载的广播************
创建一个类
···
//应用安装卸载的广播接收器
public class AppInstall extends BroadcastReceiver{
@Override
public void onReceive(Context context, Intent intent) {
String action = intent.getAction();
//获取应用的包名
Uri data=intent.getData();
if ("android.intent.action.PACKAGE_ADDED".equals(action)) {
Log.e("TAG", "install----->" +data);
} else if("android.intent.action.PACKAGE_REMOVED".equals(action)) {
Log.e("TAG", "removed---->" +data);
}
}
}
···
清单文件注册:
···
<receiver android:name=".AppInstall">
<intent-filter >
<action android:name="android.intent.action.PACKAGE_ADDED"/>
<action android:name="android.intent.action.PACKAGE_REMOVED"/>
<data android:scheme="package"/>
</intent-filter>
</receiver>
···
************开机*********
···
//开机启动的广播接收者
public class BootReceiver extends BroadcastReceiver{
@Override
public void onReceive(Context context, Intent intent) {
         Log.e("TAG", "机器开机了")  ;
         Intent intent2 = new Intent(context,MainActivity.class);
         //指定任务栈   现在是在广播接收者中创建一个Activity
         //当前应用没有任何Activity运行  所以不在一个任务栈
         //需要通过指定一个Flags 在创建Activity的同时创建任务栈
         intent2.setFlags(Intent.FLAG_ACTIVITY_NEW_TASK);

         context.startActivity(intent2);


}
}
···
在****MainActivity**************
···
public class MainActivity extends Activity {
EditText et_code;
BroadcastReceiver receiver;
@Override
protected void onCreate(Bundle savedInstanceState) {
super.onCreate(savedInstanceState);
setContentView(R.layout.activity_main);
et_code=(EditText) findViewById(R.id.et_code);
     receiver=new CodeRecerive();

    IntentFilter filter=new IntentFilter();
    filter.addAction("com.krr.getcode");
    registerReceiver(receiver, filter);
}
//屏蔽返回键
@Override
public void onBackPressed() {

}
private class CodeRecerive extends BroadcastReceiver{

    @Override
    public void onReceive(Context context, Intent intent) {
        String code=intent.getStringExtra("code");
        et_code.setText(code);

    }

}
@Override
    protected void onDestroy() {
    unregisterReceiver(receiver);
    }
}
···
同样在清单文件里注册:
···
<receiver android:name=".BootReceiver">
<intent-filter >
<action android:name="android.intent.action.BOOT_COMPLETED"/>
        </intent-filter>
    </receiver>
···
接收开机广播的权限
<uses-permission android:name="android.permission.RECEIVE_BOOT_COMPLETED"/>
开机广播不是点击图标打开Activtiy
这时不会创建任务栈 需要我们自己创建任务栈
Intent i =new Intent ();
i.setFlags(Intent.FLAG_ACTIVITY_NEW_TASK);
屏蔽返回键 在Activity中
重写onBackPressed()方法
————————————————————————————————————————————————————————
1、 发送无序广播:创建Intent,设置action,通过sendBroadcast(intent)就可以把广播发出去,当前的设备上只要有广播接收者注册了相同的action,就可以收到广播,并且在发广播的时候,可以通过Intent传递数据
2、接收无序广播:注册广播接收者,指定对应的action,就可以收到这个广播
接收的顺序 是否可以中断 发送的方法
有序广播 可以通过priority设置接收顺序 abortBroadcast()可以中断 sendOrderedBroadcast()
无序广播 大家一起收到 不可以中断 sendBroadcast()
3、如何区分有序广播和无序广播?
接收到广播之后在onReceive方法中调用abortBroadcast()方法,如果没有异常说明是有序广播,如果报BroadcastReceiver trying to return result during a non-ordered broadcast异常说明是无序广播
无序广播
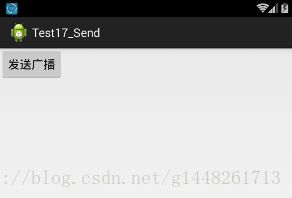
创建一个发送广播项目和接收广播项目
在发送广播项目里首先定义布局:
布局:
<Button
    android:layout_width="wrap_content"
    android:layout_height="wrap_content"
    android:text="发送广播"
    android:onClick="send"
    />
MainActivity
···
public class MainActivity extends Activity {
@Override
protected void onCreate(Bundle savedInstanceState) {
    super.onCreate(savedInstanceState);
    setContentView(R.layout.activity_main);
}
public void send(View v){
    Intent intent = new Intent();
    intent.setAction("com.krr.broadcast");
    intent.putExtra("key", "Hello");
    sendBroadcast(intent);

}
}
···
接收广播
首先创建一个类
···
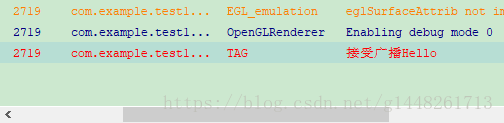
//接受自定义广播
public class CustomRecevier extends BroadcastReceiver{
@Override
public void onReceive(Context context, Intent intent) {
     Log.e("TAG", "接受广播"+intent.getStringExtra("key"));
}
}
···
广播接收器需要在清单文件里注册的
清单文件
···
<receiver android:name=".CustomRecevier">
<intent-filter >
<action android:name="com.krr.broadcast"/>
</intent-filter>
</receiver>
···
————————————————————————————————————————————————————————
有序发送广播
首先创建一个发送项目和接收项目
在布局中
···
<Button
android:layout_width="wrap_content"
android:layout_height="wrap_content"
android:text="发广播"
android:onClick="send"
/>
···
MainActivity中
···
public class MainActivity extends Activity {
@Override
protected void onCreate(Bundle savedInstanceState) {
    super.onCreate(savedInstanceState);
    setContentView(R.layout.activity_main);
}
public void send(View v){
    Intent intent = new Intent();//通过intent携带数据
    intent.setAction("com.krr.sendrice");
    //收到广播时需要的权限
    String receiverPermission=null;
    //作为最终的广播接收者
    BroadcastReceiver resultReceiver =null;
    //处理最终的广播接收者用到Handler 如果传null会在主线程处理
    Handler scheduler=null;
    //初始化数据
    String initialData="每人100斤";

    sendOrderedBroadcast(intent, receiverPermission,
resultReceiver, scheduler, Activity.RESULT_OK,
   initialData, null);//发送有序广播

}
}
···
有序接收者 我们需要创建多个接收者看谁先谁后
这里我创建3个
代码如下:
//州
public class StateRecevice extends BroadcastReceiver{
@Override
public void onReceive(Context context, Intent intent) {
    String resultData=getResultData();//获取数据
    Toast.makeText(context, resultData, Toast.LENGTH_SHORT).show();
    setResultData("现在每人60斤");
//  abortBroadcast();//终止广播继续发送   只有有序广播可以中断

}
}
第2个 接收者
···
//市
public class CityRecevice extends BroadcastReceiver{
@Override
public void onReceive(Context context, Intent intent) {
    String resultData=getResultData();//获取数据
    Toast.makeText(context, resultData, Toast.LENGTH_SHORT).show();
    setResultData("现在每人40斤");

}
}
···
第3个
···
//县
public class TownRecevice extends BroadcastReceiver{
@Override
public void onReceive(Context context, Intent intent) {
    String resultData=getResultData();//获取数据
    Toast.makeText(context, resultData, Toast.LENGTH_SHORT).show();
    setResultData("免除个人所得税");

}
}
···
都在清单文件里注册
···
<activity
android:name=".MainActivity"
android:label="@string/app_name" >
<intent-filter>
<action android:name="android.intent.action.MAIN" />
            <category android:name="android.intent.category.LAUNCHER" />
        </intent-filter>
    </activity>
    <receiver android:name=".StateRecevice">
        <intent-filter android:priority="1000" >
            <action android:name="com.krr.sendrice"/>
        </intent-filter>
    </receiver>
    <receiver android:name=".CityRecevice">
        <intent-filter android:priority="800" >
            <action android:name="com.krr.sendrice"/>
        </intent-filter>
    </receiver>
    <receiver android:name=".TownRecevice">
        <intent-filter android:priority="500" >
            <action android:name="com.krr.sendrice"/>
        </intent-filter>
    </receiver>
</application>


优先级高的有权中断 :
调用abortBroadcast();
方法
只有有序广播可以中断
有序广播的resultReceiver 作为最后的广播接收者
我们在发送广播中创建一个类Final 不需要清单文件注册 需要在MainActivity 中 new出来
···
//钦差大臣
public class Final extends BroadcastReceiver{
@Override
public void onReceive(Context context, Intent intent) {
      String resultData =getResultData();

//  Toast.makeText(context, "final:", + resultData,Toast.LENGTH_SHORT).show();
}
}
···
final最后执行


 3106
3106


 被折叠的 条评论
为什么被折叠?
被折叠的 条评论
为什么被折叠?
 到【灌水乐园】发言


