


参考网站:http://mdtux89.github.io/2015/12/11/torch-tutorial.html
Preamble
As you probably know, there are many Neural Network libraries out there. When I started working with NNs, I first learned (by which I mean I skimmed through the tutorial and ran the getting-started examples) Theano/Lasagne and then, as I wanted something more high-level, Pylearn2. The problem with Pylearn2 is that there are currently no active developers on the project. Moreover, it seemed very obscure to me how to implement recurrent architectures such as RNNs and LSTMs, which I needed. So I decided to migrate to Torch7. I’ve always loved the “Hello World” approach when learning a new programming language so that is the approach I’m going to follow: think of this post as a quick way to getting started with it. If you are looking for a complete and structured study of all Torch features and peculiarities, this is definitely not what you are looking for and you should jump straight to learn it properly (or read any of the other tutorials already available on the web).
Prerequisites
- It’s not a good idea to start using NNs if you don’t know what they are: it is quite hard to understand what the hell they are learning even when you know the theory, so learn that first!
- You need to be willing to give up Python and use Lua (although wrappers exist for using Lua from Python and vice versa). Don’t be scared, Lua is very easy.
Lua
This is just a very quick introduction to Lua, but it’s enough to start playing with Torch.
Comments
-- A one-line comment
[[ A multiple-line
comment ]]
Data structures
There are only two data structures: doubles and tables. A table is a structure that allows you to store multiple values and can be used as a dictionary as well as a list.
-- doubles
var = 10 -- variables are global by default
local var2 = 10 -- this is a local variable

-- tables
dict = {a = 1, b = 2, c = 3} -- a simple dictionary
list = {1,2,3} -- a simple list

-- two prints that display the same value
print(dict.a)
print(list[1]) -- IMPORTANT: note that the lists are 1-indexed!
Control flow statements
for i=1,10 do
  if i == 1 then
    print("one")
  elseif i == 2 then
    print("two")
  else
    print("something else")
  end
end

val = 1
while val < 10 do
  val = val * 2
end
Functions
function add_23(n)
  return n + 23
end

print(add_23(7)) -- prints 30
Functions can also be defined within tables:
tab = {1,3,4}
function tab.sum ()
  c = 0
  for i=1,#tab do
    c = c + tab[i]
  end
  return c
end

print(tab:sum()) -- displays 8 (the colon is used for calling methods)
Input/Output
I/O on file:
file = io.open("test.txt", "w")
for line in io.lines("~/input.txt") do
  file:write(line + "\n") -- write on file
end
I/O on stdin and stdout:
input_val = io.read()
io.write("You said: " .. input_val + "\n")
-- alternatively: print ("You said: " .. input_val)
Torch
First of all, install Torch (you may need to install some additional software, e.g., cmake):
git clone https://github.com/torch/distro.git ~/torch --recursive
cd ~/torch
./install.sh
source ~/.bashrc # source ~/.profile for Macs
If you now type:
th you should see the Torch interpreter, which understands only Lua code. You can exit with Ctrl+C.
If you want to run a Lua/Torch script, just type:
th name-of-your-script.lua Now, to write actual Torch code, you need to import the torch package in your Lua script:
require 'torch'The one Torch feature you absolutely need to know is the torch.Tensor data structure. A tensor (as you may know) is a generalization of scalars and vectors. Any Torch data is a torch.Tensor, so let’s see how to use it:
a = torch.Tensor(1) -- a scalar
b = torch.Tensor(2,1) -- a vector (2 rows, 1 column)
c = torch.Tensor(2,2) -- a 2D vector (2 rows, 2 columns)
[[ Note that 'a','b' and 'c' contain garbage values at this moment ]]

a[1] = 10 -- now 'a' is a tensor containing an actual value, i.e. 10.
d = torch.rand(2,2) -- this is a 2D vector (2x2) with random values.
e = d:t() -- 'e' is the transpose of 'd'
The nn package
nn is the Neural Networks package. So what do we need to train and test a NN?
- Model. Do we want a feedforward network, a convolutional network, a recurrent network, a recursive one? How many layers? How many units for each layer? Which activation function do we want to use on each layer? Do we want to use dropouts to reduce overfitting?
- Training. We want two things: an algorithm (e.g., Stochastic Gradient Descent) and a loss function (called Criterion in Torch) to optimize.
- Data. This is the most important part: no data, no fun.
- Prediction and Evaluation. Finally, we need to be able to use the trained model to make predictions and assess its performance on a test dataset.
Before starting, a small note on passing hyperparameters. Hyperparameter tuning (such as the choice of the number of layers, units, so on and so forth) is very important when running experiments with NNs so we don’t want to change the script every time we change one. We can specify them as command line options (with default values, of course):
cmd = torch.CmdLine()
cmd:text()
cmd:text('Options for my NN')
cmd:option('-units', 10,'units in the hidden layer')
cmd:option('-learningRate', 0.1, 'learning rate')
-- etc...
cmd:text()
opt = cmd:parse(arg)
Model
The package defines different containers, which determine how the input data is fed into the layers and how the final output data is computed. For example, we might want to feed each column of a 2D torch Tensor to a different layer (container nn.Parallel), or we may like to apply the same input to different layers and then concatenate the output (container nn.Concat). The easiest case is when we just want a fully-connected feed-forward network (container nn.Sequential). In this case we will have something like this:
require 'nn'
mlp = nn.Sequential()
Now, let’s say we need two hidden feedforward layers. The functionality of a simple feedforward layer is given by the module nn.Linear, which simply applies a linear transformation to the input data. Neural networks are good at learning non-linear representation of the input data. Therefore, we usually want to apply some sort of non-linearity at each layer. To accomplish this, we add a transfer function (such as nn.Tanh, nn.Sigmoid, nn.ReLU, etc..) to the model. Let’s assume we want to use tanh as the transfer function, we have a 10-dimensional input and we want 10 units in each hidden layer (as specified in the default values for the command line options defined earlier):
inputSize = 10
hiddenLayer1Size = opt.units
hiddenLayer2Size = opt.units

mlp:add(nn.Linear(inputSize, hiddenLayer1Size))
mlp:add(nn.Tanh())
mlp:add(nn.Linear(hiddenLayer1Size, hiddenLayer2Size))
mlp:add(nn.Tanh())
Finally, we need an output layer. Assuming that we want to perform some sort of classification task (say, choosing between 2 classes), the Softmax transfer function (actually, the log of Softmax) is the most common choice:
nclasses = 2

mlp:add(nn.Linear(hiddenLayer2Size, nclasses))
mlp:add(nn.LogSoftMax())
We can now print the model:
print mlpwhich will output something like:
nn.Sequential {
  [input -> (1) -> (2) -> (3) -> (4) -> (5) -> (6) -> output]
  (1): nn.Linear(10 -> 10)
  (2): nn.Tanh
  (3): nn.Linear(10 -> 10)
  (4): nn.Tanh
  (5): nn.Linear(10 -> 2)
  (6): nn.LogSoftMax
}
Here’s a graphical representation of the NN: 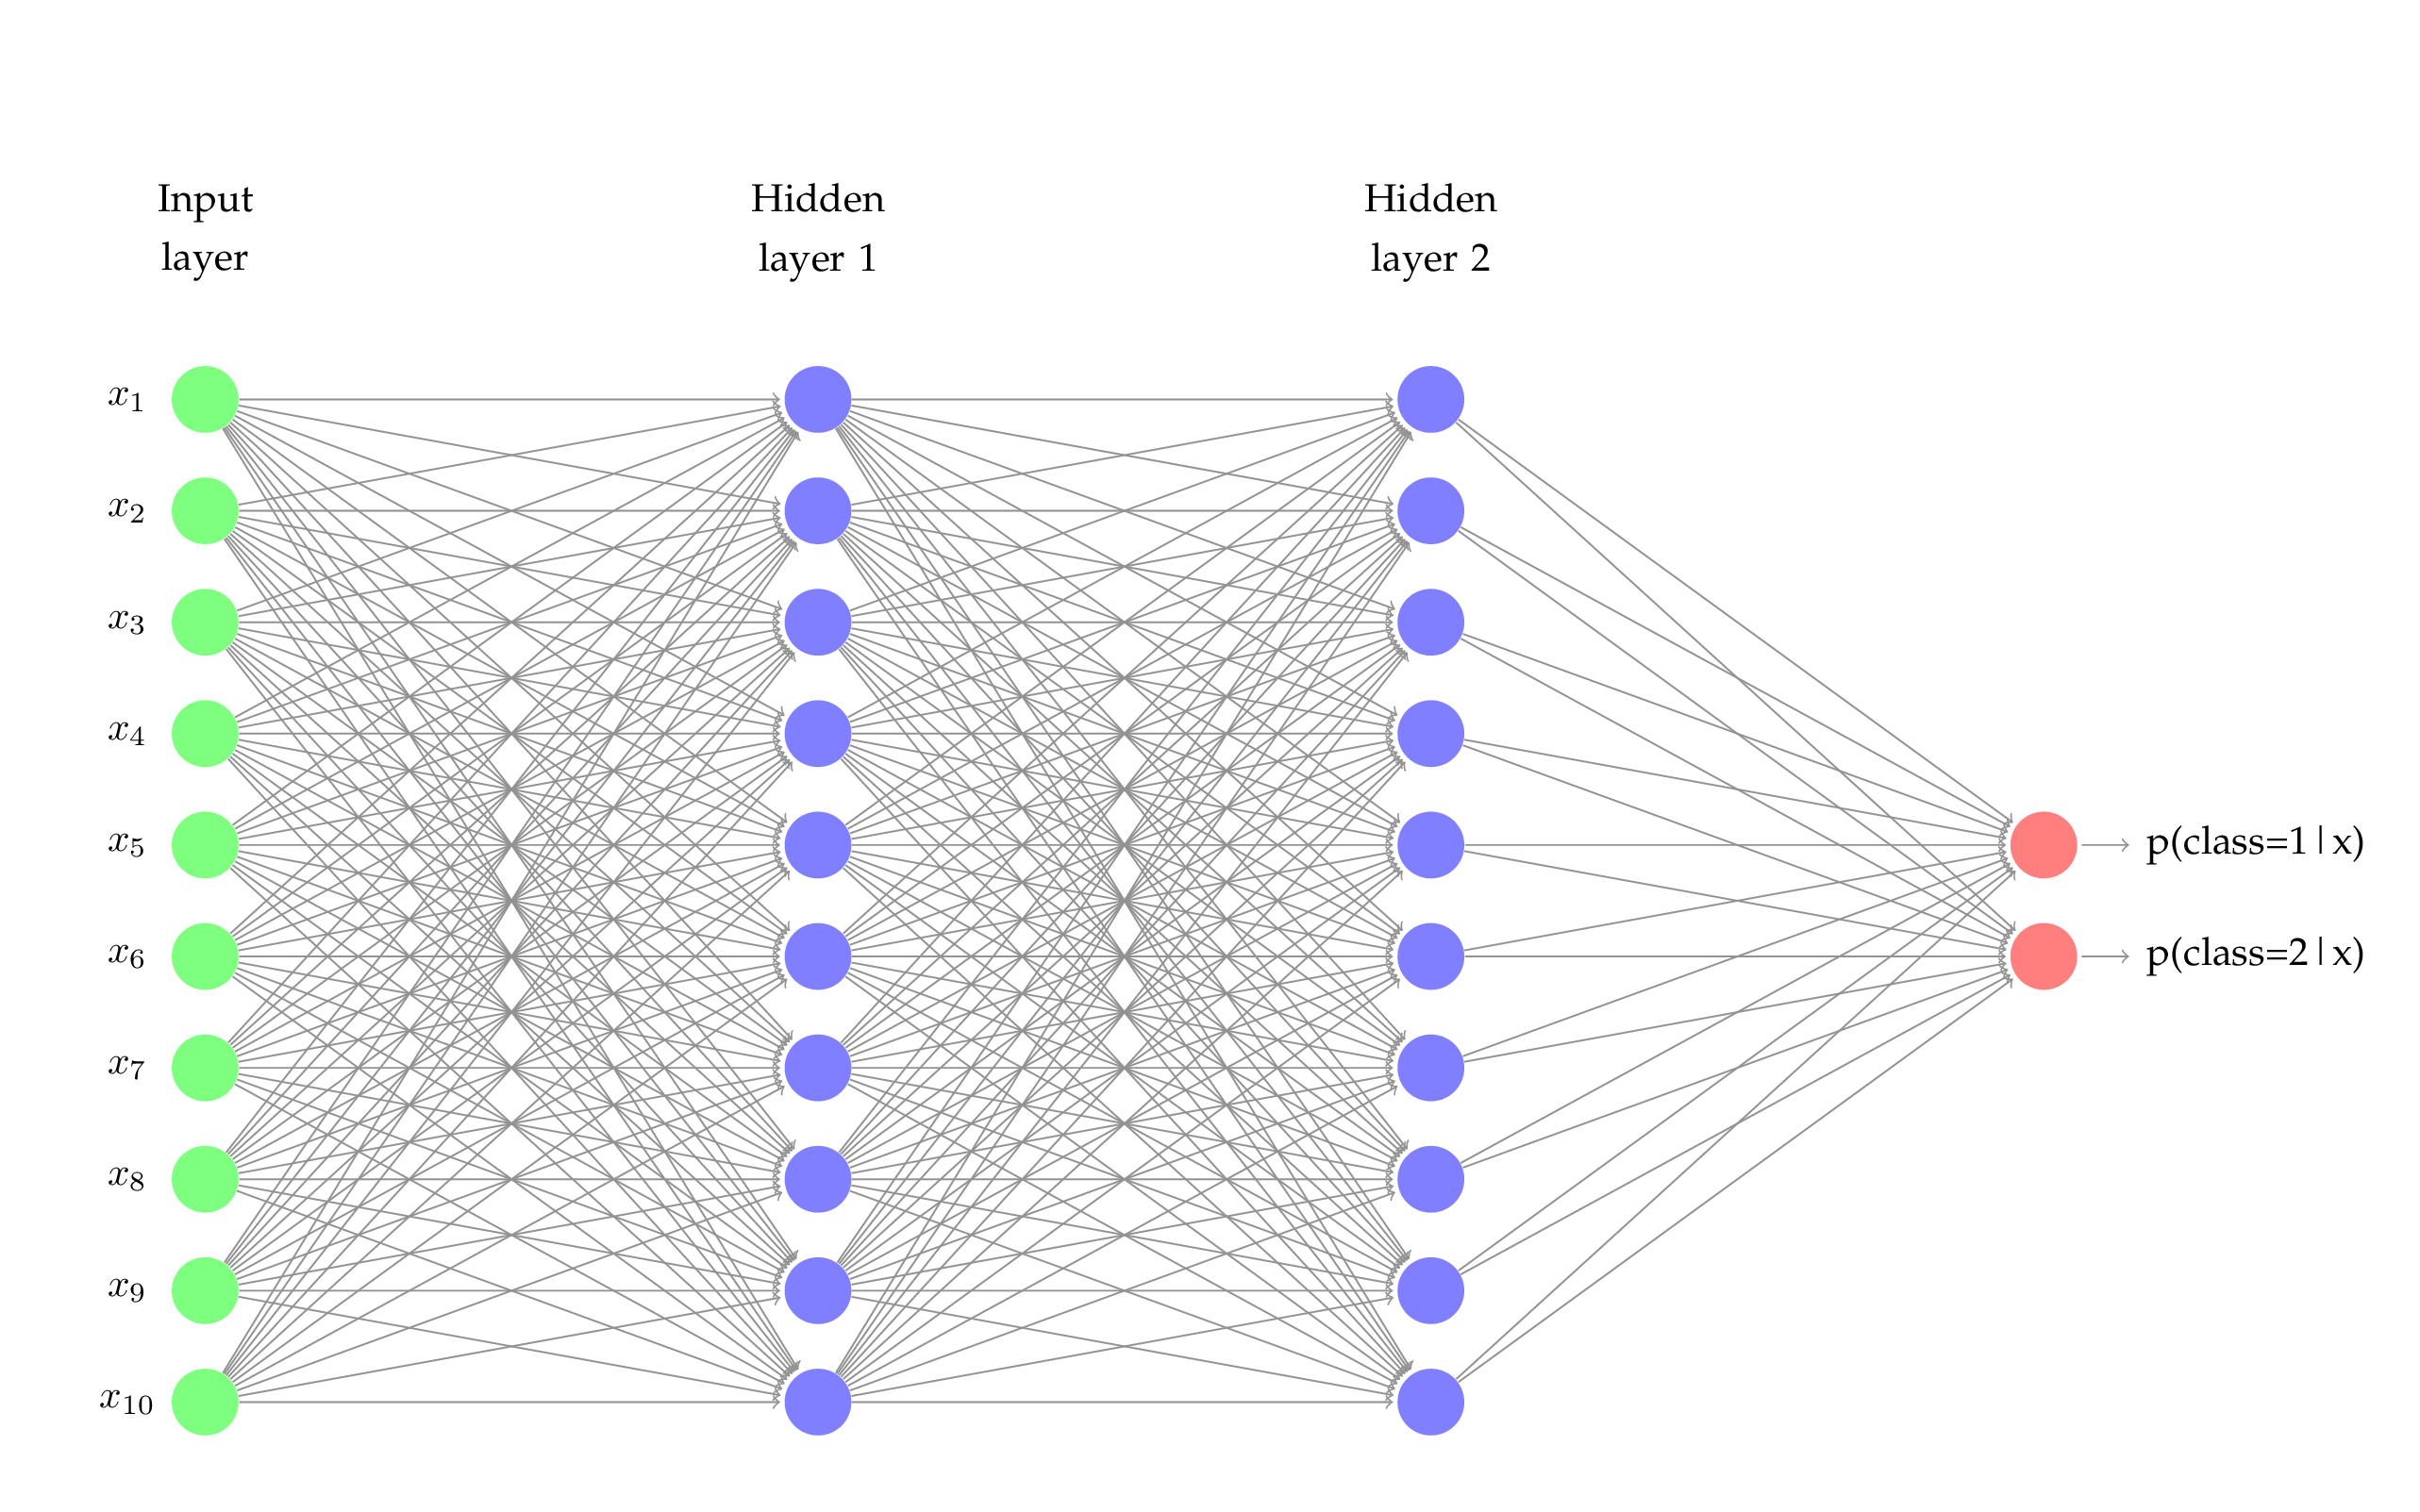
One useful thing to try when defining a NN is to be sure the forward pass works and does what it’s supposed to. That’s easily achieved with Module:forward:
out = mlp:forward(torch.randn(1,10))
print(out)
The output must be a 1x2 tensor, where out[1][i] is the log probability the input (randomly generated in this example) belongs to class i.
Training
For the training algorithm, you could implement your own training loop, where you take the input, feed it into the network, compute the gradients and update the network parameters or you can use the ready-to-use implementation of Stochastic Gradient Descent (SGD): nn.StochasticGradient. It takes the model we just defined and a loss function (Criterion). There are many available criteria on the nnpackage, but here we are going to use the negative log-likelihood criterion (which is the more natural to work with the Log-Softmax layer we defined earlier). nn.StochasticGradient has several parameters that can be tweaked, one of which is the learning rate, which we are now going to set to the value specified in the command line options:
criterion = nn.ClassNLLCriterion()
trainer = nn.StochasticGradient(mlp, criterion)
trainer.learningRate = opt.learningRate
Data
Now we need some data to train our network. The only requirement for the dataset is that it needs to be a Lua table with method size() returning the number of elements in the table. Each element will be a subtable with two elements: the input (a Tensor of size 1 x input_size) and the target class (a Tensor of size 1 x 1). Let’s assume that our data is going to be stored in a CSV file (or similar format) with the last number being the target class. To my knowledge, Lua doesn’t have any built-in function to read CSV file so we have to write some Lua code (inspired by this stackoverflow discussion):
function string:splitAtCommas()
  local sep, values = ",", {}
  local pattern = string.format("([^%s]+)", sep)
  self:gsub(pattern, function(c) values[#values+1] = c end)
  return values
end

function loadData(dataFile)
  local dataset = {}
  for line in io.lines(dataFile) do
    local values = line:splitAtCommas()
    local y = torch.Tensor(1)
    y[1] = values[#values] -- the target class is the last number in the line
    values[#values] = nil
    local x = torch.Tensor(values) -- the input data is all the other numbers
    dataset[i] = {x, y}
    i = i + 1
  end
  function dataset:size() return (i - 1) end -- the requirement mentioned
  return dataset
end

dataset = loadData("trainfile.csv")
Then nn.StochasticGradient:train() can be used to start the actual training:
trainer:train(dataset)Prediction and evaluation
Once the network is trained, it can be used to classify new data:
x = torch.randn(10)
y = mlp:forward(x)
print(y) -- returns the log probability of each class
Now that we know how to use the classifier, we can compute its accuracy:
tot = 0
pos = 0
for line in io.lines("testfile.csv") do
  values = line:splitAtCommas()
  local y = torch.Tensor(1)
  y[1] = values[#values]
  values[#values] = nil
  local x = torch.Tensor(values)
  local prediction = argmax(mlp:forward(x))
  if math.floor(prediction) == math.floor(y[1]) then
    pos = pos + 1
  end
  tot = tot + 1
end
print("Accuracy(%) is " .. pos/tot*100)
There’s no built-in argmax function in Lua so we need to define it:
function argmax(v)
  local maxvalue = torch.max(v)
  for i=1,v:size(1) do
    if v[i] == maxvalue then
      return i
    end
  end
end
We might also want to save it on disk and load it later on:
print("Weights of saved model: ")
print(mlp:get(1).weight)
-- mlp:get(1) is the first module of mlp, i.e. nn.Linear(10 -> 10)
-- mlp:get(1).weight is the weight matrix of that layer
torch.save('file.th', mlp)
mlp2 = torch.load('file.th')
print("Weights of saved model:")
print(mlp2:get(1).weight) -- this will print the exact same matrix
The dp package
dp is a deep learning library that extends nn with many useful features. The package includes common datasets for computer vision and Natural Language Processing (NLP) and provides an elegant way to create new ones and load them. Moreover, the experiment-based framework, inspired by PyLearn2, allows you to easily include techniques such as learning rate decaying, Early Stopping on a development set as well as reporting accuracies and confusion matrices on training, development and testing sets. As an example, see this experiment script; chances are that you can copy and paste most of it =).
Word embeddings
In the field of NLP, word embeddings are one of the most helpful techniques because they allow us to create distributed representation for words which have been shown to capture syntactic and semantic properties. Tools such as word2vec and GloVe can be used to generate word embeddings on large Language Modelling corpora that can be then directly used to represent the words in your neural networks. For instance, if your input is a sequence of words, you can replace each word with its pretrained embedding vector and then concatenate all vectors, hence generating your numeric input layer, which you can then use as discussed above. To do so, you will need a script that generates the vector given the sequence of input words: my solution to this is to use a Python script, which is straightforward to write and I’m therefore not showing here (the Lua solution would probably be much harder to write, at least for me =)).
An alternative is to jointly train your embeddings with the rest of your NN. In this case, the input layer will be composed of a sequence of indices, representing the index of each word in a predefined vocabulary. Then, the second layer, called embedding layer or lookup table, will be responsible for extracting the embedding vector corresponding to that index. The lookup table is a weight matrix, trained similarly to the weight matrices of the other NN layers, where the i-th row contains the embedding for the i-th word in the vocabulary. If we initialize this matrix randomly as we do for the other matrices, at the beginning this embeddings are not going to be helpful but once the training starts, backpropagation will start updating the matrix, which eventually will be able to generate embeddings that contains syntactic and semantic information. In Torch:
require 'nn';
require 'dp'; --necessary for nn.Collapse

vocabularySize = 10000
embeddingSize = 100 -- a commmon choice for word embeddings

model = nn.Sequential()
model:add(nn.LookupTable(vocabularySize, embeddingSize))
model:add(nn.Collapse(2)) -- to concatenate the embeddings of all input words
-- then you can add the rest of your network..
Pretraining is a common technique which simply uses word embeddings trained beforehand (e.g., with word2vec or GloVe) to initialize the embedding layer. This techniques is very helpful because it drastically reduces the number of epochs required to train your network. You can implement it in Torch as follows:
model = nn.Sequential()
emb = nn.LookupTable(vocabularySize, embeddingSize))
i = 1
for line in io.lines("pretrained.txt") do
  vals = line:splitAtCommas()
  emb.weight[i] = torch.Tensor(vals) -- set the pretrained values in the matrix
  i = i + 1
end
model:add(emb)
model:add(nn.Collapse(2))
The nngraph package
nngraph is an extension to nn that allows you to write any kind of DAG (Directed Acyclic Graph) neural network architecture. In practice, this is used when we want to create a network which takes multiple input and/or that outputs multiple output (e.g., an LSTM). Technically, nn provides modules to do so but writing such architectures as a graph rather than in a sequential order is much more convenient and flexible.
Let’s redefine the feed-forward NN defined earlier with nngraph. First, let’s define the input (one or more):
require 'nngraph'

inputs = {}
table.insert(inputs, nn.Identity()())
input = inputs[1]
We then construct the network:
lin1 = nn.Linear(inputSize, hiddenLayer1Size)(input)
act1 = nn.Tanh()(lin1)
lin2 = nn.Linear(hiddenLayer1Size, hiddenLayer2Size)(act1)
act2 = nn.Tanh()(lin2)

out = nn.Linear(hiddenLayer2Size, nclasses)(act2)
softmax = nn.LogSoftMax()(out)
Finally, we define the output (one or more) and build the nn.GModule object that can be used as a traditional nn container:
outputs = {}
table.insert(outputs, softmax)

mlp = nn.gModule(inputs, outputs)
Learn Torch properly
First thing is to learn properly Lua. In my experience (which is pretty limited, to be honest) you don’t need to learn many fancy features. The basic syntax, tables, indexing, scope and functions is all that I needed so far. This website provides just that, plus some extra stuff. If you are eager to learn more, the website has a link to a 1-hour video lecture.
You can then start playing around with the Torch interpreter th and the torch package for Lua scripts. Read this two-page tutorial, which will introduce you to the torch Tensor data structure and the optimpackage.
Up to this point, no NNs are involved. To do NN stuff, go to the Torch wiki and learn the nn, dp and nngraph packages. You can then explore all the packages specific to your interests from the same link. They are all github projects and there are probably some others out there =).
Final note
This tutorial may contain (actually, it’s quite likely to contain) a large number of mistakes of all kinds. If you notice some of them, please let me know. Any suggestion or feeedback is welcome. The code shown in this post was tested on a Raspberry Pi running Rasbpian (because why not). Thanks for reading!
Acknowledgments
Thanks to Thomas for spotting a mistake in the post!


 5873
5873

 被折叠的 条评论
为什么被折叠?
被折叠的 条评论
为什么被折叠?
 到【灌水乐园】发言


