


消息中间件
前言
本文只适合初级入门,阐述了消息中间件的基础概念,和部分实践,理论性比较强。
为什么要使用消息中间件
有一家专业做保险的大公司,他有一套保险系统,记录着保险销售的所有信息,他在全国有38家分公司,每一家分公司都有自己的保险系统,总公司与分公司之间有着保单数据共享的关系,总公司每销售一份保险都要向分公司提供该保单的基本信息,而分公司每销售一份保险也需要向总公司和其他分公司提供该保单的基本信息。那么总公司与分公司们的系统是如何实现数据共享的呢?
假如有一个中介,总公司和分公司都对他进行了订阅,总公司卖出一份保险后,交给中介一份保单的基本信息,然后中介向他的订阅者们下发这份保单信息。分公司卖出保险也同样交给中介一份保单信息,让中介来下发。
那么消息中间件中的订阅模式就是这个中介的实现。
什么是中间件
非底层操作系统软件,非业务应用软件,不是直接给最终用户使用的,不能直接给客户带来价值的软件统称为中间件。
什么是消息中间件
关注于数据的发送和接受,利用高效可靠的异步消息传递机制集成分布式系统。
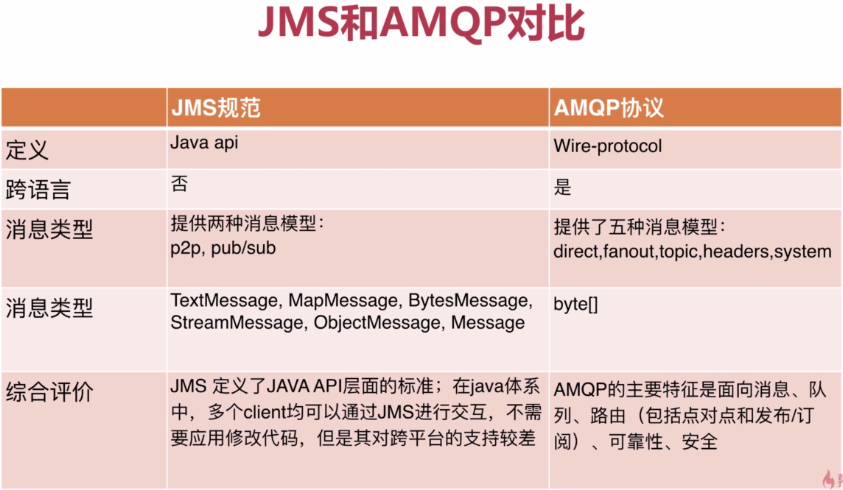
什么是JSM
Java消息服务,及JMS是一个java平台中关于面向消息中间件的API,用于在两个应用程序之间,或分布式系统中发送消息,进行异步通信。
什么是AMQP
AMQP是一个提供统一消息服务的应用层标准协议,基于此协议的客户端与消息中间件可传递消息,并不受客户/中间件不同产品,不同开发语言等条件限制。
ActiveMQ
是Apache出品,能力强劲的开源消息总线。ActiveMq是一个完美支持JSM1.1和jaEE1.4规范的JMS实现,尽管JMS规范出台已经很久了,但是JMS在当今的J2ee中仍然扮演者特殊的地位。
RabbitMQ
是一个开源的AMQP试下,服务端用Erlang语言编写,用于分布式系统中存储转发消息,在易用性、扩展性。高可用性表现不俗。
高可用HA(High Availability)是分布式系统架构设计中必须考虑的因素之一,它通常是指,通过设计减少系统不能提供服务的时间
JMS规范
相关概念
提供者:实现JMS规范的消息中间件服务器
客户端:发送或接受消息的应用程序
生产者/发布者:创建并发送消息的客户端
消费者/订阅者:接受并处理消息的客户端
消息:在应用程序之间传递的数据内容
消息模式:在客户端之间传递消息的方式,JMS中定义了主题和队列两种模式。
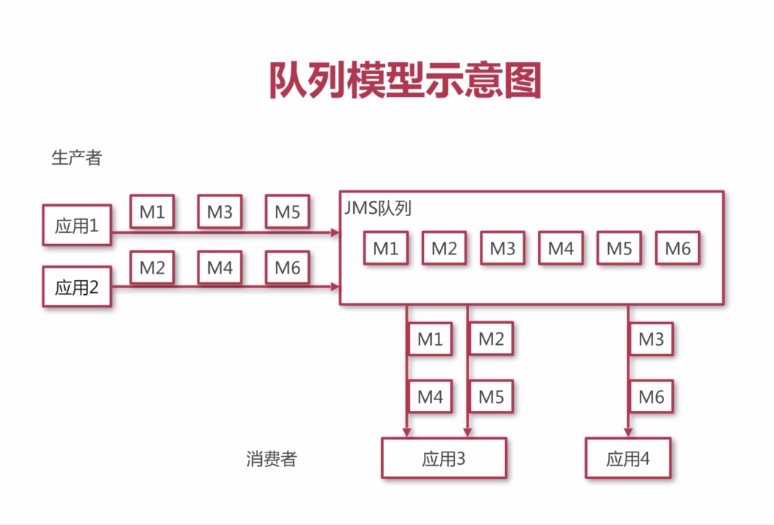
消息模式
队列模式
客户端包括生产者和消费者
队列中的消息只能被一个消费者消费
消费者可以随时消费队列中的消息
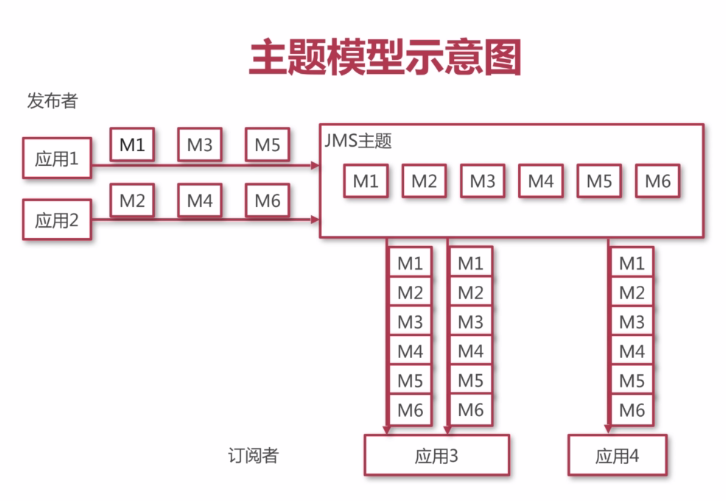
订阅模式
客户端包括发布者和订阅者
主题中的消息被所有订阅者消费
消费者不能消费订阅之前就发送到主题中的消息
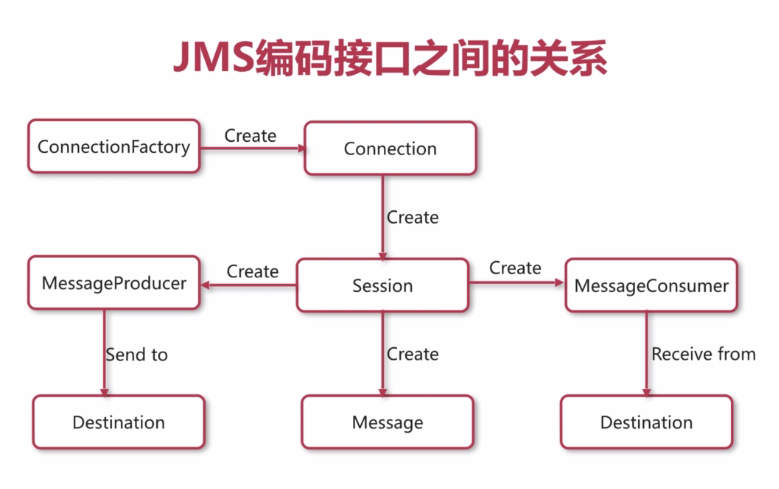
JMS编码接口
ConnectionFactory:用于创建连接到消息中间件的连接工厂
Connection:代表了应用程序和消息服务器之间的通信链路
Destination:指消息发布接收的地点,包括队列或主题
Session:表示一个单线程的上下文,用于发送和接收消息
MessageConsumer:由会话创建,用于接收发送到目标的消息
MessageProducer:由会话创建,用于发送消息到目标
Message:是在消费者和生产者之间传送的对象,消息头,一组消息属性,一个消息体
JMS编码接口之间的关系
默认端口:8161是后台管理系统,61616是给java用的tcp端口
队列模式代码演示
生产者:
public class Producer {
    public static final String URL = "tcp://localhost:61616";
    public static final String queueName = "queue-test";
    public static void main(String args[]) throws JMSException {
        //1.创建ConnectionFactory
        ActiveMQConnectionFactory connectionFactory = new ActiveMQConnectionFactory(URL);
        //2.创建Connection
        Connection connection = connectionFactory.createConnection();
        //3.启动连接
        connection.start();
        //4.创建会话
        Session session = connection.createSession(false, Session.AUTO_ACKNOWLEDGE);
        //5.创建一个目标
        Destination destination = session.createQueue(queueName);
        //6.创建一个生产者
        MessageProducer producer = session.createProducer(destination);
        for (int i = 0 ;i < 10; i++){
            //7.创建消息
            TextMessage message = session.createTextMessage("hello point:"+i);
            //8.发送消息
            producer.send(message);
            System.out.println("yes"+i);
        }
        //9.关闭连接
        connection.close();
    }
}
消费者
public class Consumer {
    public static void main(String args[]) throws JMSException {
        ActiveMQConnectionFactory connectionFactory = new ActiveMQConnectionFactory(Producer.URL);
        Connection connection = connectionFactory.createConnection();
        Session session = connection.createSession(false, Session.AUTO_ACKNOWLEDGE);
        connection.start();
        Queue destination = session.createQueue(Producer.queueName);
        MessageConsumer consumer = session.createConsumer(destination);
        //创建监听器
        consumer.setMessageListener(new MessageListener() {
            @Override
            public void onMessage(Message message) {
                TextMessage textMessage = (TextMessage)message;
                try {
                    System.out.println(textMessage.getText());
                } catch (JMSException e) {
                    e.printStackTrace();
                }
            }
        });
    }
}
订阅模式代码演示
只需在创建目标的使用,创建订阅模式就行。 session.createTopic(Producer.topicName);
createSession(paramA,paramB)方法详解:
paramA为boolean类型,标识是否支持事务
paramB为int类型,可以设置acknowledgment mode (称之为创建会话时的应答模式)取值有:
1) Session.AUTO_ACKNOWLEDGE
a. 为自动确认,客户端发送和接收消息不需要做额外的工作。
2) Session.CLIENT_ACKNOWLEDGE
a. 为客户端确认。客户端接收到消息后,必须调用javax.jms.Message的acknowledge方法。jms服务器才会删除消息。
3) Session.DUPS_OK_ACKNOWLEDGE
a. 允许副本的确认模式。一旦接收方应用程序的方法调用从处理消息处返回,会话对象就会确认消息的接收;而且允许重复确认。在需要考虑资源使用时,这种模式非常有效。
4) Session.SESSION_TRANSACTED
paramA设置为false时代表不支持事务:paramB的值可为Session.AUTO_ACKNOWLEDGE,Session.CLIENT_ACKNOWLEDGE,DUPS_OK_ACKNOWLEDGE其中一个。
paramA设置为true时:paramB的值忽略, acknowledgment mode被jms服务器设置为SESSION_TRANSACTED 。
使用Spring集成JMS连接ActiveMQ
Spring提供了一些JSM封装的接口:
ConnectionFactory:用于管理连接的连接工厂,Spring提供的
JmsTemplate:用于发送和接受消息的模板类
Messagelistener:消息监听器
ConnectionFactory
ConnectionFactory:是Spring为我们提供的连接池
JmsTemplate:每次发送消息都会创建连接,会话和producter,因为很耗性能,所以spring推出了连接池
Spring提供了两种连接池,SingleConnectionFactory和CachingConnectionFactory
SingleConnectionFactory:对于建立的JMS请求只会返回同一个连接,并且会忽略Connection的close方法调用。
CachingConnectionFactory:继承了SingleConnectionFactory,所以它拥有SingleConnectionFactory的所有功能,同时它还新增了缓存功能,它可以缓存Session、MessageProducer和MessageConsumer
JmsTemplate
是Spring提供的,只需要向Spring容器内注册这个类就可以使用JMSTemplate方便的操作jms
是线程安全的,可以在整个应用范围内使用,可以创建多个JmsTemplate
MessageListerner
实现一个onMessage方法,该方法只接受一个Message参数。
订阅模式代码演示:
1.新建spring配置文件common.xml,配置公共bean
在这个配置文件中,配置公共的bean,ActiveMQ连接工厂,spring提供的jms连接池,目的地等。
<?xml version="1.0" encoding="UTF-8"?>
<beans xmlns="http://www.springframework.org/schema/beans"
       xmlns:xsi="http://www.w3.org/2001/XMLSchema-instance"
       xmlns:context="http://www.springframework.org/schema/context"
       xsi:schemaLocation="http://www.springframework.org/schema/beans http://www.springframework.org/schema/beans/spring-beans.xsd http://www.springframework.org/schema/context http://www.springframework.org/schema/context/spring-context.xsd">
    <context:annotation-config/>
    <!--创建ActiveMQ为我们提供的连接工厂-->
    <bean id = "targetConnectionFactory" class="org.apache.activemq.ActiveMQConnectionFactory">
        <property name="brokerURL" value="tcp://127.0.0.1:61616"></property>
    </bean>
    <!--创建spring提供的JMS连接池-->
    <bean id="connectionFactory" class="org.springframework.jms.connection.SingleConnectionFactory">
        <property name="targetConnectionFactory" ref="targetConnectionFactory"></property>
    </bean>
    <!--创建目的地,队列模式-->
    <bean id = "queueDestination" class="org.apache.activemq.command.ActiveMQQueue">
        <constructor-arg value="queue-test-spring"></constructor-arg>
    </bean>
    <!--创建目的地,订阅模式-->
    <bean id="topicDestination" class="org.apache.activemq.command.ActiveMQTopic">
        <constructor-arg value="topic-text-spring"/>
    </bean>
</beans>
2. 新建spring配置文件,produce.xml,配置发布者
在这个配置文件中,引入公共的配置文件common.xml,配置jms模板
<?xml version="1.0" encoding="UTF-8"?>
<beans xmlns="http://www.springframework.org/schema/beans"
       xmlns:xsi="http://www.w3.org/2001/XMLSchema-instance"
       xsi:schemaLocation="http://www.springframework.org/schema/beans http://www.springframework.org/schema/beans/spring-beans.xsd">

    <import resource="common.xml"></import>
    <bean id="jmsTemplate" class="org.springframework.jms.core.JmsTemplate">
        <property name="connectionFactory" ref="connectionFactory"></property>
    </bean>
    <bean class="com.jsm.springdemo.producer.ProducerServiceImpl"></bean>
</beans>
3. 创建ProducerService接口
提供一个发送信息的方法
public interface ProducerService {
    public void sendMessage(String message);
}
4.创建ProducerService实现类
在这个实现类中,我们需要注入JmsTemplate,用来发送信息。注入定义好的订阅模式的目的地和实现ProducerService接口。
public class ProducerServiceImpl implements ProducerService{
    @Autowired
    JmsTemplate jmsTemplate;

    @Resource(name = "topicDestination")
    Destination destination;
    @Override
    public void sendMessage(final String message) {
        jmsTemplate.send(destination, new MessageCreator() {
            @Override
            public Message createMessage(Session session) throws JMSException {
                TextMessage textMessage = session.createTextMessage(message);
                return textMessage;
            }

        });
        System.out.println("Success:"+message);
    }
}
5. 创建AppProducer类
启动Producer
public class AppProducer {
    public static void main(String agrs[]){
        ClassPathXmlApplicationContext applicationContext = new  ClassPathXmlApplicationContext("producer.xml");
        ProducerService producerService = (ProducerService) applicationContext.getBean(ProducerService.class);
        for (int i = 0; i < 100; i++) {
            producerService.sendMessage("消息编号:"+i);
        }
        applicationContext.close();
    }
}
6. 创建消费者ConsumerListener监听器
此类用来接受发布者发送的信息,需要实现MessageListener接口
public class ConsumerListener implements MessageListener{
    @Override
    public void onMessage(Message message) {
        TextMessage textMessage = (TextMessage) message;
        try {
            System.out.println(textMessage.getText());
        } catch (JMSException e) {
            e.printStackTrace();
        }
    }
}
7. 创建consumer.xml配置文件
在这个配置文件中,引入公共的配置文件common.xml,配置监听容器,注入连接池,目的地,自定义的监听器等。
<?xml version="1.0" encoding="UTF-8"?>
<beans xmlns="http://www.springframework.org/schema/beans"
       xmlns:xsi="http://www.w3.org/2001/XMLSchema-instance"
       xsi:schemaLocation="http://www.springframework.org/schema/beans http://www.springframework.org/schema/beans/spring-beans.xsd">
    <import resource="common.xml"/>
    <bean id="consumerListener" class="com.jsm.springdemo.consumer.ConsumerListener">
    </bean>
    <bean id = "jmsContainer" class="org.springframework.jms.listener.DefaultMessageListenerContainer">
        <property name="connectionFactory" ref="connectionFactory"/>
        <property name="destination" ref="topicDestination"/>
        <property name="messageListener" ref="consumerListener"/>
    </bean>
</beans>
8. 新建AppConsumer类
我们在spring容器中配置了监听容器,因此项目启动的时候,监听器也随之启动
public class AppConcumer {
    public static void main(String args[]){
        ApplicationContext applicationContext = new ClassPathXmlApplicationContext("consumer.xml");
    }
}
队列模式代码演示
队列模式,在common.xml配置文件中配置队列目的地,在发布者ProducerService实现类中,将queueDestination注入到Destination中。
在消费者配置配件consumer.xml的监听容器中,将queueDestination注入到destination
Common.xml:
<!--创建目的地,队列模式-->
    <bean id = "queueDestination" class="org.apache.activemq.command.ActiveMQQueue">
        <constructor-arg value="queue-test-spring"></constructor-arg>
    </bean>
ProducerServiceImpl :
public class ProducerServiceImpl implements ProducerService{
    @Autowired
    JmsTemplate jmsTemplate;

    @Resource(name = "queueDestination")
    Destination destination;
    @Override
    public void sendMessage(final String message) {
        jmsTemplate.send(destination, new MessageCreator() {
            @Override
            public Message createMessage(Session session) throws JMSException {
                TextMessage textMessage = session.createTextMessage(message);
                return textMessage;
            }

        });
        System.out.println("Success:"+message);
    }
}
consumer.xml:
<bean id = "jmsContainer" class="org.springframework.jms.listener.DefaultMessageListenerContainer">
    <property name="connectionFactory" ref="connectionFactory"/>
    <property name="destination" ref="queueDestination"/>
    <property name="messageListener" ref="consumerListener"/>
</bean>
ActiveMQ集群配置
为什么要对消息中间件集群?
实现高可用,以排除单点故障引起的服务终端
实现负载均衡,以提高效率为更多客户提供服务
ActiveMQ集群基础知识
集群方式
客户端集群:让多个消费者消费同一个队列
Broker Cluster:多个Broker之间同步消息
Master Slave:实现高可用,当主服务器宕机时,备用服务器会立即补充
客户端配置
ActiveMQ失效转移(failover)
允许当其中一台消息服务器宕机时,客户端在传输层上重新连接到其它消息服务器
语法:failover:(uri1,...,uriN)?transportOptions
transportOptions参数说明
Randomize默认true,标识URI列表中选择URI连接时是否采用随机策略
initialReconnectDelay 默认10,单位毫秒,表示第一次尝试重新连接之间等待的时间
maxReconnectDelay 默认30000,单位毫秒,最长重连的时间间隔
Broker Cluster集群配置
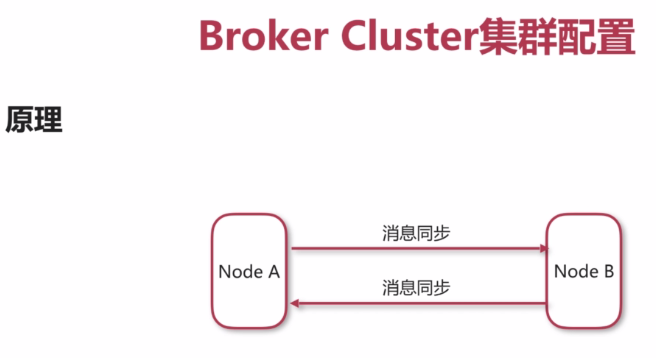
当我们有两个节点:A、B,节点A可以把消息同步到节点B,节点B也可以把消息同步到节点A,通过这个机制,节点A的消息可以被B消费,节点B的消息也可以被A消费。
实现方式是采用NetworkConnector(网络连接器)网络连接器实现的。
NetworkConnector(网络连接器)主要用于配置ActiveMQ服务器与服务器之间的网络通讯方式,用于服务器透传消息。
网络连接器分为静态连接器和动态连接器
静态连接器,是指在服务器的IP地址上面去指定具体的IP地址
<networkConnectors>
<networkConnector name="local_network" uri="static:(tcp:/127.0.0.1:6167,tcp://127.0.0.1:61618" />
</networkConnectors>
如果服务器比较多,并且需要通过动态扩展,这时候可以使用动态
动态连接器,他是使用多播的方式通知其他服务器
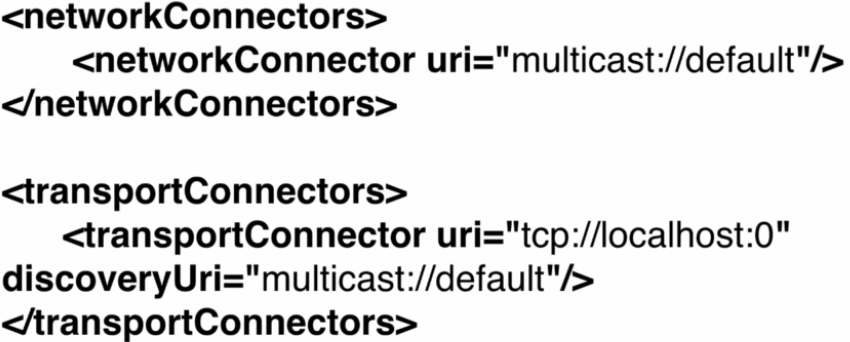
定义一个网络连接器和传输连接器,传输连接器会给出一个发现的uri地址,即组播地址,就可以达到动态效果了
Master/Slave集群配置
Share nothing storage master/slave(过时,5.8移除)
Shared storage master/slave 共享存储
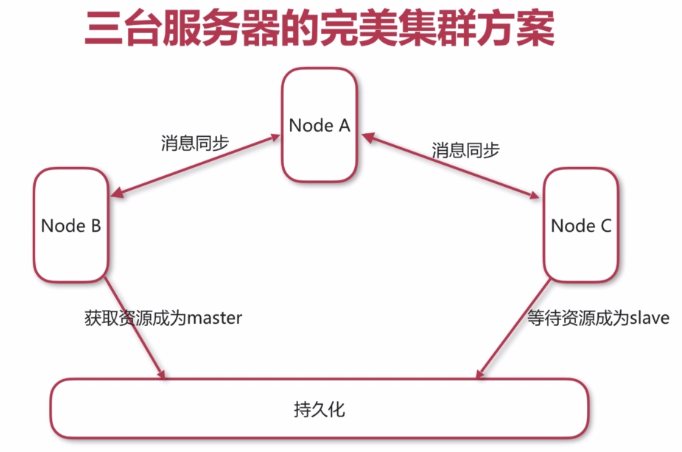
节点获取的消息存储排他锁,就可以成为master,而没有获取资源锁的节点称之为slave,当master待机的时候回释放资源锁,而获取资源锁的slave会成为新的master。
Replicated LevelDB Store 基于复制的LevelDB Store
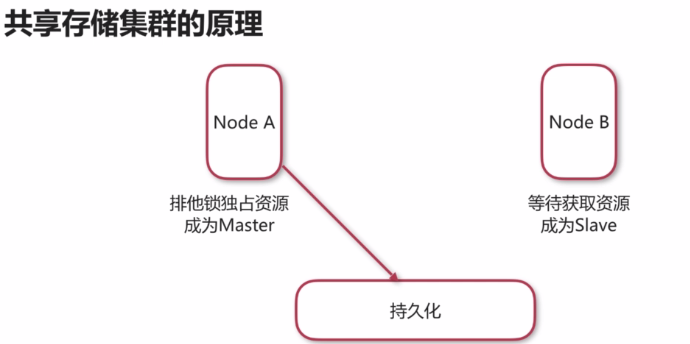
共享存储集群的原理
有节点A、B两台服务器,有一个共享的存储地址,称之为持久化,它可以是数据库或者san文件系统,把节点A、B的持久化配置到同一个地方之后,先启动节点A,这个时候节点A就获取了资源排他锁称为master,在启动节点B,B获取不到排他锁所以称为slave,称为master的服务器有对外开放的能力,外部的客户端可以提交信息给A,不能给B
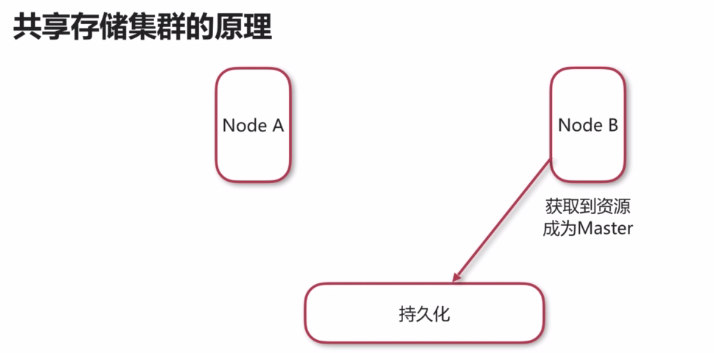
如果A挂掉了,B会立即过去资源的排他锁,成为Master,而外部客户端就可以提交信息给B。
基于LevelDB Store的原理
基于Zookeeper,有三个节点A、B、C,他们都有自己的存储方式,三个节点配置同一个Zookeeper节点,ZooKeeper选举一台成为Master,比如A,此时A具有服务能力,A获取消息后本地存储,然后通过ZooKeeper同步到B、C,B、C分别对消息存储。
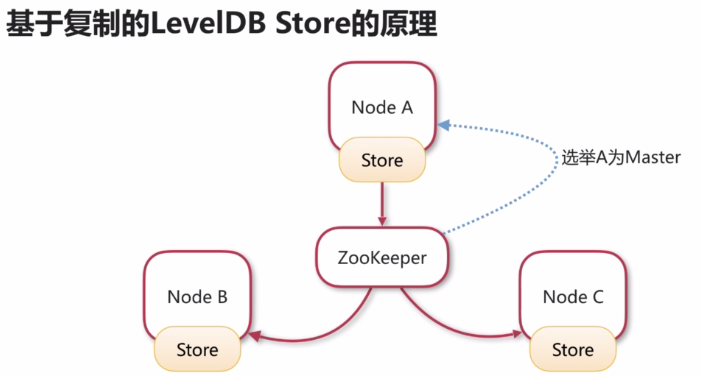
如果节点A故障,ZooKeeper会立即从新选举一台作为Master
两种集群方式对比
Master/Slave可以做到高可用,但不能做到负载均衡,因为Slave不具备服务能力,而Broker/Cluster不具备高可用,当这台服务器挂掉后,它处理的数据会同步丢失,能做负载均衡

三台服务器的完美集群方案
ActiveMQ集群实战
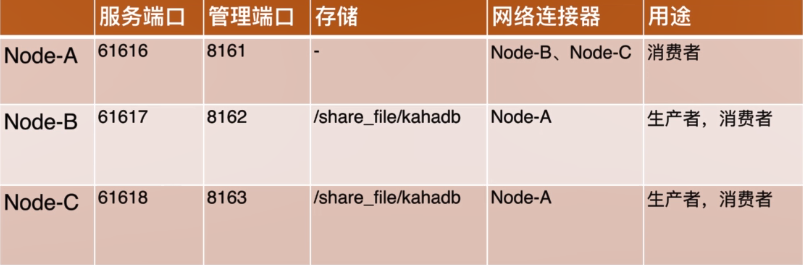
因为是在一台电脑上实践,通过修改端口来模拟不同主机。因为A节点是做Broker,所以不需要单独配置存储,B、C是做master/slave,所以配置共享文件夹就可以了
将下载的activemq文件解压,复制三份,分别起名:activemq_a/activemq_b/activemq_c
配置A节点
1. 找到activemq.xml配置文件,由于A默认使用61616,所以不需要修改,其他的端口我们不需要,注释就可以了
2. 配置网络连接器:
<transportConnectors>
            <!-- DOS protection, limit concurrent connections to 1000 and frame size to 100MB -->
            <transportConnector name="openwire" uri="tcp://0.0.0.0:61616?maximumConnections=1000&wireFormat.maxFrameSize=104857600"/>
            <!--
            <transportConnector name="amqp" uri="amqp://0.0.0.0:5672?maximumConnections=1000&wireFormat.maxFrameSize=104857600"/>
            <transportConnector name="stomp" uri="stomp://0.0.0.0:61613?maximumConnections=1000&wireFormat.maxFrameSize=104857600"/>
            <transportConnector name="mqtt" uri="mqtt://0.0.0.0:1883?maximumConnections=1000&wireFormat.maxFrameSize=104857600"/>
            <transportConnector name="ws" uri="ws://0.0.0.0:61614?maximumConnections=1000&wireFormat.maxFrameSize=104857600"/>
            -->

</transportConnectors>
<!-- 配置网络连接器 -->
<networkConnectors>
<networkConnector name="local_network" uri="static:(tcp:/127.0.0.1:6167,tcp://127.0.0.1:61618" />
</networkConnectors>
3. 修改后端提供管理的地址端口,修改jetty.xml,id为jettyPort->port,因为A节点使用默认端口,所以不需要修改。
配置B节点
1. 修改端口、配置网络连接器:
<transportConnectors>
            <!-- DOS protection, limit concurrent connections to 1000 and frame size to 100MB -->
            <transportConnector name="openwire" uri="tcp://0.0.0.0:61617?maximumConnections=1000&wireFormat.maxFrameSize=104857600"/>
            <!--<transportConnector name="amqp" uri="amqp://0.0.0.0:5672?maximumConnections=1000&wireFormat.maxFrameSize=104857600"/>
            <transportConnector name="stomp" uri="stomp://0.0.0.0:61613?maximumConnections=1000&wireFormat.maxFrameSize=104857600"/>
            <transportConnector name="mqtt" uri="mqtt://0.0.0.0:1883?maximumConnections=1000&wireFormat.maxFrameSize=104857600"/>
            <transportConnector name="ws" uri="ws://0.0.0.0:61614?maximumConnections=1000&wireFormat.maxFrameSize=104857600"/>
       --> </transportConnectors>

<networkConnectors>
<networkConnector name = "network_a" uri="static:(tcp://127.0.0.1:61616)"/>
</networkConnectors>
2. 修改共享存储地址
        <persistenceAdapter>
            <kahaDB directory="D:\activemq_jiqun\kahadb"/>
        </persistenceAdapter>
3. 配置b节点后端管理端口
<bean id="jettyPort" class="org.apache.activemq.web.WebConsolePort" init-method="start">
      <!-- the default port number for the web console -->
        <property name="host" value="0.0.0.0"/>
        <property name="port" value="8162"/>
</bean>
配置C节点
1. 修改端口、配置网络连接器:
<transportConnectors>
            <!-- DOS protection, limit concurrent connections to 1000 and frame size to 100MB -->
            <transportConnector name="openwire" uri="tcp://0.0.0.0:61618?maximumConnections=1000&wireFormat.maxFrameSize=104857600"/>
            <!--
            <transportConnector name="amqp" uri="amqp://0.0.0.0:5672?maximumConnections=1000&wireFormat.maxFrameSize=104857600"/>
            <transportConnector name="stomp" uri="stomp://0.0.0.0:61613?maximumConnections=1000&wireFormat.maxFrameSize=104857600"/>
            <transportConnector name="mqtt" uri="mqtt://0.0.0.0:1883?maximumConnections=1000&wireFormat.maxFrameSize=104857600"/>
            <transportConnector name="ws" uri="ws://0.0.0.0:61614?maximumConnections=1000&wireFormat.maxFrameSize=104857600"/>
            -->

</transportConnectors>
<networkConnectors>
<networkConnector name = "network_a" uri="static:(tcp://127.0.0.1:61616)"/>
</networkConnectors>
2. 共享存储地址
<persistenceAdapter>
     <kahaDB directory="D:\activemq_jiqun\kahadb"/>
</persistenceAdapter>
3. 配置c节点后端管理端口
<bean id="jettyPort" class="org.apache.activemq.web.WebConsolePort" init-method="start">
        <!-- the default port number for the web console -->
        <property name="host" value="0.0.0.0"/>
        <property name="port" value="8163"/>
 </bean>
然后依次启动A、B、C
代码演示
参考上面代码演示,注意,在URL中failover
生产者URL
public static final String URL = "failover:(tcp://localhost:61617,tcp://localhost:61618)?randomize=true";消费者URL
public static final String URL = "failover:(tcp://localhost:61617,tcp://localhost:61618,tcp://localhost:61616)?randomize=true";


 2319
2319


 被折叠的 条评论
为什么被折叠?
被折叠的 条评论
为什么被折叠?
 到【灌水乐园】发言


