gradle使用
前提条件
安装jvm,并配置好了java环境变量
安装步骤
1.下载gradle 2.3版本
2.将压缩包解压到某个目录如 e:/gradle
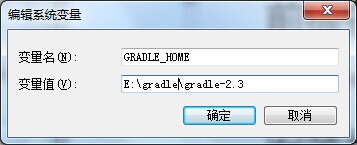
添加GRADLE_HOME 地址
添加PATH环境变量:%GRADLE_HOME%\bin;
验证是否安装成功
cmd中输入 gradle -version
Gradle 2.3
Build time: 2015-02-16 05:09:33 UTC
Build number: none
Revision: 586be72bf6e3df1ee7676d1f2a3afd9157341274
Groovy: 2.3.9
Ant: Apache Ant(TM) version 1.9.3 compiled on December 23 2013
JVM: 1.7.0_17 (Oracle Corporation 23.7-b01)
OS: Windows 7 6.1 amd64
maven to gradle
在maven项目根目录下执行命令:
gradle init --type pom
当然你得先下载Gradle,配置完环境变量。
gradle to maven
- apply plugin: 'java'
- apply plugin: 'maven'
- group = 'xxx.xxx'
- version = '1.0-SNAPSHOT'
- dependencies {
- compile 'commons-lang:commons-lang:2.3'
- }

apply plugin: 'java'
apply plugin: 'maven'

group = 'org.demo.shiro'
version = '1.0.0-SNAPSHOT'
sourceCompatibility = 1.7
task writeNewPom << {
    pom {
        project {
            inceptionYear '2008'
            licenses {
                license {
                    name 'The Apache Software License, Version 2.0'
                    url 'http://www.apache.org/licenses/LICENSE-2.0.txt'
                    distribution 'repo'
                }
            }
        }
    }.writeTo("$buildDir/../pom.xml")
}

apply plugin: 'java'
apply plugin: 'idea'
apply plugin: 'eclipse'
apply plugin: 'war'
apply plugin: 'jetty'
sourceCompatibility = 1.7
version = '1.0'
description='shiro和spring演示'
[compileJava,compileTestJava,javadoc]*.options*.encoding = 'utf-8'


//构建工程目录布局
task createJavaProject << {
    sourceSets*.java.srcDirs*.each { it.mkdirs() }
    sourceSets*.resources.srcDirs*.each { it.mkdirs()}
}

task createWebProject(dependsOn: 'createJavaProject') << {
   // def webApp =file(projectDir.path+"src/main/webapp");
   // println "webapp.path:"+webApp.path;
  //  webApp.mkdirs()

}

repositories {
    maven {
      url "http://maven.aliyun.com/nexus/content/groups/public/"
    }
}
eclipse {
    classpath {
      defaultOutputDir = file("build/eclipse")
    }
}
//源码定义
sourceSets {
    main {
        java {
            srcDir 'src/main/java'
            srcDir 'src/test/java'
        }
        resources {
            srcDir 'src/main/resources'
            srcDir 'src/test/resources'
        }
    }
}
dependencies {
    //spring
    compile  'org.springframework:spring-beans:3.0.4.RELEASE'
    compile  'org.springframework:spring-core:3.0.4.RELEASE'
    compile  'org.springframework:spring-web:3.0.4.RELEASE'
    compile  'org.springframework:spring-webmvc:3.0.4.RELEASE'
    compile  'org.springframework:spring-context:3.0.4.RELEASE'
    compile  'org.springframework:spring-context-support:3.0.4.RELEASE'
    //json
    compile   'org.codehaus.jackson:jackson-core-lgpl:1.8.1'
    compile   'org.codehaus.jackson:jackson-mapper-lgpl:1.8.1'
    compile   'commons-fileupload:commons-fileupload:1.3.1'
    compile   'commons-io:commons-io:2.4'
    compile   'org.apache.commons:commons-lang3:3.4'
    //shiro
    compile  'org.apache.shiro:shiro-core:1.2.3'
    compile  'org.apache.shiro:shiro-web:1.2.3'
    compile  'org.apache.shiro:shiro-spring:1.2.3'
    //j2ee
    compile 'javax.servlet:javax.servlet-api:3.1.0'
    //log
    compile  "org.slf4j:slf4j-log4j12:1.7.5"
    //jedis
    compile  "redis.clients:jedis:2.1.0"
    testCompile 'junit:junit:4.11'
}


clean{
   println "删除构建目录"
   delete "$project.buildDir"
}


jettyRun {
    httpPort = 9080
    contextPath = ''
    //按下enter键,加载eclipse的class
    reload = 'manual'
    classpath = files(eclipse.classpath.defaultOutputDir) + classpath
   // classpath.each{
       println "classPath:$it.path";
    //}
    print "webapp.path:$war.archivePath.path"
    print "webAppSourceDirectory:$webAppSourceDirectory.path"


}

task copyResources(type:Copy)  {
    from("$project.buildDir/resources/main")
    into("$webAppDir/WEB-INF/")
}

写这个博客的动机是,网上有很多错误的方法,我希望给大家一个引导,节省时间。
以CAS-4.2.7项目为例,这是一个gradle构建的项目,我们希望把它转为maven项目,方法很简单,如下:
找到一个个子项目目录下的build.gradle文件,在文件开头添加以下内容:
apply plugin: 'java'
apply plugin: 'maven'
group = 'com.wonhigh'
version = '4.2.7-RELEASE'
sourceCompatibility = 1.7
task writeNewPom << {
pom {
project {
inceptionYear '2008'
licenses {
license {
name 'The Apache Software License, Version 2.0'
url 'http://www.apache.org/licenses/LICENSE-2.0.txt'
distribution 'repo'
}
}
}
}.writeTo("$buildDir/../pom.xml")
}
以下两句必要时加入:
dependencies {
compile 'commons-lang:commons-lang:2.4'
}
当然,你可以根据自己公司的实际情况修改,很简单,似曾相识,对,就是maven的pom文件内容。
在这个项目下,运行:gradle install,记住,是install命令,网上很多都说是gradle build,是错误的。
命令执行后,项目下会出现\build\poms目录,把里面的pom-default.xml改成pom.xml(不改工程导入不了),剪贴到子项目根目录下,任务完成。
对于CAS这个项目,有很多子项目,怎么办呢?
有个简单点的办法,需要在每个子项目下都修改build.gradle,然后到CAS根目录下执行:gradlew install -x test,这样一次行就把所有子项目下的pom文件都生成了,但是还是得手工一个一个贴到根下。
如果不想一个一个pom文件剪贴到项目根目录下,则在CAS根目录下运行:gradlew writeNewPom,命令执行完后,各子项目下均有pom文件了。


 1万+
1万+


 被折叠的 条评论
为什么被折叠?


