


这段时间利用项目空隙,研究了一下Silverlight的动态加载技术。动态加载分为两种:
1、网页局部加载(即一个网页上有多个Silverlight应用)
2、单个Silverlight应用动态加载(即模块分步加载)。
这里讨论的是第二种加载方式,对于这种加载模式的处理, 目前网上比较常见的方法也有两种:一种是动态加载xap包,另一种是动态加载dll, 两种方法的实现原理都是一样的(个人比较推荐前一种,因为xap是压缩包可节省带宽,而且如果需要加载多个dll时,后一种方案处理起来较为麻烦)。但是有一些细节处理让人不是很满意,比如silverlight动态加载(研究与探讨) 这篇文章,虽然实现了动态加载,但是没有很好的解决dll重复引用的问题。本文将在前人研究的基础上,做些总结和改进,提供一个较为完美的解决方案。
一、认识XAP包
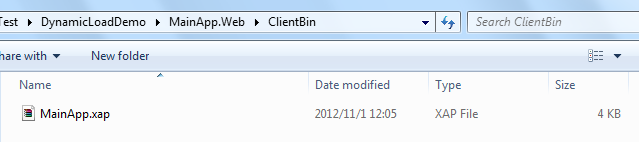
使用VS新建一个名为MainApp的Silverlight应用程序,使用默认设置生成一个对应的MainApp.Web工程。完成编译,这时会在对应的Web工程的ClienBin目录下生成MainApp.xap文件(实际上是一个zip包)

使用工具打开xap:
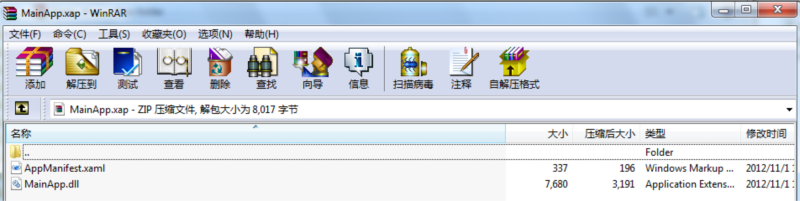
可以看到xap包中有一个AppMainfest.xaml文件和一个dll文件,我们着重介绍一下AppMainfest.xaml文件。使用文本编辑工具打开这个文件:
<Deployment xmlns="http://schemas.microsoft.com/client/2007/deployment"
xmlns:x="http://schemas.microsoft.com/winfx/2006/xaml"
EntryPointAssembly="MainApp" EntryPointType="MainApp.App" RuntimeVersion="5.0.61118.0">
<Deployment.Parts>
<AssemblyPart x:Name="MainApp" Source="MainApp.dll" />
</Deployment.Parts>
</Deployment>
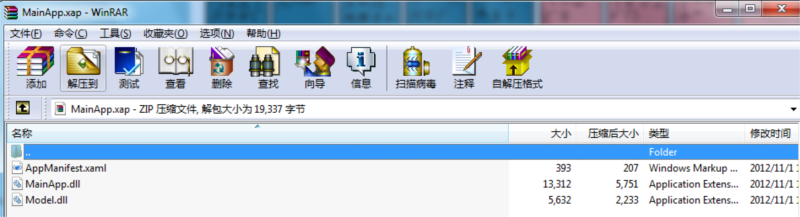
Deployment结点中描述了应用程序入口程序集名称,入口类型,运行时版本。Deployment.Parts下描述了各个引用的程序集名称及dll所在位置。我们新建一个Model工程,并在MainApp中引用,再次编译,这次生成的XAP包中又多了Model的引用。

再次打开AppMainfest.xaml :
<Deployment xmlns="http://schemas.microsoft.com/client/2007/deployment"
xmlns:x="http://schemas.microsoft.com/winfx/2006/xaml"
EntryPointAssembly="MainApp" EntryPointType="MainApp.App" RuntimeVersion="5.0.61118.0">
<Deployment.Parts>
<AssemblyPart x:Name="MainApp" Source="MainApp.dll" />
<AssemblyPart x:Name="Model" Source="Model.dll" />
</Deployment.Parts>
</Deployment>
对应的AssemblyPart也对应的增加了,不难想象如果在MainApp中引用了很多dll,那么最终生成的xap包的体积也会变的很大,造成用户访问程序时加载速度很慢。因为即使有些dll在一开始并没有用到,也会在首次加载中一同下载到客户端。对于这种情况,有一种简单的处理方法—— 应用程序库缓存。
二、应用程序库缓存(Application Libary Caching)
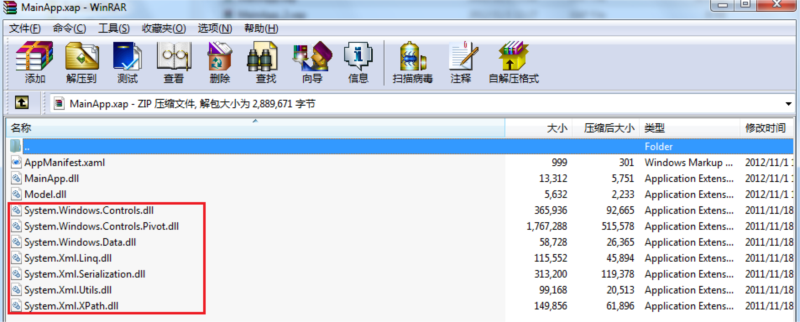
我们在MainApp工程中随便添加几个引用,模拟真实开发环境。重新编译后,新生成的xap包增加了800多KB。
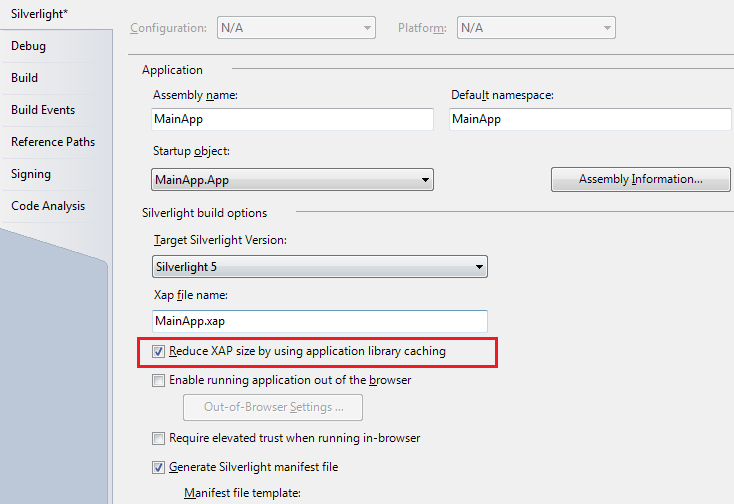
此时,打开MainApp工程属性页面,勾选"Reduce XAP size by using application libary caching"
再次编译,ClientBin目录下生成了几个zip文件,同时这次生成的xap包了体积又降回了原来的9KB
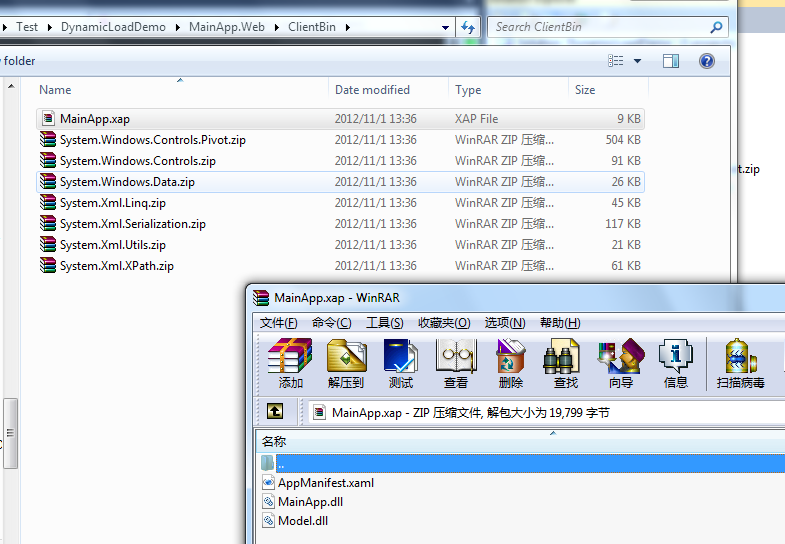
仔细观察的话,会发现原来xap包中引用的外部dll和新生成的zip文件一一对应。而此时的AppMainfest.xaml 也发生了变化:
<Deployment xmlns="http://schemas.microsoft.com/client/2007/deployment"
xmlns:x="http://schemas.microsoft.com/winfx/2006/xaml"
EntryPointAssembly="MainApp" EntryPointType="MainApp.App" RuntimeVersion="5.0.61118.0">
<Deployment.Parts>
<AssemblyPart x:Name="MainApp" Source="MainApp.dll" />
<AssemblyPart x:Name="Model" Source="Model.dll" />
</Deployment.Parts>
<Deployment.ExternalParts>
<ExtensionPart Source="System.Windows.Controls.Pivot.zip" />
<ExtensionPart Source="System.Windows.Data.zip" />
<ExtensionPart Source="System.Xml.Linq.zip" />
<ExtensionPart Source="System.Xml.Serialization.zip" />
<ExtensionPart Source="System.Xml.Utils.zip" />
<ExtensionPart Source="System.Xml.XPath.zip" />
<ExtensionPart Source="System.Windows.Controls.zip" />
</Deployment.ExternalParts>
</Deployment>
多出了Deployment.ExternalParts结点。通过这种方式,用户访问Silverlight应用时,xap下载的速度会得到改善,当程序中用到某一个外部程序集时,则会自动下载对应的Zip包到客户端,并加载其中的程序集。这样只要合理组织程序集之间的引用就可以达到提高加载速度的目的。非常方便简单。
三、动态加载XAP
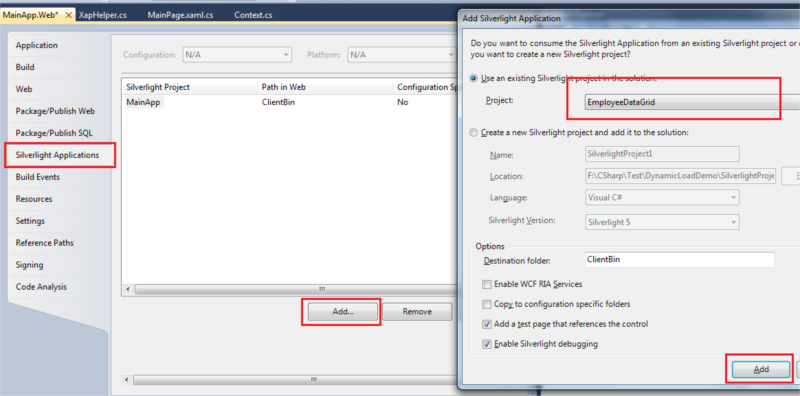
有了对Xap包结构和AppMainfest.xaml 结构的初步认识之后,要实现Xap包的动态加载就比较容易了。新建一个Silverlight应用程序EmployeeDataGrid,添加一些逻辑代码和引用。之后再将工程添加到MainApp.Web工程的Silverlight Application中。
编译之后在ClinetBin目录下会生成EmployeeDataGrid.xap文件。运行MainApp.Web工程,看到下面的页面。
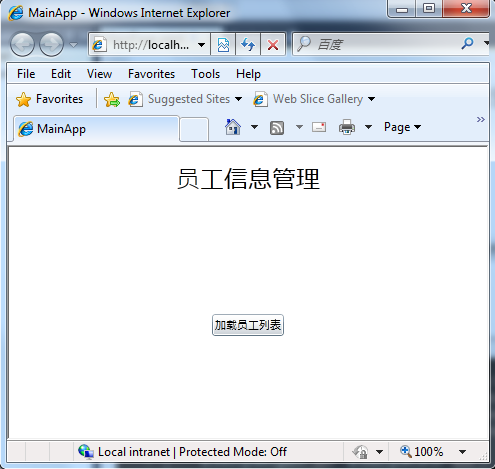
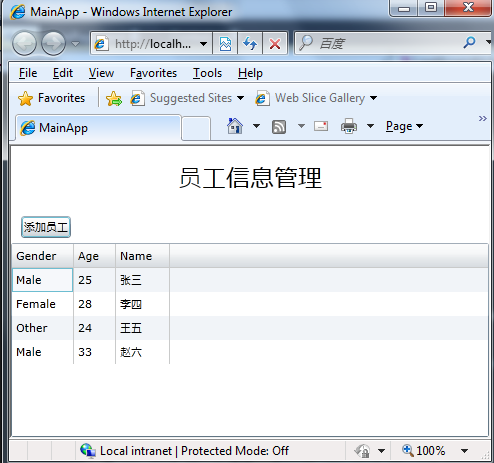
首页打开加载MainApp页面,点击页面上的“加载员工列表”按钮,动态加载EmployeeDataGrid.xap并初始化员工列表,代码如下:
/// <summary>
/// 加载员工列表按钮点击事件
/// </summary>
private void BtnLoadEmployeeListClick(object sender, RoutedEventArgs e)
{
LayoutRoot.Children.Remove(BtnLoadEmployeeList);
LoadXapProgressPanel.Visibility = Visibility.Visible;
// 下载xap包
var xapClient = new WebClient();
xapClient.OpenReadCompleted += new OpenReadCompletedEventHandler(ManageXapOpenReadCompleted);
xapClient.DownloadProgressChanged += new DownloadProgressChangedEventHandler(ManageXapDownloadProgressChanged);
var xapUri = new Uri(HtmlPage.Document.DocumentUri, "ClientBin/EmployeeDataGrid.xap");
xapClient.OpenReadAsync(xapUri);
}
/// <summary>
/// Xap包下载完成
/// </summary>
/// <param name="sender"></param>
/// <param name="e"></param>
private void ManageXapOpenReadCompleted(object sender, OpenReadCompletedEventArgs e)
{
if (e.Error == null)
{
// 利用反射创建页面
Assembly assembly = XapHelper.LoadAssemblyFromXap(e.Result);
var employeeDataGrid = assembly.CreateInstance("EmployeeDataGrid.MainPage") as UserControl;
// 将列表页面加载到主页面中
Grid.SetRow(employeeDataGrid, 1);
LayoutRoot.Children.Add(employeeDataGrid);
LayoutRoot.Children.Remove(LoadXapProgressPanel);
}
else
{
MessageBox.Show(e.Error.Message);
}
}
加载Xap中程序集的代码:
/// <summary>
/// 从XAP包中返回程序集信息
/// </summary>
/// <param name="packageStream">Xap Stream</param>
/// <returns>入口程序集</returns>
public static Assembly LoadAssemblyFromXap(Stream packageStream)
{
// 加载AppManifest.xaml
var streamResourceInfo = new StreamResourceInfo(packageStream, null);
Stream stream = Application.GetResourceStream(streamResourceInfo, new Uri("AppManifest.xaml", UriKind.Relative)).Stream;
XmlReader xmlReader = XmlReader.Create(stream);
// 读取程序集信息
Assembly entryAssembly = null;
string entryAssemblyName = string.Empty;
var assemblyPartInfos = new List<AssemblyPartInfo>();
while (xmlReader.Read())
{
switch (xmlReader.NodeType)
{
case XmlNodeType.Element:
if (xmlReader.Name == "Deployment")
{
// 入口程序集名称
entryAssemblyName = xmlReader.GetAttribute("EntryPointAssembly");
}
else if (xmlReader.Name == "AssemblyPart")
{
var name = xmlReader.GetAttribute("x:Name");
var source = xmlReader.GetAttribute("Source");
assemblyPartInfos.Add(new AssemblyPartInfo { Name = name, Source = source });
}
break;
default:
break;
}
}
var assemblyPart = new AssemblyPart();
streamResourceInfo = new StreamResourceInfo(packageStream, "application/binary");
// 加载程序集
foreach (var assemblyPartInfo in assemblyPartInfos)
{
var assemblyUri = new Uri(assemblyPartInfo.Source, UriKind.Relative);
StreamResourceInfo streamInfo = Application.GetResourceStream(streamResourceInfo, assemblyUri);
// 入口程序集
if (assemblyPartInfo.Name == entryAssemblyName)
{
entryAssembly = assemblyPart.Load(streamInfo.Stream);
}
// 其他程序集
else
{
assemblyPart.Load(streamInfo.Stream);
}
}
return entryAssembly;
}
至此,已经可以实现Xap的动态加载了。
四、一些细节问题
一、重复引用的程序集
让我们回过头来看看MainApp.xap和EmployeeDataGrid.xap中的程序集。
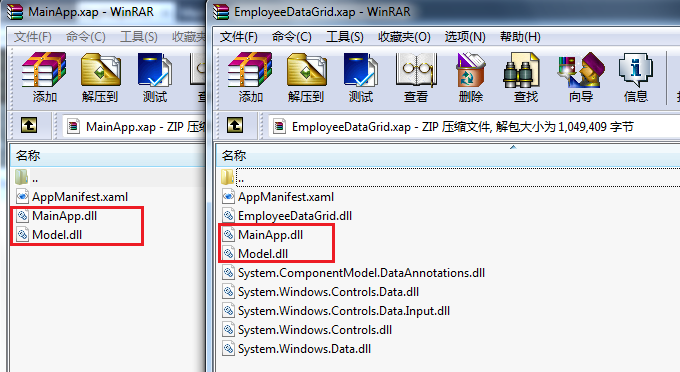
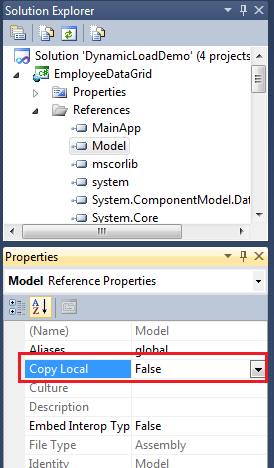
发现,MainApp.xap中已经有的MainApp.dll和Model.dll在EmployeeDataGrid.xap中重复存在了,比较不爽。有人会说只要在发布之前手动删除EmployeeDataGrid.xap中重复的dll就可以了。虽然这样是可行的,但是无疑带来了很多无谓的工作量。其实有一种非常简单的方法可以解决这一问题。只要设置EmployeeDataGrid引用工程中那些重复引用程序集的Copy Local属性为Fasle,再重新编译一下,这次生成xap包时就不会讲这些程序集压缩进去。
二、资源问题
之前看网上的资料,有人提到动态加载xap后一些用到资源的地方会有问题。为此我在Demo中做了测试。在MainApp工程中新建一个UserControl,里面放了一个TextBlock,Text属性绑定到TestControl的Text属性上。并且样式使用静态样式TestStyle(定义在MainApp工程的Resource\Style.xaml中, 在App.xaml中添加)
TestControl:
<UserControl x:Class="MainApp.TestControl"
xmlns="http://schemas.microsoft.com/winfx/2006/xaml/presentation"
xmlns:x="http://schemas.microsoft.com/winfx/2006/xaml"
xmlns:d="http://schemas.microsoft.com/expression/blend/2008"
xmlns:mc="http://schemas.openxmlformats.org/markup-compatibility/2006" mc:Ignorable="d"
d:DesignHeight="300" d:DesignWidth="400">
<TextBlock Text="{Binding Path=Text}" Name="TxtTest" Style="{StaticResource TestStyle}" />
</UserControl>
Style.xaml:
<ResourceDictionary xmlns="http://schemas.microsoft.com/winfx/2006/xaml/presentation"
xmlns:x="http://schemas.microsoft.com/winfx/2006/xaml">
<Style x:Key="TestStyle" TargetType="TextBlock" >
<Setter Property="FontSize" Value="20"/>
<Setter Property="Foreground" Value="Blue" />
</Style>
</ResourceDictionary>
这样在MainApp工程中用到TestControl没有任何问题。然而当在EmployeeDataGrid中使用TestControl时却出了问题:
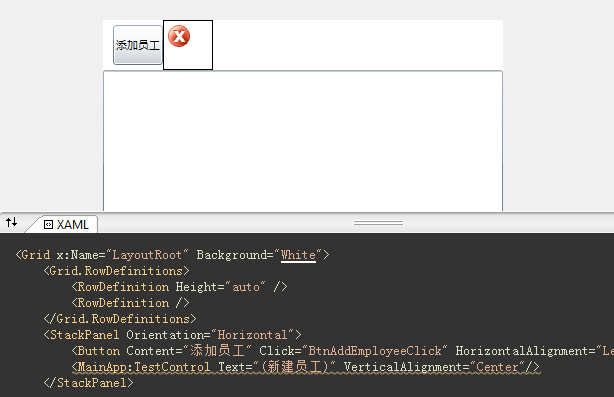
因为在EmployeeDataGrid中构造TestControl时,TesrControl内部的TextBlock从当前程序集中找不到名为TestStyle的资源,所以无法完成初始化,就报错了。对于这个错误,有两个解决办法:
1、修改TestControl的代码,TestBlock对资源的应用放在后台代码中进行:
public TestControl()
{
InitializeComponent();
this.DataContext = this;
var style = Application.Current.Resources["TestStyle"] as Style;
if (style != null)
{
TxtTest.Style = style;
}
}
2、不修改TestControl的代码,而是在EmployeeDataGrid的App中引用MainApp中的资源。
<Application xmlns="http://schemas.microsoft.com/winfx/2006/xaml/presentation"
xmlns:x="http://schemas.microsoft.com/winfx/2006/xaml"
x:Class="EmployeeDataGrid.App">
<Application.Resources>
<ResourceDictionary>
<ResourceDictionary.MergedDictionaries>
<ResourceDictionary Source="/MainApp;component/Resource/Style.xaml"/>
</ResourceDictionary.MergedDictionaries>
</ResourceDictionary>
</Application.Resources>
</Application>
比较两种方法,第二种方法优势明显。第一种方法对于资源的引用都放在后台代码中,增加工作量,而且在设计时也看不到直观效果。所以个人推荐采用第二种方法。
五、结尾
由于xap包自身的压缩特性和AppMainfest.xaml 对程序集引用的描述全是由IDE自动生成,无需人为干预。所以通过Xap动态加载提高Silverlight应用程序加载速度(结合应用程序库缓存效果更好)实现起来简单方便,在实际项目开发中可加以借鉴。同时对于资源的处理可以根据实际项目考虑放在单独的资源工程中,方便组织管理。如果对本文有任何问题或建议,欢迎给我留言讨论。


 104
104

 被折叠的 条评论
为什么被折叠?
被折叠的 条评论
为什么被折叠?
 到【灌水乐园】发言


