


转载注明出处:http://blog.csdn.net/xiaohanluo/article/details/52084105
1. View简介
View类是Android中各种交互式组件的基类,显示在屏幕上的视图由一个或多个View组成,它们排列在一个View树中,我们可以向树中添加新的View或者View树。


2. View绘制过程
每一个Android研发每天都会和各种View打交道,Android中任何一个布局或者任何一个控件都是直接或者间接继承View的,例如TextView、Button、ListView等等,尽管这些布局或者控件都是系统提供好的我们直接用就行,但是如果我们知道了这些布局或者控件绘制到屏幕上的过程后,我们就可以根据我们的需求自定义View了。
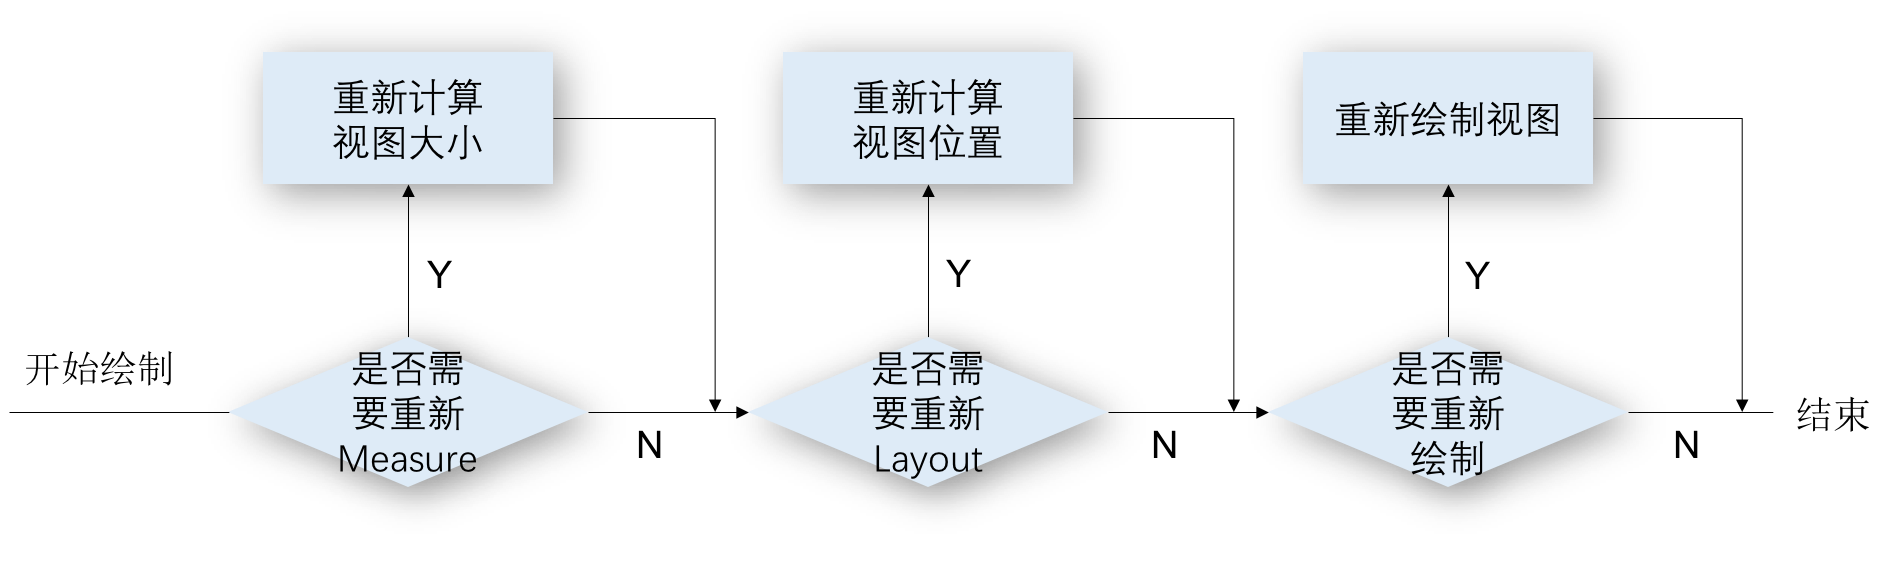
任何一个控件能够精确的显示到屏幕上,都是经过严格的绘制过程的。每一个View的绘制过程都会经历三个步骤,即Measure、Layout、Draw。
| 绘制过程 | 功能 |
|---|---|
| Measure | 计算视图的大小 |
| Layout | 计算视图的位置 |
| Draw | 绘制视图 |
注:视图可为单个控件也可以为布局
整个View树的绘制过程是从ViewRootImpl类的performsTraversals()方法开始的,大体绘制过程就是根据之前设置的状态,选择是否需要重新计算视图大小、重新计算视图位置、重新绘制视图。
ViewRootImpl是一个隐藏类,需要下载源码后查看,在用户android_sdk目录/sources/android-版本号/android/view/目录下可以找到,有兴趣同学可以自己去查看。
视图的绘制过程如下图。
2.1 Measure
Measure是测量的意思,在这个过程中主要计算视图的大小。
在这个过程主要有三个主要的方法。
- public final void measure(int widthMeasureSpec, int heightMeasureSpec)
- protected void onMeasure(int widthMeasureSpec, int heightMeasureSpec)
- protected final void setMeasuredDimension(int measuredWidth, int measureHight)
View类中的measure()方法是final类型,它是不可被子类重写的,在measure()方法中主要是一些逻辑的判断,主要的计算过程是在onMeasure()方法中,这个方法可以被子类覆盖。我们先看看一下measure()的这个方法的部分代码。
public final void measure(int widthMeasureSpec, int heightMeasureSpec) {
    ...
    int cacheIndex = (mPrivateFlags & PFLAG_FORCE_LAYOUT) == PFLAG_FORCE_LAYOUT ? -1 :
            mMeasureCache.indexOfKey(key);
    if (cacheIndex < 0 || sIgnoreMeasureCache) {
        // 计算视图大小
        onMeasure(widthMeasureSpec, heightMeasureSpec);
        mPrivateFlags3 &= ~PFLAG3_MEASURE_NEEDED_BEFORE_LAYOUT;
    } else {
        ...
    }
    ...
    mPrivateFlags |= PFLAG_LAYOUT_REQUIRED;

    mOldWidthMeasureSpec = widthMeasureSpec;
    mOldHeightMeasureSpec = heightMeasureSpec;

    ...
}onMeasure()
方法。我们看一下
onMeasure()
方法,里面调用了
getDefaultSize()
方法,一并查看一下。
protected void onMeasure(int widthMeasureSpec, int heightMeasureSpec) {
    setMeasuredDimension(getDefaultSize(getSuggestedMinimumWidth(), widthMeasureSpec),
        getDefaultSize(getSuggestedMinimumHeight(), heightMeasureSpec));
}

public static int getDefaultSize(int size, int measureSpec) {
    int result = size;
    // 获取视图模式和大小
    int specMode = MeasureSpec.getMode(measureSpec);
    int specSize = MeasureSpec.getSize(measureSpec);

    // 根据计算模式,得到计算的视图大小
    switch (specMode) {
    case MeasureSpec.UNSPECIFIED:
        result = size;
        break;
    case MeasureSpec.AT_MOST:
    case MeasureSpec.EXACTLY:
        result = specSize;
        break;
    }
    return result;
} onMeasure()这个方法有两个参数,是父视图调用子视图measure()方法对子视图进行测量时候,传入的参数,通过这两个参数,分别确定子视图宽度和高度的specSize和specMode。MeasureSpec参数的值为int型,32位,因为specMode分三种,所以前两位是用来标识specMode的,specMode三种模式如下。
- MeasureSpec.UNSPECIFIED 父视图没有添加任何限制,子视图大小可以使任意大小。
- MeasureSpec.AT_MOST 父视图为子视图指定了大小,即specSize
- MeasureSpec.EXACTLY 子视图大小最多是俯视图指定的代销,即specSize
在getDefaultSize方法中,我们可以看到如果是UNSPECIFIED模式,返回的大小是系统建议的最小宽度或者最小高度;如果是AT_MOST或者EXACTLY模式,返回的是从measureSpec参数里面获取的specSize。
所以我们可以得知,其实计算视图的大小是在onMeasure()方法里进行的,而且这个方法是可以重写的。在获取了视图的大小之后,调用setMeasuredDimension将计算后的数据储存起来。
单个View大小计算比较简单,大体跟上面相似,但是如果是ViewGroup的话,它的计算过程是怎么样的呢。因为ViewGroup是个抽象的类,那我们就以LinearLayout为例子查看具体的细节,直接来查看一下LinearLayout的onMeasure的过程。
protected void onMeasure(int widthMeasureSpec, int heightMeasureSpec) {
    if (mOrientation == VERTICAL) {
        measureVertical(widthMeasureSpec, heightMeasureSpec);
    } else {
        measureHorizontal(widthMeasureSpec, heightMeasureSpec);
    }
}
代码很简单,先查看了LinearLayout方向
orientation
属性,根据不同的属性进行不同的计算,我们只挑垂直方向时候的计算过程查看吧,去看一下
measureVertical()
方法,方法代码非常多,我们只查看重要的逻辑。
void measureVertical(int widthMeasureSpec, int heightMeasureSpec) {
    // 初始化一些局部变量
    ...
    // 获取垂直方向上的子View个数
    final int count = getVirtualChildCount();

    // 获取本身的specSize和specMode
    final int widthMode = MeasureSpec.getMode(widthMeasureSpec);
    final int heightMode = MeasureSpec.getMode(heightMeasureSpec);

    // 初始化局部变量
    ...

    // 遍历子View获取其高度,并记录下子View中最高的高度数值
    for (int i = 0; i < count; ++i) {
        final View child = getVirtualChildAt(i);

        // 子View为空,measureNullChile(int)返回值恒为0
        if (child == null) {
            mTotalLength += measureNullChild(i);
            continue;
        }

        // 子View不可见,直接跳过该View的measure过程,getChildrenSkipCount()返回值恒为0
        // 注意如果view的可见属性设置为VIEW.INVISIBLE,还是会计算该view大小
        if (child.getVisibility() == View.GONE) {
           i += getChildrenSkipCount(child, i);
           continue;
        }

        // 添加分割线高度
        if (hasDividerBeforeChildAt(i)) {
            mTotalLength += mDividerHeight;
        }

        // 获取子View的布局参数
        LinearLayout.LayoutParams lp = (LinearLayout.LayoutParams) child.getLayoutParams();

        // 记录子View是否有weight属性设置,用于后面判断是否需要二次measure
        totalWeight += lp.weight;

        if (heightMode == MeasureSpec.EXACTLY && lp.height == 0 && lp.weight > 0) {
            // 此地方可以简单理解为
            // 如果LinearLayout的specMode为EXACTLY且子View设置了weight属性,在这里会跳过子View的measure过程
            // 同时标记skippedMeasure属性为true,后面会根据该属性决定是否进行第二次measure
            // 这也是为什么LinearLayout的子View使用weight属性时候,最好替换成RelativeLayout布局
            // 因为如果LinearLayout的子View设置了weight,会进行两次measure计算,比较耗时
            final int totalLength = mTotalLength;
            mTotalLength = Math.max(totalLength, totalLength + lp.topMargin + lp.bottomMargin);
            skippedMeasure = true;
        } else {
            int oldHeight = Integer.MIN_VALUE;

            if (lp.height == 0 && lp.weight > 0) {
                // 如果LinearLayout本身的specMode为UNSPECIFIED或者AT_MOST时候
                // 子View设置了weight属性想占用一些空间,暂时将该子view的高度属性设置为WRAP_CONTENT
                // 至此,不论LinearLayout何种specMode,都对子View设置了weight属性有了相应的处理
                oldHeight = 0;
                lp.height = LayoutParams.WRAP_CONTENT;
            }

            // 在这个方法内部,最终会调用到子View的measure方法,计算出子View的大小,也就是在这里形成了递归
            measureChildBeforeLayout(
                   child, i, widthMeasureSpec, 0, heightMeasureSpec,
                   totalWeight == 0 ? mTotalLength : 0);

            if (oldHeight != Integer.MIN_VALUE) {
               lp.height = oldHeight;
            }

            // 记录LinearLayout占用的总高度
            final int childHeight = child.getMeasuredHeight();
            final int totalLength = mTotalLength;
            mTotalLength = Math.max(totalLength, totalLength + childHeight + lp.topMargin +
                   lp.bottomMargin + getNextLocationOffset(child));

            // 记录下最高的子View的高度数值
            if (useLargestChild) {
                largestChildHeight = Math.max(childHeight, largestChildHeight);
            }
        }

        // 其他逻辑处理
        ...
    }

    // 添加LinearLayout最底部分割线高度
    if (mTotalLength > 0 && hasDividerBeforeChildAt(count)) {
        mTotalLength += mDividerHeight;
    }

    // 其他逻辑处理
    ...

    // 添加本身的padding属性值
    mTotalLength += mPaddingTop + mPaddingBottom;

    int heightSize = mTotalLength;

    // 其他逻辑处理
    ...

    // 如果子View设置了weight属性或者在之前的绘制过程中可能跳过某些子View的测量,现在要进行第二次测量计算
    int delta = heightSize - mTotalLength;
    if (skippedMeasure || delta != 0 && totalWeight > 0.0f) {
        float weightSum = mWeightSum > 0.0f ? mWeightSum : totalWeight;

        mTotalLength = 0;

        for (int i = 0; i < count; ++i) {
            final View child = getVirtualChildAt(i);

            // 如果子View不可见二次measure依旧忽略
            if (child.getVisibility() == View.GONE) {
                continue;
            }

            // 获取子View的布局属性
            LinearLayout.LayoutParams lp = (LinearLayout.LayoutParams) child.getLayoutParams();

            float childExtra = lp.weight;
            // 如果子View设置了weight属性,就进行measure测量
            if (childExtra > 0) {
                // 计算子View通过weight属性获取的拉伸比例
                int share = (int) (childExtra * delta / weightSum);
                weightSum -= childExtra;
                delta -= share;

                    // 获取子View的measureSpec属性
                final int childWidthMeasureSpec = getChildMeasureSpec(widthMeasureSpec,
                        mPaddingLeft + mPaddingRight +
                                lp.leftMargin + lp.rightMargin, lp.width);

                // 如果子View已经测量过,在这里进行二次测量
                if ((lp.height != 0) || (heightMode != MeasureSpec.EXACTLY)) {
                    int childHeight = child.getMeasuredHeight() + share;
                    if (childHeight < 0) {
                        childHeight = 0;
                    }

                    child.measure(childWidthMeasureSpec,
                            MeasureSpec.makeMeasureSpec(childHeight, MeasureSpec.EXACTLY));
                } else {//如果子View在第一次测量时候跳过了测量过程,就使用通过设置weight获取的拉伸比例进行第一次测量
                    child.measure(childWidthMeasureSpec,
                            MeasureSpec.makeMeasureSpec(share > 0 ? share : 0,
                                    MeasureSpec.EXACTLY));
                }

                ...
            }

            ...

            final int totalLength = mTotalLength;
            // 记录计算的总高度
            mTotalLength = Math.max(totalLength, totalLength + child.getMeasuredHeight() +
                    lp.topMargin + lp.bottomMargin + getNextLocationOffset(child));
        }

        // 添加本身的padding属性
        mTotalLength += mPaddingTop + mPaddingBottom;
        // TODO: Should we recompute the heightSpec based on the new total length?
    } else {// 如果没有跳过任何子View测量过程情况的处理
        ...
    }

  ...
}
源代码注释已经非常详尽了,从上面源代码中可以了解到,LinearLayout的measure计算过程远远比单个View的measure计算过程要复杂得多,主要是因为作为ViewGroup的容器,会包含子View,需要通过递归调用子View的measure过程,最后才能完整地得出LinearLayout最终的大小。同时也从代码里面得知,如果LinearLayout的子View设置了weight属性的话,会进行额外的测量计算过程,所以在平时使用中尽量的使用RelativeLayout来代替LinearLayout。
至此关于视图的measure过程都有了大体的认识,如果是单个View,会直接测量计算出自身的大小;如果是ViewGroup,会递归的调用子View的measure()方法,最终得出容器的整体大小,当然ViewGroup只是一个抽象的类,在具体的容器中可能测量的过程有些不同,但是大体还是通过递归依次调用子View的measure()方法,最终完成测量计算。
2.2 Layout
Layout这个过程是计算视图在父布局中的位置信息,这个过程完成后,就知道视图该显示在屏幕的什么地方了。这个方法会传入四个参数,l,t,r,b分别代表视图在父视图中左,上,右,下的位置,看一下源代码。
/* @param l Left position, relative to parent
 * @param t Top position, relative to parent
 * @param r Right position, relative to parent
 * @param b Bottom position, relative to parent
 */
public void layout(int l, int t, int r, int b) {
    ...
    int oldL = mLeft;
    int oldT = mTop;
    int oldB = mBottom;
    int oldR = mRight;

    boolean changed = isLayoutModeOptical(mParent) ?
            setOpticalFrame(l, t, r, b) : setFrame(l, t, r, b);

    if (changed || (mPrivateFlags & PFLAG_LAYOUT_REQUIRED) == PFLAG_LAYOUT_REQUIRED) {
        onLayout(changed, l, t, r, b);
        ...
    }

    mPrivateFlags &= ~PFLAG_FORCE_LAYOUT;
    mPrivateFlags3 |= PFLAG3_IS_LAID_OUT;
}onLayout()
方法,那么这个方法到底会做些什么事呢?于是去查看了一下
onLayout()
方法,居然是个抽象方法。
protected void onLayout(boolean changed, int left, int top, int right, int bottom) {} onLayout
是个抽象方法,那在自定义View的时候,重写的
onLayout
方法里面也没有具体计算过程,但是View还是正确的显示在屏幕上了,这是为什么呢?是什么时候将视图位置信息的保存下来的呢?向上看,会发现调用了
setOpticalFrame
和
setFrame
这个两个方法,这两个方法会接受四个参数,而这四个参数正好可以确定视图在父视图中的位置。直接去查看这两个方法吧。
private boolean setOpticalFrame(int left, int top, int right, int bottom) {
    Insets parentInsets = mParent instanceof View ?
            ((View) mParent).getOpticalInsets() : Insets.NONE;
    Insets childInsets = getOpticalInsets();
    return setFrame(
            left   + parentInsets.left - childInsets.left,
            top    + parentInsets.top  - childInsets.top,
            right  + parentInsets.left + childInsets.right,
            bottom + parentInsets.top  + childInsets.bottom);
}

protected boolean setFrame(int left, int top, int right, int bottom) {
    ...
    mLeft = left;
    mTop = top;
    mRight = right;
    mBottom = bottom;
    mRenderNode.setLeftTopRightBottom(mLeft, mTop, mRight, mBottom);
} setOpticalFrame方法也会调用到setFrame方法,而在setFrame方法中,将四个参数保存了下来,这样就记录下了视图的位置信息。
这样,视图的位置也记录了下来,如果是ViewGroup的话,会在onLayout方法中,会递归调用子视图的layout方法,这个过程完毕后,View树中所有的View在屏幕中显示的位置都能被确定。因为ViewGroup是个抽象类,onLayout()是个抽象的方法,并没有具体的测量计算过程,我们还是以LinearLayout为例查看一下onLayout()过程。直接从源代码看起。
protected void onLayout(boolean changed, int l, int t, int r, int b) {
    if (mOrientation == VERTICAL) {
        layoutVertical(l, t, r, b);
    } else {
        layoutHorizontal(l, t, r, b);
    }
}
和LinearLayout自身的
measure()
方法有些类似,都是先查看了本身的方向
orientation
属性,不同的方向处理方式不同,我们也挑一种进行查看,查看一下垂直方向的处理过程,
layoutVertical()
方法代码如下。
void layoutVertical(int left, int top, int right, int bottom) {
    final int paddingLeft = mPaddingLeft;

    int childTop;
    int childLeft;

    // LinearLayout的宽度
    final int width = right - left;
    // 子View在父布局中的右边界
    int childRight = width - mPaddingRight;

    // 子View剩余的宽度
    int childSpace = width - paddingLeft - mPaddingRight;

    // 子View的数量
    final int count = getVirtualChildCount();

    // 获取子View的顶部边界
    final int majorGravity = mGravity & Gravity.VERTICAL_GRAVITY_MASK;
    final int minorGravity = mGravity & Gravity.RELATIVE_HORIZONTAL_GRAVITY_MASK;

    switch (majorGravity) {
       case Gravity.BOTTOM:
           childTop = mPaddingTop + bottom - top - mTotalLength;
           break;

       case Gravity.CENTER_VERTICAL:
           childTop = mPaddingTop + (bottom - top - mTotalLength) / 2;
           break;

       case Gravity.TOP:
       default:
           childTop = mPaddingTop;
           break;
    }

    // 遍历子View,进行计算
    for (int i = 0; i < count; i++) {
        final View child = getVirtualChildAt(i);
        if (child == null) {
            childTop += measureNullChild(i);
        } else if (child.getVisibility() != GONE) {
            final int childWidth = child.getMeasuredWidth();
            final int childHeight = child.getMeasuredHeight();

            final LinearLayout.LayoutParams lp =
                    (LinearLayout.LayoutParams) child.getLayoutParams();

            int gravity = lp.gravity;
            if (gravity < 0) {
                gravity = minorGravity;
            }
            // 获取子View的左边界
            final int layoutDirection = getLayoutDirection();
            final int absoluteGravity = Gravity.getAbsoluteGravity(gravity, layoutDirection);
            switch (absoluteGravity & Gravity.HORIZONTAL_GRAVITY_MASK) {
                case Gravity.CENTER_HORIZONTAL:
                    childLeft = paddingLeft + ((childSpace - childWidth) / 2)
                            + lp.leftMargin - lp.rightMargin;
                    break;

                case Gravity.RIGHT:
                    childLeft = childRight - childWidth - lp.rightMargin;
                    break;

                case Gravity.LEFT:
                default:
                    childLeft = paddingLeft + lp.leftMargin;
                    break;
            }

            // 添加分割线高度,更新顶部边界
            if (hasDividerBeforeChildAt(i)) {
                childTop += mDividerHeight;
            }

            // 由于子View是垂直方向排列,每一次计算完毕后,更新子View的顶部边界
            childTop += lp.topMargin;

            // 递归调用子View的`layout()`方法,对子View的位置信息进行测量计算
            setChildFrame(child, childLeft, childTop + getLocationOffset(child),
                    childWidth, childHeight);

            // 添加子View的底部margin值和偏移量,更新子View顶部边界
            childTop += childHeight + lp.bottomMargin + getNextLocationOffset(child);

            i += getChildrenSkipCount(child, i);
        }
    }
} 从代码中可以看出来,LinearLayout的onLayout()方法的测量过程思路非常清晰简单,分别计算了子View的上下左右的边界,然后递归调用了子View的layout()方法,将子Viewd的上下左右边界传入,直至测量完成,计算出LinearLayout在父布局的位置,也计算出LinearLayout中子View在容器中的位置。不同的容器layout()方法实现过程差别很大,大体思路也是通过递归调用子View的layout()方法,从View树的根节点开始测量计算,最终计算出整个View树中各个View在屏幕中的位置。
最后注意,因为ViewGroup中的onLayout()方法是个抽象方法,所以我们在自定义ViewGroup的时候需要重写这个方法的。
2.3 Draw
在计算完毕视图的大小和位置之后,终于可以开始绘制视图了。
public void draw(Canvas canvas) {
    ...

    /*
     * 绘制过程会执行以下几个步骤:
     *   1. 绘制view背景
     *   2. 为绘制渐变做准备
     *   3. 绘制view内容
     *   4. 绘制子View
     *   5. 绘制渐变框
     *   6. 绘制其他东西,滑动条等等
     */

    // 步骤1, 绘制view背景
    int saveCount;
    if (!dirtyOpaque) {
        drawBackground(canvas);
    }

    // 通常情况下直接跳过2和5步骤
    final int viewFlags = mViewFlags;
    boolean horizontalEdges = (viewFlags & FADING_EDGE_HORIZONTAL) != 0;
    boolean verticalEdges = (viewFlags & FADING_EDGE_VERTICAL) != 0;
    if (!verticalEdges && !horizontalEdges) {
        // 步骤3 绘制view内容
        if (!dirtyOpaque) onDraw(canvas);

        // 步骤4 绘制子View
        dispatchDraw(canvas);

        ...

        // 步骤6 绘制滑动条和前景色等等
        onDrawForeground(canvas);

        // we're done...
        return;
    }
    ...
} 从源代码上面看,draw的过程已经非常清楚了,有几个重要的方法需要注意,调用onDraw()方法来绘制本身,调用dispatchDraw()来绘制子View,在ViewGroup中,已经重写好了该方法的,我们在自定义ViewGroup的时候并不需要重写该过程,但是可以捕获到该过程做一些其他的事情。
3. 总结
单个的View绘制过程非常简单,但如果遇见了ViewGroup绘制过程就会复杂一些,而且对于不同的布局容器,绘制过程也会有一些不同,这个可以通过源代码去查看具体的细节。既然了解了View的绘制过程,我们就可以自定义自己的View了。


 729
729


 被折叠的 条评论
为什么被折叠?
被折叠的 条评论
为什么被折叠?
 到【灌水乐园】发言


