


 本文介绍了使用Amazon Rekognition的API搭建人脸识别系统。先说明了人脸识别领域及使用函数库搭建系统的好处,接着以K - pop女团照片为例,详细阐述了单人脸检测、人脸对比、多人脸检测识别的实现步骤,还给出了代码地址和参考文章。
人脸识别是目前机器视觉最成功的一个领域了,有许多的人脸检测与识别算法以及人脸识别的函数库。对于入门深度学习来说,从头开始一步一步训练出一个自己的人脸识别项目对你学习深度学习是非常有帮助的,但是在学习之前何不用人脸识别的函数库来体验一下快速搭建人脸识别系统的成就感,也为后续学习提供动力。
目前人脸识别的api有旷视、百度等,今天我们使用的是Amazon Rekognition提供的api来搭建人脸识别,通过这个api只需要编写一个简单的python脚本就可以进行人脸检测和人脸识别。下面我使用K-pop女团照片来作为例子,先看一张小姐姐们的照片:

单人脸检测
使用Amazon Rekognition之前,我们需要注册aws账户并安装boto3函数库,在做好准备之后,我们开始识别单人脸图片检测。我们先导入函数库:
import boto3from PIL import Image%matplotlib inline
from PIL import Image
%matplotlib inline
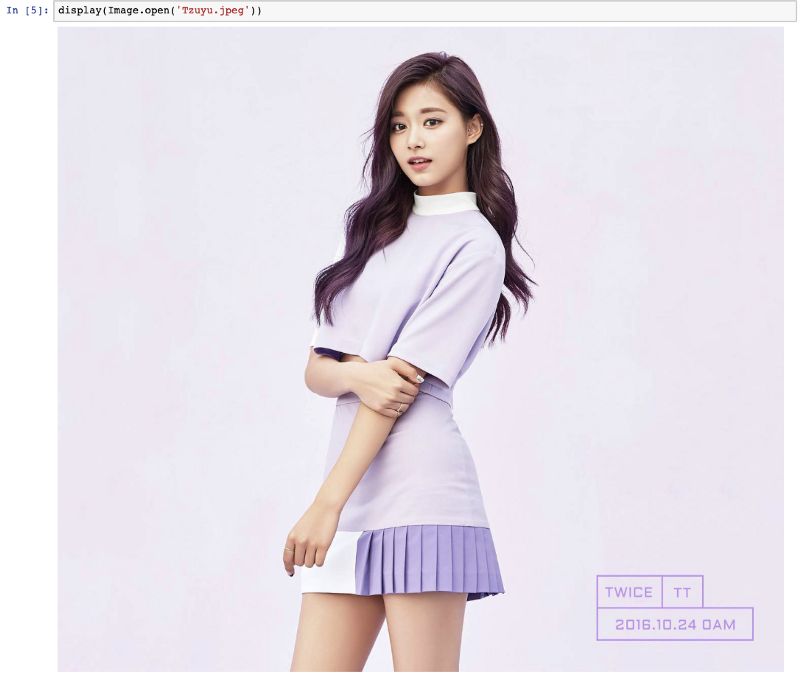
现在我们需要一张我们想要处理的图片,我们将此图像发送到Rekognition API以获取其图像识别结果。先输出一下我们选择的照片:
现在我们可以开始使用Rekognition对给定图像进行面部识别,以下是识别的代码:
import iorekognition = boto3.client('rekognition')image = Image.open("Tzuyu.jpeg")stream = io.BytesIO()image.save(stream,format="JPEG")image_binary = stream.getvalue()rekognition.detect_faces(Image={'Bytes':image_binary},Attributes=['ALL'])
rekognition = boto3.client('rekognition')
image = Image.open("Tzuyu.jpeg")
stream = io.BytesIO()
image.save(stream,format="JPEG")
image_binary = stream.getvalue()
rekognition.detect_faces(
Image={'Bytes':image_binary},Attributes=['ALL'])
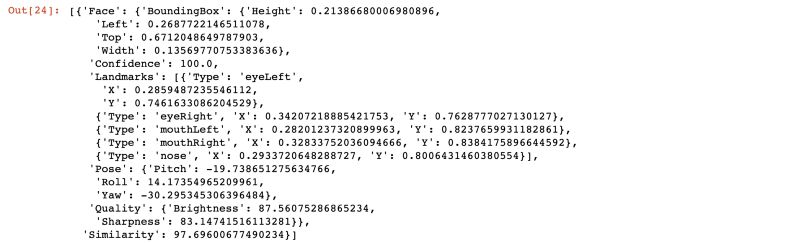
该程序是直接从本地计算机将图像作为内存中的二进制文件对象发送到Rekogntion,并调用rekognition.detect_faces()将您的存储桶和密钥详细信息作为参数,然后从Rekognition的detect_faces函数获得所有图像识别信息。识别结果中不仅包括人脸的边界位置,还有人脸的年龄估计、面部情绪、性别等多中信息。返回的信息太长,下边给大家看下部分识别信息:
{'FaceDetails': [{'AgeRange': {'High': 38, 'Low': 20},   'Beard': {'Confidence': 99.98848724365234, 'Value': False},   'BoundingBox': {'Height': 0.1584049016237259,    'Left': 0.4546355605125427,    'Top': 0.0878104418516159,    'Width': 0.09999311715364456},   'Confidence': 100.0,   'Emotions': [{'Confidence': 37.66959762573242, 'Type': 'SURPRISED'},    {'Confidence': 29.646778106689453, 'Type': 'CALM'},    {'Confidence': 3.8459930419921875, 'Type': 'SAD'},    {'Confidence': 3.134934186935425, 'Type': 'DISGUSTED'},    {'Confidence': 2.061260938644409, 'Type': 'HAPPY'},    {'Confidence': 18.516468048095703, 'Type': 'CONFUSED'},    {'Confidence': 5.1249613761901855, 'Type': 'ANGRY'}],   'Eyeglasses': {'Confidence': 99.98339080810547, 'Value': False},   'EyesOpen': {'Confidence': 99.9864730834961, 'Value': True},   'Gender': {'Confidence': 99.84709167480469, 'Value': 'Female'},   }'AgeRange': {'High': 38, 'Low': 20},
   'Beard': {'Confidence': 99.98848724365234, 'Value': False},
   'BoundingBox': {'Height': 0.1584049016237259,
    'Left': 0.4546355605125427,
    'Top': 0.0878104418516159,
    'Width': 0.09999311715364456},
   'Confidence': 100.0,
   'Emotions': [{'Confidence': 37.66959762573242, 'Type': 'SURPRISED'},
    {'Confidence': 29.646778106689453, 'Type': 'CALM'},
    {'Confidence': 3.8459930419921875, 'Type': 'SAD'},
    {'Confidence': 3.134934186935425, 'Type': 'DISGUSTED'},
    {'Confidence': 2.061260938644409, 'Type': 'HAPPY'},
    {'Confidence': 18.516468048095703, 'Type': 'CONFUSED'},
    {'Confidence': 5.1249613761901855, 'Type': 'ANGRY'}],
   'Eyeglasses': {'Confidence': 99.98339080810547, 'Value': False},
   'EyesOpen': {'Confidence': 99.9864730834961, 'Value': True},
   'Gender': {'Confidence': 99.84709167480469, 'Value': 'Female'},
   }
人脸对比
下面我们开始人脸对比,我将一张人脸图片设置为我的源图片,然后通过Rekognition将在目标图片中找到与源图片最相似的面部。例如在一张有许多人脸的图片中找到目标人脸。我将K-pop团体中一个成员设为源图片,然后在她们组合照片中框出目标。代码如下:
sourceFile='Tzuyu.jpeg'targetFile='twice_group.jpg'imageSource=open(sourceFile,'rb')imageTarget=open(targetFile,'rb')response = rekognition.compare_faces(SimilarityThreshold=80,                              SourceImage={'Bytes': imageSource.read()},                              TargetImage={'Bytes': imageTarget.read()})response['FaceMatches']
targetFile='twice_group.jpg'

imageSource=open(sourceFile,'rb')
imageTarget=open(targetFile,'rb')
response = rekognition.compare_faces(SimilarityThreshold=80,
                              SourceImage={'Bytes': imageSource.read()},
                              TargetImage={'Bytes': imageTarget.read()})
response['FaceMatches']
返回信息如下:
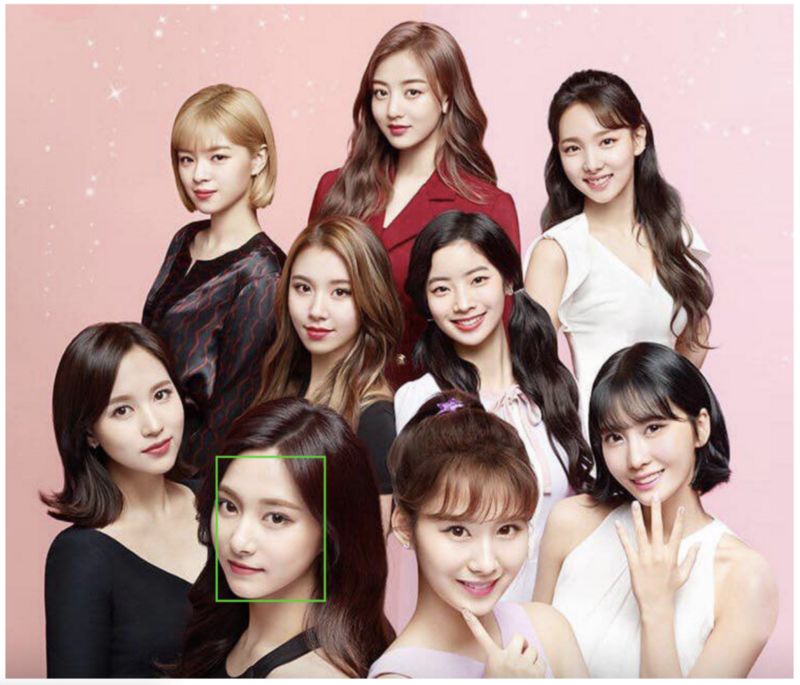
上述compare_faces的响应也将输出组图中所有不匹配面的信息,这可能会很长,所以我只是通过指定响应['FaceMatches']输出Rekognition找到的匹配。似乎从集体照片中找到了匹配的面部,相似度约为97%。使用边界框信息,让我们检查Rekognition所指的面部是Tzuyu的面部。
顺便说一下,BoundingBox部分中的值是整个图像大小的比率。因此,为了使用BoundingBox中的值绘制框,您需要通过将比率乘以实际图像高度或宽度来计算框的每个点的位置。您可以在下面的代码段中找到它是如何完成的。
from PIL import ImageDrawimage = Image.open("twice_group.jpg")imgWidth,imgHeight  = image.size  draw = ImageDraw.Draw(image)box = response['FaceMatches'][0]['Face']['BoundingBox']left = imgWidth * box['Left']top = imgHeight * box['Top']width = imgWidth * box['Width']height = imgHeight * box['Height']points = ((left,top),            (left + width, top),            (left + width, top + height),            (left , top + height),            (left, top))draw.line(points, fill='#00d400', width=2)display(image)import ImageDraw
image = Image.open("twice_group.jpg")
imgWidth,imgHeight  = image.size
draw = ImageDraw.Draw(image)
box = response['FaceMatches'][0]['Face']['BoundingBox']
left = imgWidth * box['Left']
top = imgHeight * box['Top']
width = imgWidth * box['Width']
height = imgHeight * box['Height']
points = ((left,top),
            (left + width, top),
            (left + width, top + height),
            (left , top + height),
            (left, top))
draw.line(points, fill='#00d400', width=2)
display(image)
结果如下,非常成功的框出了我们要找的人脸。
多人脸检测识别
现在我们可以从图片中检测和识别单个脸部,接下来我们想要识别出图片中多个人脸并标记出她们的名字,这样当我们发送一张Twice的新图片时,它可以检测每个成员的面部并显示他们的名字。为了实现这一点,我们需要使用亚马逊的“ 基于存储的API操作””。此类操作有两个特定于亚马逊的术语。“集合”是一个虚拟空间,其中Rekognition存储有关检测到的面部的信息。使用集合,我们可以“索引”面,这意味着检测图像中的面,然后将信息存储在指定的集合中。重要的是Rekognition存储在集合中的信息不是实际图像,而是Rekognition算法提取的特征向量。让我们看看如何创建集合并添加索引。代码如下:
collectionId='test-collection'rekognition.create_collection(CollectionId=collectionId)sourceFile='Tzuyu.jpeg'   imageSource=open(sourceFile,'rb')rekognition.index_faces(Image={'Bytes':imageSource.read()},ExternalImageId='Tzuyu',CollectionId=collectionId)
rekognition.create_collection(CollectionId=collectionId)
sourceFile='Tzuyu.jpeg'
imageSource=open(sourceFile,'rb')
rekognition.index_faces(Image={'Bytes':imageSource.read()},ExternalImageId='Tzuyu',CollectionId=collectionId)
就是这样简单,我们已经创建一个集合并通过ExternalImageId参数为其赋予字符串“Tzuyu”的值。当我们尝试从新图片识别Tzuyu时,Rekognition将搜索与任何索引面部匹配的面部。现在我们需要将K-pop组合中所有成员添加进组合。代码如下:
import ospath = 'Twice'for r, d, f in os.walk(path):    for file in f:        if file != '.DS_Store':            sourceFile = os.path.join(r,file)            imageSource=open(sourceFile,'rb')            rekognition.index_faces(Image={'Bytes':imageSource.read()},ExternalImageId=file.split('_')[0],CollectionId=collectionId)rekognition.describe_collection(CollectionId=collectionId)
path = 'Twice'
for r, d, f in os.walk(path):
    for file in f:
        if file != '.DS_Store':
            sourceFile = os.path.join(r,file)
            imageSource=open(sourceFile,'rb')
            rekognition.index_faces(Image={'Bytes':imageSource.read()},ExternalImageId=file.split('_')[0],CollectionId=collectionId)
rekognition.describe_collection(CollectionId=collectionId)
添加完成后,现在就让我们来看一下在一张图片中识别多个人脸的效果吧!
from PIL import ImageFontimage = Image.open("twice_group.jpg")image_width,image_height  = image.size for face in all_faces:    box=face['BoundingBox']    x1 = box['Left'] * image_width    y1 = box['Top'] * image_height    x2 = x1 + box['Width'] * image_width    y2 = y1 + box['Height']  * image_height    image_crop = image.crop((x1,y1,x2,y2))    stream = io.BytesIO()    image_crop.save(stream,format="JPEG")    image_crop_binary = stream.getvalue()response = rekognition.search_faces_by_image(            CollectionId=collectionId,            Image={'Bytes':image_crop_binary}                                                   )    if len(response['FaceMatches']) > 0:        draw = ImageDraw.Draw(image)        points = (                    (x1,y1),                    (x2, y1),                    (x2, y2),                    (x1 , y2),                    (x1, y1))        draw.line(points, fill='#00d400', width=2)        fnt = ImageFont.truetype('/Library/Fonts/Arial.ttf', 15)        draw.text((x1,y2),response['FaceMatches'][0]['Face']['ExternalImageId'], font=fnt, fill=(255, 255, 0))display(image)import ImageFont
image = Image.open("twice_group.jpg")
image_width,image_height  = image.size

for face in all_faces:
    box=face['BoundingBox']
    x1 = box['Left'] * image_width
    y1 = box['Top'] * image_height
    x2 = x1 + box['Width'] * image_width
    y2 = y1 + box['Height']  * image_height
    image_crop = image.crop((x1,y1,x2,y2))

    stream = io.BytesIO()
    image_crop.save(stream,format="JPEG")
    image_crop_binary = stream.getvalue()
response = rekognition.search_faces_by_image(
            CollectionId=collectionId,
            Image={'Bytes':image_crop_binary}
            )

    if len(response['FaceMatches']) > 0:
        draw = ImageDraw.Draw(image)
        points = (
                    (x1,y1),
                    (x2, y1),
                    (x2, y2),
                    (x1 , y2),
                    (x1, y1)
)
        draw.line(points, fill='#00d400', width=2)
        fnt = ImageFont.truetype('/Library/Fonts/Arial.ttf', 15)
        draw.text((x1,y2),response['FaceMatches'][0]['Face']['ExternalImageId'], font=fnt, fill=(255, 255, 0))
display(image)
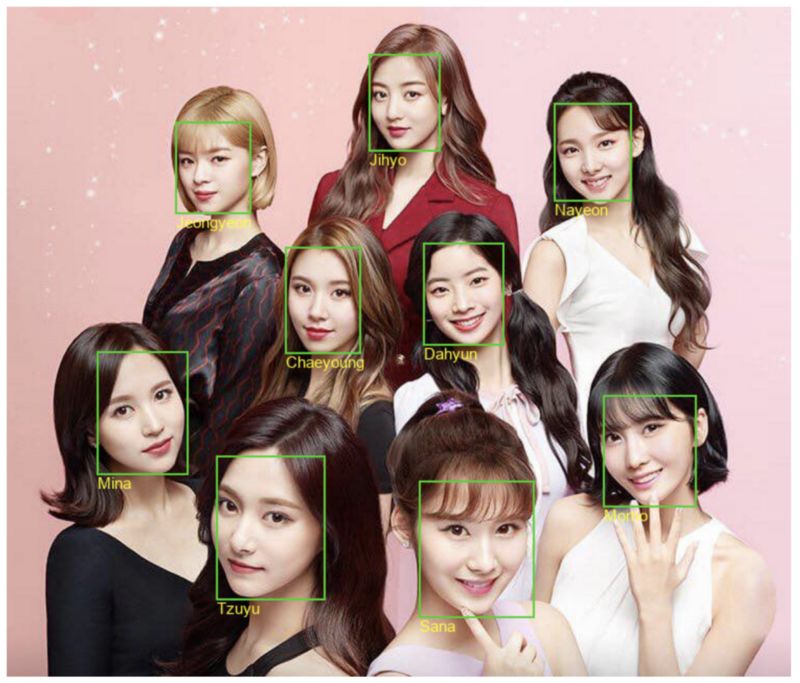
检测识别效果如下:
代码地址:
https://github.com/tthustla/twice_recognition
参考文章:
https://towardsdatascience.com/building-k-pop-idol-identifier-with-amazon-rekognition-92302442d763
热 门 推 荐用Python创建微信机器人
用Python机器人监听微信群聊
用Python获取摄像头并实时控制人脸
开源项目 | 用Python美化LeetCode仓库
推荐Python中文社区旗下的几个服务类公众号
征稿启事 | Python中文社区有奖征文


 728
728

 被折叠的 条评论
为什么被折叠?
被折叠的 条评论
为什么被折叠?
 到【灌水乐园】发言


