


RPC著名框架为Dubbo
其中生产者和消费者都需要创建一个接口服务类,通过这个类进行服务调用
生产者有接口实现类
消费者有接口所需的参数
服务中心需要对服务进行管理,和参数的返回
核心难点:利用接口类的构造器进行反射(说法可能不太对)
看下面
public static void main(String[] args) throws InterruptedException {

        RPClientPro rpClientPro=new RPClientCus().RPContextApplication();
        //重点:接口获取实例
        Test1 mc= RpcClientProxy.getProxy(Test1.class,rpClientPro);
        //调用方法触发invoke,
        System.out.println(mc.SayNumber());
    }
 public  static <T> T getProxy(Class<T> clazz,RPClientPro rpClientPro) {
        return (T) Proxy.newProxyInstance(clazz.getClassLoader()
                , new Class<?>[]{clazz},
                new InvocationHandler() {
                    public Object invoke(Object proxy, Method method, Object[] args) throws Throwable {
                        System.out.println("开启事务");
//这里可以获取到参数,Customer在这里进行RPC方法参数传输
                        System.out.println("关闭事务");
                        return obj;
                    }
                });
    }
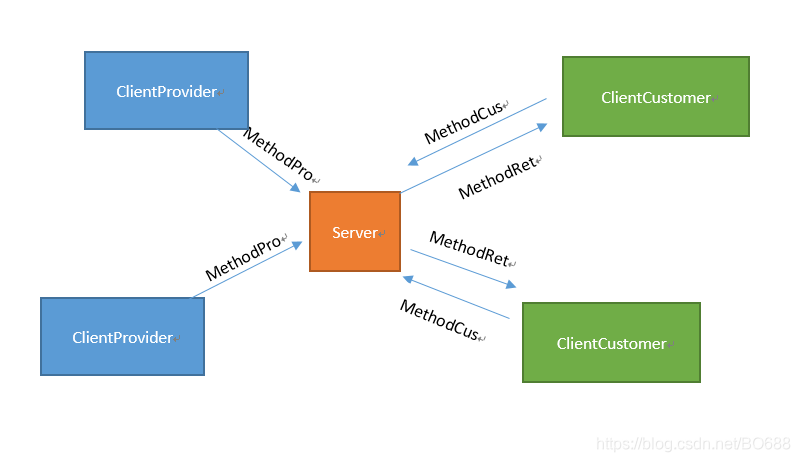
RPC中netty数据流程图
这里通讯工具使用netty,使用类序列化和反序列化进行传输即可。
注意Channel和Ctx不可序列化,类包含这个将无法序列化传输。
- 需要开启服务注册中心
- 生产者进行服务传输并且连接
- 消费者进行服务请求
- 服务中心进行服务调用,并且返回
如果想象Dubbo一样使用配置文件
就需要这个进行文件读取

    public Beans(String configxml) throws Exception {
        SAXReader reader = new SAXReader();
        URL sources = Beans.class.getClassLoader().getResource(configxml);
        Document document = reader.read(sources);
        List<Element> elements = document.getRootElement().elements();
        for (Element element : elements) {
            String id = element.attributeValue("id");//获取id属性
            String path = element.attributeValue("path");//获取class属性
            String clazz = element.attributeValue("class");//获取class属性
            try {
                beansList.add(Class.forName(path));
                beansPath.put(id,path);
                beansObject.put(id,Class.forName(clazz).newInstance());
            }catch (Exception e){
            }
        }

    }
<?xml version="1.0" encoding="UTF-8" ?>
<!--自定义 父节点-->
<beans>
    <!--自定义 子节点-->
    <beans id="cat" path="com.PRC.Service.Test1" />
    <beans id="dog" path="com.PRC.Service.Test"/>
</beans>
或者你想要使用注解直接修饰interface
@Target(ElementType.TYPE)
@Retention(RetentionPolicy.RUNTIME)
public @interface ProvideMethod {

}
@ProvideMethod
public interface Test1 {
    int SayNumber();
    String SayString (String param);
}
这个获取注解标识的interface
 Reflections reflections = new Reflections();
        Set<Class> classes = reflections.getTypesAnnotatedWith(ProvideMethod.class);
pom.xml
<?xml version="1.0" encoding="UTF-8"?>
<project xmlns="http://maven.apache.org/POM/4.0.0"
         xmlns:xsi="http://www.w3.org/2001/XMLSchema-instance"
         xsi:schemaLocation="http://maven.apache.org/POM/4.0.0 http://maven.apache.org/xsd/maven-4.0.0.xsd">
    <modelVersion>4.0.0</modelVersion>

    <groupId>com.conpany.RPC</groupId>
    <artifactId>RPC</artifactId>
    <version>1.0-SNAPSHOT</version>
    <dependencies>
        <dependency>
            <groupId>io.netty</groupId>
            <artifactId>netty-all</artifactId>
            <version>4.1.50.Final</version>
        </dependency>
        <dependency>
            <groupId>com.alibaba</groupId>
            <artifactId>fastjson</artifactId>
            <version>1.2.36</version>
        </dependency>
        <dependency>
            <groupId>cn.hutool</groupId>
            <artifactId>hutool-all</artifactId>
            <version>4.3.1</version>
        </dependency>
        <dependency>
            <groupId>org.slf4j</groupId>
            <artifactId>slf4j-api</artifactId>
            <version>1.7.30</version>
        </dependency>
        <dependency>
            <groupId>org.reflections</groupId>
            <artifactId>reflections</artifactId>
            <version>0.9.10</version>
        </dependency>
        <dependency>
            <groupId>org.projectlombok</groupId>
            <artifactId>lombok</artifactId>
            <version>1.16.18</version>
        </dependency>
        <!-- dom4j 依赖-->
        <dependency>
            <groupId>org.dom4j</groupId>
            <artifactId>dom4j</artifactId>
            <version>2.1.1</version>
        </dependency>
        <dependency>
            <groupId>junit</groupId>
               <artifactId>junit</artifactId>
            <version>4.11</version>
               <scope>test</scope>
        </dependency>
    </dependencies>
</project>


 5553
5553


 被折叠的 条评论
为什么被折叠?
被折叠的 条评论
为什么被折叠?
 到【灌水乐园】发言


