 CAS单点登录部署与Spring Security整合


基本概述
什么是单点登录?
单点登录(Single Sign On),简称为 SSO,是目前比较流行的企业业务整合的解决方案之一。SSO的定义是在多个应用系统中,用户只需要登录一次就可以访问所有相互信任的应用系统。
我们目前的系统存在诸多子系统,而这些子系统是分别部署在不同的服务器中,那么使用传统方式的session是无法解决的,我们需要使用相关的单点登录技术来解决。
CAS 是 Yale 大学发起的一个开源项目,旨在为 Web 应用系统提供一种可靠的单点登录方法,CAS 在 2004 年 12 月正式成为 JA-SIG 的一个项目。CAS 具有以下特点:
- 开源的企业级单点登录解决方案。
- CAS Server 为需要独立部署的 Web 应用。
- CAS Client 支持非常多的客户端(这里指单点登录系统中的各个 Web 应用),包括 Java, .Net, PHP, Perl, Apache, uPortal, Ruby 等。
从结构上看,CAS 包含两个部分: CAS Server 和 CAS Client。CAS Server 需要独立部署,主要负责对用户的认证工作;CAS Client 负责处理对客户端受保护资源的访问请求,需要登录时,重定向到 CAS Server。
执行流程
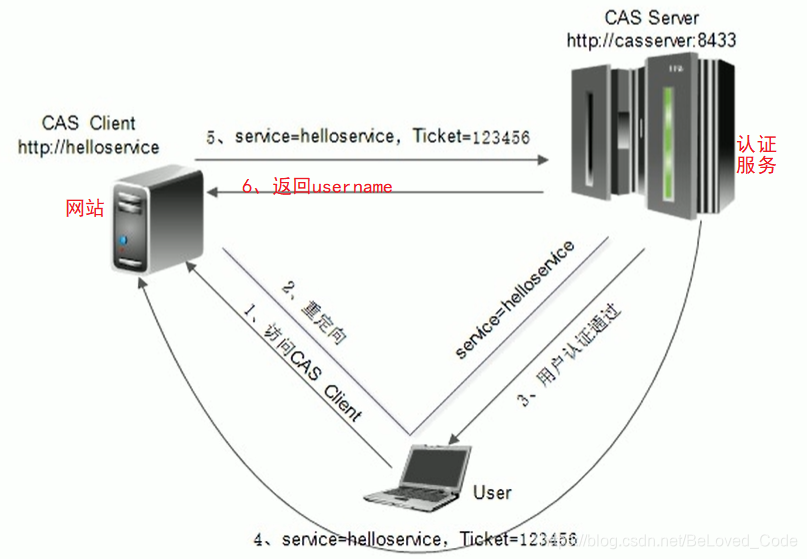
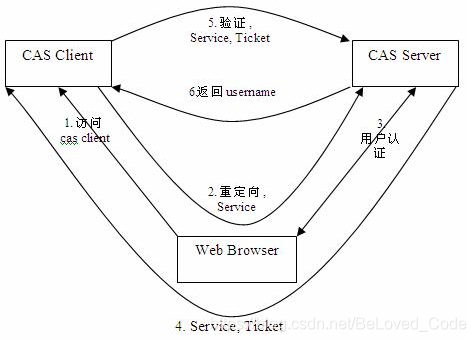
当我们访问网站(CAS Client)的时候,CAS Client客户端会识别用户身份(这个步骤为标线1),当他发现无法识别的时候就会重定向到CAS服务端(标线2),服务端也无法识别身份的话就需要进行登录(标线3进行用户认证,这里只写出认证通过的情况),认证通过后可以访问目标地址,同时会给一个ticket(票据)携带过去(标线4),当请求到达CAS客户端后会进行校验票据(标线5),票据验证通过后,服务端会将用户认证结果传输给客户端(标线6)
安装部署
CAS服务器端部署
将cas.war包放到tomcat的webapps下,启动tomcat后,访问http://localhost:8080/cas/index.jsp
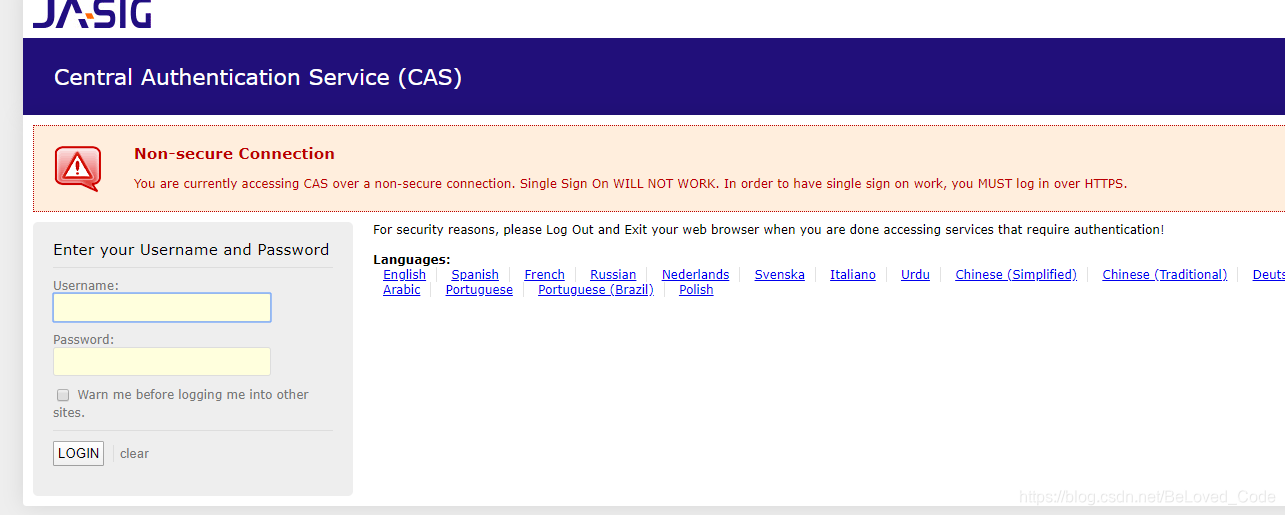
这里有个固定的用户名和密码:casuser/Mellon
CAS服务端配置
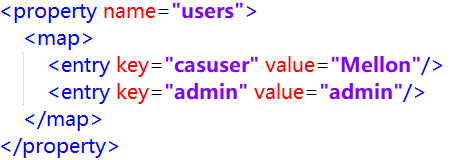
修改用户名、密码
webapps\cas\WEB-INF\deployerConfigContext.xml:
端口修改
修改TOMCAT的端口
打开tomcat 目录 conf\server.xml 找到下面的配置

将端口8080,改为9100
修改CAS配置文件
修改cas的WEB-INF/cas.properties
本机就用localhost
server.name=http://ip:9100
去除https认证
1、修改cas的WEB-INF/deployerConfigContext.xml
找到下面的配置

增加参数p:requireSecure=“false”,requireSecure属性意思为是否需要安全验证,即HTTPS,false为不采用
2、修改cas的/WEB-INF/spring-configuration/ticketGrantingTicketCookieGenerator.xml
找到下面配置

参数p:cookieSecure=“true”,同理为HTTPS验证相关,TRUE为采用HTTPS验证,FALSE为不采用https验证。
参数p:cookieMaxAge="-1",是COOKIE的最大生命周期,-1为无生命周期,即只在当前打开的窗口有效,关闭或重新打开其它窗口,仍会要求验证。可以根据需要修改为大于0的数字,比如3600等,意思是在3600秒内,打开任意窗口,都不需要验证。
我们这里将cookieSecure改为false , cookieMaxAge 改为1800
3、修改cas的WEB-INF/spring-configuration/warnCookieGenerator.xml
找到下面配置

将cookieSecure改为false , cookieMaxAge 改为1800
CAS服务端数据源设置
修改cas服务端中WEB-INF下deployerConfigContext.xml,文件末尾添加如下配置
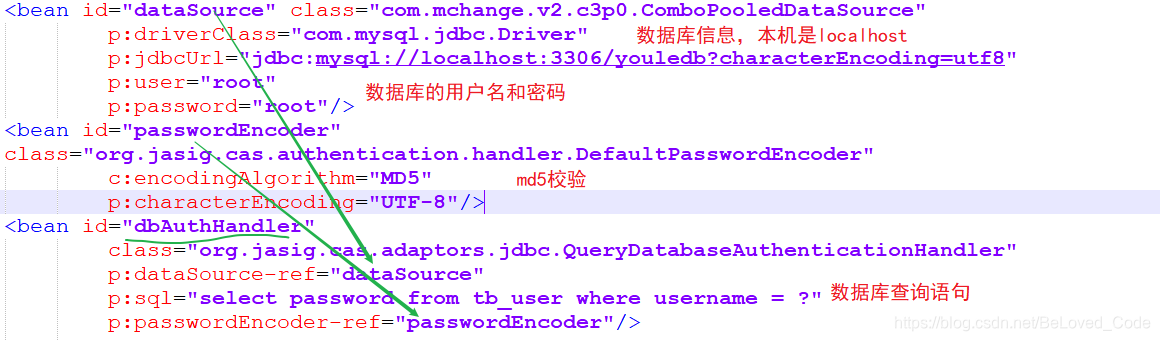
<bean id="dataSource" class="com.mchange.v2.c3p0.ComboPooledDataSource"
		p:driverClass="com.mysql.jdbc.Driver"
		p:jdbcUrl="jdbc:mysql://localhost:3306/youledb?characterEncoding=utf8"
		p:user="root"
		p:password="root"/>
<bean id="passwordEncoder"
class="org.jasig.cas.authentication.handler.DefaultPasswordEncoder"
		c:encodingAlgorithm="MD5"
		p:characterEncoding="UTF-8"/>
<bean id="dbAuthHandler"
		class="org.jasig.cas.adaptors.jdbc.QueryDatabaseAuthenticationHandler"
		p:dataSource-ref="dataSource"
		p:sql="select password from tb_user where username = ?"
		p:passwordEncoder-ref="passwordEncoder"/>
然后在配置文件开始部分找到如下配置
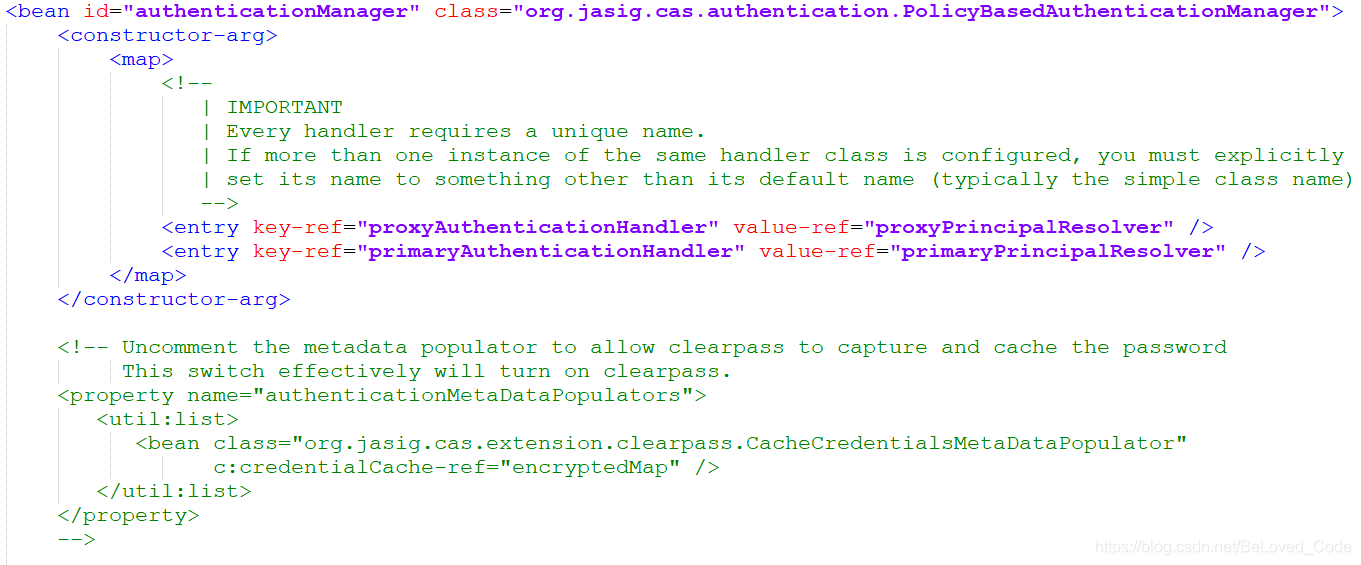
<entry key-ref="primaryAuthenticationHandler" value-ref="primaryPrincipalResolver" />
这句是使用固定的用户名和密码,在下方添加
<entry key-ref="dbAuthHandler" value-ref="primaryPrincipalResolver"/>
这句使用我们刚刚配置好连接数据库查询的用户名和密码
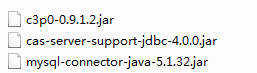
将以下三个jar包放入webapps\cas\WEB-INF\lib下
添加完成后,我们重新启动服务器可以使用数据库中用户名和密码进行登录
cas与spring-security的整合
spring-security负责页面请求的拦截,然后将信息交给cas认证,cas认证通过后再返回给spring-security
创建war工程casSpringSecurityDemo,引入相关依赖,设置tomcat端口
 <properties>
    <webVersion>3.0</webVersion>
    <spring.version>4.2.4.RELEASE</spring.version>
</properties>

<dependencies>
    <dependency>
        <groupId>org.springframework</groupId>
        <artifactId>spring-core</artifactId>
        <version>${spring.version}</version>
    </dependency>
    <dependency>
        <groupId>org.springframework</groupId>
        <artifactId>spring-context</artifactId>
        <version>${spring.version}</version>
    </dependency>
    <dependency>
        <groupId>org.springframework</groupId>
        <artifactId>spring-web</artifactId>
        <version>${spring.version}</version>
    </dependency>
    <dependency>
        <groupId>org.springframework</groupId>
        <artifactId>spring-webmvc</artifactId>
        <version>${spring.version}</version>
    </dependency>
    <dependency>
        <groupId>org.springframework</groupId>
        <artifactId>spring-context-support</artifactId>
        <version>${spring.version}</version>
    </dependency>

    <dependency>
        <groupId>org.springframework.security</groupId>
        <artifactId>spring-security-web</artifactId>
        <version>${spring.version}</version>
    </dependency>
    <dependency>
        <groupId>org.springframework.security</groupId>
        <artifactId>spring-security-config</artifactId>
        <version>${spring.version}</version>
    </dependency>

    <dependency>
        <groupId>org.springframework.security</groupId>
        <artifactId>spring-security-cas</artifactId>
        <version>${spring.version}</version>
    </dependency>

    <dependency>
        <groupId>org.jasig.cas.client</groupId>
        <artifactId>cas-client-core</artifactId>
        <version>3.3.3</version>
        <exclusions>
            <exclusion>
                <groupId>org.slf4j</groupId>
                <artifactId>log4j-over-slf4j</artifactId>
            </exclusion>
        </exclusions>
    </dependency>

</dependencies>

<build>
    <plugins>
        <plugin>
            <groupId>org.apache.maven.plugins</groupId>
            <artifactId>maven-compiler-plugin</artifactId>
            <version>3.7.0</version>
            <configuration>
                <source>1.8</source>
                <target>1.8</target>
                <encoding>UTF-8</encoding>
            </configuration>
        </plugin>
        <plugin>
            <groupId>org.apache.tomcat.maven</groupId>
            <artifactId>tomcat7-maven-plugin</artifactId>
            <version>2.2</version>
            <configuration>
                <port>8012</port>
                <path>/</path>
                <uriEncoding>utf-8</uriEncoding>
            </configuration>
        </plugin>
    </plugins>
</build>
配置spring-security.xml
<?xml version="1.0" encoding="UTF-8"?>
<beans:beans xmlns="http://www.springframework.org/schema/security"
             xmlns:beans="http://www.springframework.org/schema/beans"
             xmlns:xsi="http://www.w3.org/2001/XMLSchema-instance"
             xsi:schemaLocation="http://www.springframework.org/schema/beans
		http://www.springframework.org/schema/beans/spring-beans.xsd
		http://www.springframework.org/schema/security
		http://www.springframework.org/schema/security/spring-security.xsd">

    <!-- entry-point-ref 入口点引用 -->
    <http use-expressions="false" entry-point-ref="casProcessingFilterEntryPoint">
        <intercept-url pattern="/**" access="ROLE_USER" />
        <csrf disabled="true" />
        <!-- custom-filter为过滤器, position表示将过滤器放在指定的位置上,before表示放在指定位置之前 ,after表示放在指定的位置之后 -->
        <custom-filter ref="casAuthenticationFilter" position="CAS_FILTER" />
        <custom-filter ref="requestSingleLogoutFilter" before="LOGOUT_FILTER" />
        <custom-filter ref="singleLogoutFilter" before="CAS_FILTER" />
    </http>

    <!-- CAS入口点 开始 -->
    <beans:bean id="casProcessingFilterEntryPoint"
                class="org.springframework.security.cas.web.CasAuthenticationEntryPoint">
        <!-- 单点登录服务器登录URL -->
        <beans:property name="loginUrl" value="http://localhost:8080/cas/login" />
        <beans:property name="serviceProperties" ref="serviceProperties" />
    </beans:bean>

    <beans:bean id="serviceProperties"
                class="org.springframework.security.cas.ServiceProperties">
        <!--service 配置自身工程的根地址+/login/cas -->
        <beans:property name="service" value="http://localhost:8012/login/cas" />
    </beans:bean>
    <!-- CAS入口点 结束 -->


    <!-- 认证过滤器 开始 -->
    <beans:bean id="casAuthenticationFilter"
                class="org.springframework.security.cas.web.CasAuthenticationFilter">
        <beans:property name="authenticationManager" ref="authenticationManager" />
    </beans:bean>
    <!-- 认证管理器 -->
    <authentication-manager alias="authenticationManager">
        <authentication-provider ref="casAuthenticationProvider"/>
    </authentication-manager>
    <!-- 认证提供者 -->
    <beans:bean id="casAuthenticationProvider"
                class="org.springframework.security.cas.authentication.CasAuthenticationProvider">
        <beans:property name="authenticationUserDetailsService">
            <beans:bean
                    class="org.springframework.security.core.userdetails.UserDetailsByNameServiceWrapper">
                <beans:constructor-arg ref="userDetailsService" />
            </beans:bean>
        </beans:property>
        <beans:property name="serviceProperties" ref="serviceProperties" />
        <!-- ticketValidator 为票据验证器 -->
        <beans:property name="ticketValidator">
            <beans:bean
                    class="org.jasig.cas.client.validation.Cas20ServiceTicketValidator">
                <beans:constructor-arg index="0" value="http://localhost:8080/cas" />
            </beans:bean>
        </beans:property>
        <beans:property name="key"
                        value="an_id_for_this_auth_provider_only" />
    </beans:bean>
    <!-- 认证类 -->
    <beans:bean id="userDetailsService"
                class="com.weilinyang.service.UserDetailServiceImpl" />
    <!-- 认证过滤器 结束 -->

    <!-- 单点登出 开始 -->
    <beans:bean id="singleLogoutFilter"
                class="org.jasig.cas.client.session.SingleSignOutFilter" />
    <beans:bean id="requestSingleLogoutFilter"
                class="org.springframework.security.web.authentication.logout.LogoutFilter">
        <beans:constructor-arg
                value="http://localhost:8080/cas/logout?service=http://www.baidu.com" />
        <beans:constructor-arg>
            <beans:bean
                    class="org.springframework.security.web.authentication.logout.SecurityContextLogoutHandler" />
        </beans:constructor-arg>
        <!-- 完成本地工程登出/logout/cas 和 http://localhost:8080/cas/logout...的转换 -->
        <beans:property name="filterProcessesUrl" value="/logout/cas" />
    </beans:bean>
    <!-- 单点登出 结束 -->

</beans:beans>
配置web.xml
<?xml version="1.0" encoding="UTF-8"?>
<web-app xmlns:xsi="http://www.w3.org/2001/XMLSchema-instance"
         xmlns="http://xmlns.jcp.org/xml/ns/javaee"
         xsi:schemaLocation="http://xmlns.jcp.org/xml/ns/javaee http://xmlns.jcp.org/xml/ns/javaee/web-app_3_1.xsd"
         id="WebApp_ID" version="3.1">

    <context-param>
        <param-name>contextConfigLocation</param-name>
        <param-value>classpath:spring-security.xml</param-value>
    </context-param>

    <listener>
        <listener-class>org.springframework.web.context.ContextLoaderListener</listener-class>
    </listener>

    <filter>
        <filter-name>springSecurityFilterChain</filter-name>
        <filter-class>org.springframework.web.filter.DelegatingFilterProxy</filter-class>
    </filter>
    <filter-mapping>
        <filter-name>springSecurityFilterChain</filter-name>
        <url-pattern>/*</url-pattern>
    </filter-mapping>

</web-app>
创建授权认证类
/**
 * 认证类:本质认证工作由cas完成<br>
 * 此类主要负责在认证后返回角色列表
 */
public class UserDetailServiceImpl implements UserDetailsService {

    @Override
    public UserDetails loadUserByUsername(String username) throws UsernameNotFoundException {
        // 构建角色集合
        List<GrantedAuthority> authorities = new ArrayList<>();

        authorities.add(new SimpleGrantedAuthority("ROLE_USER"));

        return new User(username, "", authorities);
    }
}


 353
353

 被折叠的 条评论
为什么被折叠?
被折叠的 条评论
为什么被折叠?
 到【灌水乐园】发言


