


文章参考:
环境搭建:
1. 安装anaconda;
2. 在anaconda中创建一个新的环境 (比如obj);
3. 在obj环境中安装所需要的各种模块;
4. 下载maskrcnn源码;
5. 调试遇到的坑;
实现步骤:
1. 安装anaconda: 下载对应版本的linux Anaconda;然后 在linux终端输入:
bash Anaconda3-2019.03-Linux-x86_64.shAnaconda下载链接:https://pan.baidu.com/s/1XB_agMgj3PBo8iJgrkxO9g
提取码:0b7s
2. 在anaconda中创建一个新的环境 (比如obj):
# obj是新的环境名称;
# python=3.6 代表该环境下安装的python版本是3.6;
# 坑: 必须要安装python在新的环境下,否则创建新的环境不能用python运行

conda create -n obj python=3.6

source activate obj # 激活这个环境


'''
    其它一些conda常用指令:
            1)conda list 查看安装了哪些包。

            2)conda env list 或 conda info -e 查看当前存在哪些虚拟环境

            3)conda update conda 检查更新当前conda

            4)conda --version 查询conda版本

            5)conda -h 查询conda的命令使用

            6)source deactivate   退出当前环境

            7)conda remove -n your_env_name(虚拟环境名称) --all  删除虚拟环境

            8)conda remove --name your_env_name  package_name 删除虚拟环境中的包


'''
3. 在obj环境中安装所需要的各种模块:
conda install scipy
conda install matplotlib
conda install cython
conda install scikit-learn
conda install jupyter notebook
conda install ipython
conda install pandas
conda install pytorch torchvision cudatoolkit=9.0 -c pytorch
4. 下载maskrcnn源码:
(1)安装pycocotools:
git clone https://github.com/cocodataset/cocoapi.git
cd cocoapi/PythonAPI
python setup.py build_ext install
(2)安装vision库,在github下面的v0.3.0分支下:
git clone https://github.com/pytorch/vision.git
cd vision
git checkout v0.3.0


cp references/detection/utils.py ../   # references 是v0.3.0里面的refernces
cp references/detection/transforms.py ../
cp references/detection/coco_eval.py ../
cp references/detection/engine.py ../
cp references/detection/coco_utils.py ../
(3)自己写下train & evalution 代码:需要把路径改成你自己的路径。
import os
import numpy as np
import torch
from PIL import Image

import torchvision
from torchvision.models.detection.faster_rcnn import FastRCNNPredictor
from torchvision.models.detection.mask_rcnn import MaskRCNNPredictor

from engine import train_one_epoch, evaluate
import utils
import transforms as T


class PennFudanDataset(object):
    def __init__(self, root, transforms):
        self.root = root
        self.transforms = transforms
        # load all image files, sorting them to
        # ensure that they are aligned

        # ***********************************"image_pca" 改成自己的图片路径
        # ***********************************"mask_pic" 改成自己的mask图片路径
        self.imgs = list(sorted(os.listdir(os.path.join(root, "image_pca"))))
        self.masks = list(sorted(os.listdir(os.path.join(root, "mask_pic"))))

    def __getitem__(self, idx):
        # load images ad masks
        # ***********************************"image_pca" 改成自己的图片路径
        # ***********************************"mask_pic" 改成自己的mask图片路径
        img_path = os.path.join(self.root, "image_pca", self.imgs[idx])
        mask_path = os.path.join(self.root, "mask_pic", self.masks[idx])
        img = Image.open(img_path).convert("RGB")
        # note that we haven't converted the mask to RGB,
        # because each color corresponds to a different instance
        # with 0 being background
        mask = Image.open(mask_path)

        mask = np.array(mask)
        # instances are encoded as different colors
        obj_ids = np.unique(mask)
        # first id is the background, so remove it
        obj_ids = obj_ids[1:]

        # split the color-encoded mask into a set
        # of binary masks
        masks = mask == obj_ids[:, None, None]

        # get bounding box coordinates for each mask
        num_objs = len(obj_ids)
        boxes = []
        for i in range(num_objs):
            pos = np.where(masks[i])
            xmin = np.min(pos[1])
            xmax = np.max(pos[1])
            ymin = np.min(pos[0])
            ymax = np.max(pos[0])
            boxes.append([xmin, ymin, xmax, ymax])

        boxes = torch.as_tensor(boxes, dtype=torch.float32)
        # there is only one class
        labels = torch.ones((num_objs,), dtype=torch.int64)
        masks = torch.as_tensor(masks, dtype=torch.uint8)

        image_id = torch.tensor([idx])
        area = (boxes[:, 3] - boxes[:, 1]) * (boxes[:, 2] - boxes[:, 0])
        # suppose all instances are not crowd
        iscrowd = torch.zeros((num_objs,), dtype=torch.int64)

        target = {}
        target["boxes"] = boxes
        target["labels"] = labels
        target["masks"] = masks
        target["image_id"] = image_id
        target["area"] = area
        target["iscrowd"] = iscrowd

        if self.transforms is not None:
            img, target = self.transforms(img, target)

        return img, target

    def __len__(self):
        return len(self.imgs)


def get_model_instance_segmentation(num_classes):
    # load an instance segmentation model pre-trained pre-trained on COCO
    model = torchvision.models.detection.maskrcnn_resnet50_fpn(pretrained=True)

    # get number of input features for the classifier
    in_features = model.roi_heads.box_predictor.cls_score.in_features
    # replace the pre-trained head with a new one
    model.roi_heads.box_predictor = FastRCNNPredictor(in_features, num_classes)

    # now get the number of input features for the mask classifier
    in_features_mask = model.roi_heads.mask_predictor.conv5_mask.in_channels
    hidden_layer = 256
    # and replace the mask predictor with a new one
    model.roi_heads.mask_predictor = MaskRCNNPredictor(in_features_mask,
                                                       hidden_layer,
                                                       num_classes)

    return model


def get_transform(train):
    transforms = []
    transforms.append(T.ToTensor())
    if train:
        transforms.append(T.RandomHorizontalFlip(0.5))
    return T.Compose(transforms)


def main():
    # train on the GPU or on the CPU, if a GPU is not available
    device = torch.device('cuda') if torch.cuda.is_available() else torch.device('cpu')

    # our dataset has two classes only - background and person
    num_classes = 2
    # use our dataset and defined transformations

    # *********************************"maskrcnn_data"改成你自己的图片路径
    dataset = PennFudanDataset('maskrcnn_data', get_transform(train=True))
    dataset_test = PennFudanDataset('maskrcnn_data', get_transform(train=False))

    # split the dataset in train and test set
    indices = torch.randperm(len(dataset)).tolist()
    dataset = torch.utils.data.Subset(dataset, indices[:-50])
    dataset_test = torch.utils.data.Subset(dataset_test, indices[-50:])

    # define training and validation data loaders
    data_loader = torch.utils.data.DataLoader(
        dataset, batch_size=3, shuffle=True, num_workers=4,
        collate_fn=utils.collate_fn)

    data_loader_test = torch.utils.data.DataLoader(
        dataset_test, batch_size=2, shuffle=False, num_workers=4,
        collate_fn=utils.collate_fn)

    # get the model using our helper function
    model = get_model_instance_segmentation(num_classes)

    # move model to the right device
    model.to(device)

    # construct an optimizer
    params = [p for p in model.parameters() if p.requires_grad]
    optimizer = torch.optim.SGD(params, lr=0.005,
                                momentum=0.9, weight_decay=0.0005)
    # and a learning rate scheduler
    lr_scheduler = torch.optim.lr_scheduler.StepLR(optimizer,
                                                   step_size=3,
                                                   gamma=0.1)

    # let's train it for 10 epochs
    num_epochs =20

    for epoch in range(num_epochs):
        # train for one epoch, printing every 10 iterations
        train_one_epoch(model, optimizer, data_loader, device, epoch, print_freq=10)
        # update the learning rate
        lr_scheduler.step()
        # evaluate on the test dataset
        evaluate(model, data_loader_test, device=device)

    print("That's it!")


if __name__ == "__main__":
    main()
(4)文件组织形式:
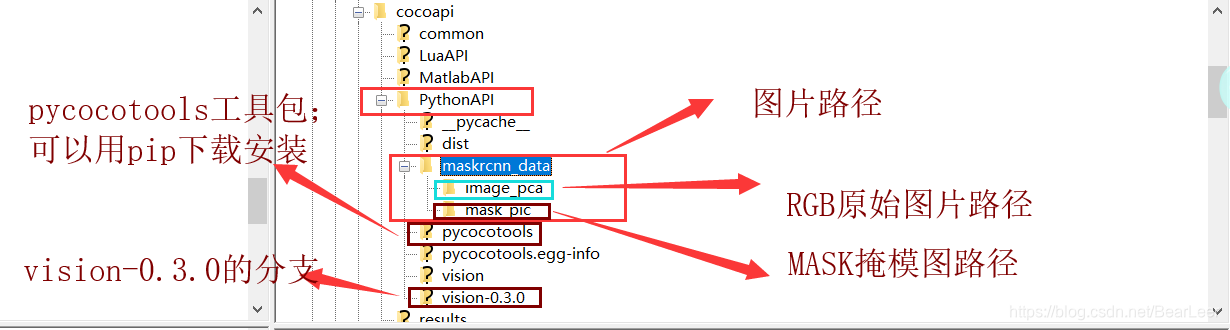
(5) PythonAPI 路径下面有4个Python文件:如果重复,可替换:
链接:https://pan.baidu.com/s/1MMfI3v_UY67cs4eXaH0p6w
提取码:g7sf
5. 调试遇到的坑:
(1)发生AssertionError错误:
AssertionError:
The NVIDIA driver on your system is too old (found version 9000).
Please update your GPU driver by downloading and installing a new
version from the URL: http://www.nvidia.com/Download/index.aspx
Alternatively, go to: https://pytorch.org to install
a PyTorch version that has been compiled with your version
of the CUDA driver.
解决办法:重新安装cuda和torch;原因在于cuda和torch版本不匹配;
conda install pytorch torchvision cuda90 -c pytorch
(2)ModuleNotFoundError:No module named 'pycocotools._mask'
解决办法:没有编译
cd coco/PythonAPI
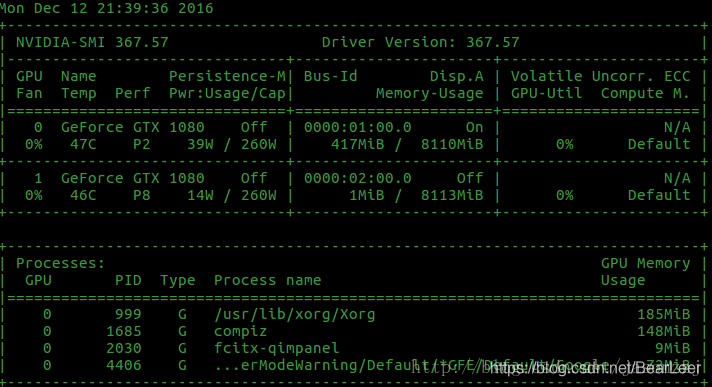
make(3)RuntimeError: out of memory
解决办法:在训练代码的开头出加上:
os.environ['CUDA_VISIBLE_DEVICES']='0, 1' # 0,1 是你的空闲GPU块号查看空闲GPU块号的方法:
nvidia-smi结果如下:其中0号 GPU共8110MB显存,已使用417MB;1号 GPU共8113MB,共使用1MB;故0号和1号GPU均可使用;


 5946
5946


 被折叠的 条评论
为什么被折叠?
被折叠的 条评论
为什么被折叠?
 到【灌水乐园】发言


