


开发环境:JDevloper 11.1.2.1.0+ Oracle Database 10g Express Edition 10.2.0.1。
TaskFlow可以以inline popup窗口的方式显示,那么如何得到TaskFlow的返回值呢?
回答是通过按钮上的ReturnListener方法。
本实验场景如下:在员工表单修改页面,点击浏览部门按钮,弹出一个popup窗口,选择一个部门,确定后,该部门即为当前员工的部门。
重点步骤说明:
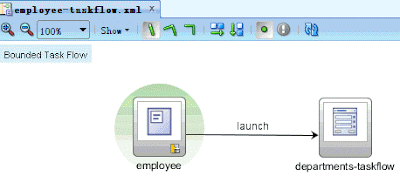
1. employee-taskflow
这是一个使用page fragment的Bounded TaskFlow。
2. employee.jsff
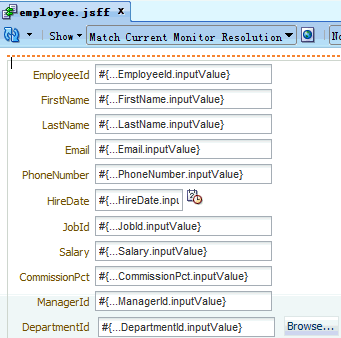
Browse按钮的代码如下:
属性说明:
(1)useWindow=true, 表明下一个导航目的地,使用popup窗口方式展现。
(2)windowEmbedStyle=inlineDocument,popup窗口与原始页面是同一个view id;=window,popup窗口单独使用一个view id。
(3)windowModalityType=applicationModal,modal模式;=modeless,非modal模式。
(4)lanchListener=popup窗口装载时调用的方法,可以用来向popup窗口传递参数。
(5)returnListener=popup窗口的返回时调用的方法,可以用来接收返回值。
(6)partialSubmit=true,防止显示popup窗口时,原始页面被reloading。
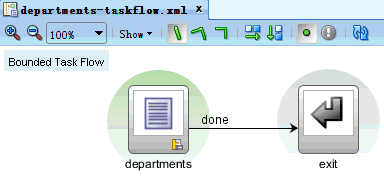
3. departments-taskflow
(1)该TaskFlow即是在popup窗口中显示的TaskFlow。
注意,这是一个没有使用page fragment的Bounded TaskFlow。也就是说,在popup窗口中显示的TaskFlow没有要求一定要用page fragment。

(2)departments.jsf
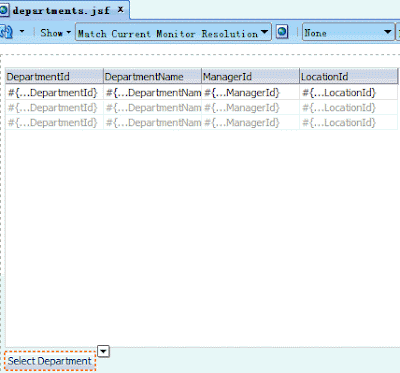
Select Department按钮的代码如下:
注意,为了方便地在页面中引用DepartmentId的值,我手工为页面添加一个AttributeBinding:DepartmentId。
可以看出,点击按钮后,DepartmentId的值将被传递到pageFlowScope.selectedDepartmentId中。
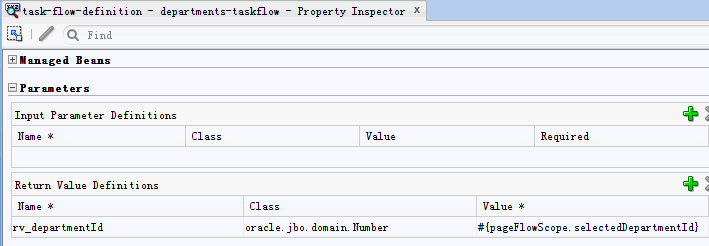
(3)设置departments-taskflow的返回参数值
参数bv_departmentId的值正是来自于前面设置的pageFlowScope.selectedDepartmentId。

那么,最终是如何获得返回值的呢?答案在Managed Bean的代码中。
4. Managed Bean的代码
注意,这里直接通过returnEvent.getReturnValue()获取返回对象,因为只有一个返回值,所以不用根据变量名字查找。
如果是返回多个值,可以使用returnEvent.getReturnParameters();获取所有变量值。
更进一步,你可以在程序中自己创建一个HashMap对象,为其增加Key和Value,然后返回。比如:
HashMap hm = new HashMap();
hm.put("myreturn","The Value");
AdfFacesContext.getCurrentInstance().returnFromDialog(null,hm);
5. 支持双击选择
点击Select Department按钮选择当前行有些麻烦,如果能够支持双击选择就好了。
关于支持Table双击的方法请参考《 Table 组件使用指南之二:基于Table的CRUD 》。
这里只重点说明Managed Bean中新增加的方法:handleTableDoubleClick。
(1)使用ViewIterator查找当前行对象。
(2)获取PageFlowScope,并通过程序设置pageFlowScope.selectedDepartmentId变量。
(3)使用NavigationHandler实现程序导航。
Project下载: ADF_TaskFlow_ReturnValues.7z
参考文献:
1. http://www.yaosansi.com/post/605.html
TaskFlow可以以inline popup窗口的方式显示,那么如何得到TaskFlow的返回值呢?
回答是通过按钮上的ReturnListener方法。
本实验场景如下:在员工表单修改页面,点击浏览部门按钮,弹出一个popup窗口,选择一个部门,确定后,该部门即为当前员工的部门。
重点步骤说明:
1. employee-taskflow
这是一个使用page fragment的Bounded TaskFlow。

2. employee.jsff

Browse按钮的代码如下:
<af:commandButton text="Browse..." id="cb6" windowHeight="350" windowWidth="430"
                  returnListener="#{myBackingBean.departmentsTaskFlowReturnListener}" partialSubmit="true"
                  useWindow="true" action="launch" windowEmbedStyle="window"/>
属性说明:
(1)useWindow=true, 表明下一个导航目的地,使用popup窗口方式展现。
(2)windowEmbedStyle=inlineDocument,popup窗口与原始页面是同一个view id;=window,popup窗口单独使用一个view id。
(3)windowModalityType=applicationModal,modal模式;=modeless,非modal模式。
(4)lanchListener=popup窗口装载时调用的方法,可以用来向popup窗口传递参数。
(5)returnListener=popup窗口的返回时调用的方法,可以用来接收返回值。
(6)partialSubmit=true,防止显示popup窗口时,原始页面被reloading。
3. departments-taskflow
(1)该TaskFlow即是在popup窗口中显示的TaskFlow。
注意,这是一个没有使用page fragment的Bounded TaskFlow。也就是说,在popup窗口中显示的TaskFlow没有要求一定要用page fragment。
(2)departments.jsf

Select Department按钮的代码如下:
<af:commandButton text="Select Department" id="cb1" action="done">
    <af:setPropertyListener type="action" from="#{bindings.DepartmentId.inputValue}"
                            to="#{pageFlowScope.selectedDepartmentId}"/>
</af:commandButton>
注意,为了方便地在页面中引用DepartmentId的值,我手工为页面添加一个AttributeBinding:DepartmentId。
可以看出,点击按钮后,DepartmentId的值将被传递到pageFlowScope.selectedDepartmentId中。
(3)设置departments-taskflow的返回参数值
参数bv_departmentId的值正是来自于前面设置的pageFlowScope.selectedDepartmentId。
那么,最终是如何获得返回值的呢?答案在Managed Bean的代码中。
4. Managed Bean的代码
package view;

import java.util.Map;

import javax.faces.application.Application;
import javax.faces.application.NavigationHandler;
import javax.faces.context.FacesContext;

import oracle.adf.model.BindingContext;

import oracle.adf.model.binding.DCIteratorBinding;
import oracle.adf.view.rich.render.ClientEvent;

import oracle.binding.AttributeBinding;
import oracle.binding.BindingContainer;

import oracle.binding.ControlBinding;

import oracle.jbo.Row;

import org.apache.myfaces.trinidad.context.RequestContext;
import org.apache.myfaces.trinidad.event.ReturnEvent;

public class MyBackingBean {
    public MyBackingBean() {
        super();
    }

    public void departmentsTaskFlowReturnListener(ReturnEvent returnEvent) {
        BindingContext bindingContext = BindingContext.getCurrent();
        BindingContainer bindings = bindingContext.getCurrentBindingsEntry();
        ControlBinding control = bindings.getControlBinding("DepartmentId");
        AttributeBinding deptId = (AttributeBinding)control;
        deptId.setInputValue(returnEvent.getReturnValue());
    }
}
注意,这里直接通过returnEvent.getReturnValue()获取返回对象,因为只有一个返回值,所以不用根据变量名字查找。
如果是返回多个值,可以使用returnEvent.getReturnParameters();获取所有变量值。
Map params = returnEvent.getReturnParameters();
for (Map.Entry entry : params.entrySet()) {
    Object key =  entry.getKey();
    Object value =  entry.getValue();
    System.out.println(key.toString() + ":" + value.toString());
}
更进一步,你可以在程序中自己创建一个HashMap对象,为其增加Key和Value,然后返回。比如:
HashMap hm = new HashMap();
hm.put("myreturn","The Value");
AdfFacesContext.getCurrentInstance().returnFromDialog(null,hm);
5. 支持双击选择
点击Select Department按钮选择当前行有些麻烦,如果能够支持双击选择就好了。
关于支持Table双击的方法请参考《 Table 组件使用指南之二:基于Table的CRUD 》。
这里只重点说明Managed Bean中新增加的方法:handleTableDoubleClick。
(1)使用ViewIterator查找当前行对象。
(2)获取PageFlowScope,并通过程序设置pageFlowScope.selectedDepartmentId变量。
(3)使用NavigationHandler实现程序导航。
 public void handleTableDoubleClick(ClientEvent clientEvent) {
        Map pageFlowScope = RequestContext.getCurrentInstance().getPageFlowScope();
        BindingContainer bindings = BindingContext.getCurrent().getCurrentBindingsEntry();
        DCIteratorBinding iter = (DCIteratorBinding)bindings.get("DepartmentsView1Iterator");
        Row row = iter.getCurrentRow();
        pageFlowScope.put("selectedDepartmentId", row.getAttribute("DepartmentId"));

        FacesContext fctx = FacesContext.getCurrentInstance();
        Application application = fctx.getApplication();
        NavigationHandler navHandler = application.getNavigationHandler();
        ControllerContext controllerContext = ControllerContext.getInstance();
        String viewId = controllerContext.getCurrentViewPort().getViewId();
        navigationHandler.handleNavigation(fctx, viewId,  "done");
    }
Project下载: ADF_TaskFlow_ReturnValues.7z
参考文献:
1. http://www.yaosansi.com/post/605.html
2. http://oracleseeker.com/2009/12/30/adf_dialog_inlinepopup_11g/
http://maping930883.blogspot.com/2010/04/adf086task-flowtask-flow2.html


 694
694

 被折叠的 条评论
为什么被折叠?
被折叠的 条评论
为什么被折叠?
 到【灌水乐园】发言


