文章翻译自:www.codeproject.com
原作者:Shalom Keller.
关键字:Building your own operating system
翻译:FISH
日期:2007-08-27

介绍:
如果你了解操作系统的工作原理, 这对你的编程会大有裨益,特别是对那些开发设备驱动的系统程序员。即使是非系统程序员也会从中获得很多知识。我相信:每个搞程序开发的人都想有一个自己制作的操作系统。
通过阅读本篇文章你也会学到怎样从磁盘驱动器读写原始扇区。
背景知识:
这篇文章, 我会解释构建 OS 的第一部分。
当你启动计算机时会发生下面的动作::
1. BIOS (基本输入输出系统--是和主板一起的一段小程序,存放在主板的芯片中)检查所有的计算机组建确保他们能够正常工作。
2. 如果所有的组建能够正常工作,BIOS 会开始查找可能含有操作系用的磁盘驱动器。BIOS 能够查找硬盘,软盘,光驱等等。BIOS 检查的顺序可以在BIOS的设置程序里进行设置。要进入到 BIOS 的设置程序,在计算机打开时按 "DELETE" 键,直到进入BIOS 设置程序。不同的计算机进入BIOS的设置的方法可能不同,具体要看启机时屏幕有关的提示信息。
3. BIOS 检查第一个驱动器查看它是否有一个有效的启动扇区“BOOT SECTOR”(磁盘被划分为许多小的区域,每个小区域叫做扇区)。大部分的驱动器扇区的大小是 512 字节.) 如果该驱动器有一个有效的启动扇区,BIOS 将会把该扇区中的数据加载到内存,加载地址是 0: 7c 00(=31.744),然后把就控制权交给这块内存区域。
4. 这个小程序从启动扇区被加载,然后继续加载操作系统,在操作系统加载完毕后,初始化操作系统并把控制权交给操作系统。
制作启动磁盘
步骤如下:
1. 找到一张你不再需要的软盘
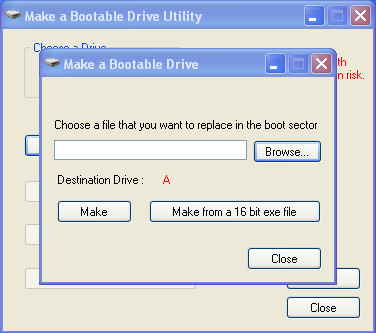
2. 使用本文章附带的程序 BOOTSectorUtility.exe 把 BOOT.bin 拷贝到软件的启动扇区中。
3. 检查你的 BIOS 设置为从软盘启动, 这样我们的操作系统就会贝加载。
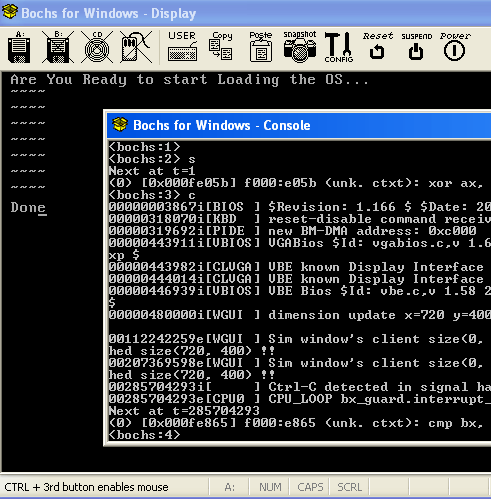
4. 把软件插入计算机,重新启动,你会看到我们自己的简陋OS。
利用BOOTSectorUtility.exe, 我们能把当前正在使用操作系统的启动扇区保存在特定的文件中,作为备份。
要读取文件,打开cmd 命令行,键入 debug <文件名> ( 我们使用的是 windows)
debug 命令行运行一个 16 位的调试器(任何启动扇区都是 16 位的,因为当计算机启动时它处于 16 模式下,仅在运行之后它从把CPU 转到 32 位或者是 64 位模式). 输入 u (unassembler) 然后回车,如下图所示:
反汇编16 位代码

读取原始字节
下面的代码说明了怎么从磁盘读取原始字节:
//
// Reading/writing raw sectors.
//
// pBuffer has to be at least 512 bytes wide.
//
BOOL ReadSector(char chDriveName, char *pBuffer, DWORD nSector)
{
char Buffer[256];
HANDLE hDevice;
DWORD dwBytesReaden;
//
//Init the drive name (as a Driver name).
//
sprintf(Buffer,"////.//%c:",chDriveName);
hDevice = CreateFile(Buffer, // drive to open.
GENERIC_READ,
FILE_SHARE_READ | // share mode.
FILE_SHARE_WRITE,
NULL, // default security attributes.
OPEN_EXISTING, // disposition.
0, // file attributes.
NULL); //
//
//if Error Openning a drive.
//
if(hDrive==INVALID_HANDLE_VALUE)
{
return FALSE;
}
//
//Move the read pointer to the right sector.
//
if(SetFilePointer(hDevice,
nSector*512,
NULL,
FILE_BEGIN)==0xFFFFFFFF)
return FALSE;
//
//Read the Sector.
//
ReadFile(hDevice,
pBuffer,
512,
&dwBytesReaden,
0);
//
//if Error reading the sector.
//
if(dwBytesReaden!=512)
return FALSE;
return TRUE;
}
制作启动程序
现在我将解释一下启动程序的基本知识 ( 要理解启动程序, 你需要熟悉汇编语言, 中断和中断向量表 )
中断向量表: 从地址 0 到 1024 保存着 256 个结构体(每个大小是 4 字节), 这些结构体以 CS:IP = xxxx:xxxx 的形式保存地址。这样你会有一个从 INT 1 到 INT 256 的地址。,每个中断向量都有一个在此表中的索引。向下面这样使用此表: 例如 你使用指令 INT 10H, 那么CPU 检查中断向量中 10H 索引位置, 该位置的数值是处理 INT 10H 例程的地址,CPU 然后跳转到该地址,把控制权交给该处理程序(中断处理程序)。
下面我会解释仅用 BIOS 怎样打印字符串, 读扇区,等待按键。
打印字符串:
mov ah , 0ah
int 10h
移动光标
mov ah , 2h
int 10h
读取扇区
mov ah , 2h
int 13h
等待击键
mov ah , 0h
int 16h
我使用的 TASM V3.1 和 TLINK 制作的启动扇区, 但是你可以使用任何的 x86 的 16 位汇编器。
现在我解释一下启动程序的大体步骤:
1. 作一个 Stack Frame。如果你没有进行此步,将得不到任何堆栈.
2. 设置 DS 数据段寄存器, 这样你能访问数据
3. 在我的启动扇区中,我添加了这些功能 (给用户显示一条消息,等待击键消息,继续)
4. 设置磁盘参数块结构体(Disk Parameter Block) (磁盘参数块结构体保存一些有关驱动器的信息,例如它有多少扇区,驱动控制器通过它知道怎样读取驱动器上的磁盘)
5. 要设置磁盘参数块结构体,得到它的地址( 它的地址是由 INT 1EH 指向的,在内存中这是一个 1E x 4 bytes= 78h = 30 x 4 bytes = 120)
下面展示了怎样初始化一个3.5 英寸(1.44MB) 软磁盘的 Disk Parameter Block 。
StepRateAndHeadUnloadTime db 0DFh
HeadLoadTimeAndDMAModeFlag db 2h
DelayForMotorTurnOff db 25h
BytesPerSector db 2h
SectorsPerTrack db 12h
IntersectorGapLength db 1bh
DataLength db 0FFh
IntersectorGapLengthDuringFormat db 54h
FormatByteValue db 0F 6h
HeadSettlingTime db 0Fh
DelayUntilMotorAtNormalSpeed db 8h
DisketteSectorAddress(as LBA)OfTheDataArea db 0
CylinderNumberToReadFrom db 0
SectorNumberToReadFrom db 0
DisketteSectorAddress (as LBA) OfTheRootDirectory db 0
6. 设置 INT 1E 指向的地址为我们上面设置的 Disk Parameter Block
7. 重设驱动器(使用 INT 13h ,ah = 0)
8. 通过 INT 31h , ah = 2 开始读取磁盘
9. 把控制权交给已加载的操作系统 , 这是通过在加载的操作系统中插入 jump 代码实现的。即你从磁盘的启动扇区( 即 0: 7c 00 )加载了操作系统的 512 字节, 或者是你能使用另外一种方式: call address, 然后在该地址处改变堆栈的返回地址为自己想要调转的地址,像这样:
call GiveControlToOS
GiveControlToOS:
Pop ax
Pop ax
Mov ax , CodeSegement ; Push the new CS to return
Push ax
mov ax , InstructionPointer ; Push the new IP to return
Push ax
ret ; Return to the modified address
在启动扇区的结尾是 0x55h,0x0AAh。如果启动扇区没有这些值,BIOS 不会加载启动扇区。
在这之后我们就完成了 Boot Sector 的全部工作, 然后我们启动系统。
启动扇区的程序
.MODEL SMALL
.CODE
ORG
7c
00h ;Because BIOS loades the OS at
; address 0:
7C
00h so ORG
7C
00h
; makes that the refrence to date
; are with the right offset (
7c
00h).
ProgramStart:
; CS = 0 / IP =
7C
00h // SS = ? / SP = ?
; You are now at address
7c
00.
jmp start ;Here we start the, BIOS gave us now the control.
;///////////////////////////////////////////
;//Here goes all the data of the program.
;///////////////////////////////////////////
xCursor db 0
yCursor db 0
nSector db 0
nTrack db 0
nSide db 0
nDrive db 0
nTrays db 0
'Are You Ready to start Loading the OS...',0
szReady db
'Error Reading Drive, Press any Key to reboot...',0
szErrorReadingDrive db
;//Done Reading a track.
szPlaceMarker db '~~~~',0
szDone db 'Done',0
pOS dw 7E00h
;//Points to were to download the Operating System.
;//Disk Paremeter Table.
StepRateAndHeadUnloadTime db 0DFh
HeadLoadTimeAndDMAModeFlag db 2h
DelayForMotorTurnOff db 25h
;// (1 = 256) //(2 = 512 bytes)
BytesPerSector db 2h
;// 18 sectors in a track.
SectorsPerTrack db 18
IntersectorGapLength db 1Bh
DataLength db 0FFh
IntersectorGapLengthDuringFormat db 54h
FormatByteValue db
0F
6h
HeadSettlingTime db 0Fh
DelayUntilMotorAtNormalSpeed db 8h
DisketteSectorAddress_as_LBA_OfTheDataArea db 0
CylinderNumberToReadFrom db 0
SectorNumberToReadFrom db 0
DisketteSectorAddress_as_LBA_OfTheRootDirectory db 0
;/////////////////////////////////
;//Here the program starts.
;/////////////////////////////////
Start:
CLI ;Clear Interupt Flag so while setting
;up the stack any intrupt would not be fired.
mov AX,7B0h ;lets have the stack start at
7c
00h-256 = 7B00h
mov SS,ax ;SS:SP = 7B0h:256 = 7B00h:256
mov SP,256 ;Lets make the stack 256 bytes.
Mov ax,CS ;Set the data segment = CS = 0
mov DS,ax
XOR AX,AX ;Makes AX=0.
MOV ES,AX ;Make ES=0
STI ;Set Back the Interupt Flag after
;we finished setting a stack fram.
Call ClearScreen ;ClearScreen()
LEA AX,szReady ;Get Address of szReady.
CALL PrintMessage ;Call PrintfMessage()
CALL GetKey ;Call GetKey()
CALL SetNewDisketteParameterTable
;SetNewDisketteParameterTable()
CALL DownloadOS
CALL GetKey ;Call GetKey()
CALL FAR PTR GiveControlToOS ;Give Control To OS.
ret
;/////////////////////////////////////
;//Prints a message to the screen.
;/////////////////////////////////////
PrintMessage PROC
mov DI,AX ;AX holds the address of the string to Display.
Mov xCursor,1 ;Column.
ContinuPrinting:
cmp byte ptr [DI],0 ;Did we get to the End of String.
JE EndPrintingMessage ;if you gat to the end of the string return.
mov AH,2 ;Move Cursor
mov DH,yCursor ;row.
mov DL,xCursor ;column.
mov BH,0 ;page number.
INT 10h
INC xCursor
mov AH,0Ah ;Display Character Function.
mov AL,[DI] ;character to display.
mov BH,0 ;page number.
mov CX,1 ;number of times to write character
INT 10h
INC DI ;Go to next character.
JMP ContinuPrinting ;go to Print Next Character.
EndPrintingMessage:
Inc yCursor ;So Next time the message would
;be printed in the second line.
cmp yCursor,25
JNE dontMoveCorsurToBegin
Mov yCursor,0
dontMoveCorsurToBegin:
ret
PrintMessage EndP
;//////////////////////////////////////
;//Watis for the user to press a key.
;//////////////////////////////////////
GetKey PROC
mov ah,0
int 16h ;Wait for a key press.
Ret
GetKey EndP
;///////////////////////////////////////////
;//Gives Control To Second Part Loader.
;///////////////////////////////////////////
GiveControlToOS PROC
LEA AX,szDone
Call PrintMessage
CALL GetKey
db 0e9h ;Far JMP op code.
dw 512 ;JMP 512 bytes ahead.
; POP AX ;//Another why to make
;the CPU jump to a new place.
; POP AX
; Push 7E0h ;Push New CS address.
; Push 0 ;Push New IP address.
;The address that comes out is 7E00:0000.
;(512 bytes Higher from were BIOS Put us.)
; ret
GiveControlToOS EndP
;///////////////////////////////////
;//Clear Screen.
;///////////////////////////////////
ClearScreen PROC
mov ax,0600h ;//Scroll All Screen UP to Clear Screen.
mov bh,07
mov cx,0
mov dx,184fh
int 10h
Mov xCursor,0 ;//Set Corsur Position So next
//write would start in
//the beginning of screen.
Mov yCursor,0
Ret
ClearScreen EndP
;/////////////////////////////////
;//PrintPlaceMarker.
;/////////////////////////////////
PrintPlaceMarker PROC
LEA AX,szPlaceMarker
CALL PrintMessage ;Call PrintfMessage()
CALL GetKey ;Call GetKey()
ret
PrintPlaceMarker EndP
;/////////////////////////////////////////
;//Set New Disk Parameter Table
;/////////////////////////////////////////
SetNewDisketteParameterTable PROC
LEA DX,StepRateAndHeadUnloadTime
;//Get the address of the Disk Parameters Block.
;//Int 1E (that is in address 0:78h)
;//holds the address of the disk parametrs
;//block, so now change it to
;//our parametr black.
;//DX holds the address of our Parameters block.
MOV WORD PTR CS:[0078h],DX
MOV WORD PTR CS:[007Ah],0000
;
Reset Drive
To Update the DisketteParameterTable.
MOV AH,0
INT 13H
ret
SetNewDisketteParameterTable EndP
;///////////////////////////////////
;//DownloadOS
;///////////////////////////////////
DownloadOS PROC
mov nDrive,0
mov nSide,0
mov nTrack,0
mov nSector,1
ContinueDownload:
INC nSector ;Read Next Sector.
cmp nSector,19 ;Did we get to end of track.
JNE StayInTrack
CALL PrintPlaceMarker ;Print now '~~~~' so the user would
;now that we finished reding a track
INC nTrack ;If we gat to end of track Move to next track.
mov nSector,1 ;And Read Next Sector.
CMP nTrack,5 ;Read 5 Tracks (Modify this value
;to how much Tracks you want to read).
JE EndDownloadingOS
StayInTrack:
;ReadSector();
Call ReadSector
JMP ContinueDownload
;If diden't yet finish Loading OS.
EndDownloadingOS:
ret
DownloadOS EndP
;////////////////////////////////////////
;//Read Sector.
;////////////////////////////////////////
ReadSector PROC
mov nTrays,0
TryAgain:
mov AH,2 ;//Read Function.
mov
AL
,1 ;//1 Sector.
mov CH,nTrack
mov CL,nSector ;//Remember: Sectors start with 1, not 0.
mov DH,nSide
mov DL,nDrive
Mov BX,pOS ;//ES:BX points to the address
;to were to store the sector.
INT 13h
CMP AH,0 ;Int 13 return Code is in AH.
JE EndReadSector ;if 'Sucsess' (AH = 0) End function.
mov AH,0 ;
Else Reset Drive
. And Try Again...
INT 13h
cmp nTrays,3 ;Chack if you tryed reading
;more then 3 times.
JE DisplayError ; if tryed 3 Times Display Error.
INC nTrays
jmp TryAgain ;Try Reading again.
DisplayError:
LEA AX,szErrorReadingDrive
Call PrintMessage
Call GetKey
mov AH,0 ;Reboot Computer.
INT 19h
EndReadSector:
;ADD WORD PTR pOS,512 ;//Move the pointer
;(ES:BX = ES:pOS = 0:pOS) 512 bytes.
;//Here you set the varible
;pOS (pOS points to were BIOS
;//Would load the Next Sector).
Ret
ReadSector EndP
;////////////////////////////////////
;//
;////////////////////////////////////
END ProgramStart
总结
我花了一段时间才把启动扇区做好, 下面是我在此过程中遇到的一些bugs
1. 没有设置正确的堆栈
2. 我没有修改 Disk Parameter Block
3. I loaded the operating system to areas that are used by BIOS routines (and even to the Interpret table).
4. 我把 OS 加载到了BIOS 例程使用的区域(设置是 中断向量表区域)
5. 在启动扇区的结束,必须是 0x55,0xAA .( 标志着有效的启动扇区 )


 2593
2593


