


前言
为什么我们要隐藏部分接口?
因为我们在用swagger代替接口的时候,难免有些接口会直观的暴露出来,比如我们结合Consul一起使用的时候,会将健康检查接口以及报警通知接口暴露出来,这些接口有时候会出于方便考虑,没有进行加密,这个时候我们就需要把接口隐藏起来,只有内部的开发者知道。
为什么要分组?
通常当我们写前后端分离的项目的时候,难免会遇到编写很多接口供前端页面进行调用,当接口达到几百个的时候就需要区分哪些是框架接口,哪些是业务接口,这时候给swaggerUI的接口分组是个不错的选择。

swaggerUI中加入授权请求
1.新建 HttpHeaderOperationFilter 操作过滤器,继承 Swashbuckle.AspNetCore.SwaggerGen.IOperationFilter 接口,实现 Apply 方法
/// <summary>
/// swagger请求头
/// </summary>
public class HttpHeaderOperationFilter : IOperationFilter
{
    public void Apply(Operation operation, OperationFilterContext context)
    {
        #region 新方法
        if (operation.Parameters == null)
        {
            operation.Parameters = new List<IParameter>();
        }

        if (context.ApiDescription.TryGetMethodInfo(out MethodInfo methodInfo))
        {
            if (!methodInfo.CustomAttributes.Any(t => t.AttributeType == typeof(AllowAnonymousAttribute))
                    &&!(methodInfo.ReflectedType.CustomAttributes.Any(t => t.AttributeType == typeof(AuthorizeAttribute))))
            {
                operation.Parameters.Add(new NonBodyParameter
                {
                    Name = "Authorization",
                    In = "header",
                    Type = "string",
                    Required = true,
                    Description = "请输入Token,格式为bearer XXX"
                });
            }
        }
        #endregion

        #region 已过时
        //if (operation.Parameters == null)
        //{
        //    operation.Parameters = new List<IParameter>();
        //}
        //var actionAttrs = context.ApiDescription.ActionAttributes().ToList();
        //var isAuthorized = actionAttrs.Any(a => a.GetType() == typeof(AuthorizeAttribute));
        //if (isAuthorized == false)
        //{
        //    var controllerAttrs = context.ApiDescription.ControllerAttributes();
        //    isAuthorized = controllerAttrs.Any(a => a.GetType() == typeof(AuthorizeAttribute));
        //}
        //var isAllowAnonymous = actionAttrs.Any(a => a.GetType() == typeof(AllowAnonymousAttribute));
        //if (isAuthorized && isAllowAnonymous == false)
        //{
        //    operation.Parameters.Add(new NonBodyParameter
        //    {
        //        Name = "Authorization",
        //        In = "header",
        //        Type = "string",
        //        Required = true,
        //        Description = "请输入Token,格式为bearer XXX"
        //    });
        //}
        #endregion
    }
}
2.然后修改 Startup.cs 中的 ConfigureServices 方法,添加我们自定义的 HttpHeaderOperationFilter 过滤器
public IServiceProvider ConfigureServices(IServiceCollection services)
{
    ...
    services.AddSwaggerGen(c =>
    {
        ...
        c.OperationFilter<HttpHeaderOperationFilter>();
    });
    ...
}
这时候我们再访问swaggerUI就可以输入Token了

API分组
1.修改 Startup.cs 中的 ConfigureServices 方法,添加多个swagger文档
public IServiceProvider ConfigureServices(IServiceCollection services)
{
    ...
    services.AddSwaggerGen(c =>
    {
        c.SwaggerDoc("v1", new Info
        {
            Version = "v1",
            Title = "接口文档",
            Description =  "接口文档-基础",
            TermsOfService = "",
            Contact = new Contact
            {
                Name = "XXX1111",
                Email = "XXX1111@qq.com",
                Url = ""
            }
        });

        c.SwaggerDoc("v2", new Info
        {
            Version = "v2",
            Title = "接口文档",
            Description =  "接口文档-基础",
            TermsOfService = "",
            Contact = new Contact
            {
                Name = "XXX2222",
                Email = "XXX2222@qq.com",
                Url = ""
            }
        });

        //反射注入全部程序集说明
        GetAllAssemblies().Where(t => t.CodeBase.EndsWith("Controller.dll")).ToList().ForEach(assembly =>
            {
                c.IncludeXmlComments(assembly.CodeBase.Replace(".dll", ".xml"));
            });

        c.OperationFilter<HttpHeaderOperationFilter>();
        //c.DocumentFilter<HiddenApiFilter>();
    });
    ...
}
2.修改 Startup.cs 中的 Configure 方法,加入
public void Configure(IApplicationBuilder app, ILoggerFactory loggerFactory)
{
    ...
    app.UseSwagger();
    app.UseSwaggerUI(c =>
    {
        c.SwaggerEndpoint("/swagger/v2/swagger.json", "接口文档-基础");//业务接口文档首先显示
        c.SwaggerEndpoint("/swagger/v1/swagger.json", "接口文档-业务");//基础接口文档放后面后显示
        c.RoutePrefix = string.Empty;//设置后直接输入IP就可以进入接口文档
    });
    ...

}
3.控制器上面标注swagger文档的版本

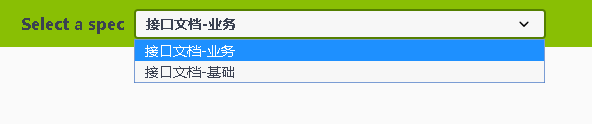
这时候我们就可以将接口文档进行分组显示了
API隐藏
1.创建自定义隐藏特性 HiddenApiAttribute.cs
/// <summary>
/// 隐藏swagger接口特性标识
/// </summary>
[AttributeUsage(AttributeTargets.Method | AttributeTargets.Class)]
public class HiddenApiAttribute:System.Attribute
{
}
2.创建API隐藏过滤器 HiddenApiFilter 继承 Swashbuckle.AspNetCore.SwaggerGen.IDocumentFilter 接口,实现 Apply 方法
/// <summary>
/// 自定义Swagger隐藏过滤器
/// </summary>
public class HiddenApiFilter : IDocumentFilter
{
    public void Apply(SwaggerDocument swaggerDoc, DocumentFilterContext context)
    {
        foreach (ApiDescription apiDescription in context.ApiDescriptions)
        {
            if (apiDescription.TryGetMethodInfo(out MethodInfo method))
            {
                if (method.ReflectedType.CustomAttributes.Any(t=>t.AttributeType==typeof(HiddenApiAttribute))
                        || method.CustomAttributes.Any(t => t.AttributeType == typeof(HiddenApiAttribute)))
                {
                    string key = "/" + apiDescription.RelativePath;
                    if (key.Contains("?"))
                    {
                        int idx = key.IndexOf("?", System.StringComparison.Ordinal);
                        key = key.Substring(0, idx);
                    }
                    swaggerDoc.Paths.Remove(key);
                }
            }
        }
    }
}
3.在 Startup.cs 中使用 HiddenApiFilter
public IServiceProvider ConfigureServices(IServiceCollection services)
{
    ...
    services.AddSwaggerGen(c =>
    {
        c.SwaggerDoc("v1", new Info
        {
            Version = "v1",
            Title = "接口文档",
            Description =  "接口文档-基础",
            TermsOfService = "",
            Contact = new Contact
            {
                Name = "XXX1111",
                Email = "XXX1111@qq.com",
                Url = ""
            }
        });

        c.SwaggerDoc("v2", new Info
        {
            Version = "v2",
            Title = "接口文档",
            Description =  "接口文档-基础",
            TermsOfService = "",
            Contact = new Contact
            {
                Name = "XXX2222",
                Email = "XXX2222@qq.com",
                Url = ""
            }
        });

        //反射注入全部程序集说明
        GetAllAssemblies().Where(t => t.CodeBase.EndsWith("Controller.dll")
            && !t.CodeBase.Contains("Common.Controller.dll")).ToList().ForEach(assembly =>
            {
                c.IncludeXmlComments(assembly.CodeBase.Replace(".dll", ".xml"));
            });

        c.OperationFilter<HttpHeaderOperationFilter>();
        c.DocumentFilter<HiddenApiFilter>();
    });
    ...
}
示例
我这里提供了Consul的心跳检查接口

但是在接口文档中并没有显示出来


 8994
8994


 被折叠的 条评论
为什么被折叠?
被折叠的 条评论
为什么被折叠?
 到【灌水乐园】发言


