


文章内容
本博客主要实现用python脚本控制导入的网格(static mesh)。主要包括按顶点操纵网格,操纵每个顶点的位置和颜色。 【目前估计对于较大的网格,本文的方法应该比较慢】
主要内容
- 导入python 插件 UnrealEnginePython
具体教程可以参考 网址1 网址2 。 最好先看懂,且实验后再来看本博客
下载插件的地方 目前已经支持很多版本,竟然还支持自己的python,我已经试过可以使用pytorch这些,甚至是GPU运算
- 建立新关卡,按照上面的教程创建一个
PyActor,导入一个mesh(可以是自己的obj文件,我后面会提供一个本实验用的),新建一个材质,添加一个材质蓝图(后面贴图),并赋给这个mesh。
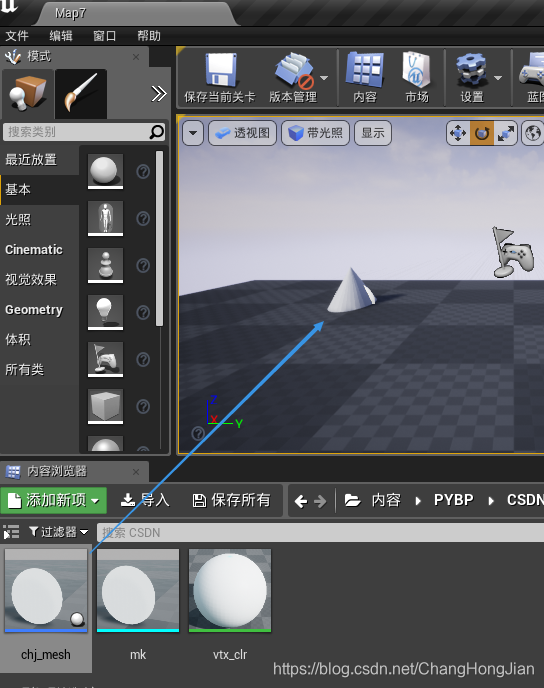
下图是全部完成时的内容中的情况,及命名(这些命名与程序相关)
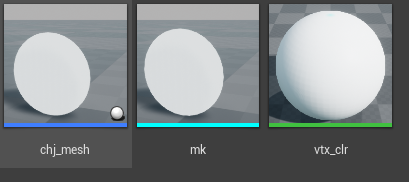
其中,chj_mesh 这个是新建的PyActor,mk这是导入的mesh,vtx_clr这是新建的材质。
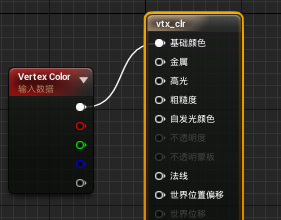
新建材质的蓝图如下,其中后面那个新建之后就有,而vertex color需要自己添加(右键后搜索)。
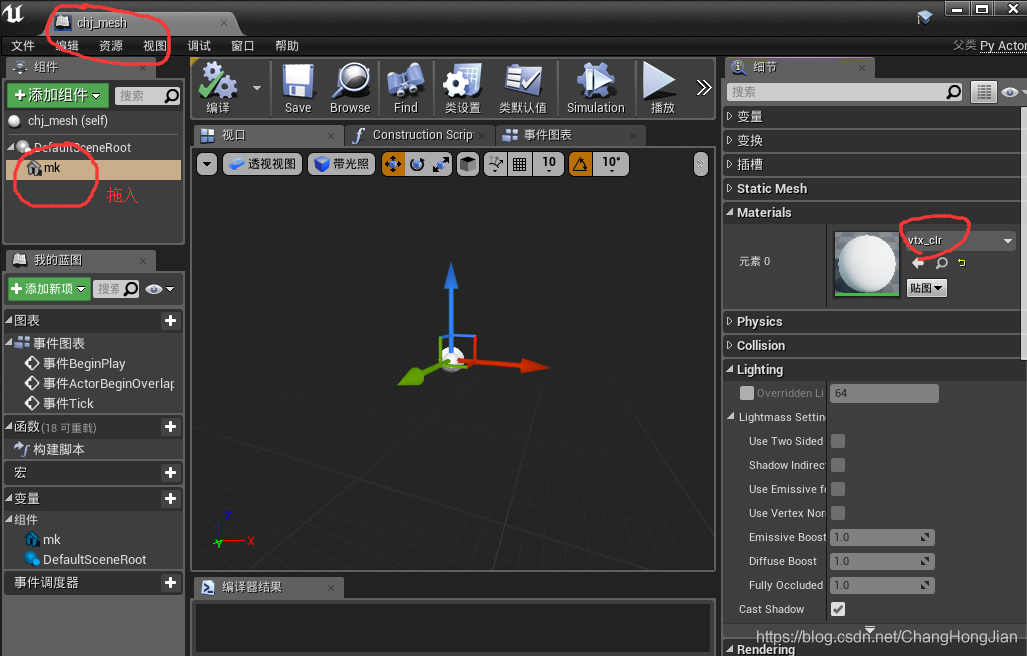
将这个蓝图绑定到mk的材质上,
 然后,可以先建立脚本,放在项目的
Content\Scripts文件夹下,如

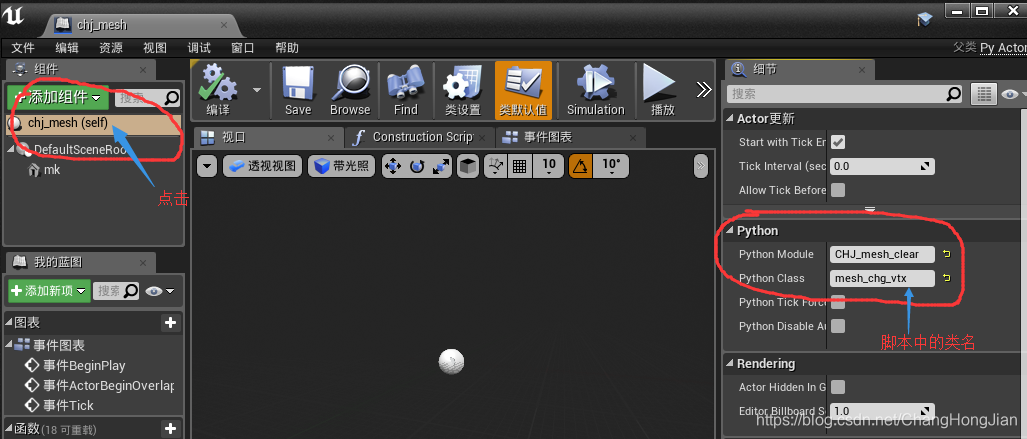
接着设置关联
 我的脚本如下
CHJ_mesh_clear
import unreal_engine as ue
from unreal_engine.classes import SkeletalMesh, StaticMesh
from unreal_engine import FColor
import random
from unreal_engine import FTransform, FVector, FRotator
from unreal_engine.structs import StaticMeshSourceModel, MeshBuildSettings
from unreal_engine import FRawMesh
from unreal_engine.classes import Skeleton, SkeletalMesh, MorphTarget
from unreal_engine import FTransform, FVector, FSoftSkinVertex, FMorphTargetDelta

def get_static_mesh_componet(self, nm):
    #uobject = self.uobject.get_actor_component(nm)
    #staticMeshComponent = uobject.get_owner().get_property(nm)
    #return staticMeshComponent
    return self.uobject.get_property(nm)

def get_static_raw_mesh(self, nm):
    staticMeshComponent = get_static_mesh_componet(self, nm)
    static_mesh = staticMeshComponent.StaticMesh
    raw_mesh = static_mesh.get_raw_mesh()
    return raw_mesh

def get_lod_vtx():
    lod1 = StaticMeshSourceModel(BuildSettings=MeshBuildSettings(bRecomputeNormals=True, bRecomputeTangents=True, bUseMikkTSpace=True, bBuildAdjacencyBuffer=True, bRemoveDegenerates=True))
    return lod1

def get_lod_clr():
    lod1 = StaticMeshSourceModel(BuildSettings=MeshBuildSettings(bRecomputeNormals=False, bRecomputeTangents=True, bUseMikkTSpace=True, bBuildAdjacencyBuffer=True, bRemoveDegenerates=True))
    return lod1

class mesh_chg_vtx:
    def begin_play(self):
        ue.log('------ bg')
        print("If you see this, it will be ok")
        self._cnt=0
        self._flag=False

        self.raw_mesh = get_static_raw_mesh(self, "mk")
        self.comp = get_static_mesh_componet(self, "mk")

        self.org_vertices = self.raw_mesh.get_vertex_positions()
        self.org_colors = self.raw_mesh.get_wedge_colors()


    def tick(self, delta_time):
        # 上下移动
        location = self.uobject.get_actor_location()
        location.z += 10 * delta_time
        location.z %= 200
        self.uobject.set_actor_location(location)

        # 个别顶点位置改变
        raw_mesh = self.raw_mesh
        vertices = raw_mesh.get_vertex_positions()

        if self._flag:
            vertices[2]  -= FVector(0, -1, 5)
            vertices[9]  -= FVector(0, 6, 1)
            vertices[19] -= FVector(0, 11, 2)
            self._cnt -= 1
        else:
            vertices[2]  += FVector(0, -1, 5)
            vertices[9]  += FVector(0, 6, 1)
            vertices[19] += FVector(0, 11, 2)
            self._cnt += 1

        if self._cnt == 100:
            self._flag=True
        elif self._cnt == 0:
            self._flag=False

        raw_mesh.set_vertex_positions(vertices)
        # 顶点颜色改变
        # 应该是指每个face,因此需要3倍的color
        upcolors=[]
        for i in raw_mesh.get_face_material_indices():
            frate = random.random
            c1=FColor(int(frate()*255), 0, 0)
            c2=FColor(0, int(frate()*255), 0)
            c3=FColor(0, 0, int(frate()*255))
            upcolors+=[c1, c2, c3]

        raw_mesh.set_wedge_colors(upcolors)

        lod1 = get_lod_vtx()
        #lod1 = get_lod_clr()
        raw_mesh.save_to_static_mesh_source_model(lod1)

        self.comp.StaticMesh.SourceModels = [lod1]
        #self.comp.StaticMesh.static_mesh_build() # 会自动编译

    def end_play(self, _var):
        print('------ ed')

        lod1 = get_lod_vtx()
        self.raw_mesh.set_vertex_positions(self.org_vertices)
        self.raw_mesh.set_wedge_colors(self.org_colors)
        self.raw_mesh.save_to_static_mesh_source_model(lod1)
        self.comp.StaticMesh.SourceModels = [lod1]
-
把
chj_mesh拖入
这样就可以运行了。结果如下,顶点颜色,和顶点的位置都可以改变。
-
注意事项
- 写python可以用自己喜欢的编辑器,调试的时候需要借助
print或者ue.log在python console里面查看。

- 对比较大的mesh比较慢。
最后文中使用的mk.obj如下,可以通过导入选项导入到UE中
v  00.000 00.235 -10.000
v  00.000 20.235  00.000
v  01.950 00.235 -09.807
v  03.826 00.235 -09.238
v  05.555 00.235 -08.314
v  07.071 00.235 -07.071
v  08.314 00.235 -05.555
v  09.238 00.235 -03.826
v  09.807 00.235 -01.950
v  10.000 00.235 -00.000
v  09.807 00.235  01.950
v  09.238 00.235  03.826
v  08.314 00.235  05.555
v  07.071 00.235  07.071
v  05.555 00.235  08.314
v  03.826 00.235  09.238
v  01.950 00.235  09.807
v -00.000 00.235  10.000
v -01.950 00.235  09.807
v -03.826 00.235  09.238
v -05.555 00.235  08.314
v -07.071 00.235  07.071
v -08.314 00.235  05.555
v -09.238 00.235  03.826
v -09.807 00.235  01.950
v -10.000 00.235 -00.000
v -09.807 00.235 -01.950
v -09.238 00.235 -03.826
v -08.314 00.235 -05.555
v -07.071 00.235 -07.071
v -05.555 00.235 -08.314
v -03.826 00.235 -09.238
v -01.950 00.235 -09.807
f 32//1 2//1 33//1
f 1//2 2//2 3//2
f 31//3 2//3 32//3
f 30//4 2//4 31//4
f 29//5 2//5 30//5
f 28//6 2//6 29//6
f 27//7 2//7 28//7
f 26//8 2//8 27//8
f 25//9 2//9 26//9
f 24//10 2//10 25//10
f 23//11 2//11 24//11
f 22//12 2//12 23//12
f 21//13 2//13 22//13
f 20//14 2//14 21//14
f 19//15 2//15 20//15
f 18//16 2//16 19//16
f 17//17 2//17 18//17
f 16//18 2//18 17//18
f 15//19 2//19 16//19
f 14//20 2//20 15//20
f 13//21 2//21 14//21
f 12//22 2//22 13//22
f 11//23 2//23 12//23
f 10//24 2//24 11//24
f 9//25 2//25 10//25
f 8//26 2//26 9//26
f 7//27 2//27 8//27
f 6//28 2//28 7//28
f 5//29 2//29 6//29
f 4//30 2//30 5//30
f 33//31 2//31 1//31
f 3//32 2//32 4//32
f 1//33 3//33 4//33 5//33 6//33 7//33 8//33 9//33 10//33 11//33 12//33 13//33 14//33 15//33 16//33 17//33 18//33 19//33 20//33 21//33 22//33 23//33 24//33 25//33 26//33 27//33 28//33 29//33 30//33 31//33 32//33 33//33


 4312
4312


 被折叠的 条评论
为什么被折叠?
被折叠的 条评论
为什么被折叠?
 到【灌水乐园】发言


