Android proguard代码混淆

代码混淆并不是让代码无法被反编译,而是将代码中的类、方法、变量等信息进行重命名,将它们改成一些毫无意义的名字,譬如A类的b()方法等。所以说代码混淆可以在不影响程序正常运行的前提下让破解者很头疼,从而大大提升了程序的安全性。

我们的Android项目可以使用Android Studio来创建,也可以使用Eclipse创建。下面我们分别针对这两种情况对项目代码实现混淆。

创建项目

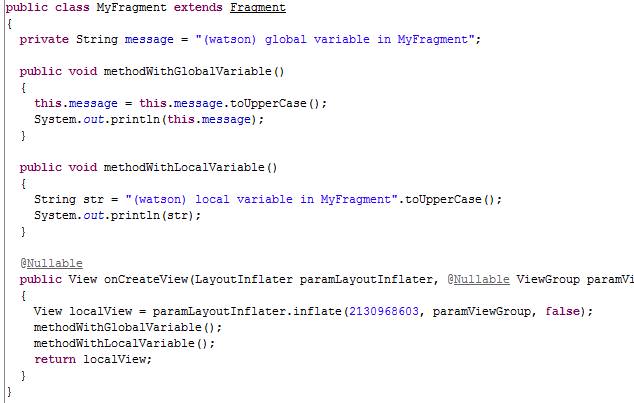
首先新建一个MyFragment类,代码如下所示:

public class MyFragment extends Fragment {
    private String message = "(watson) global variable in MyFragment";

    @Nullable
    @Override
    public View onCreateView(LayoutInflater inflater, @Nullable ViewGroup container, @Nullable Bundle savedInstanceState) {
        View view = inflater.inflate(R.layout.fragment_my, container, false);
        methodWithGlobalVariable();
        methodWithLocalVariable();
        return view;
    }

    public void methodWithGlobalVariable() {
        message = message.toUpperCase();
        System.out.println(message);
    }

    public void methodWithLocalVariable() {
        String message2 = "(watson) local variable in MyFragment";
        message2 = message2.toUpperCase();
        System.out.println(message2);
    }
}
 
 
  • 1
  • 2
  • 3
  • 4
  • 5
  • 6
  • 7
  • 8
  • 9
  • 10
  • 11
  • 12
  • 13
  • 14
  • 15
  • 16
  • 17
  • 18
  • 19
  • 20
  • 21
  • 22
  • 23
  • 1
  • 2
  • 3
  • 4
  • 5
  • 6
  • 7
  • 8
  • 9
  • 10
  • 11
  • 12
  • 13
  • 14
  • 15
  • 16
  • 17
  • 18
  • 19
  • 20
  • 21
  • 22
  • 23

MyFragment继承自Fragment,onCreateView()方法中调用了methodWithGlobalVariable()和methodWithLocalVariable()方法,这两个方法的内部分别引用了一个全局变量和一个局部变量。 
接下来新建一个NormalUtils类,代码如下所示:

public class NormalUtils {

    public void methodNormal() {
        String logMessage = "(watson) this is normal method";
        logMessage = logMessage.toUpperCase();
        System.out.println(logMessage);
    }

    public void methodUnused() {
        String logMessage = "(watson) this is unused method";
        logMessage = logMessage.toUpperCase();
        System.out.println(logMessage);
    }
}
 
 
  • 1
  • 2
  • 3
  • 4
  • 5
  • 6
  • 7
  • 8
  • 9
  • 10
  • 11
  • 12
  • 13
  • 14
  • 1
  • 2
  • 3
  • 4
  • 5
  • 6
  • 7
  • 8
  • 9
  • 10
  • 11
  • 12
  • 13
  • 14

非常普通的工具类,没有任何继承关系。有两个方法methodNormal()和methodUnused(),它们的内部逻辑都是一样的,唯一的区别是稍后methodNormal()方法会被调用,而methodUnused()方法不会被调用。 
下面再新建一个NativeUtils类,代码如下所示:

public class NativeUtils {

    public static native void methodNative();

    public static void methodNotNative() {
        String logMessage = "(watson) this is not native method";
        logMessage = logMessage.toUpperCase();
        System.out.println(logMessage);
    }
}
 
 
  • 1
  • 2
  • 3
  • 4
  • 5
  • 6
  • 7
  • 8
  • 9
  • 10
  • 1
  • 2
  • 3
  • 4
  • 5
  • 6
  • 7
  • 8
  • 9
  • 10

这个类中同样有两个方法,一个是native方法,一个是非native方法。 
再新建一个Student的Bean文件:

public class Student {
    public String name;
    public int age;

    public String toString() {
        return "[name="+name+", age="+age+"]";
    }
}
 
 
  • 1
  • 2
  • 3
  • 4
  • 5
  • 6
  • 7
  • 8
  • 1
  • 2
  • 3
  • 4
  • 5
  • 6
  • 7
  • 8

最后,MainActivity中的代码,如下所示:

public class MainActivity extends AppCompatActivity {
    private String message = "(watson) global variable in MainActivity";

    @Override
    protected void onCreate(Bundle savedInstanceState) {
        super.onCreate(savedInstanceState);
        setContentView(R.layout.activity_main);
        getSupportFragmentManager().beginTransaction().add(R.id.fragment, new MyFragment()).commit();
        Button button = (Button) findViewById(R.id.button);
        button.setOnClickListener(new View.OnClickListener() {
            @Override
            public void onClick(View v) {
                methodWithGlobalVariable();
                methodWithLocalVariable();
                NormalUtils normalUtils = new NormalUtils();
                normalUtils.methodNormal();
                try {
                    NativeUtils.methodNative(); //会报UnsatisefiedLinkError
                } exception(Exception e) {
                    e.printStackTrace(); 
                }            
                NativeUtils.methodNotNative();
                runGsonMethod();
            }
        });
    }

    public void runGsonMethod() {
        String jsonStr = "{" +"  \"name\": \"watson\"," +"  \"age\": \"28\"" +"}";
        Student student = getStudentDataByJson(jsonStr);
        System.out.println("(watson)" + student.toString());
    }

    public Student getStudentDataByJson(String json) {
        Student data = null;
        try {
            Gson g = new Gson();
            data = g.fromJson(json, Student.class);
        } catch (Exception e) {
            e.printStackTrace();
        }
        return data;
    }

    public void methodWithGlobalVariable() {
        message = message.toUpperCase();
        System.out.println(message);
    }

    public void methodWithLocalVariable() {
        String message2 = "(watson) local variable in MainActivity";
        message2 = message2.toUpperCase();
        System.out.println(message2);
    }
}
 
 
  • 1
  • 2
  • 3
  • 4
  • 5
  • 6
  • 7
  • 8
  • 9
  • 10
  • 11
  • 12
  • 13
  • 14
  • 15
  • 16
  • 17
  • 18
  • 19
  • 20
  • 21
  • 22
  • 23
  • 24
  • 25
  • 26
  • 27
  • 28
  • 29
  • 30
  • 31
  • 32
  • 33
  • 34
  • 35
  • 36
  • 37
  • 38
  • 39
  • 40
  • 41
  • 42
  • 43
  • 44
  • 45
  • 46
  • 47
  • 48
  • 49
  • 50
  • 51
  • 52
  • 53
  • 54
  • 55

可以看到,MainActivity和MyFragment类似,也是定义了methodWithGlobalVariable()和methodWithLocalVariable()这两个方法,然后MainActivity对MyFragment进行了添加,并在Button的点击事件里面调用了自身的、NormalUtils的、以及NativeUtils中的方法。注意调用native方法需要有相应的so库实现,不然的话就会报UnsatisefiedLinkError,不过这里其实我也并没有真正的so库实现,只是演示一下让大家看看混淆结果。点击事件的最后是调用gson-2.1.jar中的方法将我们的Json数据转化为Student对象并打印出来,这是测试引用第三方Jar包的场景。

混淆代码

Android Studio工程: 
app完整的build.gradle内容如下所示:

apply plugin: 'com.android.application'

android {
    compileSdkVersion 24
    buildToolsVersion "25.0.0"
    defaultConfig {
        applicationId "com.hx.obfuscate"
        minSdkVersion 14
        targetSdkVersion 24
        versionCode 1
        versionName "1.0"
        testInstrumentationRunner "android.support.test.runner.AndroidJUnitRunner"
    }
    buildTypes {
        release {
            minifyEnabled false
            proguardFiles getDefaultProguardFile('proguard-android.txt'), 'proguard-rules.pro'
        }
    }
}

dependencies {
    compile fileTree(dir: 'libs', include: ['*.jar'])
    androidTestCompile('com.android.support.test.espresso:espresso-core:2.2.2', {
        exclude group: 'com.android.support', module: 'support-annotations'
    })
    compile 'com.android.support:appcompat-v7:24.2.1'
    compile 'com.android.support:support-v4:24.2.1'
    testCompile 'junit:junit:4.12'
}
 
 
  • 1
  • 2
  • 3
  • 4
  • 5
  • 6
  • 7
  • 8
  • 9
  • 10
  • 11
  • 12
  • 13
  • 14
  • 15
  • 16
  • 17
  • 18
  • 19
  • 20
  • 21
  • 22
  • 23
  • 24
  • 25
  • 26
  • 27
  • 28
  • 29
  • 30
  • 1
  • 2
  • 3
  • 4
  • 5
  • 6
  • 7
  • 8
  • 9
  • 10
  • 11
  • 12
  • 13
  • 14
  • 15
  • 16
  • 17
  • 18
  • 19
  • 20
  • 21
  • 22
  • 23
  • 24
  • 25
  • 26
  • 27
  • 28
  • 29
  • 30

借助SDK中自带的Proguard工具,只需要修改build.gradle中的一行配置即可。可以看到,现在build.gradle中minifyEnabled的值是false,这里我们只需要把值改成true,打出来的APK包就是混淆过的了。如下所示:

release {
    minifyEnabled true
    proguardFiles getDefaultProguardFile('proguard-android.txt'), 'proguard-rules.pro'
}
 
 
  • 1
  • 2
  • 3
  • 4
  • 1
  • 2
  • 3
  • 4

其中minifyEnabled用于设置是否启用混淆,proguardFiles用于选定混淆配置文件。注意这里是在release闭包内进行配置的,因此只有打出正式版的APK才会进行混淆,Debug版的APK是不会混淆的。当然这也是非常合理的,因为Debug版的APK文件我们只会用来内部测试,不用担心被人破解。 
那么现在我们来打一个正式版的APK文件,在Android Studio导航栏中点击Build->Generate Signed APK,然后选择签名文件并输入密码,最终点击Finish完成打包,生成的APK文件会自动存放在app目录下。

Eclipse工程: 
project.propertites完整内容如下:

# This file is automatically generated by Android Tools.
# Do not modify this file -- YOUR CHANGES WILL BE ERASED!
#
# This file must be checked in Version Control Systems.
#
# To customize properties used by the Ant build system edit
# "ant.properties", and override values to adapt the script to your
# project structure.
#
# To enable ProGuard to shrink and obfuscate your code, uncomment this (available properties: sdk.dir, user.home):
# proguard.config=${sdk.dir}/tools/proguard/proguard-android.txt:proguard-project.txt
 
 
  • 1
  • 2
  • 3
  • 4
  • 5
  • 6
  • 7
  • 8
  • 9
  • 10
  • 11
  • 1
  • 2
  • 3
  • 4
  • 5
  • 6
  • 7
  • 8
  • 9
  • 10
  • 11

同样借助SDK中自带的Proguard工具,只需要修改project.propertites中的一行配置即可。只需要把最下面那行代码打开即可,打出来的APK包就是混淆过的了。如下所示:

proguard.config=${sdk.dir}/tools/proguard/proguard-android.txt:proguard-project.txt
 
 
  • 1
  • 1

同样这里需要打包正式APK,在项目目录右键->Android Tools->Export Signed Application Package,然后选择签名文件并输入密码,指定APK存放目录,最终点击Finish完成打包。

注意:打包过程中有的项目会报error:Proguard returned with error code 1. See console 
console中说存在多个重复v4包的原因。 
解决: 
只需在你的proguard-project.txt中添加如下两行即可。

-ignorewarnings
-libraryjars libs/android-support-v4.jar
 
 
  • 1
  • 2
  • 1
  • 2

你可以根据你的项目提示,添加需要的jar。

反编译并解析代码

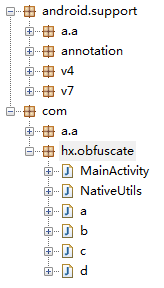
将上面Android Studio生成的正式APK文件进行反编译,结构图所示: 
这里写图片描述

很明显代码混淆功能已经生效了。下面我们尝试来阅读一下这个混淆后的代码,大体上可以分为三大部分,第一部分android.support可以猜测出是我们引用的android support库的代码,第二部分com下面的aa,已经面目全非了,但可以猜测出是gson-2.1.jar包下面的所有代码,第三部分com下面的hx.obfuscate很明显是我们自己的代码了,可以看出除了MainActivity和NativeUtils外,其他四个类的类名已经被混淆掉了。 
下面逐一看看它们的内容吧: 
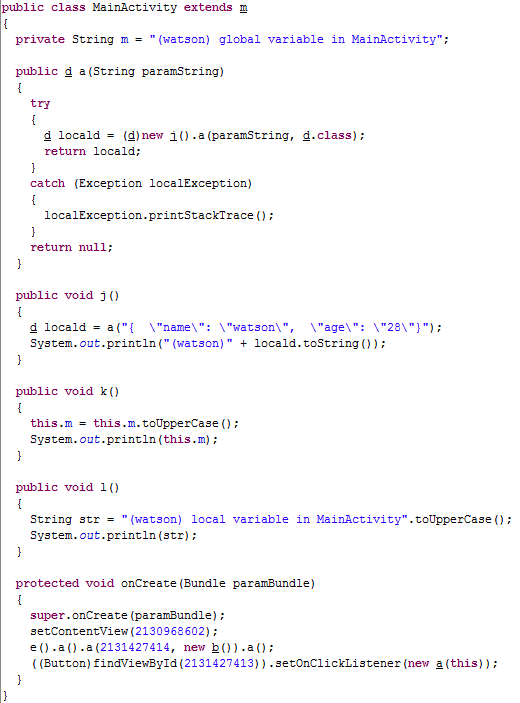
首先MainActivity中的代码: 
这里写图片描述

MainActivity的类名是没有混淆的,onCreate()方法也没有被混淆,但是我们定义的方法、全局变量、局部变量都被混淆了。 
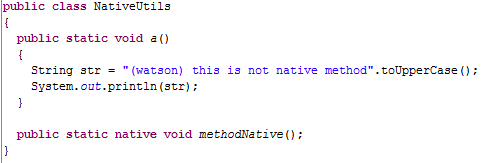
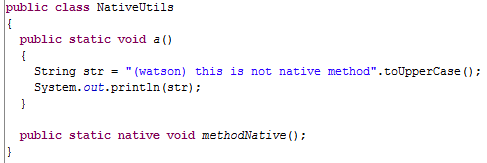
再来打开下一个类NativeUtils,如下所示: 
这里写图片描述

NativeUtils的类名没有被混淆,其中声明成native的方法也没有被混淆,但是非native方法的方法名和局部变量都被混淆了。 
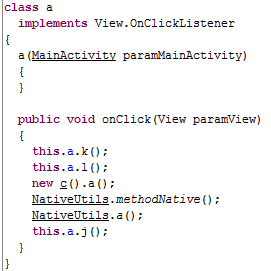
接下来是a类的代码,如下所示: 
这里写图片描述

很明显,这个是MainActivity中按钮点击事件的匿名类,在onClick()方法中的调用代码虽然都被混淆了,但是调用顺序是不会改变的,对照源代码就可以看出哪一行是调用的什么方法了。 
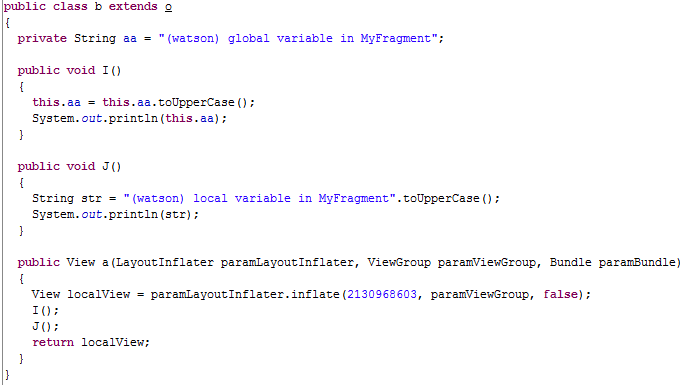
再接下来是b类,代码如下所示: 
这里写图片描述

其实这个是MyFragment类,其中所有的方法名、全局变量、局部变量都被混淆了。 
最后再来看下c类,代码如下所示: 
这里写图片描述

c类中只有一个a方法,从字符串的内容我们可以看出,这个是NormalUtils类中的methodNormal()方法,但是没有使用的methodUnused()方法却没有了。

我们来总结一下混淆规则吧: 
(1)首先像NormalUtils这样的普通类肯定是会被混淆的,不管是类名、方法名还是变量都不会放过。除了混淆之外NormalUtils类还说明了一个问题,就是minifyEnabled会对资源进行压缩,因为Utils类中我们明明定义了两个方法,但是反编译之后就只剩一个方法了,因为另外一个方法没有被调用,所以认为是多余的代码,在打包的时候就给移除掉了。不仅仅是代码,没有被调用的资源同样也会被移除掉,因此minifyEnabled除了混淆代码之外,还可以起到压缩APK包的作用。 
(2)接着看一下MyFragment,这个类也是混淆的比较彻底的,基本没有任何保留。那有些朋友可能会有疑问,Fragment怎么说也算是系统组件吧,就算普通方法名被混淆了,至少像onCreateView()这样的生命周期方法不应该被混淆吧?其实生命周期方法会不会被混淆和我们使用Fragment的方式有关,比如在本项目中,我使用的是android.support.v4.app.Fragment,support-v4包下的,就连Fragment的源码都被一起混淆了,因此生命周期方法当然也不例外了。但如果你使用的是android.app.Fragment,这就是调用手机系统中预编译好的代码了,很明显我们的混淆无法影响到系统内置的代码,因此这种情况下onCreateView()方法名就不会被混淆,但其它的方法以及变量仍然会被混淆。 
(3)接下来看一下MainActivity,同样也是系统组件之一,但MainActivity的保留程度就比MyFragment好多了,至少像类名、生命周期方法名都没有被混淆,这是为什么呢?根据我亲身测试得出结论,凡是需要在AndroidManifest.xml中去注册的所有类的类名以及从父类重写的方法名都自动不会被混淆。因此,除了Activity之外,这份规则同样也适用于Service、BroadcastReceiver和ContentProvider。 
(4)最后看一下NativeUtils类,这个类的类名也没有被混淆,这是由于它有一个声明成native的方法。只要一个类中有存在native方法,它的类名就不会被混淆,native方法的方法名也不会被混淆,因为C++代码要通过包名+类名+方法名来进行交互。 但是类中的别的代码还是会被混淆的。 
(5)除此之外,第三方的Jar包都是会被混淆的,gson-2.1.jar中不管是包名还是类名还是方法名都被完完全全混淆掉了。 
这些就是Android Studio打正式APK时默认的混淆规则。

proguard默认混淆规则

那么上面这些混淆规则是在哪里定义的呢?其实就是刚才在build.gradle的release闭包下配置的proguard-android.txt文件,这个文件存放于<\Android SDK>/tools/proguard目录下,我们打开看一下:

# This is a configuration file for ProGuard.
# http://proguard.sourceforge.net/index.html#manual/usage.html
#
# Starting with version 2.2 of the Android plugin for Gradle, these files are no longer used. Newer
# versions are distributed with the plugin and unpacked at build time. Files in this directory are
# no longer maintained.

-dontusemixedcaseclassnames
-dontskipnonpubliclibraryclasses
-verbose

# Optimization is turned off by default. Dex does not like code run
# through the ProGuard optimize and preverify steps (and performs some
# of these optimizations on its own).
-dontoptimize
-dontpreverify
# Note that if you want to enable optimization, you cannot just
# include optimization flags in your own project configuration file;
# instead you will need to point to the
# "proguard-android-optimize.txt" file instead of this one from your
# project.properties file.

-keepattributes *Annotation*
-keep public class com.google.vending.licensing.ILicensingService
-keep public class com.android.vending.licensing.ILicensingService

# For native methods, see http://proguard.sourceforge.net/manual/examples.html#native
-keepclasseswithmembernames class * {
    native <methods>;
}

# keep setters in Views so that animations can still work.
# see http://proguard.sourceforge.net/manual/examples.html#beans
-keepclassmembers public class * extends android.view.View {
   void set*(***);
   *** get*();
}

# We want to keep methods in Activity that could be used in the XML attribute onClick
-keepclassmembers class * extends android.app.Activity {
   public void *(android.view.View);
}

# For enumeration classes, see http://proguard.sourceforge.net/manual/examples.html#enumerations
-keepclassmembers enum * {
    public static **[] values();
    public static ** valueOf(java.lang.String);
}

-keepclassmembers class * implements android.os.Parcelable {
  public static final android.os.Parcelable$Creator CREATOR;
}

-keepclassmembers class **.R$* {
    public static <fields>;
}

# The support library contains references to newer platform versions.
# Don't warn about those in case this app is linking against an older
# platform version.  We know about them, and they are safe.
-dontwarn android.support.**

# Understand the @Keep support annotation.
-keep class android.support.annotation.Keep

-keep @android.support.annotation.Keep class * {*;}

-keepclasseswithmembers class * {
    @android.support.annotation.Keep <methods>;
}

-keepclasseswithmembers class * {
    @android.support.annotation.Keep <fields>;
}

-keepclasseswithmembers class * {
    @android.support.annotation.Keep <init>(...);
}
 
 
  • 1
  • 2
  • 3
  • 4
  • 5
  • 6
  • 7
  • 8
  • 9
  • 10
  • 11
  • 12
  • 13
  • 14
  • 15
  • 16
  • 17
  • 18
  • 19
  • 20
  • 21
  • 22
  • 23
  • 24
  • 25
  • 26
  • 27
  • 28
  • 29
  • 30
  • 31
  • 32
  • 33
  • 34
  • 35
  • 36
  • 37
  • 38
  • 39
  • 40
  • 41
  • 42
  • 43
  • 44
  • 45
  • 46
  • 47
  • 48
  • 49
  • 50
  • 51
  • 52
  • 53
  • 54
  • 55
  • 56
  • 57
  • 58
  • 59
  • 60
  • 61
  • 62
  • 63
  • 64
  • 65
  • 66
  • 67
  • 68
  • 69
  • 70
  • 71
  • 72
  • 73
  • 74
  • 75
  • 76
  • 77
  • 78

也许你现在看起来还比较吃力,没关系,我们先来学习一下proguard中的关键字和通配符。 
proguard中一共有三组六个keep关键字,我们通过一个表格来直观地看下: 
这里写图片描述

注意:keep和keepclasseswithmembers这两个关键字的区别—–唯一的区别就在于类中声明的成员存不存在。

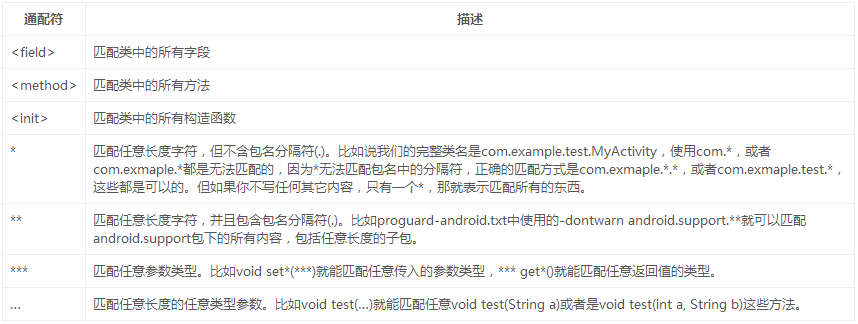
除此之外,proguard中的通配符也比较让人难懂,我们来看一下它们之间的区别: 
这里写图片描述

学会了上面两个表的内容,我们再来看看proguard-android.txt中的默认混淆配置,一起来逐行阅读一下。

-dontusemixedcaseclassnames  
 
 
  • 1
  • 1

表示混淆时不使用大小写混合类名。

-dontskipnonpubliclibraryclasses  
 
 
  • 1
  • 1

表示不跳过library中的非public的类。

-verbose
 
 
  • 1
  • 1

表示打印混淆的详细信息。

-dontoptimize
 
 
  • 1
  • 1

表示不进行优化,建议使用此选项,因为根据proguard-android-optimize.txt中的描述,优化可能会造成一些潜在风险,不能保证在所有版本的Dalvik上都正常运行。

-dontpreverify
 
 
  • 1
  • 1

表示不进行预校验。这个预校验是作用在Java平台上的,Android平台上不需要这项功能,去掉之后还可以加快混淆速度。

-keepattributes *Annotation* 
 
 
  • 1
  • 1

表示对注解中的参数进行保留。

-keep public class com.google.vending.licensing.ILicensingService
-keep public class com.android.vending.licensing.ILicensingService
 
 
  • 1
  • 2
  • 1
  • 2

表示不混淆这两个类,这两个类我们基本也用不上,是接入Google原生的一些服务时使用的。

-keepclasseswithmembernames class * {
    native <methods>;
}
 
 
  • 1
  • 2
  • 3
  • 1
  • 2
  • 3

表示不混淆任何包含native方法的类的类名以及native方法名,这个和我们刚才验证的结果是一致的。

-keepclassmembers public class * extends android.view.View {
   void set*(***);
   *** get*();
}
 
 
  • 1
  • 2
  • 3
  • 4
  • 1
  • 2
  • 3
  • 4

表示不混淆任何一个View中的setXxx()和getXxx()方法,因为属性动画需要有相应的setter和getter的方法实现,混淆了就无法工作了。

-keepclassmembers class * extends android.app.Activity {
   public void *(android.view.View);
}
 
 
  • 1
  • 2
  • 3
  • 1
  • 2
  • 3

表示不混淆Activity中参数是View的方法,因为有这样一种用法,在XML中配置android:onClick=”buttonClick”属性,当用户点击该按钮时就会调用Activity中的buttonClick(View view)方法,如果这个方法被混淆的话就找不到了。

-keepclassmembers enum * {
    public static **[] values();
    public static ** valueOf(java.lang.String);
}
 
 
  • 1
  • 2
  • 3
  • 4
  • 1
  • 2
  • 3
  • 4

表示不混淆枚举中的values()和valueOf()方法。

-keepclassmembers class * implements android.os.Parcelable {
  public static final android.os.Parcelable$Creator CREATOR;
}
 
 
  • 1
  • 2
  • 3
  • 1
  • 2
  • 3

表示不混淆Parcelable实现类中的CREATOR字段,毫无疑问,CREATOR字段是绝对不能改变的,包括大小写都不能变,不然整个Parcelable工作机制都会失败。

-keepclassmembers class **.R$* {
    public static <fields>;
}
 
 
  • 1
  • 2
  • 3
  • 1
  • 2
  • 3

表示不混淆R文件中的所有静态字段,我们都知道R文件是通过字段来记录每个资源的id的,字段名要是被混淆了,id也就找不着了。

-dontwarn android.support.**
 
 
  • 1
  • 1

表示对android.support包下的代码不警告,因为support包中有很多代码都是在高版本中使用的,如果我们的项目指定的版本比较低在打包时就会给予警告。不过support包中所有的代码都在版本兼容性上做足了判断,因此不用担心代码会出问题,所以直接忽略警告就可以了。

好了,这就是proguard-android.txt文件中所有默认的配置,而我们混淆代码也是按照这些配置的规则来进行混淆的。经过我上面的讲解之后,相信大家对这些配置的内容基本都能理解了。

定制自己项目的混淆规则

刚才打出的APK虽然已经成功混淆了,但是混淆的规则都是按照proguard-android.txt中默认的规则来的,当然我们也可以修改proguard-android.txt中的规则,但是直接在proguard-android.txt中修改会对我们本机上所有项目的混淆规则都生效,那么有没有什么办法只针对当前项目的混淆规则做修改呢?当然是有的,注意任何一个Android Studio项目在app模块目录下都有一个proguard-rules.pro文件,而任何一个Eclipse项目在根目录下都有一个proguard-project.txt文件,这两个文件就是用于让我们编写只适用于当前项目的混淆规则的,那么接下来我们就利用刚才学到的所有知识来对混淆规则做修改吧。

这里我先列出要实现的目标:

  • 对MyFragment类进行完全保留,不混淆其类名、方法名、以及变量名。
  • 对NormalUtils类中的未调用方法进行保留,防止其被移除掉。
  • 对第三方库进行保留,不混淆android-support库,以及gson库中的代码。

下面我们就来逐一实现这些目标。 
首先要对MyFragment类进行完全保留可以使用keep关键字,keep后声明完整的类名,然后保留类中的所有内容可以使用*通配符实现,如下所示:

-keep class com.hx.obfuscate.MyFragment {
    *;
}
 
 
  • 1
  • 2
  • 3
  • 1
  • 2
  • 3

然后保留NormalUtils类中的未调用方法可以使用keepclassmembers关键字,后跟NormalUtils完整类名,然后在内部声明未调用的方法,如下所示:

-keepclassmembers class com.hx.obfuscate.NormalUtils {
    public void methodUnused();
}
 
 
  • 1
  • 2
  • 3
  • 1
  • 2
  • 3

最后不要混淆第三方库,目前我们使用了两种方式来引入第三方库,一种是通过本地jar包引入的,一种是通过remote引入的,其实这两种方式没什么区别,要保留代码都可以使用**这种通配符来实现,如下所示:

-keep class com.google.** {
    *;
}

-keep class android.support.** {
    *;
}
 
 
  • 1
  • 2
  • 3
  • 4
  • 5
  • 6
  • 7
  • 1
  • 2
  • 3
  • 4
  • 5
  • 6
  • 7

我们这里使用Android Studio创建的工程,将上面所有内容都写入proguard-rules.pro,重新打一个正式版的APK文件,然后再反编译看看效果: 
这里写图片描述

可以看到实现了我们预定目标的第一点,对MyFragment类进行完全保留,不混淆其类名、方法名、以及变量名。 
再来看看预定目标第二点: 
这里写图片描述

可以看到并没有移除NormalUtils类中的未调用方法。再看看第三点吧: 
这里写图片描述

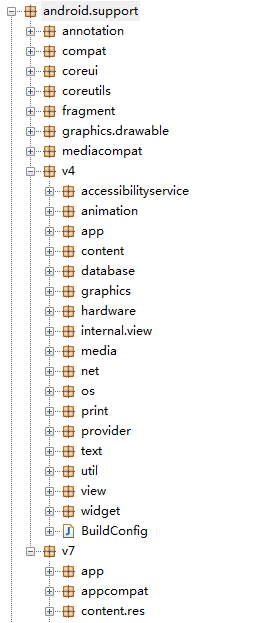
可见对android-support库中v4包和v7没有进行混淆。 
这里写图片描述

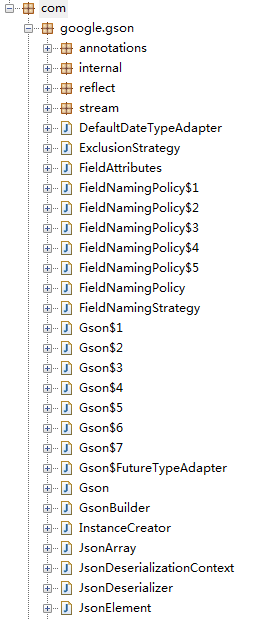
可以看到第三方的gson包也没有进行混淆。至此,我们预定的三个目标都已经实现了。

评论
添加红包

请填写红包祝福语或标题

红包个数最小为10个

红包金额最低5元

当前余额3.43前往充值 >
需支付:10.00
成就一亿技术人!
领取后你会自动成为博主和红包主的粉丝 规则
hope_wisdom
发出的红包
实付
使用余额支付
点击重新获取
扫码支付
钱包余额 0

抵扣说明:

1.余额是钱包充值的虚拟货币,按照1:1的比例进行支付金额的抵扣。
2.余额无法直接购买下载,可以购买VIP、付费专栏及课程。

余额充值