


暂时还未有时间开发这效果,所以先贴出来。
先贴一张效果图,这是一张手机截屏:
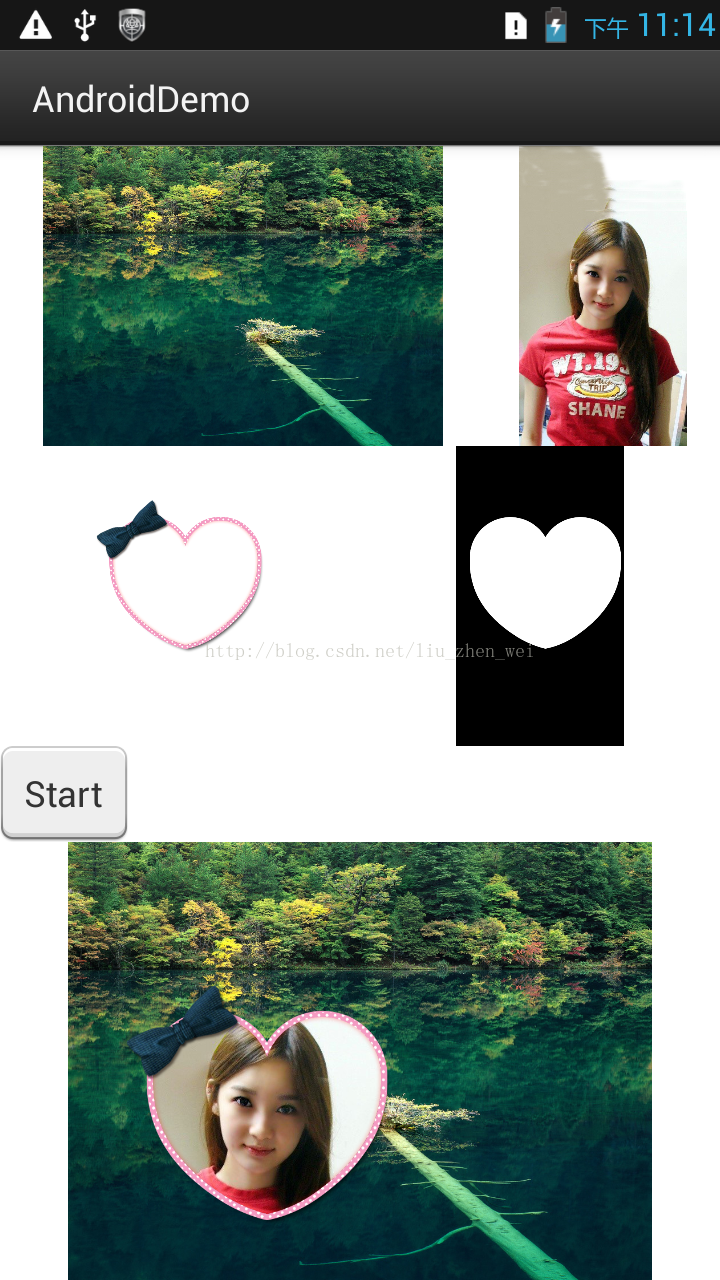
左上方的风景图:背景图片
右上方的人物图:前景图片
左边心型透明图:相框图片
右边心型黑色图:蒙板图片
功能:把前景图应用蒙板,添加相框效果,合成到后景图上面:
结果就是下面的那张图片了。
还有一种是透明度渐变的,效果图如下:
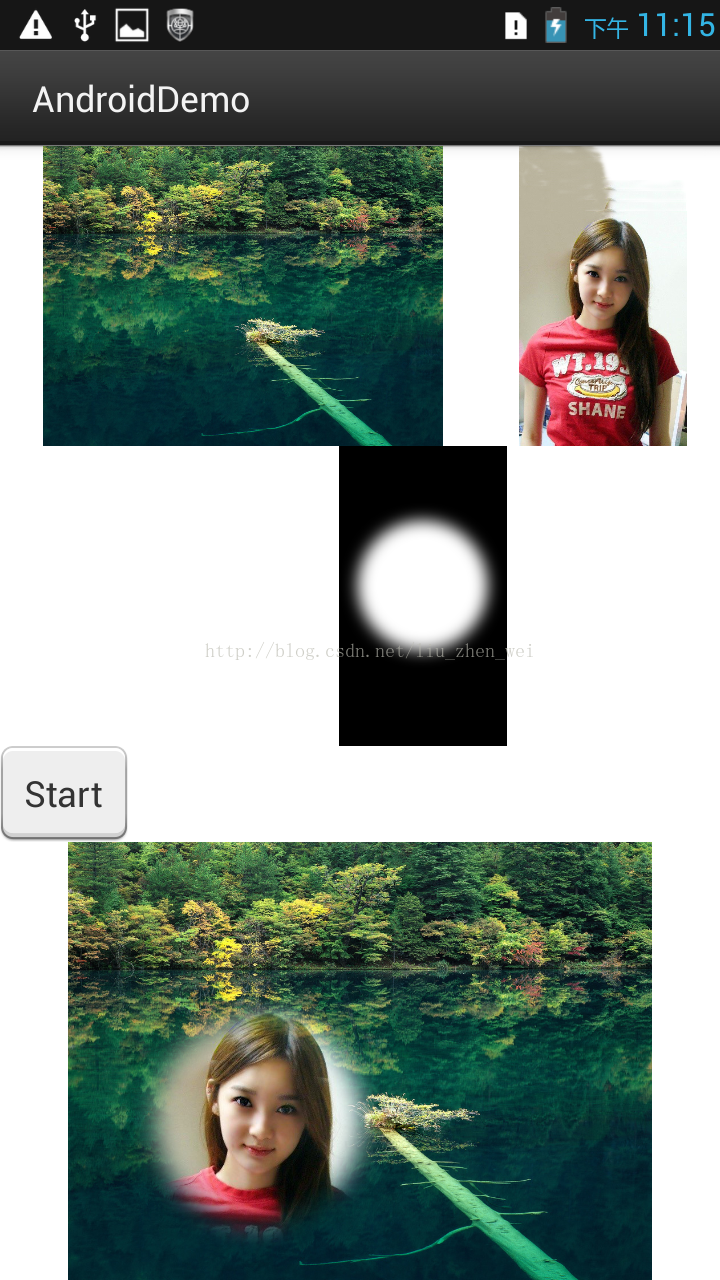
因为只有透明度渐变,没有相框。但实现上基本一样。
下面是实现过程,直接贴代码吧,其中写了比较详细的注释。只有一个文件,如下:
- package com.example.androiddemo;
- import android.os.Bundle;
- import android.os.Environment;
- import android.app.Activity;
- import android.graphics.Bitmap;
- import android.graphics.BitmapFactory;
- import android.graphics.Canvas;
- import android.util.Log;
- import android.view.View;
- import android.view.View.OnClickListener;
- import android.widget.Button;
- import android.widget.ImageView;
- public class MainActivity extends Activity {
- private static final String TAG = "liuzw";
- private ImageView picBGView;
- private ImageView pictureView;
- private ImageView maskView;
- private ImageView frameView;
- private ImageView resultView;
- private Button startProcess;
- private Bitmap picBitmap;
- private Bitmap maskBitmap;
- private Bitmap frameBitmap;
- private Bitmap resultBitmap;
- private Bitmap fengjingBitmap;
- private Bitmap composedBitmap;
- private final int WITHOUT = -1;
- private static final int FRAME = 0;
- private static final int MASK = 1;
- // private int[] resIds = new int[]{ //斜框锯齿
- // R.drawable.pip_6_frame,
- // R.drawable.pip_6_frame_mask,
- // };
- // private int[] resIds = new int[]{ //胶条
- // R.drawable.pip_1_frame,
- // R.drawable.pip_1_frame_mask,
- // };
- private int[] resIds = new int[]{ //渐变
- WITHOUT,
- R.drawable.pip_2_frame_mask,
- };
- // private int[] resIds = new int[]{ //心形
- // R.drawable.pip_3_frame,
- // R.drawable.pip_3_frame_mask,
- // };
- @Override
- protected void onCreate(Bundle savedInstanceState) {
- super.onCreate(savedInstanceState);
- setContentView(R.layout.activity_main);
- picBGView = (ImageView) findViewById(R.id.pic_bg);
- picBGView.setImageResource(R.drawable.fengjing);
- pictureView = (ImageView) findViewById(R.id.pic);
- pictureView.setImageResource(R.drawable.pip_test);
- maskView = (ImageView) findViewById(R.id.mask);
- maskView.setImageResource(resIds[MASK]);
- frameView = (ImageView) findViewById(R.id.frame);
- frameView.setImageResource(resIds[FRAME]);
- startProcess = (Button) findViewById(R.id.btnStart);
- startProcess.setOnClickListener(mListener);
- resultView = (ImageView) findViewById(R.id.showResult);
- }
- /**
- * 获得前置照片
- */
- private void getFrontPicture(){
- //蒙板的Bitmap
- if(maskBitmap == null || maskBitmap.isRecycled() && resIds[MASK] != WITHOUT){
- maskBitmap = BitmapFactory.decodeResource(this.getResources(), resIds[MASK]);
- }
- if(maskBitmap == null) return;
- //前置的原图,并将其缩放到跟蒙板大小一直
- if(picBitmap == null || picBitmap.isRecycled()){
- picBitmap = BitmapFactory.decodeResource(this.getResources(), R.drawable.pip_test);
- picBitmap = Bitmap.createScaledBitmap(picBitmap, maskBitmap.getWidth(), maskBitmap.getHeight(), false);
- }
- //相框的Bitmap
- if(frameBitmap == null || frameBitmap.isRecycled() && resIds[FRAME] != WITHOUT){
- frameBitmap = BitmapFactory.decodeResource(this.getResources(), resIds[FRAME]);
- }
- int w = maskBitmap.getWidth();
- int h = maskBitmap.getHeight();
- int edgeColor = maskBitmap.getPixel(1, 1);
- int centerColor = maskBitmap.getPixel(w/2, h/2);
- Log.d(TAG, "edgeColor = " + Integer.toHexString(edgeColor) + ", centerColor = " + Integer.toHexString(centerColor));
- if(resultBitmap == null){
- resultBitmap = Bitmap.createBitmap(w, h, Bitmap.Config.ARGB_8888);
- }
- //这是背景的风景图
- if(fengjingBitmap == null){
- fengjingBitmap = BitmapFactory.decodeResource(getResources(), R.drawable.fengjing);
- }
- //前置相片添加蒙板效果
- int[] picPixels = new int[w*h];
- int[] maskPixels = new int[w*h];
- picBitmap.getPixels(picPixels, 0, w, 0, 0, w, h);
- maskBitmap.getPixels(maskPixels, 0, w, 0, 0, w, h);
- for(int i = 0; i < maskPixels.length; i++){
- if(maskPixels[i] == 0xff000000){
- picPixels[i] = 0;
- }else if(maskPixels[i] == 0){
- //donothing
- }else{
- //把mask的a通道应用与picBitmap
- maskPixels[i] &= 0xff000000;
- maskPixels[i] = 0xff000000 - maskPixels[i];
- picPixels[i] &= 0x00ffffff;
- picPixels[i] |= maskPixels[i];
- }
- }
- //生成前置图片添加蒙板后的bitmap:resultBitmap
- resultBitmap.setPixels(picPixels, 0, w, 0, 0, w, h);
- }
- /**
- * 图片合成
- */
- private void compose(){
- if(fengjingBitmap == null || fengjingBitmap.isRecycled()){
- Log.e(TAG, "compose ERROR: fengjingBitmap is not valuable");
- return;
- }
- composedBitmap = Bitmap.createBitmap(fengjingBitmap.getWidth(), fengjingBitmap.getHeight(), Bitmap.Config.ARGB_8888);
- if(composedBitmap == null || composedBitmap.isRecycled()){
- Log.e(TAG, "compose ERROR: composedBitmap is not valuable");
- return;
- }
- if(resultBitmap == null || resultBitmap.isRecycled()){
- Log.e(TAG, "compose ERROR: resultBitmap is not valuable");
- return;
- }
- Canvas cv = new Canvas(composedBitmap);
- cv.drawBitmap(fengjingBitmap, 0, 0, null);
- cv.drawBitmap(resultBitmap, 100, 100, null);
- if(frameBitmap != null && !frameBitmap.isRecycled()){
- cv.drawBitmap(frameBitmap, 100, 100, null);
- }
- cv.save(Canvas.ALL_SAVE_FLAG);
- cv.restore();
- resultView.setImageBitmap(composedBitmap);
- }
- @Override
- protected void onDestroy() {
- // TODO Auto-generated method stub
- super.onDestroy();
- //释放资源
- resultView.setImageBitmap(null);
- if(picBitmap != null && !picBitmap.isRecycled()){
- picBitmap.recycle();
- picBitmap = null;
- }
- if(maskBitmap != null && !maskBitmap.isRecycled()){
- maskBitmap.recycle();
- maskBitmap = null;
- }
- if(frameBitmap != null && !frameBitmap.isRecycled()){
- frameBitmap.recycle();
- frameBitmap = null;
- }
- if(resultBitmap != null && !resultBitmap.isRecycled()){
- resultBitmap.recycle();
- resultBitmap = null;
- }
- if(fengjingBitmap != null && !fengjingBitmap.isRecycled()){
- fengjingBitmap.recycle();
- fengjingBitmap = null;
- }
- if(composedBitmap != null && !composedBitmap.isRecycled()){
- composedBitmap.recycle();
- composedBitmap = null;
- }
- }
- private OnClickListener mListener = new OnClickListener(){
- @Override
- public void onClick(View v) {
- // TODO Auto-generated method stub
- switch(v.getId()){
- case R.id.btnStart:
- getFrontPicture();
- compose();
- break;
- }
- }
- };
- }
为了完整和方便参考,把布局文件也贴一下,如下:
- <RelativeLayout xmlns:android="http://schemas.android.com/apk/res/android"
- xmlns:tools="http://schemas.android.com/tools"
- android:layout_width="match_parent"
- android:layout_height="match_parent"
- android:background="#ffffffff"
- tools:context=".MainActivity" >
- <LinearLayout
- android:id="@+id/views1"
- android:layout_width="match_parent"
- android:layout_height="150dip"
- android:orientation="horizontal" >
- <ImageView
- android:id="@+id/pic_bg"
- android:layout_width="wrap_content"
- android:layout_height="wrap_content"
- android:layout_weight="1.0" />
- <ImageView
- android:id="@+id/pic"
- android:layout_width="wrap_content"
- android:layout_height="wrap_content"
- android:layout_weight="1.0" />
- </LinearLayout>
- <LinearLayout
- android:id="@+id/views2"
- android:layout_below="@+id/views1"
- android:layout_width="match_parent"
- android:layout_height="150dip"
- android:orientation="horizontal" >
- <ImageView
- android:id="@+id/frame"
- android:layout_width="wrap_content"
- android:layout_height="wrap_content"
- android:layout_weight="1.0" />
- <ImageView
- android:id="@+id/mask"
- android:layout_width="wrap_content"
- android:layout_height="wrap_content"
- android:layout_weight="1.0" />
- </LinearLayout>
- <Button
- android:id="@+id/btnStart"
- android:layout_below="@+id/views2"
- android:layout_width="wrap_content"
- android:layout_height="wrap_content"
- android:text="Start" />
- <ImageView
- android:id="@+id/showResult"
- android:layout_below="@+id/btnStart"
- android:layout_width="wrap_content"
- android:layout_height="wrap_content"/>
- </RelativeLayout>


 175
175


 被折叠的 条评论
为什么被折叠?
被折叠的 条评论
为什么被折叠?
 到【灌水乐园】发言


