


Since Spring framework 3.1+, developers are able to implement a 100% code-based approach for bootstrapping a Spring Web MVC application, without any XML configuration. This tutorial is going to explore how we can achieve that to build a completely XML-free sample Spring Web MVC application.
Since Servlet 3.0+, the above registration for Spring’s dispatcher servlet can be done programmatically (code-based), thanks to the Servlet 3.0’s new feature called shared libraries/runtimes pluggability which scans jar files bundled in the
WEB-INF\lib
directory for implementations of the
ServletContainerInitializer
interface and invokes its
onStartup()
method which contains initialization/bootstrapping code, during servlet container/web application startup. In respond to this new feature, Spring 3.1+ provides its own implementation by the
SpringServletContainerInitializer
class which is bundled in configured in the
spring-web-VERSION.jar
file.
However, as we can see, the Spring’s application context configuration still remains XML-based:
We may configure the
applicationContext.xml
file as follows:
So to replace this XML by a code-based approach, we can create a configuration class using Spring’s
@Configuration
and
@Bean
annotations and register this configuration class by the
AnnotationConfigWebApplicationContext
class.
This configuration defines two beans, one for a typical Spring MVC’s view resolver and one for a controller. Code of the
HomeController
class is as follows:
The
handleRequest()
method of this controller class simply returns a logical view name “home” which is mapped to the following
home.jsp
page:
And register this configuration file using the
AnnotationConfigWebApplicationContext
class as follows:
Usually we create a Spring’s application context file (e.g. applicationContext.xml ) which configures beans definitions such as view resolver beans, controller beans, DAO beans, application-specific beans, etc. And then we declare Spring’s dispatcher servlet in the web deployment descriptor file ( web.xml ) in order to route all requests through the Spring Web MVC container. For example, following is a typical configuration for bootstrap the Spring’s dispatcher servlet in the web.xml file:
XML-based approach:
|
1
2
3
4
5
6
7
8
9
10
11
12
13
14
15
16
17
18
19
20
21
22
23
24
25
26
|
<?
xml
version
=
"1.0"
encoding
=
"UTF-8"
?>
<
web-app
xmlns:xsi
=
"http://www.w3.org/2001/XMLSchema-instance"
xmlns
=
"http://java.sun.com/xml/ns/javaee"
xmlns:web
=
"http://java.sun.com/xml/ns/javaee/web-app_2_5.xsd"
xsi:schemaLocation="http://java.sun.com/xml/ns/javaee
http://java.sun.com/xml/ns/javaee/web-app_3_0.xsd"
id
=
"WebApp_ID"
version
=
"3.0"
>
<
display-name
>SpringWebMVCApp</
display-name
>
<
servlet
>
<
servlet-name
>SpringController</
servlet-name
>
<
servlet-class
>org.springframework.web.servlet.DispatcherServlet</
servlet-class
>
<
init-param
>
<
param-name
>contextConfigLocation</
param-name
>
<
param-value
>/WEB-INF/applicationContext.xml</
param-value
>
</
init-param
>
<
load-on-startup
>1</
load-on-startup
>
</
servlet
>
<
servlet-mapping
>
<
servlet-name
>SpringController</
servlet-name
>
<
url-pattern
>/</
url-pattern
>
</
servlet-mapping
>
</
web-app
>
|
The SpringServletContainerInitializer class is bootstrapped automatically by any Servlet 3.0-compliant container (e.g. Apache Tomcat 7), and it will look for an implementation of the WebApplicationInitializer interface and invoke its onStartup() method. Following is an example of a WebApplicationInitializer ’s implementation that does the same thing as the XML-based approach above:
Code-based approach:
|
1
2
3
4
5
6
7
8
9
10
11
12
13
14
15
16
17
18
19
20
21
22
|
import
javax.servlet.ServletContext;
import
javax.servlet.ServletException;
import
javax.servlet.ServletRegistration;
import
org.springframework.web.WebApplicationInitializer;
import
org.springframework.web.context.support.XmlWebApplicationContext;
import
org.springframework.web.servlet.DispatcherServlet;
public
class
SpringWebAppInitializer
implements
WebApplicationInitializer {
@Override
public
void
onStartup(ServletContext container)
throws
ServletException {
XmlWebApplicationContext appContext =
new
XmlWebApplicationContext();
appContext.setConfigLocation(
"/WEB-INF/applicationContext.xml"
);
ServletRegistration.Dynamic dispatcher = container.addServlet(
"SpringDispatcher"
,
new
DispatcherServlet(appContext));
dispatcher.setLoadOnStartup(
1
);
dispatcher.addMapping(
"/"
);
}
}
|
|
1
|
appContext.setConfigLocation(
"/WEB-INF/applicationContext.xml"
);
|
XML-based application context configuration:
|
1
2
3
4
5
6
7
8
9
10
11
12
13
14
15
16
|
<
beans
xmlns
=
"http://www.springframework.org/schema/beans"
xmlns:xsi
=
"http://www.w3.org/2001/XMLSchema-instance"
xmlns:context
=
"http://www.springframework.org/schema/context"
xsi:schemaLocation="http://www.springframework.org/schema/beans
http://www.springframework.org/schema/beans/spring-beans-3.0.xsd
http://www.springframework.org/schema/context
http://www.springframework.org/schema/context/spring-context-3.0.xsd">
<
bean
name
=
"/"
class
=
"net.codejava.spring.HomeController"
/>
<
bean
id
=
"viewResolver"
class
=
"org.springframework.web.servlet.view.InternalResourceViewResolver"
>
<
property
name
=
"prefix"
value
=
"/"
/>
<
property
name
=
"suffix"
value
=
".jsp"
/>
</
bean
>
</
beans
>
|
Here’s an example of a replacement for the applicationContext.xml above in Java code as follows:
Code-based application context configuration:
|
1
2
3
4
5
6
7
8
9
10
11
12
13
14
15
16
17
18
19
20
21
22
23
|
package
net.codejava.spring;
import
org.springframework.context.annotation.Bean;
import
org.springframework.context.annotation.Configuration;
import
org.springframework.web.servlet.mvc.Controller;
import
org.springframework.web.servlet.view.InternalResourceViewResolver;
@Configuration
public
class
ApplicationContextConfig {
@Bean
(name =
"viewResolver"
)
public
InternalResourceViewResolver getViewResolver() {
InternalResourceViewResolver viewResolver =
new
InternalResourceViewResolver();
viewResolver.setPrefix(
"/"
);
viewResolver.setSuffix(
".jsp"
);
return
viewResolver;
}
@Bean
(name =
"/"
)
public
Controller getHomeController() {
return
new
HomeController();
}
}
|
|
1
2
3
4
5
6
7
8
9
10
11
12
13
14
15
16
17
18
|
package
net.codejava.spring;
import
javax.servlet.http.HttpServletRequest;
import
javax.servlet.http.HttpServletResponse;
import
org.springframework.web.servlet.ModelAndView;
import
org.springframework.web.servlet.mvc.Controller;
public
class
HomeController
implements
Controller {
@Override
public
ModelAndView handleRequest(HttpServletRequest request,
HttpServletResponse response)
throws
Exception {
return
new
ModelAndView(
"home"
);
}
}
|
|
1
2
3
4
5
6
7
8
9
10
11
12
13
14
15
16
|
<%@ page language="java" contentType="text/html; charset=UTF-8"
pageEncoding="UTF-8"%>
<!DOCTYPE html PUBLIC "-//W3C//DTD HTML 4.01 Transitional//EN"
"http://www.w3.org/TR/html4/loose.dtd">
<
html
>
<
head
>
<
meta
http-equiv
=
"Content-Type"
content
=
"text/html; charset=UTF-8"
>
<
title
>Spring MVC Bootstrap</
title
>
</
head
>
<
body
>
<
div
align
=
"center"
>
<
h1
>Welcome to Spring MVC Bootstrap demo!</
h1
>
<
h3
>100% code-based approach, no XML at all!</
h3
>
</
div
>
</
body
>
</
html
>
|
|
1
2
|
AnnotationConfigWebApplicationContext appContext =
new
AnnotationConfigWebApplicationContext();
appContext.register(ApplicationContextConfig.
class
);
|
Then we have our
SpringWebAppInitializer
class finalized as follows:
If we build this application in Eclipse IDE, we would have the following project structure:
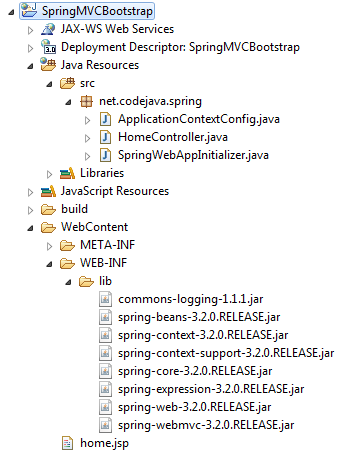
100% code-based approach:
|
1
2
3
4
5
6
7
8
9
10
11
12
13
14
15
16
17
18
19
20
21
22
23
24
25
|
package
net.codejava.spring;
import
javax.servlet.ServletContext;
import
javax.servlet.ServletException;
import
javax.servlet.ServletRegistration;
import
org.springframework.web.WebApplicationInitializer;
import
org.springframework.web.context.support.AnnotationConfigWebApplicationContext;
import
org.springframework.web.servlet.DispatcherServlet;
public
class
SpringWebAppInitializer
implements
WebApplicationInitializer {
@Override
public
void
onStartup(ServletContext container)
throws
ServletException {
AnnotationConfigWebApplicationContext appContext =
new
AnnotationConfigWebApplicationContext();
appContext.register(ApplicationContextConfig.
class
);
ServletRegistration.Dynamic dispatcher = container.addServlet(
"SpringDispatcher"
,
new
DispatcherServlet(appContext));
dispatcher.setLoadOnStartup(
1
);
dispatcher.addMapping(
"/"
);
}
}
|
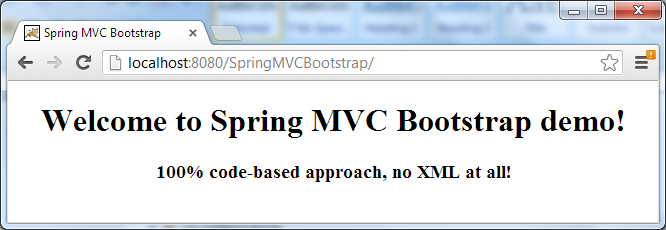
Package and deploy this application on a Servlet 3.0-compliant server (Apache Tomcat) and access it in browser by the following URL:
http://localhost:8080/SpringMVCBootstrap
Output:
As we can see, this simple Spring Web MVC application is running perfectly! Thanks to the code-based approach, we don’t have to write any XML code at all! One big benefit of this approach is that we can package our application’s bootstrap code in a jar file and put it under WEB-INF\lib directory and the servlet container will automatically detect and initialize it.
Download the sample application (Eclipse project) to test this out yourself.


 1286
1286

 被折叠的 条评论
为什么被折叠?
被折叠的 条评论
为什么被折叠?
 到【灌水乐园】发言


