


转载请标明出处:
http://blog.csdn.net/hai_qing_xu_kong/article/details/50965588
本文出自:【顾林海的博客】
##前言
由于一些原因,马上就要离开现在这家公司,有解脱,也要感慨,在公司的这段时间学到很多东西,无论是技术上的、管理、产品,都有了很好的认识。做好自己,不要和他人比较,今天带来了的是自定义标签,除了标签的自定义,还有展示成瀑布流式的。
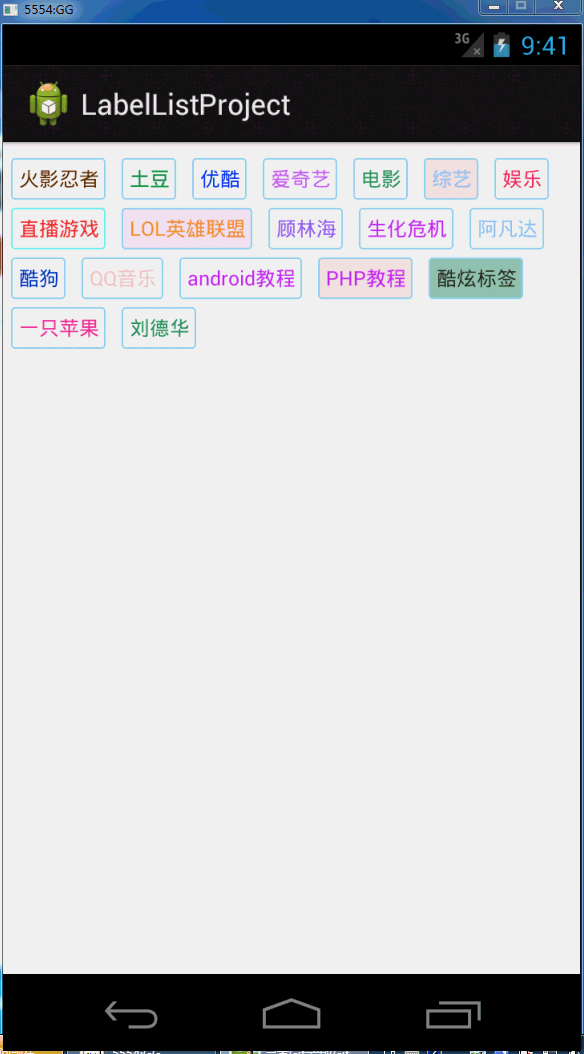
具体效果如下,项目下载地址在最下方。:
##原理讲解
制作这个瀑布流式的自定义标签列表时,我们把它拆分成两部分,一是标签的自定义,二是瀑布流式的布局。
在这里,将整个瀑布流式的标签列表进行划分,如图:

从上图可以看出,外面是LinearLayout容器,排列方式是垂直,
内部是一个个LinearLayout,排列方式是水平,内部的LinearLayout就是用来存放我们的标签。
注意的是:内部的LinearLayout一行添加标签满时,我们就得进行换行,这时就需要我们去得到一行标签的总宽度,用整个容器的宽度减去一行标签的总宽度就可以得到剩余的宽度,拿剩余的宽度和即将添加标签的宽度进行判断是否需要换行。
标签的制作使用GradientDrawable作为TextView的背景,GradientDrawable允许设置矩形四个角为圆角,以及圆角的半径,因此优先使用GradientDrawable。
##如何使用自定义的控件
这边的话先讲怎么使用我自定义的控件,顺便提一下合理的使用范型知识,可以使控件更有利于扩展。
由于业务的场景的不同,我们拿到数据类型个不相同,假如在游戏搜索页展示标签列表,定义一个GameLabel类,用于表示此场景下的标签信息:
package com.example.labellistproject.entity;

/**
 *
 * @author Linhai GU
 *
 */
public class GameLabel {
	public String name;
	public String textColor;// 字体颜色
	public String backgroudColor;// 标签背景颜色
	public String strokeColor;// 标签外框颜色
}
接着定义一个继承BaseLabelListView的类即可,如下:
package com.example.labellistproject.view;

import android.content.Context;
import android.util.AttributeSet;

import com.example.labellistproject.entity.GameLabel;
import com.example.labellistproject.view.base.BaseLabelListView;

public class LabelListView extends BaseLabelListView<GameLabel> {

	public LabelListView(Context context, AttributeSet attrs, int defStyle) {
		super(context, attrs, defStyle);
	}

	public LabelListView(Context context, AttributeSet attrs) {
		this(context, attrs, 0);
	}

	public LabelListView(Context context) {
		this(context, null);
	}

	@Override
	public String getLabelName(GameLabel object) {
		return object.name;
	}

	@Override
	public String getTextColor(GameLabel object) {
		return object.textColor;
	}

	@Override
	public String getBackgroundColor(GameLabel object) {
		return object.backgroudColor;
	}

	@Override
	public String getStrokeColor(GameLabel object) {
		return object.strokeColor;
	}

}
GameLabel这个类就是不同场景下的标签信息,这里BaseLabelListView是个抽象的范型类,因此数据的扩展性是没有问题的。
我们看到继承BaseLabelListView这个抽象类后,重写了四个方法,四个方法的说明如下:
package com.example.labellistproject.inface;

public interface ILabelInfo<T> {

	/**
	 * 标签内容
	 *
	 * @param object
	 * @return
	 */
	public String getLabelName(T object);

	/**
	 * 标签字体颜色
	 *
	 * @param object
	 * @return
	 */
	public String getTextColor(T object);

	/**
	 * 标签背景颜色
	 *
	 * @param object
	 * @return
	 */
	public String getBackgroundColor(T object);

	/**
	 * 标签外框颜色
	 *
	 * @param object
	 * @return
	 */
	public String getStrokeColor(T object);

}
到这里将我们的LabelListView 这个View加载到xml中去,以下是LabelListView 在xml中的用法:
<RelativeLayout xmlns:android="http://schemas.android.com/apk/res/android"
    xmlns:tools="http://schemas.android.com/tools"
    android:layout_width="match_parent"
    android:layout_height="match_parent" >

    <com.example.labellistproject.view.LabelListView
        android:id="@+id/label_list_view"
        android:layout_width="match_parent"
        android:layout_height="match_parent"
        android:layout_marginTop="10dp" >
    </com.example.labellistproject.view.LabelListView>

</RelativeLayout>
接着在MainActivity中的用法:
package com.example.labellistproject;

import java.util.ArrayList;

import android.app.Activity;
import android.os.Bundle;
import android.widget.Toast;

import com.example.labellistproject.entity.GameLabel;
import com.example.labellistproject.inface.IOnItemClickListener;
import com.example.labellistproject.view.LabelListView;
import com.example.labellistproject.view.base.BaseLabelListView;

public class MainActivity extends Activity {

	private LabelListView mLabelListView;
	private ArrayList<GameLabel> labelList = new ArrayList<GameLabel>();

	@Override
	protected void onCreate(Bundle savedInstanceState) {
		super.onCreate(savedInstanceState);
		setContentView(R.layout.activity_main);
		initDatas();
		initViews();
		initEvent();
	}

	private void initDatas() {
		GameLabel label = new GameLabel();
		label.name = "火影忍者";
		label.textColor = "663300";
		label.backgroudColor = "";
		label.strokeColor = "";
		labelList.add(label);
		label = new GameLabel();
		label.name = "土豆";
		label.textColor = "009933";
		label.backgroudColor = "";
		label.strokeColor = "";
		labelList.add(label);
		label = new GameLabel();
		label.name = "优酷";
		label.textColor = "0033FF";
		label.backgroudColor = "";
		label.strokeColor = "";
		labelList.add(label);
		label = new GameLabel();
		label.name = "爱奇艺";
		label.textColor = "CC66FF";
		label.backgroudColor = "";
		label.strokeColor = "";
		labelList.add(label);
		label = new GameLabel();
		label.name = "电影";
		label.textColor = "339966";
		label.backgroudColor = "";
		label.strokeColor = "";
		labelList.add(label);
		label = new GameLabel();
		label.name = "综艺";
		label.textColor = "99CCFF";
		label.backgroudColor = "FFCCCC";
		label.strokeColor = "";
		labelList.add(label);
		label = new GameLabel();
		label.name = "娱乐";
		label.textColor = "FF3366";
		label.backgroudColor = "";
		label.strokeColor = "";
		labelList.add(label);
		label = new GameLabel();
		label.name = "直播游戏";
		label.textColor = "FF3333";
		label.backgroudColor = "";
		label.strokeColor = "00FFFF";
		labelList.add(label);
		label = new GameLabel();
		label.name = "LOL英雄联盟";
		label.textColor = "FF9933";
		label.backgroudColor = "FFCCFF";
		label.strokeColor = "";
		labelList.add(label);
		label = new GameLabel();
		label.name = "顾林海";
		label.textColor = "9966FF";
		label.backgroudColor = "";
		label.strokeColor = "";
		labelList.add(label);
		label = new GameLabel();
		label.name = "生化危机";
		label.textColor = "CC33FF";
		label.backgroudColor = "";
		label.strokeColor = "";
		labelList.add(label);
		label = new GameLabel();
		label.name = "阿凡达";
		label.textColor = "99CCFF";
		label.backgroudColor = "";
		label.strokeColor = "";
		labelList.add(label);
		label = new GameLabel();
		label.name = "酷狗";
		label.textColor = "0033CC";
		label.backgroudColor = "";
		label.strokeColor = "";
		labelList.add(label);
		label = new GameLabel();
		label.name = "QQ音乐";
		label.textColor = "FFCCCC";
		label.backgroudColor = "";
		label.strokeColor = "";
		labelList.add(label);
		label = new GameLabel();
		label.name = "android教程";
		label.textColor = "CC33FF";
		label.backgroudColor = "";
		label.strokeColor = "";
		labelList.add(label);
		label = new GameLabel();
		label.name = "PHP教程";
		label.textColor = "CC33FF";
		label.backgroudColor = "FFCCCC";
		label.strokeColor = "";
		labelList.add(label);
		label = new GameLabel();
		label.name = "酷炫标签";
		label.textColor = "";
		label.backgroudColor = "339966";
		label.strokeColor = "";
		labelList.add(label);
		label = new GameLabel();
		label.name = "一只苹果";
		label.textColor = "FF3399";
		label.backgroudColor = "";
		label.strokeColor = "";
		labelList.add(label);
		label = new GameLabel();
		label.name = "刘德华";
		label.textColor = "339966";
		label.backgroudColor = "";
		label.strokeColor = "";
		labelList.add(label);

	}

	private void initViews() {
		mLabelListView = (LabelListView) findViewById(R.id.label_list_view);
		mLabelListView.setSize(25);
		mLabelListView.setData(labelList);
	}

	private void initEvent() {
		mLabelListView.setOnClickListener(new IOnItemClickListener() {

			@Override
			public void onClick(String name, int position) {
				Toast.makeText(MainActivity.this,
						"标签内容:" + name + "   位置:" + position,
						Toast.LENGTH_SHORT).show();
			}
		});
	}

}
用法非常简单,标签的各种颜色以及大小,都可以订制,是不是很方便。
##瀑布流式标签代码讲解
如何能实现以下的效果呢?这里先从制作标签开始,没一个标签都是一个TextView,我们给TextView是背景设置成GradientDrawable。
以下是制作标签的类:
package com.example.labellistproject.view.base;

import android.content.Context;
import android.graphics.Color;
import android.graphics.drawable.GradientDrawable;
import android.text.TextUtils;
import android.util.TypedValue;
import android.widget.TextView;

/**
 * 标签制作
 *
 * @author Linhai Gu
 *
 */
public class GradientTextView {

	private GradientDrawable mGradientDrawable;
	private TextView mLabelTextView;
	private Context mContext;

	public GradientTextView(Context _context) {
		this.mContext = _context;
		mGradientDrawable = new GradientDrawable();
		mLabelTextView = new TextView(mContext);
		initGradientDrawable();
		initLabelTextView();
	}

	/**
	 * 初始化GradientDrawable
	 */
	private void initGradientDrawable() {
		mGradientDrawable.setColor(mContext.getResources().getColor(
				android.R.color.white));
		mGradientDrawable.setCornerRadius(dip2px(1));
		mGradientDrawable.setStroke(dip2px(1), mContext.getResources()
				.getColor(android.R.color.holo_blue_light));
		mGradientDrawable.setAlpha(128);
	}

	/**
	 * 初始化标签
	 */
	private void initLabelTextView() {
		mLabelTextView.setTextSize(TypedValue.COMPLEX_UNIT_PX, 20);
		mLabelTextView.setPadding(dip2px(5), dip2px(4), dip2px(4), dip2px(5));
	}

	/**
	 * dp-->px
	 *
	 * @param dipValue
	 * @return
	 */
	private int dip2px(float dipValue) {
		final float scale = mContext.getResources().getDisplayMetrics().density;
		return (int) (dipValue * scale + 0.5f);
	}

	/**
	 * 是否为空
	 *
	 * @param str
	 * @return
	 */
	private boolean empty(String str) {
		return TextUtils.isEmpty(str);
	}

	/**
	 * 转换成颜色值
	 *
	 * @param color
	 * @return
	 */
	private int parseColor(String color) {
		return Color.parseColor("#" + color);
	}

	/**
	 * 标签字体颜色
	 *
	 * @param object
	 * @return
	 */
	public GradientTextView setTextColor(String color) {
		if (!empty(color)) {
			try {
				mLabelTextView.setTextColor(parseColor(color));
			} catch (Exception e) {

			}
		}
		return this;
	}

	/**
	 * 标签背景颜色
	 *
	 * @param object
	 * @return
	 */
	public GradientTextView setBackgroundColor(String color) {
		if (!empty(color)) {
			mGradientDrawable.setColor(parseColor(color));
		}
		return this;
	}

	/**
	 * 标签外框颜色
	 *
	 * @param object
	 * @return
	 */
	public GradientTextView setStrokeColor(String color) {
		if (!empty(color)) {
			mGradientDrawable.setStroke(dip2px(1), parseColor(color));
		}
		return this;
	}

	public GradientTextView setStrokeRadius(int radius) {
		mGradientDrawable.setCornerRadius(dip2px(radius));
		return this;
	}

	/**
	 * 设置标签内容
	 *
	 * @param info
	 * @return
	 */
	public GradientTextView setLabelText(String info) {
		if (!empty(info)) {
			mLabelTextView.setText(info);
		}
		return this;
	}

	public GradientTextView setTextSize(int size) {
		mLabelTextView.setTextSize(TypedValue.COMPLEX_UNIT_PX, size);
		return this;
	}

	/**
	 * 构造TextView
	 *
	 * @return
	 */
	public TextView build() {
		mLabelTextView.setBackgroundDrawable(mGradientDrawable);
		return mLabelTextView;
	}

}
代码非常简单,给TextView和GradientDrawable设置参数,最后通过build方法返回制作好的标签(TextView)。
接着编写瀑布流式的布局,上面原理讲解时已经说过了,外面是一个垂直的LinearLayout,内部是一个个垂直的LinearLayout,内部的LinearLayout是水平排列的,用于标签的排列。
因此写个继承LinearLayout的类,我们这里称为BaseLabelListView:
public abstract class BaseLabelListView<T> extends LinearLayout implements
		ILabelInfo<T> {
}
ILabelInfo是一个范型接口,内部定义了一些方法,用于在BaseLabelListView的子类中去实现的,方便我们的订制。
外部的LinearLayout是垂直的,因此需要进行设置:
	public BaseLabelListView(Context context, AttributeSet attrs, int defStyle) {
		super(context, attrs, defStyle);
		this.mContext = context;
		init();
	}

	public BaseLabelListView(Context context, AttributeSet attrs) {
		this(context, attrs, 0);
	}

	public BaseLabelListView(Context context) {
		this(context, null);
	}

	private void init() {
		this.setOrientation(LinearLayout.VERTICAL);
	}
设置完整个容器的排列方式后,就需要我们标签的添加了。
	@Override
	protected void onMeasure(int widthMeasureSpec, int heightMeasureSpec) {
		// 获取容器宽度
		groupWidth = getMeasuredWidth() - getPaddingLeft() - getPaddingRight();
		if (groupWidth > 0 && isFirst) {
			isFirst = false;
			addLabelList(mDatas);
		}
		super.onMeasure(widthMeasureSpec, heightMeasureSpec);
	}
重新onMeasure方法,获取我们的容器的宽度,之后进行标签的添加,addLabelList就是标签添加的方法。
	/**
	 * 添加标签列表
	 */
	private void addLabelList(final List<T> datas) {
		// 一行剩下的空间
		remainWidth = groupWidth;
		if (groupWidth > 0) {
			Paint paint = new Paint();
			removeAllViews();
			LinearLayout layout = new LinearLayout(mContext);
			TextView labelText;
			LayoutParams params;
			layout.setOrientation(LinearLayout.HORIZONTAL);

			addView(layout);

			for (int i = 0, length = datas.size(); i < length; i++) {
				final T data = datas.get(i);
				final int position = i;
				// 创建标签
				labelText = createLabel(data, i);
				paint.setTextSize(labelText.getTextSize());
				final int itemPadding = labelText.getCompoundPaddingLeft()
						+ labelText.getCompoundPaddingRight();
				// 获取标签宽度
				final float itemWidth = paint.measureText(getLabelName(data))
						+ itemPadding;
				labelText.setText(getLabelName(data));

				if (remainWidth > itemWidth) {
					/**
					 * 一行剩余空间大于添加标签的宽度,说明可以继续往一行添加
					 */
					layout.addView(labelText);
				} else {
					/**
					 * 如果一行已经添加不了,就另起一行继续添加标签
					 */
					layout = new LinearLayout(mContext);
					layout.addView(labelText);
					addView(layout);
					params = (LayoutParams) layout.getLayoutParams();
					params.setMargins(0, itemTopMargins, 0, 0);
					remainWidth = groupWidth;
				}
				params = (LayoutParams) labelText.getLayoutParams();

				params.setMargins(itemMargins, 0, itemMargins, 0);
				remainWidth = (int) ((remainWidth - itemWidth + 0.5f) - itemMargins * 2);
			}
		}

	}
以上代码的整体逻辑就是:
- 在每次加载标签时,进行容器的清空。
- 创建内部的LinearLayout,设置为水平排列,并添加到容器中。
- 通过循环操作,创建标签,获取标签宽度,并获取到一行标签宽度(累加),用容器的宽度减去一行标签的宽度,得到剩余的宽度,之后与添加标签的宽度比较一下,如果剩余宽度小于标签宽度,说明这行已经容纳不下这个标签了,这时应该换行,重新创建LinearLaoyt并添加到垂直排列的容器中去。
	/**
	 * 创建标签
	 *
	 * @param data
	 * @param position
	 * @return
	 */
	private TextView createLabel(final T data, final int position) {
		TextView labelText = new GradientTextView(mContext)
				.setTextColor(getTextColor(data))
				.setBackgroundColor(getBackgroundColor(data))
				.setStrokeColor(getStrokeColor(data)).setStrokeRadius(radius)
				.setTextSize(textSize).build();
		labelText.setOnClickListener(new OnClickListener() {

			@Override
			public void onClick(View v) {
				mIOnItemClickListener.onClick(getLabelName(data), position);
			}
		});
		return labelText;
	}
标签的创建很简单,最后通过build获取标签,通过接口回调标签内容和位置。
以下是BaseLabelListView类的全部代码:
package com.example.labellistproject.view.base;

import java.util.ArrayList;
import java.util.List;

import android.content.Context;
import android.graphics.Paint;
import android.util.AttributeSet;
import android.view.View;
import android.widget.LinearLayout;
import android.widget.TextView;

import com.example.labellistproject.inface.ILabelInfo;
import com.example.labellistproject.inface.IOnItemClickListener;

/**
 * 瀑布流标签的基类,所有业务类的标签样式继承BaseLabelListView
 *
 * @author Administrator
 *
 * @param <T>
 *            业务数据
 */
public abstract class BaseLabelListView<T> extends LinearLayout implements
		ILabelInfo<T> {

	private Context mContext;

	/**
	 * 接口监听
	 */
	private IOnItemClickListener mIOnItemClickListener;

	/**
	 * 数据源
	 */
	private List<T> mDatas = new ArrayList<T>();

	/**
	 * 标签间的横向间距
	 */
	private int itemMargins = 10;

	/**
	 * 标签间的纵向间距
	 */
	private int itemTopMargins = 10;

	/**
	 * 文字大小
	 */
	private int textSize = 30;

	/**
	 * 圆角度数
	 */
	private int radius = 2;

	private boolean isFirst = true;

	public BaseLabelListView(Context context, AttributeSet attrs, int defStyle) {
		super(context, attrs, defStyle);
		this.mContext = context;
		init();
	}

	public BaseLabelListView(Context context, AttributeSet attrs) {
		this(context, attrs, 0);
	}

	public BaseLabelListView(Context context) {
		this(context, null);
	}

	private void init() {
		this.setOrientation(LinearLayout.VERTICAL);
	}

	/**
	 * 添加数据
	 *
	 * @param data
	 */
	public void setData(List<T> _datas) {

		mDatas.clear();

		mDatas.addAll(_datas);

	}

	int groupWidth;
	int remainWidth;

	@Override
	protected void onMeasure(int widthMeasureSpec, int heightMeasureSpec) {
		// 获取容器宽度
		groupWidth = getMeasuredWidth() - getPaddingLeft() - getPaddingRight();
		if (groupWidth > 0 && isFirst) {
			isFirst = false;
			addLabelList(mDatas);
		}
		super.onMeasure(widthMeasureSpec, heightMeasureSpec);
	}

	/**
	 * 添加标签列表
	 */
	private void addLabelList(final List<T> datas) {
		// 一行剩下的空间
		remainWidth = groupWidth;
		if (groupWidth > 0) {
			Paint paint = new Paint();
			removeAllViews();
			LinearLayout layout = new LinearLayout(mContext);
			TextView labelText;
			LayoutParams params;
			layout.setOrientation(LinearLayout.HORIZONTAL);

			addView(layout);

			for (int i = 0, length = datas.size(); i < length; i++) {
				final T data = datas.get(i);
				// 创建标签
				labelText = createLabel(data, i);
				paint.setTextSize(labelText.getTextSize());
				final int itemPadding = labelText.getCompoundPaddingLeft()
						+ labelText.getCompoundPaddingRight();
				// 获取标签宽度
				final float itemWidth = paint.measureText(getLabelName(data))
						+ itemPadding;
				labelText.setText(getLabelName(data));

				if (remainWidth > itemWidth) {
					/**
					 * 一行剩余空间大于添加标签的宽度,说明可以继续往一行添加
					 */
					layout.addView(labelText);
				} else {
					/**
					 * 如果一行已经添加不了,就另起一行继续添加标签
					 */
					layout = new LinearLayout(mContext);
					layout.addView(labelText);
					addView(layout);
					params = (LayoutParams) layout.getLayoutParams();
					params.setMargins(0, itemTopMargins, 0, 0);
					remainWidth = groupWidth;
				}
				params = (LayoutParams) labelText.getLayoutParams();

				params.setMargins(itemMargins, 0, itemMargins, 0);
				remainWidth = (int) ((remainWidth - itemWidth + 0.5f) - itemMargins * 2);
			}
		}

	}

	/**
	 * 创建标签
	 *
	 * @param data
	 * @param position
	 * @return
	 */
	private TextView createLabel(final T data, final int position) {
		TextView labelText = new GradientTextView(mContext)
				.setTextColor(getTextColor(data))
				.setBackgroundColor(getBackgroundColor(data))
				.setStrokeColor(getStrokeColor(data)).setStrokeRadius(radius)
				.setTextSize(textSize).build();
		labelText.setOnClickListener(new OnClickListener() {

			@Override
			public void onClick(View v) {
				mIOnItemClickListener.onClick(getLabelName(data), position);
			}
		});
		return labelText;
	}

	/**
	 * 设置字体大小
	 *
	 * @param size
	 */
	public void setSize(int size) {
		this.textSize = size;
	}

	/**
	 * 设置标签圆角
	 *
	 * @param radius
	 */
	public void setStrokeRadius(int radius) {
		this.radius = radius;
	}

	/**
	 * 设置监听事件
	 *
	 * @param listener
	 */
	public void setOnClickListener(IOnItemClickListener listener) {
		this.mIOnItemClickListener = listener;
	}

}
以下是完整的github项目地址
github项目源码地址:点击【项目源码】


 1万+
1万+

 被折叠的 条评论
为什么被折叠?
被折叠的 条评论
为什么被折叠?
 到【灌水乐园】发言


