


theano学习笔记(1)环境搭建
原文地址:http://blog.csdn.net/hjimce/article/details/46654229
作者:hjimce
搭建theano实属不易,因为每个人的电脑不一样,所以安装过程会有所区别,特别是安装cuda的时候,很容易驱动冲突。网上教程一大堆,但是我都没搭建成功,最后根据官网的教程,一步一步的琢磨,总算功夫不负有心人。因此写一下艰辛的theano安装历程
环境:win7+64位系统
硬件:笔记本电脑, 显卡型号:GTX 850M
现在假设电脑啥都没装,开始从头到尾进行环境搭建。
1、安装Anconda。
因为如果安装纯净版python,还需要自己安装其它的numpy、matpolt等库,挺麻烦的。所以我直接安装集成的Anaconda ,这个软件包含了Ipython,还有许多python的计算库。下载地址为:http://www.continuum.io/downloads
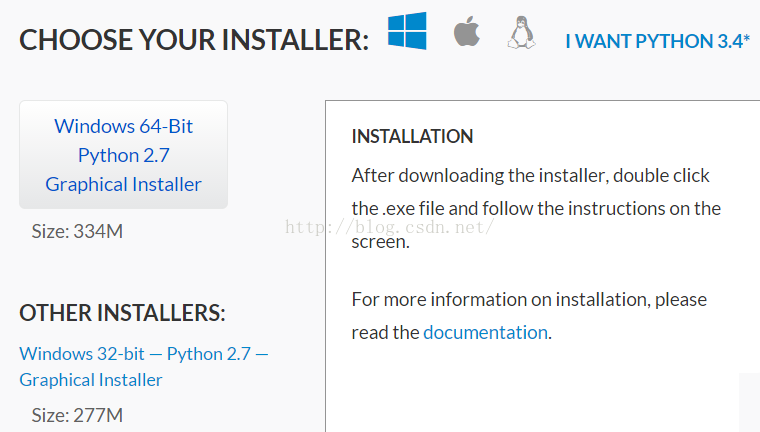
因为我是64位系统,因此选择64位的版本
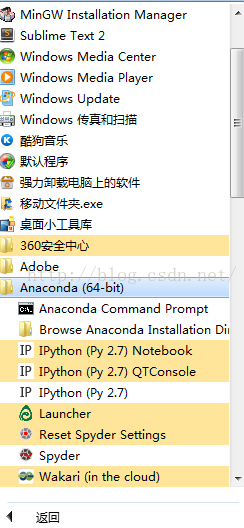
安装完成后,在window开始菜单下,的所有程序中找到已安装的Anaconda,如下:
打开Anaconda的命令窗口:Anaconda Command Prompt,然后输入命令:conda list 可以查看Anaconda为我们安装的python相关的包:
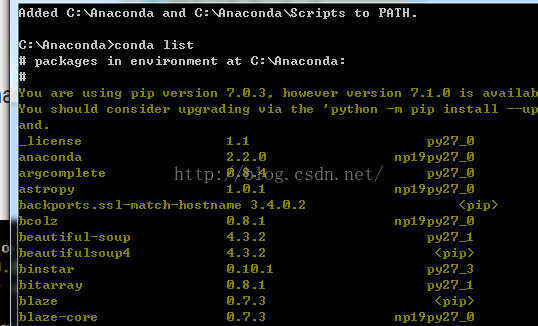
里面有非常多的包,如:numpy, nose, pip, python, scipy。
2、安装mingw、theano
(1)mingw 安装
有的Anaconda 是有包含mingw的,不过我下载到的版本安装完以后上面的包列表中并没有mingw,也就是C:\Anconda文件下没有MinGW文件夹,因此需要自己在线安装。这个如果没有装好,后面使用theano的时候会提示:g++ no detect,还有g++不是内部命令什么的。总之如果错误提示g++问题,就代表mingw没有安装或配置好。
我们在Anaconda命令窗口中,输入mingw的安装命令: conda install mingw。
声明修改:这一步用命令conda install mingw错了,最后theano安装完后,输入命令“import theano”会出现:no module named gof 的错误 。需要把mingw的安装命令改为: conda install mingw libpython。才不会出现后面的no module named gof 错误
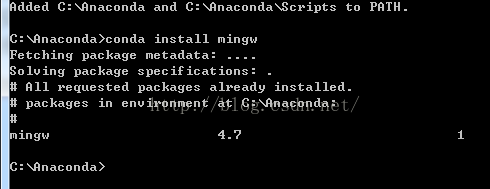
因为我已经安装过了,所以输入安装命令后,提示的是:All requested packages already installed。也就是已经安装完了,如果还没有安装的,它会自动链接在线安装。
mingw安装完后,在C:\Anconda文件下会出现:名为MinGW的文件夹。
(2)theano 安装
与mingw的安装类似,直接在anaconda的命令窗口中输入命令:pip install theano。接着会自动进行在线安装,如下所示:
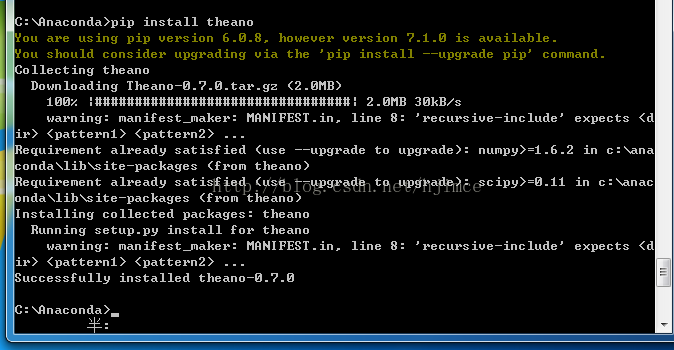
最后安装成功了会提示:successfully installed theano。
(3)配置环境变量
在桌面上我的电脑右键-》属性-》高级系统设置-》环境变量。即可进入环境变量设置界面如下:
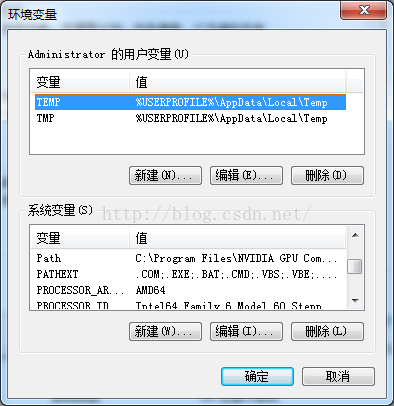
步骤一、在系统环境变量中选择“变量path”,在后面加入值:“c:\Anaconda\MinGW\bin;c:\Anaconda\MinGW\x86_64-mingw32\lib;”(如果操作系统为32位的变量值输入为“c:\Anaconda\MinGW\bin;c:\Anaconda\MinGW\i686_w64-mingw32\lib;”)(注意要带分号)
步骤二、新建环境变量。变量名为“PYTHONPATH”,变量值为“C:\Anaconda\Lib\site-packages\theano;”(同样注意要带分号)
步骤三、打开C盘-》用户-》当前用户(根据你的电脑用户而定)。因为我的电脑现在所用的是超级管理员用户Adminstrator,因此打开Adminstrator用户
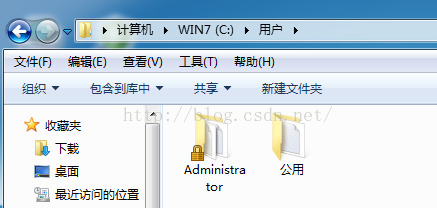
用户目录

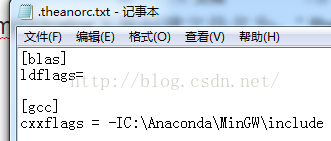
在用户Adminstrator下面创建文件名为:“.theanorc.txt”,文件内容为:
“[blas]
ldflags=
[gcc]
cxxflags = -IC:\Anaconda\MinGW\include”
即:
ok,到了这里我们已经完成了theano配置的上半部分,这个时候theano已经可以用了,接着需要做个测试,测试一下自己上面的配置有没有问题。
(4)测试配置是否有误
测试开始前,需要重启电脑,因为我们上面配置了环境变量,系统的环境变量设置完了需要重启电脑才能有效果。
测试方法一、
测试代码:
- import numpy as np
- import time
- import theano
- A = np.random.rand(1000,10000).astype(theano.config.floatX)
- B = np.random.rand(10000,1000).astype(theano.config.floatX)
- np_start = time.time()
- AB = A.dot(B)
- np_end = time.time()
- X,Y = theano.tensor.matrices('XY')
- mf = theano.function([X,Y],X.dot(Y))
- t_start = time.time()
- tAB = mf(A,B)
- t_end = time.time()
- print "NP time: %f[s], theano time: %f[s] (times should be close when run on CPU!)" %(
- np_end-np_start, t_end-t_start)
- print "Result difference: %f" % (np.abs(AB-tAB).max(), )
把上面的代码拷贝复制一下,然后用python运行一下结果如下:

测试方案二、
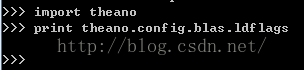
在python命令窗口中输入:
- Import theano
- print theano.config.blas.ldflags
没有出错(没有返回值)则说明已经配置成功,如下图所示,就代表成功了:
测试方案三、验证BLAS是否安装成功。由于numpy是依赖BLAS的,如果BLAS没有安装成功,虽然numpy亦可以安装,但是无法使用BLAS的加速。验证numpy是否真的成功依赖BLAS编译,用以下代码试验:

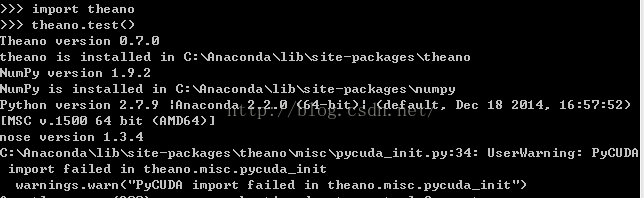
3、安装CUDA
上面的theano配置只是完成了上半部分,这个时候还不能进行gpu加速。这个时候我们可以用如下命令:
>>import theano
>>theano.test()
测试看一下结果如下,这个时候会跳出PyCUDA的相关错误信息,因为我们还没有安装CUDA。
OK,接着我们要做的就是安装CUDA了。具体步骤如下:
(1)安装vs,根据theano官网的安装教程,到网站:http://go.microsoft.com/?linkid=9709969 下载到:VS2010Express1.iso,然后用虚拟光驱打开,然后在打开VCExpress文件,双击安装文件:VCExpress\setup.exe
(2)安装CUDA。
a、下载合适的cuda版本。这一步很操蛋,因为我一开始是根据官网教程,到这个网站:https://developer.nvidia.com/cuda-toolkit-55-archive 根据我是笔记本电脑同时是win7 64位系统,最后下载了cuda_5.5.20_winvista_win7_win8_notebook_64.exe。等了一个小时终于下载完了,下载完后进行安装,结果一安装就出现如下错误:

告诉我说图形驱动与显卡不兼容,如果继续安装,即使安装成功了,也不能使用cuda。于是我就去下载了个高一点的版本:cuda6.5,等了一个小时终于下载完了,结果一运行还是同样的错误。
最后我下载了最新的版本:cuda_7.0.28_windows.exe 终于没有错误了。因此安装cuda需要根据电脑的显卡型号确定,因为我的电脑是刚买不久的,所以显卡比较先进。
根据上面的步骤,我的电脑找到了合适版本为cuda7.0版本。接着就需要安装cuda_7.0.28_windows.exe这玩意了
b、安装cuda。下载完后,直接双击安装,选择自定义安装,然后把所有包的都勾选上,省的后面出现什么错误。这一步有可能会遇到驱动冲突,导致某些包安装失败,比如我第一次安装的时候,结果图形驱动包就安装失败了。
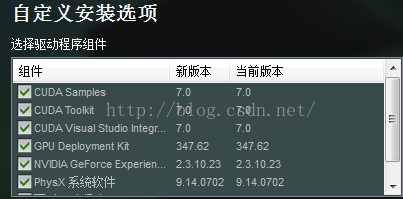
如果某些包安装失败,后面使用theano的时候,会跳出错误。像我图形驱动安装失败,运行theano的时候就出现错误提示为cuda版本与驱动版本不一致。因此如果你安装cuda的过程中,有出现安装失败的,那么请你接着往下看。安装失败一般是驱动冲突的问题,这个时候我的方法是用驱动精灵卸载掉显卡驱动,然后在进行安装。如果是笔记本电脑,因为是双显卡的,那么就先卸载掉NVIDIA的,另外一个Intel的驱动保留的着。

然后在进行安装CUDA ,还有intel驱动最好是官方驱动,不然也有可能冲突,导致安装失败。
ok,安装完后测试一下是否安装正确。
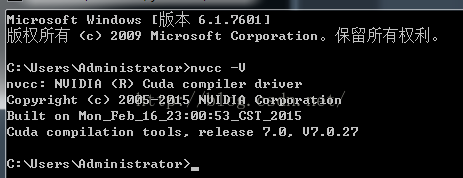
在命令提示符窗口中输入:nvcc -V,回车查看是否有版本信息。若出现版本信息,则证明nvcc安装成功,如下图所示:
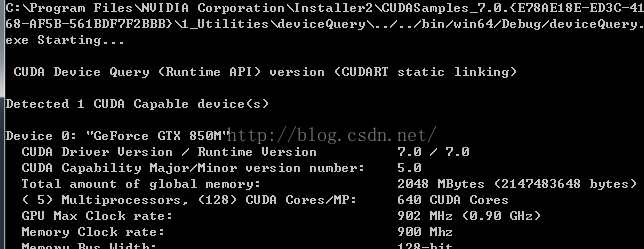
接着我们运行一个cuda自带的测试例子,名字为:deviceQuery_vs2012.sln ,这个例子目录为:C:\Program Files\NVIDIA Corporation\Installer2\CUDASamples_7.0.{E78AE18E-ED3C-4168-AF5B-561BDF7F2BBB}\1_Utilities\deviceQuery 。我用vs2012打开了deviceQuery_vs2012.sln,并编译运行得到如下结果,代表安装成功:
如果有问题,这个例子运行后,会有错误提示信息。
4、下载并安装Microsoft Visual C++ Compiler for Python 2.7。下载到的文件为:VCForPython27.msi。
接着在dos命令窗口中,cd到VCForPython27.msi所在的目录,然后输入安装命令: msiexec /i VCForPython27.msi ALLUSERS=1
接着会进行安装VCForPython27.msi。其将被安装到: C:\Program Files (x86)\Common Files\Microsoft\Visual C++ for Python\9.0.目录下
安装完后,可以到这个目录下看看有没有上面这个目录。
安装完了以后,我们新建一个文件名为:stdint.h,其文件内容如下:
- // ISO C9x compliant stdint.h for Microsoft Visual Studio
- // Based on ISO/IEC 9899:TC2 Committee draft (May 6, 2005) WG14/N1124
- //
- // Copyright (c) 2006-2013 Alexander Chemeris
- //
- // Redistribution and use in source and binary forms, with or without
- // modification, are permitted provided that the following conditions are met:
- //
- // 1. Redistributions of source code must retain the above copyright notice,
- // this list of conditions and the following disclaimer.
- //
- // 2. Redistributions in binary form must reproduce the above copyright
- // notice, this list of conditions and the following disclaimer in the
- // documentation and/or other materials provided with the distribution.
- //
- // 3. Neither the name of the product nor the names of its contributors may
- // be used to endorse or promote products derived from this software
- // without specific prior written permission.
- //
- // THIS SOFTWARE IS PROVIDED BY THE AUTHOR ``AS IS'' AND ANY EXPRESS OR IMPLIED
- // WARRANTIES, INCLUDING, BUT NOT LIMITED TO, THE IMPLIED WARRANTIES OF
- // MERCHANTABILITY AND FITNESS FOR A PARTICULAR PURPOSE ARE DISCLAIMED. IN NO
- // EVENT SHALL THE AUTHOR BE LIABLE FOR ANY DIRECT, INDIRECT, INCIDENTAL,
- // SPECIAL, EXEMPLARY, OR CONSEQUENTIAL DAMAGES (INCLUDING, BUT NOT LIMITED TO,
- // PROCUREMENT OF SUBSTITUTE GOODS OR SERVICES; LOSS OF USE, DATA, OR PROFITS;
- // OR BUSINESS INTERRUPTION) HOWEVER CAUSED AND ON ANY THEORY OF LIABILITY,
- // WHETHER IN CONTRACT, STRICT LIABILITY, OR TORT (INCLUDING NEGLIGENCE OR
- // OTHERWISE) ARISING IN ANY WAY OUT OF THE USE OF THIS SOFTWARE, EVEN IF
- // ADVISED OF THE POSSIBILITY OF SUCH DAMAGE.
- //
- ///
- #ifndef _MSC_VER // [
- #error "Use this header only with Microsoft Visual C++ compilers!"
- #endif // _MSC_VER ]
- #ifndef _MSC_STDINT_H_ // [
- #define _MSC_STDINT_H_
- #if _MSC_VER > 1000
- #pragma once
- #endif
- #if _MSC_VER >= 1600 // [
- #include <stdint.h>
- #else // ] _MSC_VER >= 1600 [
- #include <limits.h>
- // For Visual Studio 6 in C++ mode and for many Visual Studio versions when
- // compiling for ARM we should wrap <wchar.h> include with 'extern "C++" {}'
- // or compiler give many errors like this:
- // error C2733: second C linkage of overloaded function 'wmemchr' not allowed
- #ifdef __cplusplus
- extern "C" {
- #endif
- # include <wchar.h>
- #ifdef __cplusplus
- }
- #endif
- // Define _W64 macros to mark types changing their size, like intptr_t.
- #ifndef _W64
- # if !defined(__midl) && (defined(_X86_) || defined(_M_IX86)) && _MSC_VER >= 1300
- # define _W64 __w64
- # else
- # define _W64
- # endif
- #endif
- // 7.18.1 Integer types
- // 7.18.1.1 Exact-width integer types
- // Visual Studio 6 and Embedded Visual C++ 4 doesn't
- // realize that, e.g. char has the same size as __int8
- // so we give up on __intX for them.
- #if (_MSC_VER < 1300)
- typedef signed char int8_t;
- typedef signed short int16_t;
- typedef signed int int32_t;
- typedef unsigned char uint8_t;
- typedef unsigned short uint16_t;
- typedef unsigned int uint32_t;
- #else
- typedef signed __int8 int8_t;
- typedef signed __int16 int16_t;
- typedef signed __int32 int32_t;
- typedef unsigned __int8 uint8_t;
- typedef unsigned __int16 uint16_t;
- typedef unsigned __int32 uint32_t;
- #endif
- typedef signed __int64 int64_t;
- typedef unsigned __int64 uint64_t;
- // 7.18.1.2 Minimum-width integer types
- typedef int8_t int_least8_t;
- typedef int16_t int_least16_t;
- typedef int32_t int_least32_t;
- typedef int64_t int_least64_t;
- typedef uint8_t uint_least8_t;
- typedef uint16_t uint_least16_t;
- typedef uint32_t uint_least32_t;
- typedef uint64_t uint_least64_t;
- // 7.18.1.3 Fastest minimum-width integer types
- typedef int8_t int_fast8_t;
- typedef int16_t int_fast16_t;
- typedef int32_t int_fast32_t;
- typedef int64_t int_fast64_t;
- typedef uint8_t uint_fast8_t;
- typedef uint16_t uint_fast16_t;
- typedef uint32_t uint_fast32_t;
- typedef uint64_t uint_fast64_t;
- // 7.18.1.4 Integer types capable of holding object pointers
- #ifdef _WIN64 // [
- typedef signed __int64 intptr_t;
- typedef unsigned __int64 uintptr_t;
- #else // _WIN64 ][
- typedef _W64 signed int intptr_t;
- typedef _W64 unsigned int uintptr_t;
- #endif // _WIN64 ]
- // 7.18.1.5 Greatest-width integer types
- typedef int64_t intmax_t;
- typedef uint64_t uintmax_t;
- // 7.18.2 Limits of specified-width integer types
- #if !defined(__cplusplus) || defined(__STDC_LIMIT_MACROS) // [ See footnote 220 at page 257 and footnote 221 at page 259
- // 7.18.2.1 Limits of exact-width integer types
- #define INT8_MIN ((int8_t)_I8_MIN)
- #define INT8_MAX _I8_MAX
- #define INT16_MIN ((int16_t)_I16_MIN)
- #define INT16_MAX _I16_MAX
- #define INT32_MIN ((int32_t)_I32_MIN)
- #define INT32_MAX _I32_MAX
- #define INT64_MIN ((int64_t)_I64_MIN)
- #define INT64_MAX _I64_MAX
- #define UINT8_MAX _UI8_MAX
- #define UINT16_MAX _UI16_MAX
- #define UINT32_MAX _UI32_MAX
- #define UINT64_MAX _UI64_MAX
- // 7.18.2.2 Limits of minimum-width integer types
- #define INT_LEAST8_MIN INT8_MIN
- #define INT_LEAST8_MAX INT8_MAX
- #define INT_LEAST16_MIN INT16_MIN
- #define INT_LEAST16_MAX INT16_MAX
- #define INT_LEAST32_MIN INT32_MIN
- #define INT_LEAST32_MAX INT32_MAX
- #define INT_LEAST64_MIN INT64_MIN
- #define INT_LEAST64_MAX INT64_MAX
- #define UINT_LEAST8_MAX UINT8_MAX
- #define UINT_LEAST16_MAX UINT16_MAX
- #define UINT_LEAST32_MAX UINT32_MAX
- #define UINT_LEAST64_MAX UINT64_MAX
- // 7.18.2.3 Limits of fastest minimum-width integer types
- #define INT_FAST8_MIN INT8_MIN
- #define INT_FAST8_MAX INT8_MAX
- #define INT_FAST16_MIN INT16_MIN
- #define INT_FAST16_MAX INT16_MAX
- #define INT_FAST32_MIN INT32_MIN
- #define INT_FAST32_MAX INT32_MAX
- #define INT_FAST64_MIN INT64_MIN
- #define INT_FAST64_MAX INT64_MAX
- #define UINT_FAST8_MAX UINT8_MAX
- #define UINT_FAST16_MAX UINT16_MAX
- #define UINT_FAST32_MAX UINT32_MAX
- #define UINT_FAST64_MAX UINT64_MAX
- // 7.18.2.4 Limits of integer types capable of holding object pointers
- #ifdef _WIN64 // [
- # define INTPTR_MIN INT64_MIN
- # define INTPTR_MAX INT64_MAX
- # define UINTPTR_MAX UINT64_MAX
- #else // _WIN64 ][
- # define INTPTR_MIN INT32_MIN
- # define INTPTR_MAX INT32_MAX
- # define UINTPTR_MAX UINT32_MAX
- #endif // _WIN64 ]
- // 7.18.2.5 Limits of greatest-width integer types
- #define INTMAX_MIN INT64_MIN
- #define INTMAX_MAX INT64_MAX
- #define UINTMAX_MAX UINT64_MAX
- // 7.18.3 Limits of other integer types
- #ifdef _WIN64 // [
- # define PTRDIFF_MIN _I64_MIN
- # define PTRDIFF_MAX _I64_MAX
- #else // _WIN64 ][
- # define PTRDIFF_MIN _I32_MIN
- # define PTRDIFF_MAX _I32_MAX
- #endif // _WIN64 ]
- #define SIG_ATOMIC_MIN INT_MIN
- #define SIG_ATOMIC_MAX INT_MAX
- #ifndef SIZE_MAX // [
- # ifdef _WIN64 // [
- # define SIZE_MAX _UI64_MAX
- # else // _WIN64 ][
- # define SIZE_MAX _UI32_MAX
- # endif // _WIN64 ]
- #endif // SIZE_MAX ]
- // WCHAR_MIN and WCHAR_MAX are also defined in <wchar.h>
- #ifndef WCHAR_MIN // [
- # define WCHAR_MIN 0
- #endif // WCHAR_MIN ]
- #ifndef WCHAR_MAX // [
- # define WCHAR_MAX _UI16_MAX
- #endif // WCHAR_MAX ]
- #define WINT_MIN 0
- #define WINT_MAX _UI16_MAX
- #endif // __STDC_LIMIT_MACROS ]
- // 7.18.4 Limits of other integer types
- #if !defined(__cplusplus) || defined(__STDC_CONSTANT_MACROS) // [ See footnote 224 at page 260
- // 7.18.4.1 Macros for minimum-width integer constants
- #define INT8_C(val) val##i8
- #define INT16_C(val) val##i16
- #define INT32_C(val) val##i32
- #define INT64_C(val) val##i64
- #define UINT8_C(val) val##ui8
- #define UINT16_C(val) val##ui16
- #define UINT32_C(val) val##ui32
- #define UINT64_C(val) val##ui64
- // 7.18.4.2 Macros for greatest-width integer constants
- // These #ifndef's are needed to prevent collisions with <boost/cstdint.hpp>.
- // Check out Issue 9 for the details.
- #ifndef INTMAX_C // [
- # define INTMAX_C INT64_C
- #endif // INTMAX_C ]
- #ifndef UINTMAX_C // [
- # define UINTMAX_C UINT64_C
- #endif // UINTMAX_C ]
- #endif // __STDC_CONSTANT_MACROS ]
- #endif // _MSC_VER >= 1600 ]
- #endif // _MSC_STDINT_H_ ]
然后把它放到目录:
C:\Program Files (x86)\CommonFiles\Microsoft\Visual C++ for Python\9.0\VC\include\stdint.h 下面。
5、重新配置文件.theanorc.txt。把步骤2(3)中建立的文件:.theanorc.txt 内容改为如下内容:
- [blas]
- ldflags=
- [global]
- device = gpu
- floatX = float32
- [nvcc]
- fastmath=True
- flags =-LC:\Anaconda\libs
- compiler_bindir=C:\Program Files (x86)\Microsoft Visual Studio 10.0\VC\bin
- [gcc]
- cxxflags = -IC:\Anaconda\MinGW\include
这样就完成了theano的GPU配置了。上面的:
- compiler_bindir=C:\Program Files (x86)\Microsoft Visual Studio 10.0\VC\bin
6、完整测试。
测试的python代码如下:
- from theano import function, config, shared, sandbox
- import theano.tensor as T
- import numpy
- import time
- vlen = 10 * 30 * 768 # 10 x #cores x # threads per core
- iters = 1000
- rng = numpy.random.RandomState(22)
- x = shared(numpy.asarray(rng.rand(vlen), config.floatX))
- f = function([], T.exp(x))
- print f.maker.fgraph.toposort()
- t0 = time.time()
- for i in xrange(iters):
- r = f()
- t1 = time.time()
- print 'Looping %d times took' % iters, t1 - t0, 'seconds'
- print 'Result is', r
- if numpy.any([isinstance(x.op, T.Elemwise) for x in f.maker.fgraph.toposort()]):
- print 'Used the cpu'
- else:
- print 'Used the gpu'
运行结果如下:
(1)GPU测试
下面是用GPU加速的运行结果:

如上运行结果可知,用gpu进行计算时间差不多是0.68秒左右。如果想切换成只用cpu的测试的话,我是通过更改文件:.theanorc.txt的内容。如果开启gpu,那么.theanorc.txt的内容为:
- [blas]
- ldflags=
- [global]
- device = gpu
- floatX = float32
- [nvcc]
- fastmath=True
- flags =-LC:\Anaconda\libs
- compiler_bindir=C:\Program Files (x86)\Microsoft Visual Studio 10.0\VC\bin
- [gcc]
- cxxflags = -IC:\Anaconda\MinGW\include
(2)CPU测试。如果想关闭gpu,进行cpu测试那么就把.theanorc.txt内容改为:
- [blas]
- ldflags=
- [gcc]
- cxxflags = -IC:\Anaconda\MinGW\include

测试了结果,只用cpu花了13秒的时间,也就是说对于我的电脑,使用gpu进行加速,这速度提高了近20倍。
本文地址:http://blog.csdn.net/hjimce/article/details/46654229 作者:hjimce 联系qq:1393852684 更多资源请关注我的博客:http://blog.csdn.net/hjimce 原创文章,转载请保留本行信息。
参考文献:
1、http://deeplearning.net/software/theano/install_windows.html#install-windows
2、http://blog.163.com/yuyang_tech/blog/static/216050083201469101518900/
附录:
1、在调用theano.test()测试的时候,如果出现:no module name theano 的错误,表明要么没有安装,theano。如果确保已经安装了,那么就是你:高级-》环境变量 的路径没有设置好。
上面的环境变量设置:“C:\Anaconda\Lib\site-packages\theano;”查看一下是否有这个目录。比如我另外一台电脑安装的时候,不知怎么回事,theano的安装目录竟然是大写的:Theano,一直不知道错在哪
from: http://blog.csdn.net/hjimce/article/details/46654229


 363
363


 被折叠的 条评论
为什么被折叠?
被折叠的 条评论
为什么被折叠?
 到【灌水乐园】发言


