


单向认证
我们在通常访问一个网站,例如https://www.baidu.com,这是一个单向的TLS认证,具体的过程为:服务器发送证书给客户端,客户端校验证书。验证证书有效之后,客户端和服务器协商出一个对称加密密钥由服务端的私钥加密,客户端收到之后再用公钥解密这个对称密钥,然后就开始了传输层加密之旅。这种时候,服务端并不校验客户端的合法性,来者不拒,绝大部分的网站都是这种类型。
例如查看百度:
[root@iZbp1g905y8l5pclnbxvfxZ ~]# curl https://www.baidu.com -v
* About to connect() to www.baidu.com port 443 (#0)
* Trying 180.101.49.11...
* Connected to www.baidu.com (180.101.49.11) port 443 (#0)
* Initializing NSS with certpath: sql:/etc/pki/nssdb
* CAfile: /etc/pki/tls/certs/ca-bundle.crt
CApath: none
* SSL connection using TLS_ECDHE_RSA_WITH_AES_128_GCM_SHA256
* Server certificate:
* subject: CN=baidu.com,O="Beijing Baidu Netcom Science Technology Co., Ltd",OU=service operation department,L=beijing,ST=beijing,C=CN
* start date: May 09 01:22:02 2019 GMT
* expire date: Jun 25 05:31:02 2020 GMT
* common name: baidu.com
* issuer: CN=GlobalSign Organization Validation CA - SHA256 - G2,O=GlobalSign nv-sa,C=BE
> GET / HTTP/1.1
> User-Agent: curl/7.29.0
> Host: www.baidu.com
> Accept: */*
>
< HTTP/1.1 200 OK
< Accept-Ranges: bytes
< Cache-Control: private, no-cache, no-store, proxy-revalidate, no-transform
< Connection: Keep-Alive
< Content-Length: 2443
< Content-Type: text/html
< Date: Mon, 19 Aug 2019 05:56:19 GMT
< Etag: "588603eb-98b"
< Last-Modified: Mon, 23 Jan 2017 13:23:55 GMT
< Pragma: no-cache
< Server: bfe/1.0.8.18
< Set-Cookie: BDORZ=27315; max-age=86400; domain=.baidu.com; path=/
<
<!DOCTYPE html>
<!--STATUS OK--><html> <head><meta http-equiv=content-type content=text/html;charset=utf-8><meta http-equiv=X-UA-Compatible content=IE=Edge><meta content=always name=referrer><link rel=stylesheet type=text/css href=https://ss1.bdstatic.com/5eN1bjq8AAUYm2zgoY3K/r/www/cache/bdorz/baidu.min.css><title>百度一下,你就知道</title></head> <body link=#0000cc> <div id=wrapper> <div id=head> <div class=head_wrapper> <div class=s_form> <div class=s_form_wrapper> <div id=lg> <img hidefocus=true src=//www.baidu.com/img/bd_logo1.png width=270 height=129> </div> <form id=form name=f action=//www.baidu.com/s class=fm> <input type=hidden name=bdorz_come value=1> <input type=hidden name=ie value=utf-8> <input type=hidden name=f value=8> <input type=hidden name=rsv_bp value=1> <input type=hidden name=rsv_idx value=1> <input type=hidden name=tn value=baidu><span class="bg s_ipt_wr"><input id=kw name=wd class=s_ipt value maxlength=255 autocomplete=off autofocus=autofocus></span><span class="bg s_btn_wr"><input type=submit id=su value=百度一下 class="bg s_btn" autofocus></span> </form> </div> </div> <div id=u1> <a href=http://news.baidu.com name=tj_trnews class=mnav>新闻</a> <a href=https://www.hao123.com name=tj_trhao123 class=mnav>hao123</a> <a href=http://map.baidu.com name=tj_trmap class=mnav>地图</a> <a href=http://v.baidu.com name=tj_trvideo class=mnav>视频</a> <a href=http://tieba.baidu.com name=tj_trtieba class=mnav>贴吧</a> <noscript> <a href=http://www.baidu.com/bdorz/login.gif?login&tpl=mn&u=http%3A%2F%2Fwww.baidu.com%2f%3fbdorz_come%3d1 name=tj_login class=lb>登录</a> </noscript> <script>document.write('<a href="http://www.baidu.com/bdorz/login.gif?login&tpl=mn&u='+ encodeURIComponent(window.location.href+ (window.location.search === "" ? "?" : "&")+ "bdorz_come=1")+ '" name="tj_login" class="lb">登录</a>');
</script> <a href=//www.baidu.com/more/ name=tj_briicon class=bri style="display: block;">更多产品</a> </div> </div> </div> <div id=ftCon> <div id=ftConw> <p id=lh> <a href=http://home.baidu.com>关于百度</a> <a href=http://ir.baidu.com>About Baidu</a> </p> <p id=cp>©2017 Baidu <a href=http://www.baidu.com/duty/>使用百度前必读</a> <a href=http://jianyi.baidu.com/ class=cp-feedback>意见反馈</a> 京ICP证030173号 <img src=//www.baidu.com/img/gs.gif> </p> </div> </div> </div> </body> </html>
* Connection #0 to host www.baidu.com left intact
双向认证
有时候我们在一些安全性要求较高的场景下,服务器也需要来校验客户端的合法性。在客户端验证了服务器证书的合法性之后,客户端需要带上自己的证书,服务器收到证书之后,比对服务器在信任链中是否信任了客户端的证书,如果信任,则服务端校验客户端合法。如果证书不在服务端的受信列表上,则拒绝服务。这样子其实就是建立了一条双向认证的TLS传输通道。
配置SpringBoot的SSL
在SpringBoot中很容易就能做到双向认证的配置,具体如下(我们使用内嵌tomcat):
server:
  port: 8443
  ssl:
    key-store: server.jks
    key-store-password: password
    key-store-type: PKCS12
    trust-store: server_trust.jks
    trust-store-type: JKS
    trust-store-password: password
 #需要认证客户端证书
    client-auth: need
关键就是两组keyStore的生成,双向认证的情况下,首先服务器需要生成一对公私钥,并请求CA签发证书。证书通常配置在servlet容器,或者配置在前端的负载均衡服务器中。证书链(自己生成的根证书及自己签发的中间证书)或者CA根证书(操作系统中自带的信任根证书)需要转换成JKS,并且配置在服务器的trustStore配置中,也可以同样配置在负载均衡上。
另一对为客户端生成的的keyStore(Java客户端)或者包含公钥私钥的密钥交换格式(p12)。第二对的公私钥通常包含了对客户端的一些信息定义。然后将公钥发给CA,请CA签发一张证书。这个CA可以是自签名的,也可以是第三方的证书机构。然后在请求之后带上发给服务端
生成keystore的命令参考如下
keytool -importkeystore -srckeystore keystore.p12 -srcstoretype PKCS12 -deststoretype PKCS12 -destkeystore keystore.jks
测试证书配置是否正确
OpenSSL提供了一个命令来验证证书的配置是否正确,具体如下(openssl的s_client用法说明可参看我的另一篇详细讲解:https://blog.csdn.net/HD243608836/article/details/118554987):
openssl s_client -connect YOURHOST:443 -CAfile ca.pem -servername YOURHOST -key key.pem -cert cert.pem
其中-CAfile可选,在服务端配置的证书为自签名证书的情况下,需要带上这个自签名的ca证书链。
项目遇到的坑总结
因为之前对trustStore的理解不够深刻,因此,在项目中配置server.ssl.trust-store时候,直接将PKCS12密钥交换文件转换过来的JKS设置成为trustStore。这里其实是有问题的,trustStore是服务器的信任密钥存储库,存CA的证书(操作系统管理的所有受信任的根证书),有一部分人存的是客户端证书集合(比如我们内部自己的自签名证书,必须手动设置为信任)不算特别规范,但是trustStore里是绝对不能有私钥信息的。否则在加载trustStore的时候会报类似错误(spring-boot-2.1.0+内嵌tomcat):
Caused by: java.security.InvalidAlgorithmParameterException: the trustAnchors parameter must be non-empty
    at java.security.cert.PKIXParameters.setTrustAnchors(PKIXParameters.java:200) ~[na:1.8.0_181]
    at java.security.cert.PKIXParameters.<init>(PKIXParameters.java:157) ~[na:1.8.0_181]
    at java.security.cert.PKIXBuilderParameters.<init>(PKIXBuilderParameters.java:130) ~[na:1.8.0_181]
    at org.apache.tomcat.util.net.jsse.JSSEUtil.getParameters(JSSEUtil.java:390) ~[tomcat-embed-core-9.0.12.jar:9.0.12]
    at org.apache.tomcat.util.net.jsse.JSSEUtil.getTrustManagers(JSSEUtil.java:314) ~[tomcat-embed-core-9.0.12.jar:9.0.12]
    at org.apache.tomcat.util.net.AbstractJsseEndpoint.createSSLContext(AbstractJsseEndpoint.java:112) ~[tomcat-embed-core-9.0.12.jar:9.0.12]
    ... 24 common frames omitted
一开始我也一头雾水,网上找了很多方法,压根就不管用。后来还是决定跟到代码中看原因,发现了这么一个判断:
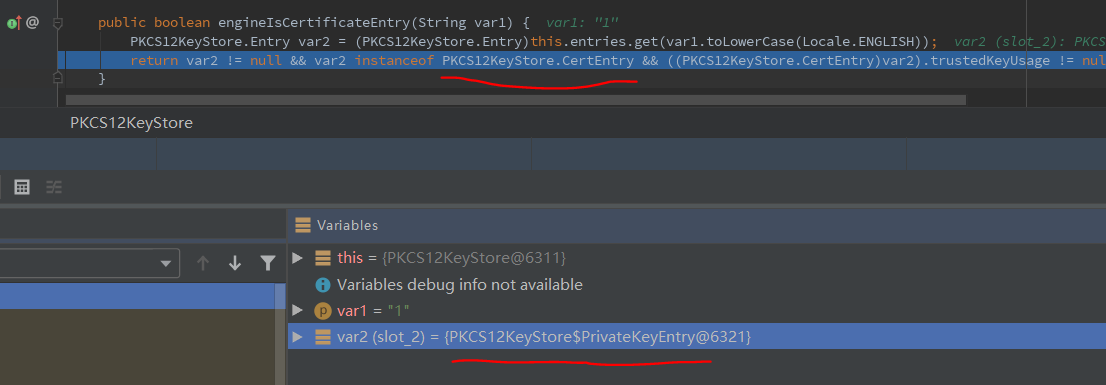
image.png
因此我有理由相信,这个trustStore的内容一定出问题了。所以,我尝试只用证书链来生成trustStore:
导入我们的证书链(从根证书到应用证书)
keytool -import -alias ourtrust -file our_trust_certificates_chain.pem -keystore our_trust.jks
然后,执行我们的测试方法(该测试方法可以放到springboot的启动类里,例如RestTemplateConfig.java通过@Configuration配合@Bean注入restTemplate到容器中):
void sslCall() throws Exception {

    char[] password = "password".toCharArray();
    // 开发环境中,不一定会有域名,因此可能会造成证书域名和真实服务器IP无法匹配而校验失败。
    //因此在开发环境中,客户端需要加上这么一段配置用来跳过服务端证书校验
    TrustStrategy acceptingTrustStrategy = (X509Certificate[] x509Certificates, String s) -> true;
    SSLContext sslContext = org.apache.http.ssl.SSLContexts.custom()
            // 配置信任链
            .loadTrustMaterial(null, acceptingTrustStrategy)
            .loadKeyMaterial(keyStore("classpath:client_keystore.jks", password), password)
            .build();
    SSLConnectionSocketFactory csf = new SSLConnectionSocketFactory(sslContext, new NoopHostnameVerifier());
    CloseableHttpClient httpClient = HttpClients.custom()
            .setSSLSocketFactory(csf)
            .build();
    HttpComponentsClientHttpRequestFactory requestFactory = new HttpComponentsClientHttpRequestFactory();
    requestFactory.setHttpClient(httpClient);

    RestTemplate restTemplate = new RestTemplate(requestFactory);
    ResponseEntity<String> response = restTemplate.exchange("https://localhost:7099/api/login", HttpMethod.GET, null, String.class);
    System.out.println(response);
}
这样就能正确通过双向认证了。
测试CURL命令
curl -k --cert cert.pem --key key.pem https://mine.host.com/api/aloha -v
~~~~~~~~~~~~~~~~~~~~~~~~~~~~~~~~~~~~~~~~~~~~~~~~~~~~~~~~~~~~~~~~~
补充(结合上文改进了一下,更优雅一些!贴上我自己在项目中写的代码,供大家参考):
我的项目是服务器与服务器之间调接口,调用是需要ssl证书双向认证的。
yml中配置:
## 证书双向认证配置(本系统作为客户端)
client:
  ssl:
    abs:
      #    jks与pkcs12(即pfx)都可以。type不区分大小写
      #    path: ssl/abs/abs@aaa.abc.com.jks
      #    type: JKS
      path: ssl/abs/abs@aaa.abc.com.pfx
      type: PKCS12
      password: 123456
      # ssl双向认证开关
      auth: true
config/RestTemplateConfig.java中:
package com.abc.config;

import lombok.Data;
import org.apache.http.conn.ssl.NoopHostnameVerifier;
import org.apache.http.conn.ssl.SSLConnectionSocketFactory;
import org.apache.http.impl.client.CloseableHttpClient;
import org.apache.http.impl.client.HttpClients;
import org.springframework.boot.context.properties.ConfigurationProperties;
import org.springframework.context.annotation.Bean;
import org.springframework.context.annotation.Configuration;
import org.springframework.http.client.HttpComponentsClientHttpRequestFactory;
import org.springframework.http.converter.StringHttpMessageConverter;
import org.springframework.web.client.RestTemplate;

import javax.net.ssl.SSLContext;
import java.io.IOException;
import java.io.InputStream;
import java.nio.charset.StandardCharsets;
import java.security.*;
import java.security.cert.CertificateException;

@Data
@Configuration
@ConfigurationProperties(prefix="client.ssl.abs")
public class RestTemplateConfig {

    private String path;
    private String type;
    private String password;
    private boolean auth;

    @Bean
    public RestTemplate getRestTemplate() throws CertificateException, UnrecoverableKeyException, NoSuchAlgorithmException, KeyStoreException, KeyManagementException, IOException {

        // https使用
        RestTemplate restTemplate = new RestTemplate(getHttpRequestFactory());

        // http使用
        // RestTemplate restTemplate = new RestTemplateBuilder().setConnectTimeout(Duration.ofSeconds(1000)).setReadTimeout(Duration.ofSeconds(5000)).build();

        //TODO 还是未解决乱码
        //解决中文乱码方式一
        restTemplate.getMessageConverters().set(1, new StringHttpMessageConverter(StandardCharsets.UTF_8));
        //解决中文乱码方式二
        //restTemplate.getMessageConverters().set(1,new MappingJackson2HttpMessageConverter());
        //StringHttpMessageConverter stringHttpMessageConverter = new StringHttpMessageConverter(StandardCharsets.UTF_8);
        //stringHttpMessageConverter.setWriteAcceptCharset(true);

        return restTemplate;
    }

    public HttpComponentsClientHttpRequestFactory getHttpRequestFactory() throws KeyStoreException, IOException, NoSuchAlgorithmException, CertificateException, KeyManagementException, UnrecoverableKeyException {
        HttpComponentsClientHttpRequestFactory requestFactory = new HttpComponentsClientHttpRequestFactory();
        requestFactory.setConnectTimeout(1000);
        requestFactory.setReadTimeout(5000);
        if(auth) {
            requestFactory.setHttpClient(getHttpClient());
        }
        return requestFactory;
    }

    /**
     *
     * 开发环境中,不一定会有域名,因此可能会造成证书域名和真实服务器IP无法匹配而校验失败,提供两种解决方案:
     *
     * 方式一(不验证服务端证书):
     *      因此在开发环境中,客户端需要加上这么一段配置重写的verify方法,用来跳过服务端证书校验。
     *      代码:
     *          TrustStrategy acceptingTrustStrategy = (X509Certificate[] x509Certificates, String s) -> true;
     *          //配置信任链
     *          SSLContexts.custom().loadTrustMaterial(null, acceptingTrustStrategy);
     *
     * 方式二(推荐)(仅不验证服务端的证书与域名匹配,其它服务端证书项正常校验):
     *      在SSLConnectionSocketFactory中加上new NoopHostnameVerifier()跳过验证。
     *      (
     *          说明:但是若采取方式二,就需要预先使用keytool工具导入证书到'jdk1.8.0_231/jre/lib/security/cacerts'中
     *          注意:有证书链要导入整个证书链
     *          命令(在jdk的security下执行,cacerts通用默认密码是changeit):keytool -import -keystore cacerts -alias CA_SUB -file ca_root_and_sub.crt
     *       )
     *
     */
    public CloseableHttpClient getHttpClient() throws KeyStoreException, IOException, NoSuchAlgorithmException, CertificateException, KeyManagementException, UnrecoverableKeyException {
        char[] password = this.password.toCharArray();
        KeyStore keyStore = KeyStore.getInstance(type);
        InputStream in = this.getClass().getClassLoader().getResourceAsStream(path);
        // 加载classpath下的文件要使用getClass().getClassLoader().getResourceAsStream(***),而不能用getClass().getResourceAsStream(***),获取不到
        // keyStore.load(new FileInputStream(new File(path)), password);
        keyStore.load(in, password);

        // TrustStrategy acceptingTrustStrategy = (X509Certificate[] x509Certificates, String s) -> true;
        SSLContext sslContext = org.apache.http.ssl.SSLContexts.custom()
                // 配置信任链,用于跳过验证服务器证书
                //.loadTrustMaterial(null, acceptingTrustStrategy)
                .loadKeyMaterial(keyStore, password)
                .build();

        // 单纯不校验域名证书匹配(NoopHostnameVerifier)
        SSLConnectionSocketFactory csf = new SSLConnectionSocketFactory(sslContext, new NoopHostnameVerifier());

        // 校验域名证书匹配
        // SSLConnectionSocketFactory csf = new SSLConnectionSocketFactory(sslContext);
        // 或
        // SSLConnectionSocketFactory csf = new SSLConnectionSocketFactory(
        //        sslContext,
        //        // new String[]{"TLSv1","TLSv1.1","TLSv1.2"},
        //        // new String[]{"TLS_ECDHE_RSA_WITH_AES_256_GCM_SHA384", "TLS_ECDHE_RSA_WITH_AES_256_CBC_SHA384"},
        //        SSLConnectionSocketFactory.getDefaultHostnameVerifier());

        return HttpClients.custom().setSSLSocketFactory(csf).build();
    }

}
原文链接,本文对原文有补充:https://www.jianshu.com/p/e1aaa5e9de17


 1万+
1万+


 被折叠的 条评论
为什么被折叠?
被折叠的 条评论
为什么被折叠?
 到【灌水乐园】发言


