


Servlet的分类
- 简单Servlet
- 过滤Servlet
- 监听Servlet
Servlet的生命周期
容器决定Servlet的生命周期。包括加载、初始化、服务、销毁、卸载5个部分。
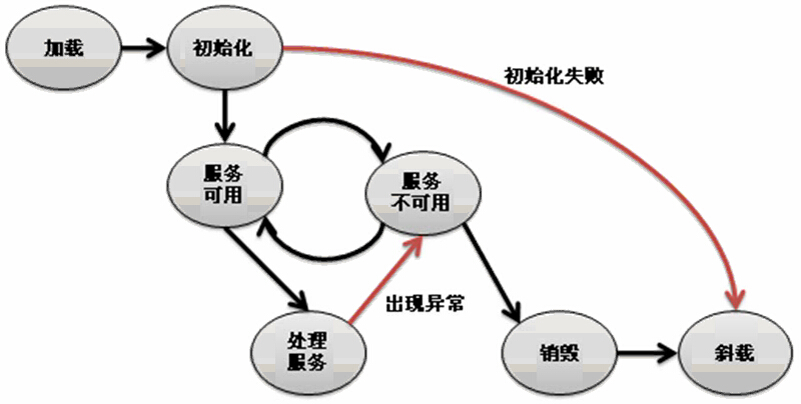
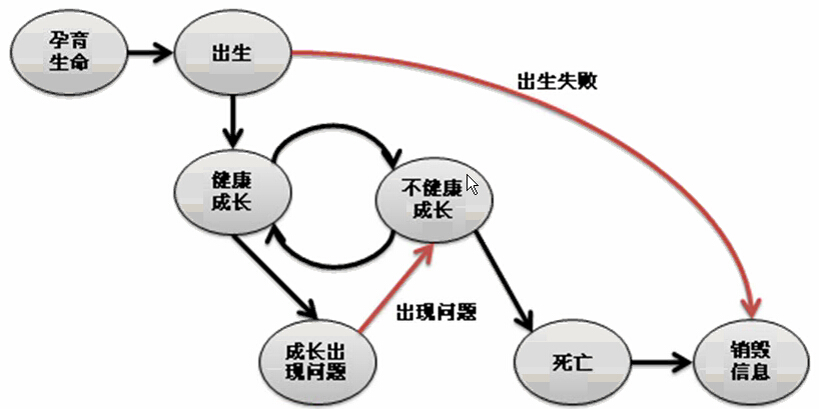
换一种方式理解Servlet的生命周期
对于HttpServlet类而言,里面的services方法主要完成的功能是区分get请求还是post请求,从而分别对于doGet和doPost方法。但是子类一旦覆写了services方法,则没有了区分能力——doGet和doPost方法都将失效。——实际上这种做法更像一种设计的模板操作,因为只需要按照它的要求将方法覆写了就可以完成相应的功能——模板设计模式。
使用Servlet取得其他内置对象
取得HttpSession实例
通过HttpServletRequest接口提供的以下方法完成:
HttpSession getSession()
HttpSession getSession(boolean create)
- 1
- 2

- 1
- 2
public class HttpServletSession extends HttpServlet {

    public HttpServletSession() {
        super();
    }

    public void destroy() {
        super.destroy(); // Just puts "destroy" string in log
    }

    public void doGet(HttpServletRequest request, HttpServletResponse response)
            throws ServletException, IOException {

        HttpSession session = request.getSession(); // 取得session
        System.out.println("sessionID:" + session.getId());
        session.setAttribute("username", "刘洋"); // 设置session属性
        System.out.println("属性内容:" + session.getAttribute("username"));
    }

    public void doPost(HttpServletRequest request, HttpServletResponse response)
            throws ServletException, IOException {
        doGet(request, response);
    }

}
- 1
- 2
- 3
- 4
- 5
- 6
- 7
- 8
- 9
- 10
- 11
- 12
- 13
- 14
- 15
- 16
- 17
- 18
- 19
- 20
- 21
- 22
- 23
- 24
- 25
- 1
- 2
- 3
- 4
- 5
- 6
- 7
- 8
- 9
- 10
- 11
- 12
- 13
- 14
- 15
- 16
- 17
- 18
- 19
- 20
- 21
- 22
- 23
- 24
- 25
web.xml
<servlet>
  <servlet-name>sessiondemo</servlet-name>
  <servlet-class>servlet.HttpServletSession</servlet-class>
</servlet>
<servlet-mapping>
  <servlet-name>sessiondemo</servlet-name>
  <url-pattern>/HttpSessionDemoServlet</url-pattern>
</servlet-mapping>
- 1
- 2
- 3
- 4
- 5
- 6
- 7
- 8
- 1
- 2
- 3
- 4
- 5
- 6
- 7
- 8

取得application对象的实例
HttpServlet的父类GenericServlet提供了public ServletContext getServletContext()方法可以取得ServletContext接口的实例。
public void doGet(HttpServletRequest request, HttpServletResponse response)
    throws ServletException, IOException {

  ServletContext app = super.getServletContext();
  System.out.println("项目的真实路径:" + app.getRealPath("/"));
}
- 1
- 2
- 3
- 4
- 5
- 6
- 1
- 2
- 3
- 4
- 5
- 6
表达式语言
Jsp2.0之后提供了表达式语言(Expression Language,简称EL),可以访问标志位page(pageContext)、request、session、application中的属性内容,这样就可以在jsp页面中有很少的script代码,可以避免null的问题语法如下:
${属性名称}
- 1
- 1
下面这个例子说明了使用EL和不使用EL的区别:
<%
    request.setAttribute("username", "陶伟华");
%>

 <!-- 使用表达式语言输出 -->
 ${username}

 <!-- 不使用EL表达式,需要判断非空 -->
<%
    if(request.getAttribute("username")!=null){
%>
    <%=request.getAttribute("username") %>
<%
    }
%>
- 1
- 2
- 3
- 4
- 5
- 6
- 7
- 8
- 9
- 10
- 11
- 12
- 13
- 14
- 15
- 1
- 2
- 3
- 4
- 5
- 6
- 7
- 8
- 9
- 10
- 11
- 12
- 13
- 14
- 15
表达式语言的内置对象
| 表达式内置对象 | 说明 |
|---|---|
| pageContext | javax.servlet.jsp.pageContext对象 |
| pageScope | page属性范围查找输出属性 |
| requestScope | request属性范围查找输出属性 |
| sessionScope | session属性范围查找输出属性 |
| applicationScope | application属性范围查找输出属性 |
| param | 接收传递到本页面的参数 |
| paramValues | 接收传递到本页面的一组参数 |
| header | 取得一个头信息数据 |
| headValues | 取得一组头信息数据 |
| cookie | 取得cookie中的数据 |
| initParam | 取得配置的初始化参数 |
EL表达式的查找范围:
<%
//  pageContext.setAttribute("info", "page属性范围");
//  request.setAttribute("info", "request属性范围");
    session.setAttribute("info", "session属性范围");
    application.setAttribute("info", "application属性范围");
%>

 <!-- EL表达式查找范围示例 -->
 ${info}
- 1
- 2
- 3
- 4
- 5
- 6
- 7
- 8
- 9
- 1
- 2
- 3
- 4
- 5
- 6
- 7
- 8
- 9
如果在不同的属性范围之内保存了同名属性,则EL的查找范围是:page–>request–>session–>application。这个时候就可以使用EL内置对象帮助我们找到特定属性范围之内的属性。(PS:实际上在开发中应该尽量避免同名属性)。
<%
    pageContext.setAttribute("info", "page属性范围");
    request.setAttribute("info", "request属性范围");
    session.setAttribute("info", "session属性范围");
    application.setAttribute("info", "application属性范围");
%>

 <!-- EL表达式查找特定属性范围的属性 -->
 page属性内容:${pageScope.info }<br />
 request属性内容:${requestScope.info }<br />
 session属性内容:${sessionScope.info }<br />
 application属性内容:${applicationScope.info }<br />
- 1
- 2
- 3
- 4
- 5
- 6
- 7
- 8
- 9
- 10
- 11
- 12
- 1
- 2
- 3
- 4
- 5
- 6
- 7
- 8
- 9
- 10
- 11
- 12
EL的内置对象中有pageContext。之前在JSP中我们可以通过pageContext取得request、session、application的JSP内置对象。我们可以直接使用EL直接完成内置对象的方法调用(实际上依靠的是Java的反射机制)。
 IP地址:${pageContext.request.remoteAddr}<br />
 session ID:${pageContext.session.id}<br />
- 1
- 2
- 1
- 2
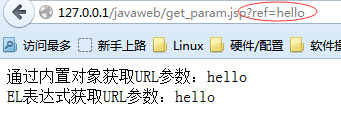
接收参数
表单和URL都可以传递参数。在EL中可以使用param对象完成。
通过内置对象获取URL参数:<%=request.getParameter("ref") %><br/>
EL表达式获取URL参数:${param.ref}
- 1
- 2
- 1
- 2
接收一组参数paramValues
<form action="get_param.jsp">
    请选择兴趣:
    <input type="checkbox" name="inst" value="游泳">游泳
    <input type="checkbox" name="inst" value="看电视">看电视
    <input type="checkbox" name="inst" value="看书">看书
    <input type="checkbox" name="inst" value="打游戏">打游戏
    <input type="checkbox" name="inst" value="打篮球">打篮球
    <input type="submit" value="提交">
  </form>
使用EL表达式获取一组参数:<br />
第一个参数:${paramValues.inst[0] }<br />
第二个参数:${paramValues.inst[1] }<br />
第三个参数:${paramValues.inst[2] }<br />
第四个参数:${paramValues.inst[3] }<br />
第五个参数:${paramValues.inst[4] }
- 1
- 2
- 3
- 4
- 5
- 6
- 7
- 8
- 9
- 10
- 11
- 12
- 13
- 14
- 15
- 1
- 2
- 3
- 4
- 5
- 6
- 7
- 8
- 9
- 10
- 11
- 12
- 13
- 14
- 15

但是在实际的开发过程中使用最多的还是param,接收多个参数的params并不常用。因为从MVC设计模式上讲,所有的参数接收都应该交给Servlet。
EL表达式中的集合操作
List和Set接口的本质区别是List接口对Collection接口进行了扩充,而Set接口并没有对Collection接口进行扩充。
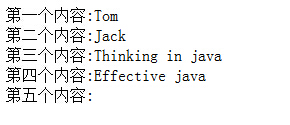
输出Collection
<%
    List<String> all = new ArrayList<String>();
    all.add("Tom");
    all.add("Jack");
    all.add("Thinking in java");
    all.add("Effective java");

    request.setAttribute("info", all); // 集合保存在request范围
 %>

 <!-- 输出集合中的内容 -->
 第一个内容:${ info[0]}<br />
 第二个内容:${ info[1]}<br />
 第三个内容:${ info[2]}<br />
 第四个内容:${ info[3]}<br />
 第五个内容:${ info[4]}<br />
- 1
- 2
- 3
- 4
- 5
- 6
- 7
- 8
- 9
- 10
- 11
- 12
- 13
- 14
- 15
- 16
- 1
- 2
- 3
- 4
- 5
- 6
- 7
- 8
- 9
- 10
- 11
- 12
- 13
- 14
- 15
- 16
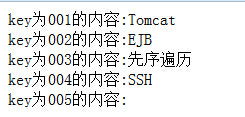
输出Map
<%
    Map<String,String> all = new HashMap<String,String>();
    all.put("001", "Tomcat");
    all.put("002", "EJB");
    all.put("003", "先序遍历");
    all.put("004", "SSH");

    request.setAttribute("info", all); // 集合保存在request范围
 %>

 <!-- 输出Map中的内容 -->
key为001的内容:${ info["001"]}<br />
key为002的内容:${ info["002"]}<br />
key为003的内容:${ info["003"]}<br />
key为004的内容:${ info["004"]}<br />
key为005的内容:${ info["005"]}<br />
- 1
- 2
- 3
- 4
- 5
- 6
- 7
- 8
- 9
- 10
- 11
- 12
- 13
- 14
- 15
- 16
- 1
- 2
- 3
- 4
- 5
- 6
- 7
- 8
- 9
- 10
- 11
- 12
- 13
- 14
- 15
- 16
在MVC中应用EL
在之前讲解MVC的时候一直都有DAO的存在,而且所有的对象都是保存在VO之中。如果将一个VO对象传递到JSP的话,则必须在JSP页面中导入VO包,如果现在使用了EL表达式的话,这个包的导入就没有任何意义了。
vo
package org.gpf.vo;

public class Dept {

    private int deptno;
    private String dname;
    private String loc;

    public int getDeptno() {
        return deptno;
    }

    public void setDeptno(int deptno) {
        this.deptno = deptno;
    }

    public String getDname() {
        return dname;
    }

    public void setDname(String dname) {
        this.dname = dname;
    }

    public String getLoc() {
        return loc;
    }

    public void setLoc(String loc) {
        this.loc = loc;
    }

    @Override
    public String toString() {
        return "Dept [deptno=" + deptno + ", dname=" + dname + ", loc=" + loc
                + "]";
    }

}
- 1
- 2
- 3
- 4
- 5
- 6
- 7
- 8
- 9
- 10
- 11
- 12
- 13
- 14
- 15
- 16
- 17
- 18
- 19
- 20
- 21
- 22
- 23
- 24
- 25
- 26
- 27
- 28
- 29
- 30
- 31
- 32
- 33
- 34
- 35
- 36
- 37
- 38
- 39
- 1
- 2
- 3
- 4
- 5
- 6
- 7
- 8
- 9
- 10
- 11
- 12
- 13
- 14
- 15
- 16
- 17
- 18
- 19
- 20
- 21
- 22
- 23
- 24
- 25
- 26
- 27
- 28
- 29
- 30
- 31
- 32
- 33
- 34
- 35
- 36
- 37
- 38
- 39
Servlet:ELServlet
public class ELServlet extends HttpServlet {

    public void doGet(HttpServletRequest request, HttpServletResponse response)
            throws ServletException, IOException {
        doPost(request, response);
    }
    public void doPost(HttpServletRequest request, HttpServletResponse response)
            throws ServletException, IOException {

        Dept dept = new Dept();
        dept.setDname("学工部");
        dept.setDeptno(1200);
        dept.setLoc("武昌区");
        request.setAttribute("deptinfo", dept);

        request.getRequestDispatcher("dept_info.jsp").forward(request, response);
    }

}
- 1
- 2
- 3
- 4
- 5
- 6
- 7
- 8
- 9
- 10
- 11
- 12
- 13
- 14
- 15
- 16
- 17
- 18
- 19
- 1
- 2
- 3
- 4
- 5
- 6
- 7
- 8
- 9
- 10
- 11
- 12
- 13
- 14
- 15
- 16
- 17
- 18
- 19
JSP页面deptinfo.jsp
 部门编号:${deptinfo.deptno }<br />
 部门名称:${deptinfo.dname }<br />
 部门位置:${deptinfo.loc }<br />
 ${deptinfo }<br />
- 1
- 2
- 3
- 4
- 1
- 2
- 3
- 4
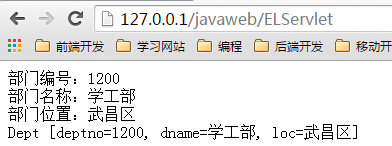
以上的JSP页面没有调用任何的getter就进行了对象的输出,则肯定应用到了反射机制。
使用MVC传递集合
ELServlet
public class ELServlet extends HttpServlet {

    public void doGet(HttpServletRequest request, HttpServletResponse response)
            throws ServletException, IOException {
        doPost(request, response);
    }
    public void doPost(HttpServletRequest request, HttpServletResponse response)
            throws ServletException, IOException {

        List<Dept> all = new ArrayList<Dept>();
        Dept dept = new Dept();
        dept.setDname("学工部");
        dept.setDeptno(1200);
        dept.setLoc("武昌区");
        all.add(dept);
        dept = new Dept();
        dept.setDeptno(1300);
        dept.setDname("卫生部");
        dept.setLoc("黄浦区");
        all.add(dept);

        request.setAttribute("allDept", all);
        request.getRequestDispatcher("dept_info.jsp").forward(request, response);
    }

}
- 1
- 2
- 3
- 4
- 5
- 6
- 7
- 8
- 9
- 10
- 11
- 12
- 13
- 14
- 15
- 16
- 17
- 18
- 19
- 20
- 21
- 22
- 23
- 24
- 25
- 26
- 1
- 2
- 3
- 4
- 5
- 6
- 7
- 8
- 9
- 10
- 11
- 12
- 13
- 14
- 15
- 16
- 17
- 18
- 19
- 20
- 21
- 22
- 23
- 24
- 25
- 26
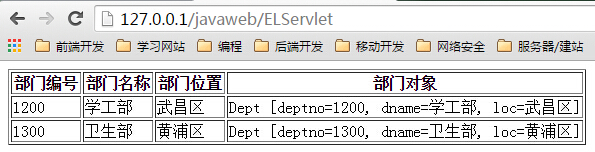
JSP页面:dept_info.jsp
<table border="1">
<%
    // 由于JSP页面中只允许导入java.util包,所以不使用泛型
    List all = (List)request.getAttribute("allDept");
    if (all != null) {
        Iterator iterator = all.iterator();
%>
            <tr>
                <th>部门编号</th>
                <th>部门名称</th>
                <th>部门位置</th>
                <th>部门对象</th>
            </tr>
<%
        while(iterator.hasNext()){
            // 将迭代的对象保存在本页面(pageContext)属性范围当中
            pageContext.setAttribute("dept", iterator.next());
%>
            <tr>
                <!-- 用取得保存在page属性范围之内的对象 -->
                <td>${dept.deptno}</td>
                <td>${dept.dname}</td>
                <td>${dept.loc}</td>
                <td>${dept}</td>
            </tr>
<%
        }
    }
%>
    </table>
- 1
- 2
- 3
- 4
- 5
- 6
- 7
- 8
- 9
- 10
- 11
- 12
- 13
- 14
- 15
- 16
- 17
- 18
- 19
- 20
- 21
- 22
- 23
- 24
- 25
- 26
- 27
- 28
- 29
- 30
- 1
- 2
- 3
- 4
- 5
- 6
- 7
- 8
- 9
- 10
- 11
- 12
- 13
- 14
- 15
- 16
- 17
- 18
- 19
- 20
- 21
- 22
- 23
- 24
- 25
- 26
- 27
- 28
- 29
- 30
EL运算符
表达式给我们进行了自动的类型转换,因此我们在使用的时候根本不需要考虑类型问题。
<%
pageContext.setAttribute("num1", 18);
pageContext.setAttribute("num2", 25);
pageContext.setAttribute("flagA", true);
pageContext.setAttribute("flagB", false);
%>
num1 = ${num1 },num2 = ${num2 }
<h2>EL数学运算</h2>
加:${num1+num2 }<br />
减:${num1-num2 }<br />
乘:${num1*num2 }<br />
除:${num1/num2 }和${num1 div num2 }<br />
取模:${num1%num2 }和${num1 mod num2 }<br />
<h2>EL关系运算符</h2>
相等判断:${num1==num2 }和${num1 eq num2 }<br />
不等判断:${num1!=num2 }和${num1 ne num2 }<br />
大于判断:${num1>num2 }和${num1 gt num2 }<br />
小于判断:${num1<span class="hljs-tag"><<span class="hljs-title">num2</span> }和${num1 lt num2 }<br />
大于等于判断:${num1>=num2 }和${num1 ge num2 }<br />
小于等于判断:${num1<span class="hljs-tag"><<span class="hljs-title">=num2</span> }和${num1 le num2 }<br />
<h2>EL逻辑运算符</h2>
flagA = ${flagA },flagB = ${flagB } <br />
与:${flagA&&flagB }和${flagA and FlagB }<br />
或:${flagA||flagB }和${flagA or FlagB }<br />
非:${!flagA }和${not flagA }<br />
- 1
- 2
- 3
- 4
- 5
- 6
- 7
- 8
- 9
- 10
- 11
- 12
- 13
- 14
- 15
- 16
- 17
- 18
- 19
- 20
- 21
- 22
- 23
- 24
- 25
- 26
- 27
- 28
- 1
- 2
- 3
- 4
- 5
- 6
- 7
- 8
- 9
- 10
- 11
- 12
- 13
- 14
- 15
- 16
- 17
- 18
- 19
- 20
- 21
- 22
- 23
- 24
- 25
- 26
- 27
- 28
Tomcat数据源
在代码中使用数据源可以提升程序的运行效率。
传统JDBC操作分为以下几个步骤:
加载DB驱动—>获得DB连接—>对DB进行CRUD操作—>关闭DB连接。
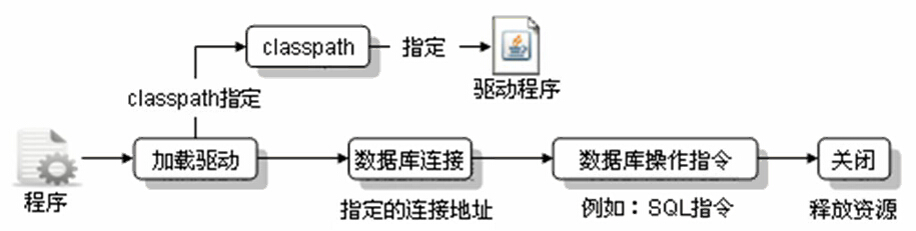
对于不同的用户只有操作的不同,而加载DB驱动、连接DB、关闭DB连接则是一个重复的操作。产生了性能瓶颈——如果不关闭数据库,用户连接的时候直接取出一个连接这样就可以省略1、2、4的3个步骤了。要进行这样的操作需要有3个量度:最小维持的数据库连接数、最大允许打开的连接数、等待时间。Tomcat4.1之后就支持这种操作了,这种操作称为数据库连接池(存放的数据库连接)。
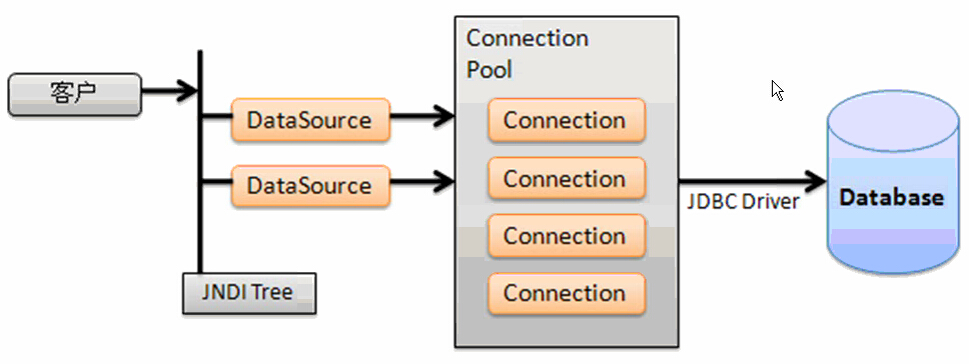
在WEB容器中,数据库的连接池都是通过数据源javax.sql.DataSource访问的。即可以通过javax.sql.DataSource类取得一个Connection对象,但是如果需要得到Connection对象需要使用JNDI进行查找。
JNDI。Java Naming and Directory Interface,java命名及查找目录接口,主要的功能是进行查找对象的。
下面是一个MySQL的Tomcat数据源配置:
WebRoot/META-INF/context.xml
<?xml version="1.0" encoding="UTF-8"?>
<Context reloadable="true">
 <!-- 配置Tomcat数据源,name数据源名称,也是JNDI查找名称;auth表示容器负责资源的连接,还有一个值是application(通过应用程序自己进行控制);type对象,数据源上每一个绑定的都是DataSource;maxActive最大连接数;minIdle最少维持数量;maxWait最长等待时间 -->
 <Resource name="jdbc/mldn"
   auth="Container"
   type="javax.sql.DataSource"
   maxActive="100"
   maxIdle="30"
   maxWait="10000"
   username="root"
   password="mysqladmin"
   driverClassName="org.gjt.mm.mysql.Driver"
   url="jdbc:mysql://localhost:3306/mldn"/>
</Context>
- 1
- 2
- 3
- 4
- 5
- 6
- 7
- 8
- 9
- 10
- 11
- 12
- 13
- 14
- 1
- 2
- 3
- 4
- 5
- 6
- 7
- 8
- 9
- 10
- 11
- 12
- 13
- 14
如果是Oracle数据库只需要更改相应的驱动程序和连接地址即可。
WebRoot/WEB-INF/web.xml
<?xml version="1.0" encoding="UTF-8"?>
<web-app version="3.0"

<!-- 配置资源引用 -->
<resource-ref>
    <res-ref-name>jdbc/mldn</res-ref-name>
    <res-type>javax.sql.DataSource</res-type>
    <res-auth>Container</res-auth>
</resource-ref>

</web-app>
- 1
- 2
- 3
- 4
- 5
- 6
- 7
- 8
- 9
- 10
- 11
- 1
- 2
- 3
- 4
- 5
- 6
- 7
- 8
- 9
- 10
- 11
查找数据源
数据源的操作使用的是JNDI的方式进行查找的,如果想要使用数据源取得数据库的连接的话,则必须按照以下的步骤进行:
- 初始化名称查找上下文(javax.naming包)。
Context ctx = new InitialContext(); - 通过名称查找
DataSource对象。DataSource ds = (DataSource)ctx.lookup(JNDI名称); - 通过
DataSource取得一个数据库连接。Connection conn = ds.getConnection();
<%
    String DSNAME = "java:comp/env/jdbc/mldn";      // 名称
    Context ctx = new InitialContext();
    DataSource ds = (DataSource)ctx.lookup(DSNAME);
    Connection conn = ds.getConnection();           // 从连接池中取得连接
 %>
 <%=conn %>
 <%
    conn.close(); // 将连接放回到池之中
 %>
- 1
- 2
- 3
- 4
- 5
- 6
- 7
- 8
- 9
- 10
- 1
- 2
- 3
- 4
- 5
- 6
- 7
- 8
- 9
- 10

在基于Tomcat的web应用程序中就可以摆脱在JDBC中使用Class.forName取得数据库连接了。
JSP标签编程
一个简单的标签
标签编程是为了尽量减少页面中的script代码。用户定义一个标签只需要继承javax.servlet.jsp.tagext.TagSupport类。如果要定义的标签内没有标签体,则直接覆写TagSupport类中的doStartTag()方法即可。一个jsp标签需要有3部分:标签文件(.java),标签库描述文件(.tld),标签显示文件(.jsp),如果需要的话还可以在web.xml中注册该标签的uri和路径。
一、定义标签支持类HelloTag.java
public class HelloTag extends TagSupport {

    /**
     * 标签开始
     */
    @Override
    public int doStartTag() throws JspException {

        JspWriter out = pageContext.getOut();
        try {
            out.write("Hello World!");
        } catch (IOException e) {
            e.printStackTrace();
        }
        return TagSupport.SKIP_BODY;
    }
}
- 1
- 2
- 3
- 4
- 5
- 6
- 7
- 8
- 9
- 10
- 11
- 12
- 13
- 14
- 15
- 16
- 17
- 1
- 2
- 3
- 4
- 5
- 6
- 7
- 8
- 9
- 10
- 11
- 12
- 13
- 14
- 15
- 16
- 17
二、定义标签库描述文件WEB-INF/hellotab.tld
<?xml version="1.0" encoding="UTF-8"?>
<taglib xmlns="http://java.sun.com/xml/ns/j2ee"
    xmlns:xsi="http://www.w3.org/2001/XMLSchema-instance"
    xsi:schemaLocation="http://java.sun.com/xml/ns/j2ee http://java.sun.com/xml/ns/j2ee/web-jsptaglibrary_2_1.xsd"
    version="2.1">
    <tlib-version>1.0</tlib-version>            <!-- 标签库版本 -->
    <short-name>firsttag</short-name>           <!-- 标签库在TLD中的描述名称 -->
    <tag>
        <name>hello</name>                      <!-- 标签库在JSP中的使用名称 -->
        <tag-class>org.gpf.tag.HelloTag</tag-class>
        <body-content>empty</body-content>      <!-- 标签体内容为空 -->
    </tag>
</taglib>
- 1
- 2
- 3
- 4
- 5
- 6
- 7
- 8
- 9
- 10
- 11
- 12
- 13
- 1
- 2
- 3
- 4
- 5
- 6
- 7
- 8
- 9
- 10
- 11
- 12
- 13
三、编写jsp页面并使用标签hellotag.jsp
<%@ page language="java" import="java.util.*" contentType="text/html; charset=utf-8"%>
<%@taglib prefix="mytag" uri="/WEB-INF/hellotag.tld"%>
<!DOCTYPE HTML PUBLIC "-//W3C//DTD HTML 4.01 Transitional//EN">
<html>
  <head>
    <title>hellotag.jsp</title>
  </head>
  <body>
    <!-- 使用标签 -->
    <mytag:hello />
  </body>
</html>
- 1
- 2
- 3
- 4
- 5
- 6
- 7
- 8
- 9
- 10
- 11
- 12
- 1
- 2
- 3
- 4
- 5
- 6
- 7
- 8
- 9
- 10
- 11
- 12
或者在web.xml中进行以下配置:
<!-- 配置jsp标签 -->
<jsp-config>
    <taglib>
        <taglib-uri>hello_tag</taglib-uri>
        <taglib-location>/WEB-INF/hellotag.tld</taglib-location>
    </taglib>
</jsp-config>
- 1
- 2
- 3
- 4
- 5
- 6
- 7
- 1
- 2
- 3
- 4
- 5
- 6
- 7
在jsp页面中这样使用:
<%@ page language="java" import="java.util.*" contentType="text/html; charset=utf-8"%>
<%@taglib prefix="mytag" uri="hello_tag"%>
<!DOCTYPE HTML PUBLIC "-//W3C//DTD HTML 4.01 Transitional//EN">
<html>
  <head>
    <title>hellotag.jsp</title>
  </head>
  <body>
    <!-- 使用标签 -->
    <mytag:hello />
  </body>
</html>
- 1
- 2
- 3
- 4
- 5
- 6
- 7
- 8
- 9
- 10
- 11
- 12
- 1
- 2
- 3
- 4
- 5
- 6
- 7
- 8
- 9
- 10
- 11
- 12
定义有属性的标签
定义一个可以完成日期格式化的操作,希望用户可以自己输入日期格式化的模板,根据此模板最终完成当前日期的显示功能
1.新建一个标签的支持类DateTag.java
public class DateTag extends TagSupport {

    private String format; // 此属性通过setter和getter完成

    public String getFormat() {
        return format;
    }

    public void setFormat(String format) {
        this.format = format;
    }

    @Override
    public int doStartTag() throws JspException {

        SimpleDateFormat sdf = new SimpleDateFormat(format);
        try {
            // 进行格式化的日期输出
            super.pageContext.getOut().write(sdf.format(new Date()));
        } catch (IOException e) {
            e.printStackTrace();
        }
        return TagSupport.SKIP_BODY;
    }
}
- 1
- 2
- 3
- 4
- 5
- 6
- 7
- 8
- 9
- 10
- 11
- 12
- 13
- 14
- 15
- 16
- 17
- 18
- 19
- 20
- 21
- 22
- 23
- 24
- 25
- 1
- 2
- 3
- 4
- 5
- 6
- 7
- 8
- 9
- 10
- 11
- 12
- 13
- 14
- 15
- 16
- 17
- 18
- 19
- 20
- 21
- 22
- 23
- 24
- 25
2.定义标签库描述文件(DateTag.tld),指定以上的标签处理类
<?xml version="1.0" encoding="UTF-8"?>
<taglib xmlns="http://java.sun.com/xml/ns/j2ee"
    xmlns:xsi="http://www.w3.org/2001/XMLSchema-instance"
    xsi:schemaLocation="http://java.sun.com/xml/ns/j2ee http://java.sun.com/xml/ns/j2ee/web-jsptaglibrary_2_1.xsd"
    version="2.1">
    <tlib-version>1.0</tlib-version>            <!-- 标签库版本 -->
    <short-name>date</short-name>               <!-- 标签库在TLD中的描述名称 -->
    <tag>
        <name>date</name>                       <!-- 标签库在JSP中的使用名称 -->
        <tag-class>org.gpf.tag.DateTag</tag-class>
        <body-content>empty</body-content>      <!-- 标签体内容为空 -->
        <attribute>
            <name>format</name>                 <!-- 设置属性 -->
            <required>true</required>           <!-- 此属性是必须的 -->
            <rtexprvalue>true</rtexprvalue>     <!-- 支持表达式输出 -->
        </attribute>
    </tag>
</taglib>
- 1
- 2
- 3
- 4
- 5
- 6
- 7
- 8
- 9
- 10
- 11
- 12
- 13
- 14
- 15
- 16
- 17
- 18
- 1
- 2
- 3
- 4
- 5
- 6
- 7
- 8
- 9
- 10
- 11
- 12
- 13
- 14
- 15
- 16
- 17
- 18
3.在web.xml中定义此标签库
<jsp-config>
    <taglib>
        <taglib-uri>hello_tag</taglib-uri>
        <taglib-location>/WEB-INF/hellotag.tld</taglib-location>
    </taglib>
    <taglib>
        <taglib-uri>date_tag</taglib-uri>
        <taglib-location>/WEB-INF/DateTag.tld</taglib-location>
    </taglib>
</jsp-config>
- 1
- 2
- 3
- 4
- 5
- 6
- 7
- 8
- 9
- 10
- 1
- 2
- 3
- 4
- 5
- 6
- 7
- 8
- 9
- 10
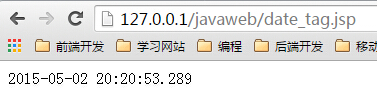
4.在jsp页面中使用以上jsp标签
<%@ page language="java" import="java.util.*" contentType="text/html; charset=utf-8"%>
<%@taglib prefix="mytag" uri="date_tag"%>
<!DOCTYPE HTML PUBLIC "-//W3C//DTD HTML 4.01 Transitional//EN">
<html>
  <head>
    <title>hellotag.jsp</title>
  </head>
  <body>
    <!-- 使用标签 -->
    <mytag:date format="yyyy-MM-dd HH:mm:ss.SSS"/>
  </body>
</html>
- 1
- 2
- 3
- 4
- 5
- 6
- 7
- 8
- 9
- 10
- 11
- 12
- 1
- 2
- 3
- 4
- 5
- 6
- 7
- 8
- 9
- 10
- 11
- 12
TagSupport类
该类是jsp标签编程的核心类,其定义如下:public class TagSupport Object implements IterationTag, Serializable。常用的属性和方法:
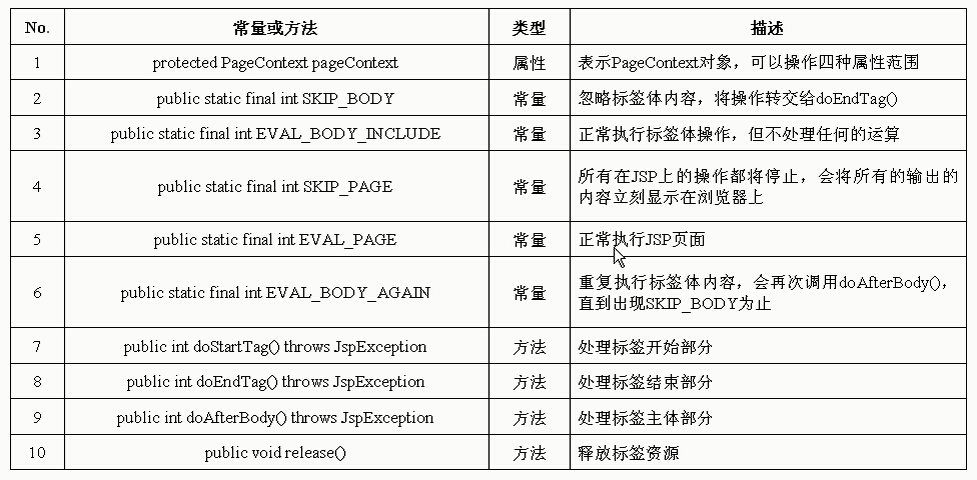
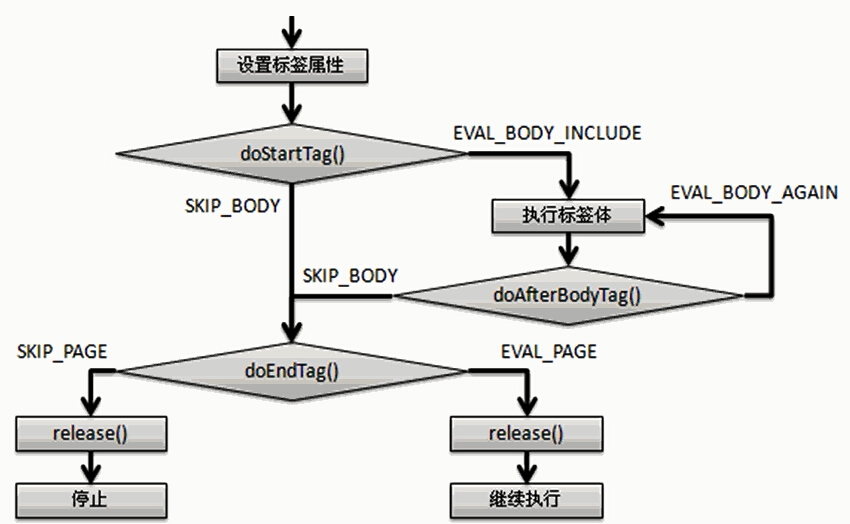
doStartTag()
标签开始的时候执行,此方法有2种返回值:
- SKIP_BODY:忽略标签体的内容,将执行权转交给
doEnd()方法。 - EVAL_BODY_INCLUDE:执行标签体的内容。
doAfterBody()
此方法是IterationTag接口和Tag接口的区别所在,本方法用来重复执行标签体的内容,有2种返回值:
- SKIP_BODY:忽略标签体的内容,将执行权转交给
doEnd()方法。 - EVAL_BODY_AGAIN:重复执行标签体的内容,会重复调用
doAfter()方法,一直循环执行下去,直到doAfterBody()方法返回SKIP_BODY为止。
doEndTag()
标签结束时执行,两种返回值:
- SKIP_PAGE:jsp页面应该立即停止执行,并将所有输出回传到浏览器。
- EVAL_PAGE:表示JSP可以正常运行完毕。
release()
将标签处理类所产生的或者是获得的资源全部释放,并等待用户下次继续使用。
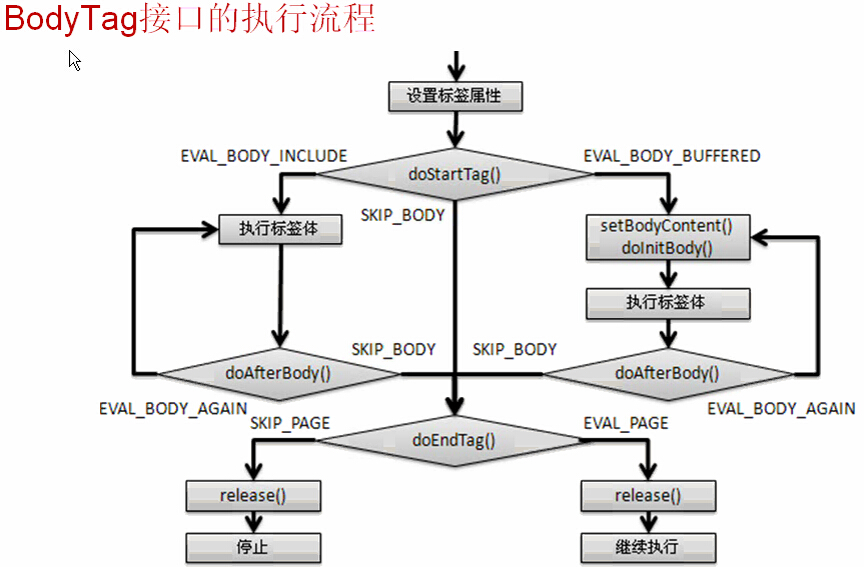
Tag接口的执行流程
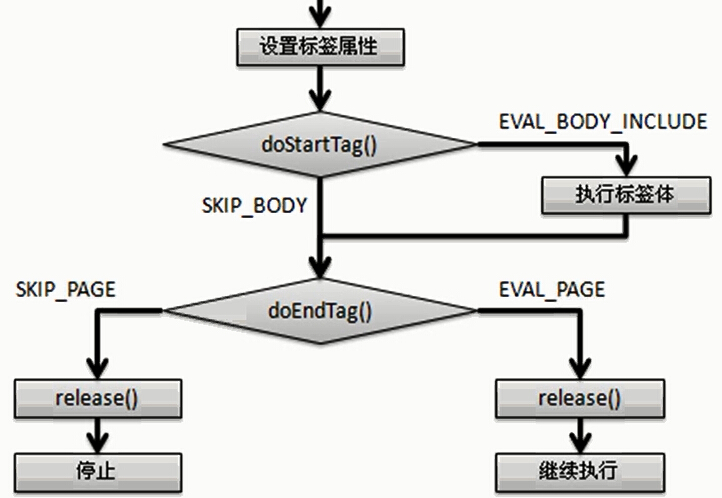
IterationTag接口的执行流程
标签支持类AttributeTag.java
public class AttributeTag extends TagSupport {

    private String name;    // 接收属性名称
    private String scope;   // 接收属性范围

    public String getName() {
        return name;
    }

    public void setName(String name) {
        this.name = name;
    }

    public String getScope() {
        return scope;
    }

    public void setScope(String scope) {
        this.scope = scope;
    }

    /**
     * 判断属性是否存在
     */
    @Override
    public int doStartTag() throws JspException {

        Object value = null;
        if ("page".equals(scope))           // 是否是page范围
            value = super.pageContext.getAttribute(name, PageContext.PAGE_SCOPE);
        if ("request".equals(scope))        // 是否是request范围
            value = super.pageContext.getAttribute(name, PageContext.REQUEST_SCOPE);
        if ("session".equals(scope))        // 是否是session范围
            value = super.pageContext.getAttribute(name, PageContext.SESSION_SCOPE);
        if ("application".equals(scope))    // 是否是application范围
            value = super.pageContext.getAttribute(name, PageContext.APPLICATION_SCOPE);

        if (value == null)
            return TagSupport.SKIP_BODY;            // 没有属性不执行标签体
        else
            return TagSupport.EVAL_BODY_INCLUDE;    // 执行标签体
    }
}
- 1
- 2
- 3
- 4
- 5
- 6
- 7
- 8
- 9
- 10
- 11
- 12
- 13
- 14
- 15
- 16
- 17
- 18
- 19
- 20
- 21
- 22
- 23
- 24
- 25
- 26
- 27
- 28
- 29
- 30
- 31
- 32
- 33
- 34
- 35
- 36
- 37
- 38
- 39
- 40
- 41
- 42
- 43
- 1
- 2
- 3
- 4
- 5
- 6
- 7
- 8
- 9
- 10
- 11
- 12
- 13
- 14
- 15
- 16
- 17
- 18
- 19
- 20
- 21
- 22
- 23
- 24
- 25
- 26
- 27
- 28
- 29
- 30
- 31
- 32
- 33
- 34
- 35
- 36
- 37
- 38
- 39
- 40
- 41
- 42
- 43
标签描述文件AttributeTag.tld
<?xml version="1.0" encoding="UTF-8"?>
<taglib xmlns="http://java.sun.com/xml/ns/j2ee"
    xmlns:xsi="http://www.w3.org/2001/XMLSchema-instance"
    xsi:schemaLocation="http://java.sun.com/xml/ns/j2ee http://java.sun.com/xml/ns/j2ee/web-jsptaglibrary_2_1.xsd"
    version="2.1">
    <tlib-version>1.0</tlib-version>            <!-- 标签库版本 -->
    <short-name>tag</short-name>                <!-- 标签库在TLD中的描述名称 -->
    <tag>
        <name>parent</name>                     <!-- 标签库在JSP中的使用名称 -->
        <tag-class>org.gpf.tag.AttributeTag</tag-class>
        <body-content>JSP</body-content>        <!-- 标签体内容为空代码 -->
        <attribute>
            <name>name</name>                   <!-- 设置属性 -->
            <required>true</required>           <!-- 此属性是必须的 -->
            <rtexprvalue>true</rtexprvalue>     <!-- 支持表达式输出 -->
        </attribute>
        <attribute>
            <name>scope</name>                  <!-- 设置属性 -->
            <required>true</required>           <!-- 此属性是必须的 -->
            <rtexprvalue>true</rtexprvalue>     <!-- 支持表达式输出 -->
        </attribute>
    </tag>
</taglib>
- 1
- 2
- 3
- 4
- 5
- 6
- 7
- 8
- 9
- 10
- 11
- 12
- 13
- 14
- 15
- 16
- 17
- 18
- 19
- 20
- 21
- 22
- 23
- 1
- 2
- 3
- 4
- 5
- 6
- 7
- 8
- 9
- 10
- 11
- 12
- 13
- 14
- 15
- 16
- 17
- 18
- 19
- 20
- 21
- 22
- 23
在web.xml中定义以上tld文件:
<taglib>
    <taglib-uri>tag</taglib-uri>
    <taglib-location>/WEB-INF/DateTag.tld</taglib-location>
</taglib>
- 1
- 2
- 3
- 4
- 1
- 2
- 3
- 4
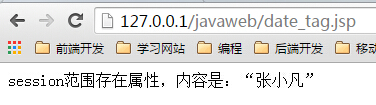
在jsp页面中使用以上标签
<%
  String scope = "session"; // 假设是session范围
  session.setAttribute("username", "张小凡");
%>
<mytag:parent name="username" scope="<%=scope %>">
    <%=scope %>范围存在属性,内容是:“${sessionScope.username }”
</mytag:parent>

<mytag:parent name="user" scope="<%=scope %>">
    request范围存在属性,内容是:“${requestScope.user }”
</mytag:parent>
- 1
- 2
- 3
- 4
- 5
- 6
- 7
- 8
- 9
- 10
- 11
- 1
- 2
- 3
- 4
- 5
- 6
- 7
- 8
- 9
- 10
- 11
开发迭代标签
标签处理类MyTag.java
public class MyTag extends TagSupport {

    private String name;    // 接收属性名称
    private String scope;   // 接收属性范围
    private String id;      // 用于保存集合中的每一个元素

    private Iterator<?>iterator = null;

    public String getName() {
        return name;
    }

    public void setName(String name) {
        this.name = name;
    }

    public String getScope() {
        return scope;
    }

    public void setScope(String scope) {
        this.scope = scope;
    }

    public String getId() {
        return id;
    }

    public void setId(String id) {
        this.id = id;
    }

    /**
     * 判断属性是否存在
     */
    @Override
    public int doStartTag() throws JspException {

        Object value = null;
        if ("page".equals(scope))           // 是否是page范围
            value = super.pageContext.getAttribute(name, PageContext.PAGE_SCOPE);
        if ("request".equals(scope))        // 是否是request范围
            value = super.pageContext.getAttribute(name, PageContext.REQUEST_SCOPE);
        if ("session".equals(scope))        // 是否是session范围
            value = super.pageContext.getAttribute(name, PageContext.SESSION_SCOPE);
        if ("application".equals(scope))    // 是否是application范围
            value = super.pageContext.getAttribute(name, PageContext.APPLICATION_SCOPE);

        if (value != null && value instanceof List<?>){
            iterator = ((List<?>)value).iterator();
            if (iterator.hasNext()) {
                super.pageContext.setAttribute(id, iterator.next());    // 将属性保存在page属性范围中
                return TagSupport.EVAL_BODY_INCLUDE;
            }else {
                return TagSupport.SKIP_BODY;
            }
        }else {
            return TagSupport.SKIP_BODY;
        }
    }

    @Override
    public int doAfterBody() throws JspException {

        if (iterator.hasNext()) {
            super.pageContext.setAttribute(id, iterator.next());    // 将属性保存在page属性范围中
            return TagSupport.EVAL_BODY_AGAIN;                      // 反复执行doAfterBody()方法
        }else {
            return TagSupport.SKIP_BODY;
        }
    }
}
- 1
- 2
- 3
- 4
- 5
- 6
- 7
- 8
- 9
- 10
- 11
- 12
- 13
- 14
- 15
- 16
- 17
- 18
- 19
- 20
- 21
- 22
- 23
- 24
- 25
- 26
- 27
- 28
- 29
- 30
- 31
- 32
- 33
- 34
- 35
- 36
- 37
- 38
- 39
- 40
- 41
- 42
- 43
- 44
- 45
- 46
- 47
- 48
- 49
- 50
- 51
- 52
- 53
- 54
- 55
- 56
- 57
- 58
- 59
- 60
- 61
- 62
- 63
- 64
- 65
- 66
- 67
- 68
- 69
- 70
- 71
- 72
标签描述文件MyTag.tld
<?xml version="1.0" encoding="UTF-8"?>
<taglib xmlns="http://java.sun.com/xml/ns/j2ee"
    xmlns:xsi="http://www.w3.org/2001/XMLSchema-instance"
    xsi:schemaLocation="http://java.sun.com/xml/ns/j2ee http://java.sun.com/xml/ns/j2ee/web-jsptaglibrary_2_1.xsd"
    version="2.1">
    <tlib-version>1.0</tlib-version>            <!-- 标签库版本 -->
    <short-name>tag</short-name>                <!-- 标签库在TLD中的描述名称 -->
    <tag>
        <name>iterator</name>                       <!-- 标签库在JSP中的使用名称 -->
        <tag-class>org.gpf.tag.MyTag</tag-class>
        <body-content>JSP</body-content>        <!-- 标签体内容为空代码 -->
        <attribute>
            <name>name</name>                   <!-- 设置属性 -->
            <required>true</required>           <!-- 此属性是必须的 -->
            <rtexprvalue>true</rtexprvalue>     <!-- 支持表达式输出 -->
        </attribute>
        <attribute>
            <name>scope</name>                  <!-- 设置属性 -->
            <required>true</required>           <!-- 此属性是必须的 -->
            <rtexprvalue>true</rtexprvalue>     <!-- 支持表达式输出 -->
        </attribute>
        <attribute>
            <name>id</name>                 <!-- 设置属性 -->
            <required>true</required>           <!-- 此属性是必须的 -->
            <rtexprvalue>true</rtexprvalue>     <!-- 支持表达式输出 -->
        </attribute>
    </tag>
</taglib>
- 1
- 2
- 3
- 4
- 5
- 6
- 7
- 8
- 9
- 10
- 11
- 12
- 13
- 14
- 15
- 16
- 17
- 18
- 19
- 20
- 21
- 22
- 23
- 24
- 25
- 26
- 27
- 28
- 1
- 2
- 3
- 4
- 5
- 6
- 7
- 8
- 9
- 10
- 11
- 12
- 13
- 14
- 15
- 16
- 17
- 18
- 19
- 20
- 21
- 22
- 23
- 24
- 25
- 26
- 27
- 28
在web.xml中配置标签
<jsp-config>
    <taglib>
        <taglib-uri>tag</taglib-uri>
        <taglib-location>/WEB-INF/MyTag.tld</taglib-location>
    </taglib>
</jsp-config>
- 1
- 2
- 3
- 4
- 5
- 6
- 1
- 2
- 3
- 4
- 5
- 6
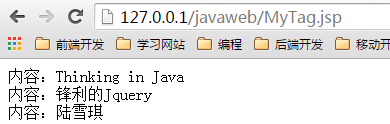
在jsp页面中使用标签
<%
    // 此代码仅仅是测试,实际的操作应该交给Servlet完成
    List<String> all = new ArrayList<String>();
    all.add("Thinking in Java");
    all.add("锋利的Jquery");
    all.add("陆雪琪");
    request.setAttribute("all", all);
   %>

    <mytag:iterator id="content" name="all" scope="request">
        内容:${content }<br />
    </mytag:iterator>
- 1
- 2
- 3
- 4
- 5
- 6
- 7
- 8
- 9
- 10
- 11
- 12
- 1
- 2
- 3
- 4
- 5
- 6
- 7
- 8
- 9
- 10
- 11
- 12
BodyTagSupport类
该类是TagSupport类的子类。继承BodyTagSupport实现的标签可以直接处理标签体内容的数据,该类的定义如下:
public class BodyTagSupport extends TagSupport implements BodyTag
- 1
- 1
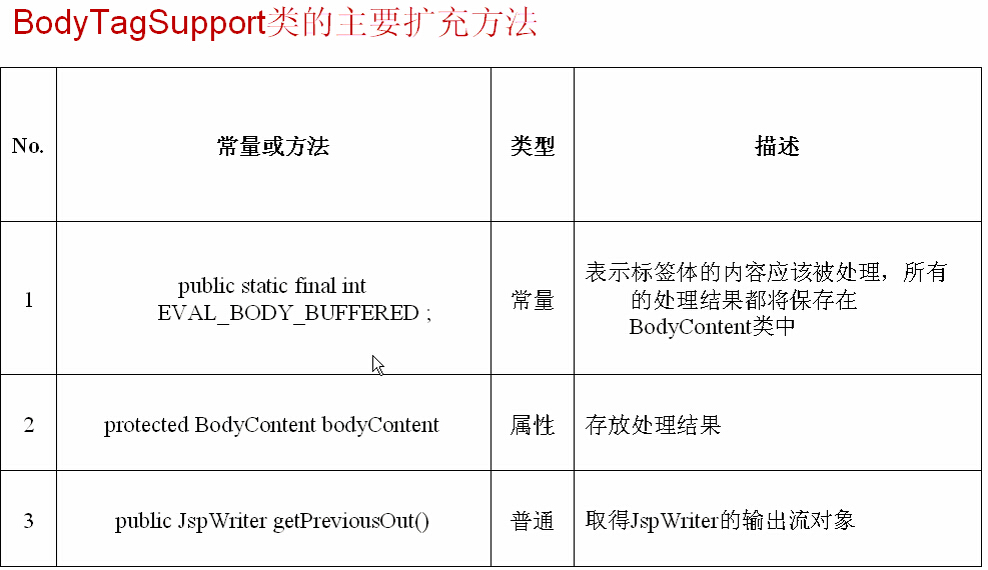
BodyContent类
在BodyTagSupport类中定义了一个bodyContent的受保护的属性,而bodyContent是BodyContent类的对象,此类定义如下:
public abstract class BodyContent extends JspWriter
- 1
- 1
可以发现BodyContent类是JspWriter类的子类,可以直接打印和输出基本类型和对象值,但是BodyContent类和JspWriter类的区别在于:BodyContent的任何写入值都不会自动向页面输出。

TagExtraInfo类和VariableInfo类
在本程序中定义了一个simple的属性名称,但是这个simple却可以像对象一样,可以直接在scriptlet中访问。而如果用户自定义的标签也需要实现同样的效果,就需要通过TagExtraInfo类和VariableInfo类来完成。
<jsp:useBean id="simple" scope="page" class="org.gpf.bean.SimpleBean" />

<%
    simple.setName("雨师妾"); // 设置name属性
    simple.setAge(18);       //  设置age属性
%>
- 1
- 2
- 3
- 4
- 5
- 6
- 1
- 2
- 3
- 4
- 5
- 6
TagExtraInfo有一个方法:public VariableInfo[] getVariableInfo(TagData data)该方法可以获取一组VariableInfo对象。
VariableInfo类的主要方法:
| 常量及方法 | 描述 |
|---|---|
| public static final int AT_BEGIN | 变量的作用范围从开始标签一直到jsp页面结束 |
| public static final int AT_END | 变量范围从结束标签一直到jsp页面结束 |
| public static final int NESTED | 变量的范围从开始标签到结束标签 |
| public VariableInfo(String varName,String className,boolean declare,int scope) | 构造,实例化VariableInfo对象 |
范例:修改上面的迭代标签。
修改之前的迭代标签
public class MyTag extends BodyTagSupport {

    private String name;    // 接收属性名称
    private String scope;   // 接收属性范围
    private String id;      // 用于保存集合中的每一个元素

    private Iterator<?>iterator = null;

    public String getName() {
        return name;
    }

    public void setName(String name) {
        this.name = name;
    }

    public String getScope() {
        return scope;
    }

    public void setScope(String scope) {
        this.scope = scope;
    }

    public String getId() {
        return id;
    }

    public void setId(String id) {
        this.id = id;
    }

    /**
     * 判断属性是否存在
     */
    @Override
    public int doStartTag() throws JspException {

        Object value = null;
        if ("page".equals(scope))           // 是否是page范围
            value = super.pageContext.getAttribute(name, PageContext.PAGE_SCOPE);
        if ("request".equals(scope))        // 是否是request范围
            value = super.pageContext.getAttribute(name, PageContext.REQUEST_SCOPE);
        if ("session".equals(scope))        // 是否是session范围
            value = super.pageContext.getAttribute(name, PageContext.SESSION_SCOPE);
        if ("application".equals(scope))    // 是否是application范围
            value = super.pageContext.getAttribute(name, PageContext.APPLICATION_SCOPE);

        if (value != null && value instanceof List<?>){
            iterator = ((List<?>)value).iterator();
            if (iterator.hasNext()) {
                super.pageContext.setAttribute(id, iterator.next());    // 将属性保存在page属性范围中
                return BodyTagSupport.EVAL_BODY_BUFFERED;               // 执行标签体的操作
            }else {
                return BodyTagSupport.SKIP_BODY;
            }
        }else {
            return BodyTagSupport.SKIP_BODY;
        }
    }

    @Override
    public int doAfterBody() throws JspException {

        if (iterator.hasNext()) {
            super.pageContext.setAttribute(id, iterator.next());    // 将属性保存在page属性范围中
            return BodyTagSupport.EVAL_BODY_BUFFERED;               // 执行标签体的操作
        }else {
            return BodyTagSupport.SKIP_BODY;
        }
    }

    @Override
    public int doEndTag() throws JspException { // 表示输出,如果没有编写,则没有输出

        if (super.bodyContent!=null) {
            try {
                super.bodyContent.writeOut(super.getPreviousOut());
            } catch (IOException e) {
                e.printStackTrace();
            }
        }
        return BodyTagSupport.EVAL_PAGE;        // 正常执行完毕
    }
}
- 1
- 2
- 3
- 4
- 5
- 6
- 7
- 8
- 9
- 10
- 11
- 12
- 13
- 14
- 15
- 16
- 17
- 18
- 19
- 20
- 21
- 22
- 23
- 24
- 25
- 26
- 27
- 28
- 29
- 30
- 31
- 32
- 33
- 34
- 35
- 36
- 37
- 38
- 39
- 40
- 41
- 42
- 43
- 44
- 45
- 46
- 47
- 48
- 49
- 50
- 51
- 52
- 53
- 54
- 55
- 56
- 57
- 58
- 59
- 60
- 61
- 62
- 63
- 64
- 65
- 66
- 67
- 68
- 69
- 70
- 71
- 72
- 73
- 74
- 75
- 76
- 77
- 78
- 79
- 80
- 81
- 82
- 83
- 84
- 85
public class BodyIteratorTagExtraInfo extends TagExtraInfo {

    @Override
    public VariableInfo[] getVariableInfo(TagData data) {

        return new VariableInfo[] {new VariableInfo(data.getId(), "java.lang.String", true, VariableInfo.NESTED)};
    }
}
- 1
- 2
- 3
- 4
- 5
- 6
- 7
- 8
- 1
- 2
- 3
- 4
- 5
- 6
- 7
- 8
配置(MyTag.tld):
<?xml version="1.0" encoding="UTF-8"?>
<taglib xmlns="http://java.sun.com/xml/ns/j2ee"
    xmlns:xsi="http://www.w3.org/2001/XMLSchema-instance"
    xsi:schemaLocation="http://java.sun.com/xml/ns/j2ee http://java.sun.com/xml/ns/j2ee/web-jsptaglibrary_2_1.xsd"
    version="2.1">
    <tlib-version>1.0</tlib-version>
    <short-name>tag</short-name>
    <tag>
        <name>bodyIterator</name>
        <tag-class>org.gpf.tag.MyTag</tag-class>
        <tei-class>org.gpf.tag.BodyIteratorTagExtraInfo</tei-class>
        <body-content>JSP</body-content>
        <attribute>
            <name>name</name>
            <required>true</required>
            <rtexprvalue>true</rtexprvalue>
        </attribute>
        <attribute>
            <name>scope</name>
            <required>true</required>
            <rtexprvalue>true</rtexprvalue>
        </attribute>
        <attribute>
            <name>id</name>
            <required>true</required>
            <rtexprvalue>true</rtexprvalue>
        </attribute>
    </tag>
</taglib>
- 1
- 2
- 3
- 4
- 5
- 6
- 7
- 8
- 9
- 10
- 11
- 12
- 13
- 14
- 15
- 16
- 17
- 18
- 19
- 20
- 21
- 22
- 23
- 24
- 25
- 26
- 27
- 28
- 29
- 1
- 2
- 3
- 4
- 5
- 6
- 7
- 8
- 9
- 10
- 11
- 12
- 13
- 14
- 15
- 16
- 17
- 18
- 19
- 20
- 21
- 22
- 23
- 24
- 25
- 26
- 27
- 28
- 29
web.xml
<jsp-config>
    <taglib>
        <taglib-uri>tag</taglib-uri>
        <taglib-location>/WEB-INF/MyTag.tld</taglib-location>
    </taglib>
</jsp-config>
- 1
- 2
- 3
- 4
- 5
- 6
- 1
- 2
- 3
- 4
- 5
- 6
在jsp页面中使用以上标签:
<%@ page language="java" import="java.util.*" contentType="text/html; charset=utf-8"%>
<%@taglib prefix="mytag" uri="tag"%>
<!DOCTYPE HTML PUBLIC "-//W3C//DTD HTML 4.01 Transitional//EN">
<html>
  <head>
    <title>hellotag.jsp</title>
  </head>
  <body>
  <%
    // 此代码仅仅是测试,实际的操作应该交给Servlet完成
    List<String> all = new ArrayList<String>();
    all.add("Thinking in Java");
    all.add("锋利的Jquery");
    all.add("陆雪琪");
    request.setAttribute("all", all);
   %>

    <mytag:bodyIterator name="all" scope="request" id="content">
        内容:${content },长度:<%=content.length() %><br />
    </mytag:bodyIterator>
  </body>
</html>
- 1
- 2
- 3
- 4
- 5
- 6
- 7
- 8
- 9
- 10
- 11
- 12
- 13
- 14
- 15
- 16
- 17
- 18
- 19
- 20
- 21
- 22
- 1
- 2
- 3
- 4
- 5
- 6
- 7
- 8
- 9
- 10
- 11
- 12
- 13
- 14
- 15
- 16
- 17
- 18
- 19
- 20
- 21
- 22
以上的content已经变成了一个变量,而这个变量的使用必须依靠BodyIteratorTagExtraInfo类的支持才得以完成。
使用BodyTagSupport类可以完成标签的开发,但是开发的过程比直接使用TagSupport要麻烦很多。通过TagExtraInfo类和VariableInfo类可以直接将标签中定义的属性变成一个变量操作。
简单标签
在jsp1.2之前如果想要进行标签库的开发,要么选择继承TagSupport类,要么继承BodyTagSupport类,而且还要去覆写doStartTag()、doAfterBody()、doEndTag()方法,还必须非常清楚这些方法的返回值,例如:SKIP_BODY、EVAL_BODY_INCLUDE等。到了jsp2.0简化了标签库开发的复杂度,专门增加了一个制作简单标签的SimpleTagSupport类,直接覆写里面的doTag()方法即可。SimpleTagSupport类的定义如下:
public class SimpleTagSupport extends Object implements SimpleTag
- 1
- 1
| 方法 | 描述 |
|---|---|
| public void doTag() | 完成具体标签功能的编写 |
| public JspContext getJspContext() | 取得jsp上下文,主要是用于输出 |
| protected JspFragment getJspBody() | 取得JspFragment对象,用于迭代输出 |
例:格式化日期的简单标签
public class SimpleDateTag extends SimpleTagSupport {

    private String format; // 格式化模式

    public String getFormat() {
        return format;
    }

    public void setFormat(String format) {
        this.format = format;
    }


    @Override
    public void doTag() throws JspException, IOException {

        SimpleDateFormat sdf = new SimpleDateFormat(format);
        super.getJspContext().getOut().write(sdf.format(new Date()));
    }
}
- 1
- 2
- 3
- 4
- 5
- 6
- 7
- 8
- 9
- 10
- 11
- 12
- 13
- 14
- 15
- 16
- 17
- 18
- 19
- 20
- 1
- 2
- 3
- 4
- 5
- 6
- 7
- 8
- 9
- 10
- 11
- 12
- 13
- 14
- 15
- 16
- 17
- 18
- 19
- 20
标签描述文件:
<?xml version="1.0" encoding="UTF-8"?>
<taglib xmlns="http://java.sun.com/xml/ns/j2ee"
    xmlns:xsi="http://www.w3.org/2001/XMLSchema-instance"
    xsi:schemaLocation="http://java.sun.com/xml/ns/j2ee http://java.sun.com/xml/ns/j2ee/web-jsptaglibrary_2_1.xsd"
    version="2.1">
    <tlib-version>1.0</tlib-version>
    <short-name>tag</short-name>
    <tag>
        <name>simpleDate</name>
        <tag-class>org.gpf.tag.SimpleDateTag</tag-class>
        <body-content>empty</body-content>
        <attribute>
            <name>format</name>
            <required>true</required>
            <rtexprvalue>true</rtexprvalue>
        </attribute>
    </tag>
</taglib>
- 1
- 2
- 3
- 4
- 5
- 6
- 7
- 8
- 9
- 10
- 11
- 12
- 13
- 14
- 15
- 16
- 17
- 18
- 1
- 2
- 3
- 4
- 5
- 6
- 7
- 8
- 9
- 10
- 11
- 12
- 13
- 14
- 15
- 16
- 17
- 18
在jsp使用标签:
<%@ page language="java" import="java.util.*" contentType="text/html; charset=utf-8"%>
<%@taglib prefix="mytag" uri="tag"%>
<!DOCTYPE HTML PUBLIC "-//W3C//DTD HTML 4.01 Transitional//EN">
<html>
  <head>
    <title>hellotag.jsp</title>
  </head>
  <body>
    <mytag:simpleDate format="yyyy-MM-dd HH:mm:ss.SSS"/>
  </body>
</html>
- 1
- 2
- 3
- 4
- 5
- 6
- 7
- 8
- 9
- 10
- 11
- 1
- 2
- 3
- 4
- 5
- 6
- 7
- 8
- 9
- 10
- 11
使用简单标签进行迭代输出:
public class SimpleIterator extends SimpleTagSupport {

    private String id;
    private String name;
    private String scope;

    public String getId() {
        return id;
    }

    public void setId(String id) {
        this.id = id;
    }

    public String getName() {
        return name;
    }

    public void setName(String name) {
        this.name = name;
    }

    public String getScope() {
        return scope;
    }

    public void setScope(String scope) {
        this.scope = scope;
    }

    @Override
    public void doTag() throws JspException, IOException {

        Object value = null;
        if("page".equals(scope))
            value = super.getJspContext().getAttribute(name,PageContext.PAGE_SCOPE);
        if("request".equals(scope))
            value = super.getJspContext().getAttribute(name,PageContext.REQUEST_SCOPE);
        if("session".equals(scope))
            value = super.getJspContext().getAttribute(name,PageContext.SESSION_SCOPE);
        if("application".equals(scope))
            value = super.getJspContext().getAttribute(name,PageContext.APPLICATION_SCOPE);

        if(value!=null&&value instanceof List<?>){
            Iterator<?>iterator = ((List<?>)value).iterator();
            while (iterator.hasNext()) {
                super.getJspContext().setAttribute(id, iterator.next());
                super.getJspBody().invoke(null);
            }
        }
    }
}
- 1
- 2
- 3
- 4
- 5
- 6
- 7
- 8
- 9
- 10
- 11
- 12
- 13
- 14
- 15
- 16
- 17
- 18
- 19
- 20
- 21
- 22
- 23
- 24
- 25
- 26
- 27
- 28
- 29
- 30
- 31
- 32
- 33
- 34
- 35
- 36
- 37
- 38
- 39
- 40
- 41
- 42
- 43
- 44
- 45
- 46
- 47
- 48
- 49
- 50
- 51
- 52
- 1
- 2
- 3
- 4
- 5
- 6
- 7
- 8
- 9
- 10
- 11
- 12
- 13
- 14
- 15
- 16
- 17
- 18
- 19
- 20
- 21
- 22
- 23
- 24
- 25
- 26
- 27
- 28
- 29
- 30
- 31
- 32
- 33
- 34
- 35
- 36
- 37
- 38
- 39
- 40
- 41
- 42
- 43
- 44
- 45
- 46
- 47
- 48
- 49
- 50
- 51
- 52
在标签库描述文件中进行描述:
<?xml version="1.0" encoding="UTF-8"?>
<taglib xmlns="http://java.sun.com/xml/ns/j2ee"
    xmlns:xsi="http://www.w3.org/2001/XMLSchema-instance"
    xsi:schemaLocation="http://java.sun.com/xml/ns/j2ee http://java.sun.com/xml/ns/j2ee/web-jsptaglibrary_2_1.xsd"
    version="2.1">
    <tlib-version>1.0</tlib-version>
    <short-name>tag</short-name>
    <tag>
        <name>simpleIterator</name>
        <tag-class>org.gpf.tag.SimpleIterator</tag-class>
        <body-content>scriptless</body-content>
        <attribute>
            <name>id</name>
            <required>true</required>
            <rtexprvalue>true</rtexprvalue>
        </attribute>
            <attribute>
            <name>name</name>
            <required>true</required>
            <rtexprvalue>true</rtexprvalue>
        </attribute>
            <attribute>
            <name>scope</name>
            <required>true</required>
            <rtexprvalue>true</rtexprvalue>
        </attribute>
    </tag>
</taglib>
- 1
- 2
- 3
- 4
- 5
- 6
- 7
- 8
- 9
- 10
- 11
- 12
- 13
- 14
- 15
- 16
- 17
- 18
- 19
- 20
- 21
- 22
- 23
- 24
- 25
- 26
- 27
- 28
- 1
- 2
- 3
- 4
- 5
- 6
- 7
- 8
- 9
- 10
- 11
- 12
- 13
- 14
- 15
- 16
- 17
- 18
- 19
- 20
- 21
- 22
- 23
- 24
- 25
- 26
- 27
- 28
在jsp页面中使用标签:
<%@ page language="java" import="java.util.*" contentType="text/html; charset=utf-8"%>
<%@taglib prefix="mytag" uri="tag"%>
<!DOCTYPE HTML PUBLIC "-//W3C//DTD HTML 4.01 Transitional//EN">
<html>
  <head>
    <title>hellotag.jsp</title>
  </head>
  <body>
  <%
    List<String> all = new ArrayList<String>();
    all.add("张小凡");
    all.add("陆雪琪");
    all.add("碧瑶");
    all.add("周一仙");
    request.setAttribute("all", all);
   %>
    <mytag:simpleIterator name="all" scope="request" id="content">
        内容:${content }<br />
    </mytag:simpleIterator>
  </body>
</html>
- 1
- 2
- 3
- 4
- 5
- 6
- 7
- 8
- 9
- 10
- 11
- 12
- 13
- 14
- 15
- 16
- 17
- 18
- 19
- 20
- 21
- 1
- 2
- 3
- 4
- 5
- 6
- 7
- 8
- 9
- 10
- 11
- 12
- 13
- 14
- 15
- 16
- 17
- 18
- 19
- 20
- 21
DynamicAttributes接口
之前的标签的所有属性如果需要使用就必须在标签描述文件.tld文件中使用<attribute>节点进行定义,如果属性不是固定的而是由用户自定义的就可以使用DynamicAttributes接口实现。
例:有用户在前台传入若干数字,进行加法计算。
public class DynamicAddTag extends SimpleTagSupport implements DynamicAttributes {

    private Map<String, Float> num = new HashMap<String, Float>();

    @Override
    public void setDynamicAttribute(String uri, String localName, Object value)
            throws JspException {
        // 取出保存的每一个属性都保存在Map中
        num.put(localName, Float.parseFloat(value.toString()));
    }

    @Override
    public void doTag() throws JspException, IOException {

        float sum = 0.0f;
        Iterator<Map.Entry<String, Float>> iterator = num.entrySet().iterator();
        while (iterator.hasNext()) {
            Map.Entry<String, Float> value = iterator.next();
            sum += value.getValue();
        }

        super.getJspContext().getOut().write(sum + ""); // 输出
    }
}
- 1
- 2
- 3
- 4
- 5
- 6
- 7
- 8
- 9
- 10
- 11
- 12
- 13
- 14
- 15
- 16
- 17
- 18
- 19
- 20
- 21
- 22
- 23
- 24
- 1
- 2
- 3
- 4
- 5
- 6
- 7
- 8
- 9
- 10
- 11
- 12
- 13
- 14
- 15
- 16
- 17
- 18
- 19
- 20
- 21
- 22
- 23
- 24
标签描述文件:
<?xml version="1.0" encoding="UTF-8"?>
<taglib xmlns="http://java.sun.com/xml/ns/j2ee"
    xmlns:xsi="http://www.w3.org/2001/XMLSchema-instance"
    xsi:schemaLocation="http://java.sun.com/xml/ns/j2ee http://java.sun.com/xml/ns/j2ee/web-jsptaglibrary_2_1.xsd" version="2.1">
    <tlib-version>1.0</tlib-version>
    <short-name>tag</short-name>
    <tag>
        <name>add</name>
        <tag-class>org.gpf.tag.DynamicAddTag</tag-class>
        <body-content>empty</body-content>
        <dynamic-attributes>true</dynamic-attributes>
    </tag>
</taglib>
- 1
- 2
- 3
- 4
- 5
- 6
- 7
- 8
- 9
- 10
- 11
- 12
- 13
- 1
- 2
- 3
- 4
- 5
- 6
- 7
- 8
- 9
- 10
- 11
- 12
- 13
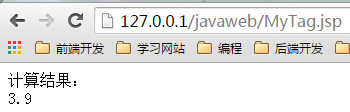
在jsp页面中使用标签库
<%@ page language="java" import="java.util.*" contentType="text/html; charset=utf-8"%>
<%@taglib prefix="mytag" uri="tag"%>
<!DOCTYPE HTML PUBLIC "-//W3C//DTD HTML 4.01 Transitional//EN">
<html>
  <head>
    <title>hellotag.jsp</title>
  </head>
  <body>
    计算结果:<br />
    <mytag:add num1="1.0" num2="2.0" num3="3.0" num4="-2.1"/>
  </body>
</html>
- 1
- 2
- 3
- 4
- 5
- 6
- 7
- 8
- 9
- 10
- 11
- 12
- 1
- 2
- 3
- 4
- 5
- 6
- 7
- 8
- 9
- 10
- 11
- 12
运行结果:


 214
214

 被折叠的 条评论
为什么被折叠?
被折叠的 条评论
为什么被折叠?
 到【灌水乐园】发言


