


【1】基础知识
JVM中的线程是和OS中的线程一一对应的,操作系统负责调度所有的线程,因此在不同的平台上,Java线程的优先级有所不同。
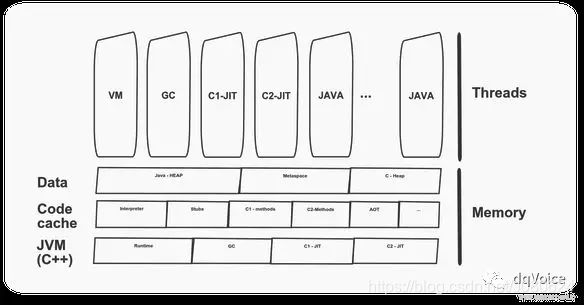
在JVM中除了应用线程,还有其他的一些线程用于支持JVM的运行,这些线程可以被划分为以下几类:
- VM Thread:负责JVM在安全点内的各种操作,这些操作(诸如自动内存管理、取消偏向锁、线程dump、线程挂起等等)在执行过程中需要JVM处于这样一个状态——堆的内容不会被改变,这种状态在JVM里叫做安全点(safe-point)。
- Periodic task thread:这个线程负责响应定时触发的事件(例如:中断),用来执行一些定时操作。
- GC thread:这些线程负责JVM里的垃圾收集活动;
- Compiler threads:这些线程负责在运行时将字节码编译为本地代码;
- Singal dispatcher thread:这些线程负责响应外部发给当前JVM进程的信号,并通过调用JVM内的其他线程。
我们现在写一个简单的hello word程序,代码如下:
public class GcExample{
	private static class E{
		public static final int[] a= new int[1024*10];
	}
	public static void main(String[] args){
		System.out.println("hello world");
		while(true){
			new E();
		}
	}
}
然后使用jmc(Java Mission Control)attach到这个程序上,展现为如下的情况:

- RMI开头的线程,负责JVM跟JMC客户端通信,吐出JVM内的运行信息;
- Attach Listener和Single Dispatcher两个线程,属于信号处理线程,负责接收外部到当前JVM的attach信号,并建立通信用的文件socket;
- Finalizer线程,用于处理Finalizer队列的线程,在Java中,如果一个对象重写了finalize()方法,那么JVM会为之创建一个对应的Finalizer对象,所有的Finzlizer对象会构成一个列表,由Finalizer线程统一处理
- Reference Handler,负责JVM中的引用处理
- main,我们例子中的业务线程。
我想你现在也有这个疑问——跟上面说的那个分类对不上,有些线程没看到,是的,可能是由于JMC的实现机制,这些线程没有被展示出来,我们再用jstack命令做一次线程dump,就可以得到如下图所示:
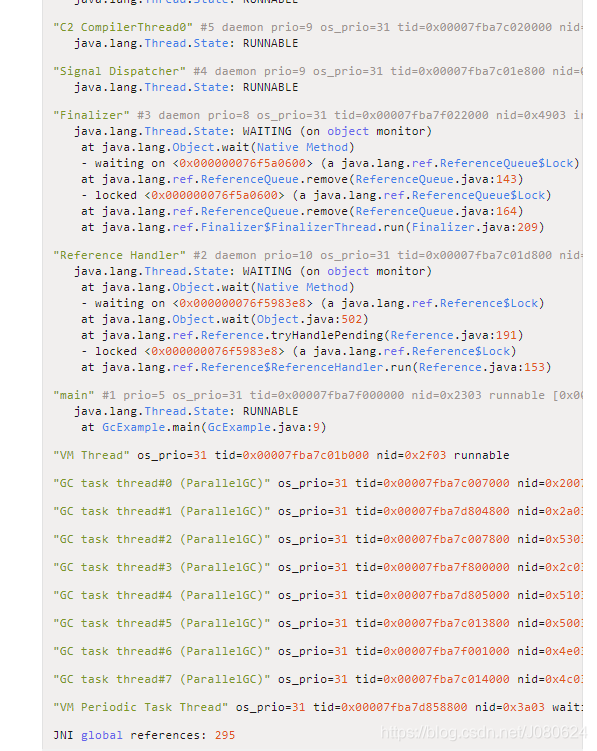
OK,从上面这个dump文件中,可以找到Periodic Task Thread、GC Thread、VM Thread、Compiler Thread的身影了。
【2】JVM源码分析
前面从概念和分类两个角度观察了JVM中的线程,现在我们从源码角度看下另一个问题,JVM是如何实现Java线程的。
java.lang.Thread类的start方法,用来启动一个Java线程,然后JVM会执行run()方法中的内容。run()方法是Runnable接口定义然后在 java.lang.Thread中提供了实现方法,start()方法的内容如下:
 public synchronized void start() {
        /**
         * This method is not invoked for the main method thread or "system"
         * group threads created/set up by the VM. Any new functionality added
         * to this method in the future may have to also be added to the VM.
         *
         * A zero status value corresponds to state "NEW".
         */
        if (threadStatus != 0)
            throw new IllegalThreadStateException();

        /* Notify the group that this thread is about to be started
         * so that it can be added to the group's list of threads
         * and the group's unstarted count can be decremented. */
        group.add(this);

        boolean started = false;
        try {
        //调用本地方法start0
            start0();
            started = true;
        } finally {
            try {
                if (!started) {
                    group.threadStartFailed(this);
                }
            } catch (Throwable ignore) {
                /* do nothing. If start0 threw a Throwable then
                  it will be passed up the call stack */
            }
        }
    }

    private native void start0();
根据注释中说的,一个线程退出后是再次start是非法的,会抛出异常,我们可以用下面的代码验证下:
public class ThreadRestartExample{
	public static void main(String[] args) throws InterruptedException{
		Thread thread = new Thread(()->{
			System.out.println("hello");
		});
		thread.start();
		Thread.sleep(1000);
		thread.start();
	}
}
运行这个代码的结果是:

start方法调用了start0方法,这是一个JNI接口,在Java中通过JNI接口可以实现Java调用本地方法;通过JVMTI接口可以实现在C++空间调用Java对象的方法。
start0方法的实现在 jdk/src/share/native/java/lang/Thread.c中定义,代码如下所示:
#include "jni.h"
#include "jvm.h"

#include "java_lang_Thread.h"

#define THD "Ljava/lang/Thread;"
#define OBJ "Ljava/lang/Object;"
#define STE "Ljava/lang/StackTraceElement;"
#define STR "Ljava/lang/String;"

#define ARRAY_LENGTH(a) (sizeof(a)/sizeof(a[0]))

static JNINativeMethod methods[] = {
    {"start0",           "()V",        (void *)&JVM_StartThread},
    {"stop0",            "(" OBJ ")V", (void *)&JVM_StopThread},
    {"isAlive",          "()Z",        (void *)&JVM_IsThreadAlive},
    {"suspend0",         "()V",        (void *)&JVM_SuspendThread},
    {"resume0",          "()V",        (void *)&JVM_ResumeThread},
    {"setPriority0",     "(I)V",       (void *)&JVM_SetThreadPriority},
    {"yield",            "()V",        (void *)&JVM_Yield},
    {"sleep",            "(J)V",       (void *)&JVM_Sleep},
    {"currentThread",    "()" THD,     (void *)&JVM_CurrentThread},
    {"countStackFrames", "()I",        (void *)&JVM_CountStackFrames},
    {"interrupt0",       "()V",        (void *)&JVM_Interrupt},
    {"isInterrupted",    "(Z)Z",       (void *)&JVM_IsInterrupted},
    {"holdsLock",        "(" OBJ ")Z", (void *)&JVM_HoldsLock},
    {"getThreads",        "()[" THD,   (void *)&JVM_GetAllThreads},
    {"dumpThreads",      "([" THD ")[[" STE, (void *)&JVM_DumpThreads},
    {"setNativeName",    "(" STR ")V", (void *)&JVM_SetNativeThreadName},
};

#undef THD
#undef OBJ
#undef STE
#undef STR

JNIEXPORT void JNICALL
Java_java_lang_Thread_registerNatives(JNIEnv *env, jclass cls)
{
    (*env)->RegisterNatives(env, cls, methods, ARRAY_LENGTH(methods));
}

JVM_StartThread的接口定义在jvm.h中,JDK中用到的jni接口,最终都会在jvm.h文件中定义,并在jvm.cpp中作为C++实现的入口,也就是说jvm.cpp是Java世界和JVM中C++世界沟通的桥梁。
/*
 * java.lang.Thread
 */
JNIEXPORT void JNICALL
JVM_StartThread(JNIEnv *env, jobject thread);
jvm.h、jvm.cpp都在hotspot\src\share\vm\prims下,也就是说除了下载openjdk源码外,还要下载hotspot源码,源码下载方式见末尾。
JVM_StartThread的具体实现在jvm.cpp中,主要代码逻辑列举如下:
JVM_ENTRY(void, JVM_StartThread(JNIEnv* env, jobject jthread))
  JVMWrapper("JVM_StartThread");
  JavaThread *native_thread = NULL;

  // We cannot hold the Threads_lock when we throw an exception,
  // due to rank ordering issues. Example:  we might need to grab the
  // Heap_lock while we construct the exception.
  bool throw_illegal_thread_state = false;

  // We must release the Threads_lock before we can post a jvmti event
  // in Thread::start.
  {
    // Ensure that the C++ Thread and OSThread structures aren't freed before
    // we operate.
    MutexLocker mu(Threads_lock);

    // Since JDK 5 the java.lang.Thread threadStatus is used to prevent
    // re-starting an already started thread, so we should usually find
    // that the JavaThread is null. However for a JNI attached thread
    // there is a small window between the Thread object being created
    // (with its JavaThread set) and the update to its threadStatus, so we
    // have to check for this
    if (java_lang_Thread::thread(JNIHandles::resolve_non_null(jthread)) != NULL) {
      throw_illegal_thread_state = true;
    } else {
      // We could also check the stillborn flag to see if this thread was already stopped, but
      // for historical reasons we let the thread detect that itself when it starts running

      jlong size =
             java_lang_Thread::stackSize(JNIHandles::resolve_non_null(jthread));
      // Allocate the C++ Thread structure and create the native thread.  The
      // stack size retrieved from java is signed, but the constructor takes
      // size_t (an unsigned type), so avoid passing negative values which would
      // result in really large stacks.
      size_t sz = size > 0 ? (size_t) size : 0;
      //注意这里  new JavaThread
      native_thread = new JavaThread(&thread_entry, sz);

      // At this point it may be possible that no osthread was created for the
      // JavaThread due to lack of memory. Check for this situation and throw
      // an exception if necessary. Eventually we may want to change this so
      // that we only grab the lock if the thread was created successfully -
      // then we can also do this check and throw the exception in the
      // JavaThread constructor.
      if (native_thread->osthread() != NULL) {
        // Note: the current thread is not being used within "prepare".
        native_thread->prepare(jthread);
      }
    }
  }

  if (throw_illegal_thread_state) {
    THROW(vmSymbols::java_lang_IllegalThreadStateException());
  }

  assert(native_thread != NULL, "Starting null thread?");

  if (native_thread->osthread() == NULL) {
    // No one should hold a reference to the 'native_thread'.
    delete native_thread;
    if (JvmtiExport::should_post_resource_exhausted()) {
      JvmtiExport::post_resource_exhausted(
        JVMTI_RESOURCE_EXHAUSTED_OOM_ERROR | JVMTI_RESOURCE_EXHAUSTED_THREADS,
        "unable to create new native thread");
    }
    THROW_MSG(vmSymbols::java_lang_OutOfMemoryError(),
              "unable to create new native thread");
  }

  Thread::start(native_thread);

JVM_END

JavaThread的构造方法实现是在thread.cpp文件中,做一些准备工作后,会通过 os::create_thread(this,thr_type,stack_sz);创建线程,os::create_thread的实现时跟具体平台有关的,如下图所示:
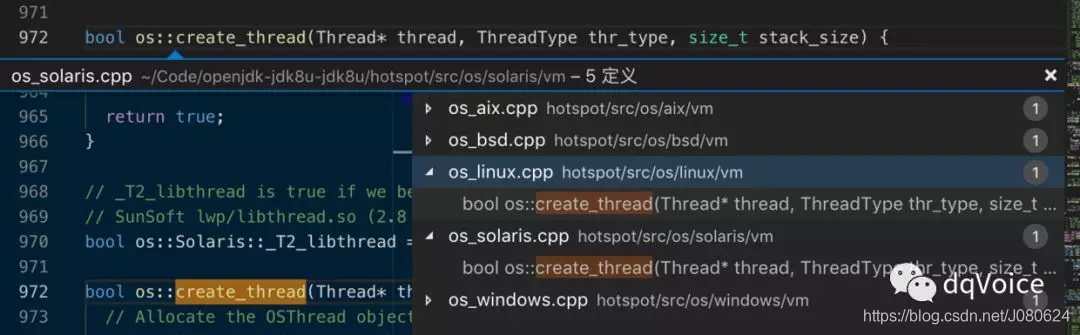
这里我们选择os_linux.cpp这个文件:
bool os::create_thread(Thread* thread, ThreadType thr_type, size_t stack_size) {
  assert(thread->osthread() == NULL, "caller responsible");

  // Allocate the OSThread object
  OSThread* osthread = new OSThread(NULL, NULL);
  if (osthread == NULL) {
    return false;
  }

  // set the correct thread state
  osthread->set_thread_type(thr_type);

  // Initial state is ALLOCATED but not INITIALIZED
  osthread->set_state(ALLOCATED);

  thread->set_osthread(osthread);

  // init thread attributes
  pthread_attr_t attr;
  pthread_attr_init(&attr);
  pthread_attr_setdetachstate(&attr, PTHREAD_CREATE_DETACHED);

  // stack size
  if (os::Linux::supports_variable_stack_size()) {
    // calculate stack size if it's not specified by caller
    if (stack_size == 0) {
      stack_size = os::Linux::default_stack_size(thr_type);

      switch (thr_type) {
      case os::java_thread:
        // Java threads use ThreadStackSize which default value can be
        // changed with the flag -Xss
        assert (JavaThread::stack_size_at_create() > 0, "this should be set");
        stack_size = JavaThread::stack_size_at_create();
        break;
      case os::compiler_thread:
        if (CompilerThreadStackSize > 0) {
          stack_size = (size_t)(CompilerThreadStackSize * K);
          break;
        } // else fall through:
          // use VMThreadStackSize if CompilerThreadStackSize is not defined
      case os::vm_thread:
      case os::pgc_thread:
      case os::cgc_thread:
      case os::watcher_thread:
        if (VMThreadStackSize > 0) stack_size = (size_t)(VMThreadStackSize * K);
        break;
      }
    }

    stack_size = MAX2(stack_size, os::Linux::min_stack_allowed);
    pthread_attr_setstacksize(&attr, stack_size);
  } else {
    // let pthread_create() pick the default value.
  }

  // glibc guard page
  pthread_attr_setguardsize(&attr, os::Linux::default_guard_size(thr_type));

  ThreadState state;

  {
    // Serialize thread creation if we are running with fixed stack LinuxThreads
    bool lock = os::Linux::is_LinuxThreads() && !os::Linux::is_floating_stack();
    if (lock) {
      os::Linux::createThread_lock()->lock_without_safepoint_check();
    }

    pthread_t tid;
    int ret = pthread_create(&tid, &attr, (void* (*)(void*)) java_start, thread);

    pthread_attr_destroy(&attr);

    if (ret != 0) {
      if (PrintMiscellaneous && (Verbose || WizardMode)) {
        perror("pthread_create()");
      }
      // Need to clean up stuff we've allocated so far
      thread->set_osthread(NULL);
      delete osthread;
      if (lock) os::Linux::createThread_lock()->unlock();
      return false;
    }

    // Store pthread info into the OSThread
    osthread->set_pthread_id(tid);

    // Wait until child thread is either initialized or aborted
    {
      Monitor* sync_with_child = osthread->startThread_lock();
      MutexLockerEx ml(sync_with_child, Mutex::_no_safepoint_check_flag);
      while ((state = osthread->get_state()) == ALLOCATED) {
        sync_with_child->wait(Mutex::_no_safepoint_check_flag);
      }
    }

    if (lock) {
      os::Linux::createThread_lock()->unlock();
    }
  }

  // Aborted due to thread limit being reached
  if (state == ZOMBIE) {
      thread->set_osthread(NULL);
      delete osthread;
      return false;
  }

  // The thread is returned suspended (in state INITIALIZED),
  // and is started higher up in the call chain
  assert(state == INITIALIZED, "race condition");
  return true;
}
os::createthread的主要动作有几个:
- 通过
pthread_attr_init(&attr);初始化线程的属性 - 通过
intret=pthread_create(&tid,&attr,(void*(*)(void*))java_start,thread);创建os线程,这里最重要了,参见pthread_create手册,可以知道,第三个参数表示启动这个线程后要执行的方法的入口,第四个参数表示要给这个方法传入的参数。
这里我们看下java_start方法的实现(该方法在hotspot\src\os\linux\vm\os_linux.cpp中),在这个方法的入参是Thread指针:
// Thread start routine for all newly created threads
static void *java_start(Thread *thread) {
  // Try to randomize the cache line index of hot stack frames.
  // This helps when threads of the same stack traces evict each other's
  // cache lines. The threads can be either from the same JVM instance, or
  // from different JVM instances. The benefit is especially true for
  // processors with hyperthreading technology.
  static int counter = 0;
  int pid = os::current_process_id();
  alloca(((pid ^ counter++) & 7) * 128);

  ThreadLocalStorage::set_thread(thread);

  OSThread* osthread = thread->osthread();
  Monitor* sync = osthread->startThread_lock();

  // non floating stack LinuxThreads needs extra check, see above
  if (!_thread_safety_check(thread)) {
    // notify parent thread
    MutexLockerEx ml(sync, Mutex::_no_safepoint_check_flag);
    osthread->set_state(ZOMBIE);
    sync->notify_all();
    return NULL;
  }

  // thread_id is kernel thread id (similar to Solaris LWP id)
  osthread->set_thread_id(os::Linux::gettid());

  if (UseNUMA) {
    int lgrp_id = os::numa_get_group_id();
    if (lgrp_id != -1) {
      thread->set_lgrp_id(lgrp_id);
    }
  }
  // initialize signal mask for this thread
  os::Linux::hotspot_sigmask(thread);

  // initialize floating point control register
  os::Linux::init_thread_fpu_state();

  // handshaking with parent thread
  {
    MutexLockerEx ml(sync, Mutex::_no_safepoint_check_flag);

    // notify parent thread
    osthread->set_state(INITIALIZED);
    sync->notify_all();

    // wait until os::start_thread()

// 这里说明,新创建的os线程不会立即执行,会等os::start_thread()的通知,在后面我们马上会分析到。
    while (osthread->get_state() == INITIALIZED) {
      sync->wait(Mutex::_no_safepoint_check_flag);
    }
  }

  // call one more level start routine
  thread->run();

  return 0;
}
在方法的最后,会通过 thread->run();调用JavaThread的run方法,然后再到JavaThread::thread_main_inner()方法(thread.cpp中),
void JavaThread::thread_main_inner() {
  assert(JavaThread::current() == this, "sanity check");
  assert(this->threadObj() != NULL, "just checking");

  // Execute thread entry point unless this thread has a pending exception
  // or has been stopped before starting.
  // Note: Due to JVM_StopThread we can have pending exceptions already!
  if (!this->has_pending_exception() &&
      !java_lang_Thread::is_stillborn(this->threadObj())) {
    {
      ResourceMark rm(this);
      this->set_native_thread_name(this->get_thread_name());
    }
    HandleMark hm(this);
//注意:这里就是Java线程要执行的run方法
    this->entry_point()(this, this);
  }

  DTRACE_THREAD_PROBE(stop, this);

  this->exit(false);
  delete this;
}
this->entry_point()(this,this);这行的调用,就会执行java.lang.Thread中的run方法,那么这个entrypoint是在哪里被设置到JavaThread对象中的呢?
回顾上文,在jvm.cpp里有一个new JavaThread(&threadentry,sz)的调用,是的,就是这里。
thread_entry的具体实现是:
static void thread_entry(JavaThread* thread, TRAPS) {
  HandleMark hm(THREAD);
  Handle obj(THREAD, thread->threadObj());
  JavaValue result(T_VOID);
  JavaCalls::call_virtual(&result,
                          obj,
                          KlassHandle(THREAD, SystemDictionary::Thread_klass()),
                          vmSymbols::run_method_name(),
                          vmSymbols::void_method_signature(),
                          THREAD);
}
这段代码要做的事情就是在JVM的c++世界里,获取到对应的java.lang.Thread的对象,然后调用它的run方法。
再看下JVM StartThread的逻辑,nativethread被创建后并不会立即被执行,而是处于初始化状态,后面还会执行 Thread::start(native_thread);代码,这是做了什么工作呢?
thread.cpp中方法如下所示:
void Thread::start(Thread* thread) {
  trace("start", thread);
  // Start is different from resume in that its safety is guaranteed by context or
  // being called from a Java method synchronized on the Thread object.
  if (!DisableStartThread) {
    if (thread->is_Java_thread()) {
      // Initialize the thread state to RUNNABLE before starting this thread.
      // Can not set it after the thread started because we do not know the
      // exact thread state at that time. It could be in MONITOR_WAIT or
      // in SLEEPING or some other state.
      java_lang_Thread::set_thread_status(((JavaThread*)thread)->threadObj(),
                                          java_lang_Thread::RUNNABLE);
    }
    os::start_thread(thread);
  }
}
根据代码可知道,这个方法先将thread的状态设置为RUNNABLE,然后再调用 os::start_thread(thread);通知刚刚创建的os线程开始运行,具体的代码如下:
void os::start_thread(Thread* thread) {
  MutexLockerEx ml(thread->SR_lock(),Mutex::_no_safepoint_check_flag);
   OSThread* osthread =thread->osthread();
   osthread->set_state(RUNNABLE);
   pd_start_thread(thread);
}
在这里pdstartthread(具体实现在os_linux.cpp)就负责通知刚刚被创建的但是处于初始化状态的线程,代码如下:
void os::pd_start_thread(Thread* thread) {
  OSThread * osthread = thread->osthread();
  assert(osthread->get_state() != INITIALIZED, "just checking");
  Monitor* sync_with_child = osthread->startThread_lock();
  MutexLockerEx ml(sync_with_child, Mutex::_no_safepoint_check_flag);
  sync_with_child->notify();
}
sync_with_child->notify();这行代码就是用来通知线程开始运行的。
总结–这篇文章主要梳理了三个问题:
-
JVM中的线程模型是怎么样的,跟os中的线程一一对应;
-
JVM里常见的几类线程都有哪些?VM Thread、周期线程、Compiler 线程、GC线程、信号量处理线程;
-
当我们在java代码中执行start()方法的时候,JVM内部做了哪些事情?
参考博文:
openJDK之如何下载各个版本的openJDK源码
深入分析JVM中线程的创建和运行原理
深入学习Java内存模型JMM


 2947
2947


 被折叠的 条评论
为什么被折叠?
被折叠的 条评论
为什么被折叠?
 到【灌水乐园】发言


