


【1】分区基础知识
① 分区方式
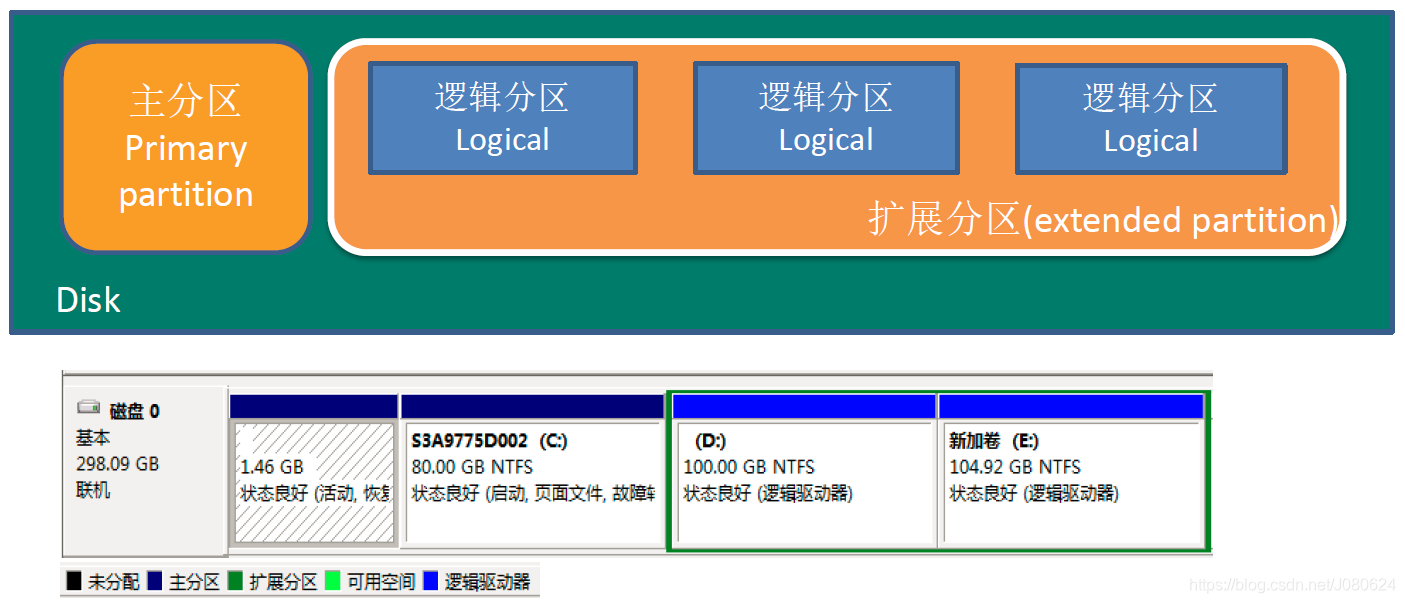
- mbr分区:
1.最多支持四个主分区
2.系统只能安装在主分区
3.扩展分区要占一个主分区
4.MBR最大只支持2TB,但拥有最好的兼容性 - gtp分区:
1.支持无限多个主分区(但操作系统可能限制,比如windows下最多128个分区)
2.最大支持18EB的大容量(1EB=1024 PB,1PB=1024 TB )
3.windows7 64位以后支持gtp
② Windows分区图示
③ Linux分区
Linux来说无论有几个分区,分给哪一目录使用,它归根结底就只有一个根目录,一个独立且唯一的文件结构, Linux中每个分区都是用来组成整个文件系统的一部分。
Linux采用了一种叫“载入”的处理方法,它的整个文件系统中包含了一整套的文件和目录,且将一个分区和一个目录联系起来。这时要载入的一个分区将使它的存储空间在一个目录下获得。
④ 硬盘说明
Linux硬盘分IDE硬盘和SCSI硬盘,目前基本上是SCSI硬盘。对于IDE硬盘,驱动器标识符为“hdx~”。
“hd”表明分区所在设备的类型,这里是指IDE硬盘了。“x”为盘号(a为基本盘,b为基本从属盘,c为辅助主盘,d为辅助从属盘)。“~”代表分区,前四个分区用数字1到4表示,它们是主分区或扩展分区,从5开始就是逻辑分区。- 例,hda3表示为第一个IDE硬盘上的第三个主分区或扩展分区,hdb2表示为第二个IDE硬盘上的第二个主分区或扩展分区。
对于SCSI硬盘则标识为“sdx~”,SCSI硬盘是用“sd”来表示分区所在设备的类型的,其余则和IDE硬盘的表示方法一样。
命令示意如下:
//查看硬盘详细信息
[root@bogon home]# fdisk -l

Disk /dev/sda: 21.5 GB, 21474836480 bytes
255 heads, 63 sectors/track, 2610 cylinders
Units = cylinders of 16065 * 512 = 8225280 bytes
Sector size (logical/physical): 512 bytes / 512 bytes
I/O size (minimum/optimal): 512 bytes / 512 bytes
Disk identifier: 0x00058b12

   Device Boot      Start         End      Blocks   Id  System
/dev/sda1   *           1          39      307200   83  Linux
Partition 1 does not end on cylinder boundary.
/dev/sda2              39        2358    18631680   83  Linux
/dev/sda3            2358        2611     2031616   82  Linux swap / Solaris

//查看硬盘分区挂载详细信息
[root@bogon home]# lsblk -l
NAME MAJ:MIN RM  SIZE RO TYPE MOUNTPOINT
sda    8:0    0   20G  0 disk
sda1   8:1    0  300M  0 part /boot
sda2   8:2    0 17.8G  0 part /
sda3   8:3    0    2G  0 part [SWAP]
sr0   11:0    1 1024M  0 rom

//目录结构树形式展示 分区信息与挂载
[root@bogon home]# lsblk -f
NAME   FSTYPE LABEL UUID                                 MOUNTPOINT
sda
├─sda1 ext4         1594a9f0-cefd-49f3-92d7-401797cfec33 /boot
├─sda2 ext4         7c099cd4-d17f-4576-adcf-524d13705ee4 /
└─sda3 swap         0e7b48c1-8be9-4346-bf17-ae7fddf77f26 [SWAP]
sr0
//一块硬盘sd 三个分区;
//两个ext4分区,一个交换分区swap
// /boot / 分别表示硬盘对应的挂载--把分区与文件系统关联
//  uuid  是硬盘格式化后唯一标识分区
// sr0 表示光驱
⑤ ext3、ext4和xfs三种文件系统
centos7.0开始默认文件系统是xfs,centos6是ext4,centos5是ext3。
ext3和ext4的最大区别在于,ext3在fsck时需要耗费大量时间(文件越多,时间越长),而ext4在fsck时用的时间会少非常多
ext4是第四代扩展文件系统(英语:Fourth EXtended filesystem,缩写为ext4)是linux系统下的日志文件系统,是ext3文件系统的后继版本。
ext4的文件系统容量达到1EB,而文件容量则达到16TB,这是一个非常大的数字了。对一般的台式机和服务器而言,这可能并不重要,但对于大型磁盘阵列的用户而言,这就非常重要了。
ext3目前只支持32000个子目录,而ext4取消了这一限制,理论上支持无限数量的子目录。
xfs是一种非常优秀的日志文件系统,它是SGI公司设计的。xfs被称为业界最先进的、最具可升级性的文件系统技术
xfs是一个64位文件系统,最大支持8EB减1字节的单个文件系统,实际部署时取决于宿主操作系统的最大块限制。对于一个32位Linux系统,文件和文件系统的大小会被限制在16TB。
xfs在很多方面确实做的比ext4好,ext4受限制于磁盘结构和兼容问题,可扩展性(scalability)确实不如xfs,另外xfs经过很多年发展,各种锁的细化做的也比较好。
【2】虚拟机添加硬盘并进行分区、格式化、挂载
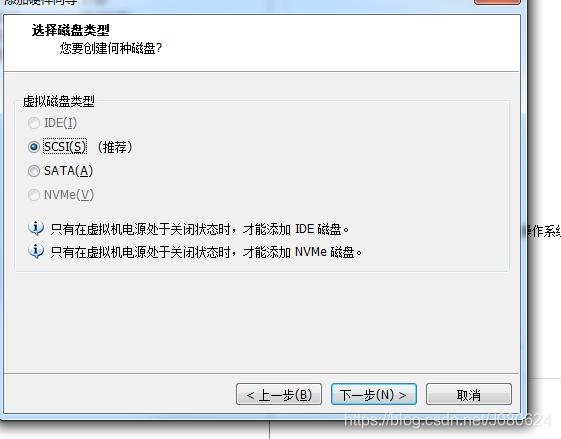
① 虚拟机添加硬盘
虚拟机–设置–添加,然后下一步…即可。
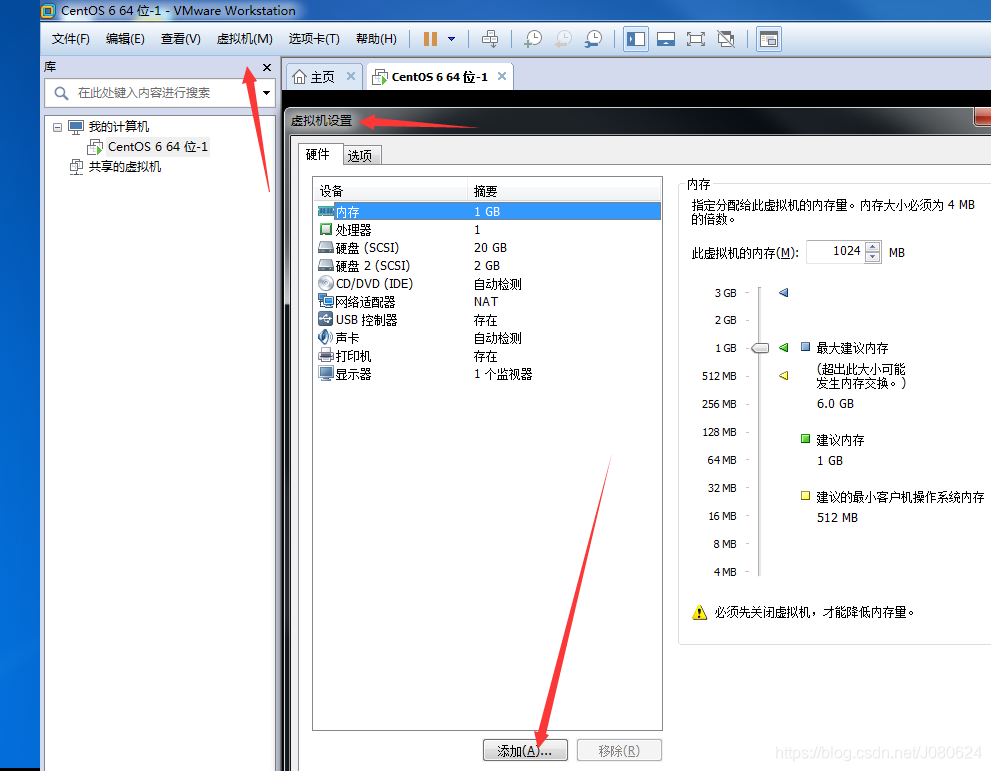
添加完后用命令查看:
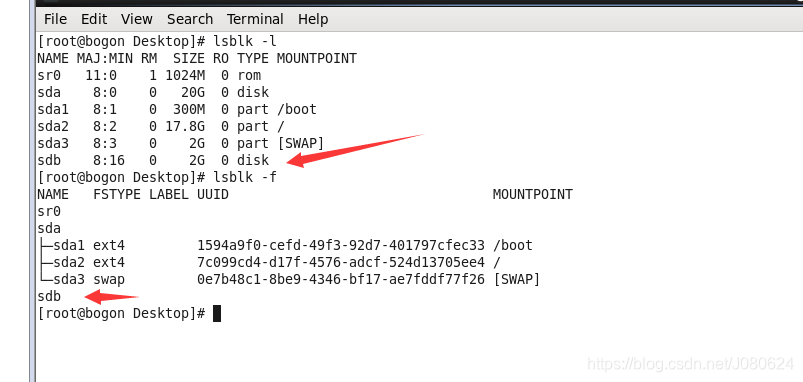
从上面可以看到已经添加一块sdb硬盘大小为2G,此时没有文件系统,没有挂载,么有UUID。
② 进行分区
添加完硬盘后首先进行分区,操作步骤如下:
[root@bogon dev]# fdisk /dev/sdb
Device contains neither a valid DOS partition table, nor Sun, SGI or OSF disklabel
Building a new DOS disklabel with disk identifier 0x2737ab8f.
Changes will remain in memory only, until you decide to write them.
After that, of course, the previous content won't be recoverable.

Warning: invalid flag 0x0000 of partition table 4 will be corrected by w(rite)

WARNING: DOS-compatible mode is deprecated. It's strongly recommended to
         switch off the mode (command 'c') and change display units to
         sectors (command 'u').

Command (m for help): m
Command action
   a   toggle a bootable flag
   b   edit bsd disklabel
   c   toggle the dos compatibility flag
   d   delete a partition
   l   list known partition types
   m   print this menu
   n   add a new partition // 添加一个新的分区
   o   create a new empty DOS partition table
   p   print the partition table
   q   quit without saving changes
   s   create a new empty Sun disklabel
   t   change a partition's system id
   u   change display/entry units
   v   verify the partition table
   w   write table to disk and exit
   x   extra functionality (experts only)

Command (m for help): n
Command action
   e   extended
   p   primary partition (1-4) //主分区
p
Partition number (1-4): 1
First cylinder (1-261, default 1): 1
Last cylinder, +cylinders or +size{K,M,G} (1-261, default 261):
Using default value 261

Command (m for help): m
Command action
   a   toggle a bootable flag
   b   edit bsd disklabel
   c   toggle the dos compatibility flag
   d   delete a partition
   l   list known partition types
   m   print this menu
   n   add a new partition
   o   create a new empty DOS partition table
   p   print the partition table
   q   quit without saving changes
   s   create a new empty Sun disklabel
   t   change a partition's system id
   u   change display/entry units
   v   verify the partition table
   w   write table to disk and exit
   x   extra functionality (experts only)
//最后进行写入
Command (m for help): w
The partition table has been altered!

Calling ioctl() to re-read partition table.
Syncing disks.

//查看硬盘与挂载详情
[root@bogon dev]# lsblk -f
NAME   FSTYPE LABEL UUID                                 MOUNTPOINT
sr0
sda
├─sda1 ext4         1594a9f0-cefd-49f3-92d7-401797cfec33 /boot
├─sda2 ext4         7c099cd4-d17f-4576-adcf-524d13705ee4 /
└─sda3 swap         0e7b48c1-8be9-4346-bf17-ae7fddf77f26 [SWAP]
sdb
└─sdb1
总结:分区命令fdisk /dev/sdb,开始对/sdb分区
	•m 显示命令列表
	•p 显示磁盘分区同fdisk –l
	•n 新增分区
	•d 删除分区
	•w 写入并退出
说明:开始分区后输入n,新增分区,然后选择p ,分区类型为主分区。两次回车默认剩余全部空间。最后输入w写入分区并退出,若不保存退出输入q。
③ 格式化
mkfs命令–>make filesystem的缩写,用来在特定的分区建立Linux文件系统。
 mkfs [options] [-t <type>] [fs-options] <device> [<size>]
 Options:
 -t, --type=<type>  filesystem type; when unspecified, ext2 is used
     fs-options     parameters for the real filesystem builder
     <device>       path to the device to be used
     <size>         number of blocks to be used on the device
 -V, --verbose      explain what is being done;
                      specifying -V more than once will cause a dry-run
 -h, --help         display this help
 -V, --version      display version
如果遇到提示命令错误,无法进行格式化的情况,可以使用如下命令尝试:
mkfs.xfs 目标磁盘
我们继续往下进行格式化:
//ext4是分区文件系统类型
[root@bogon dev]# mkfs -t ext4 /dev/sdb1
mke2fs 1.41.12 (17-May-2010)
Filesystem label=
OS type: Linux
Block size=4096 (log=2)
Fragment size=4096 (log=2)
Stride=0 blocks, Stripe width=0 blocks
131072 inodes, 524112 blocks
26205 blocks (5.00%) reserved for the super user
First data block=0
Maximum filesystem blocks=536870912
16 block groups
32768 blocks per group, 32768 fragments per group
8192 inodes per group
Superblock backups stored on blocks:
	32768, 98304, 163840, 229376, 294912

Writing inode tables: done
Creating journal (8192 blocks): done
Writing superblocks and filesystem accounting information: done

This filesystem will be automatically checked every 22 mounts or
180 days, whichever comes first.  Use tune2fs -c or -i to override.


[root@bogon dev]# lsblk -f
NAME   FSTYPE LABEL UUID                                 MOUNTPOINT
sr0
sda
├─sda1 ext4         1594a9f0-cefd-49f3-92d7-401797cfec33 /boot
├─sda2 ext4         7c099cd4-d17f-4576-adcf-524d13705ee4 /
└─sda3 swap         0e7b48c1-8be9-4346-bf17-ae7fddf77f26 [SWAP]
sdb
└─sdb1 ext4         f3b7a79c-1041-403d-889b-83372a2789d4
[root@bogon dev]#
④ 挂载
[root@bogon home]# mkdir sdb1
[root@bogon home]# ll
total 16
drwx------. 25 jane jane 4096 Jun 14 07:06 jane
drwx------. 24 janus mygroup 4096 Jul 4 00:31 janus
drwx------. 5 mysql mysql 4096 Jul 3 02:24 mysql
drwxr-xr-x. 2 root root 4096 Jul 9 02:55 sdb1
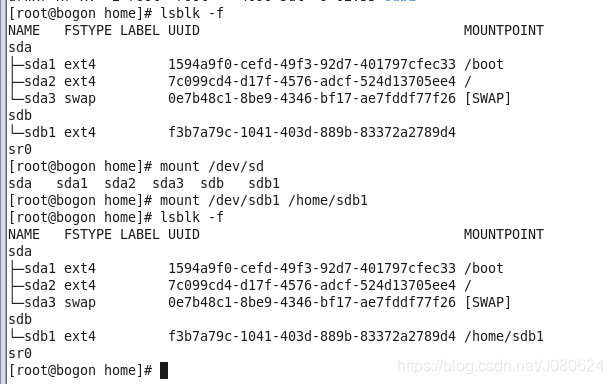
//执行命令挂载
[root@bogon home]# mount /dev/sdb1 /home/sdb1/
//查看挂载后的分区与目录
[root@bogon home]# lsblk -f
NAME FSTYPE LABEL UUID MOUNTPOINT
sr0
sda
├─sda1 ext4 1594a9f0-cefd-49f3-92d7-401797cfec33 /boot
├─sda2 ext4 7c099cd4-d17f-4576-adcf-524d13705ee4 /
└─sda3 swap 0e7b48c1-8be9-4346-bf17-ae7fddf77f26 [SWAP]
sdb
└─sdb1 ext4 f3b7a79c-1041-403d-889b-83372a2789d4 /home/sdb1
需要注意的是,用命令行挂载重启后会失效。
使用df -h命令查看磁盘使用情况:
[root@bogon home]# df -h
Filesystem      Size  Used Avail Use% Mounted on
/dev/sda2        18G  8.3G  8.3G  50% /
tmpfs           491M  228K  491M   1% /dev/shm
/dev/sda1       283M   34M  234M  13% /boot
.host:/         100G   18G   83G  18% /mnt/hgfs
/dev/sdb1       2.0G  3.1M  1.9G   1% /home/sdb1
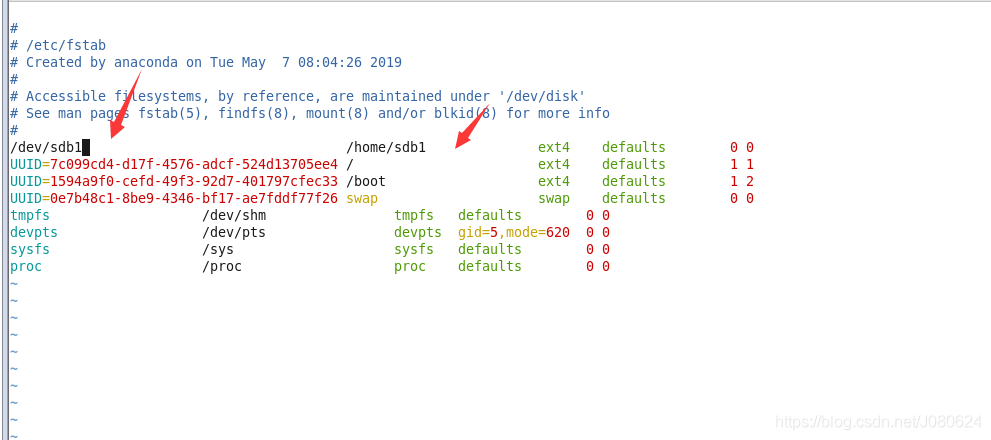
⑤ 设置永久挂载(自动挂载)
通过修改/etc/fstab实现挂载,添加完成后执行mount –a 即刻生效。
可以使用vim快捷操作yy p快捷复制一行然后修改,这里不再使用UUID直接指定目标磁盘。
⑥ 断开挂载
断开挂载关系,可以使用命令umount:
//目标磁盘
umount /dev/sdb1;

//目标文件系统
umount /home/sdb1;
【3】已经存在目录挂载硬盘
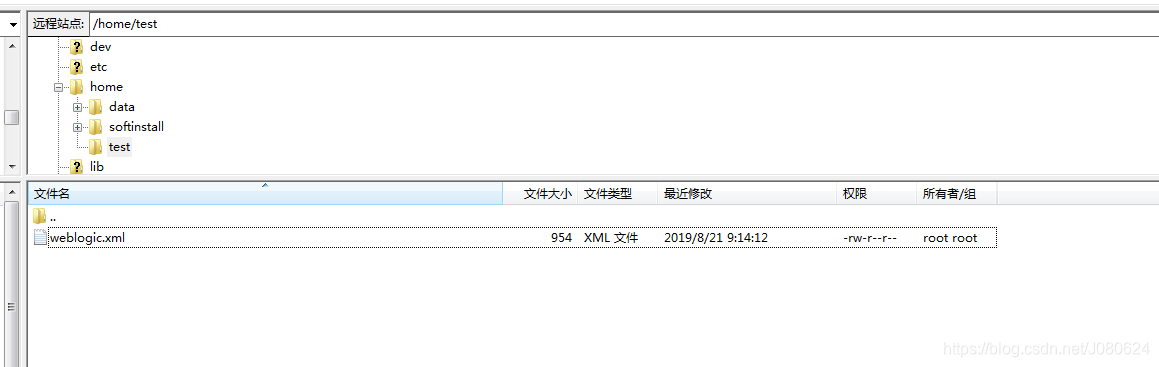
如果目录已经在系统盘里存在,这里面有这样几种情况(假设目录为/home/test,系统盘是挂载在根目录/下的):
1.目录下面无数据;
2.目录下面有数据;
3.目录已经有磁盘挂载;
① /home/test在系统盘下无数据
既然无数据,那就随意操作吧。
② /home/test在系统盘下有数据
这时候如果有磁盘挂载上去是可以挂载的,但是因为目录指向了新的磁盘,那么原先的数据将不可见。不过可以将数据先放在别的目录下,然后再转移到新的挂载的磁盘。
③ /home/test已经有磁盘挂载
比如 vdb1磁盘挂载在/home/test,那么此时你再用vdb2磁盘挂载到/home/test是挂载失败的。如果需要挂载,则先将vdb1卸载掉。然后再根据①②判断处理。
【4】根目录扩容
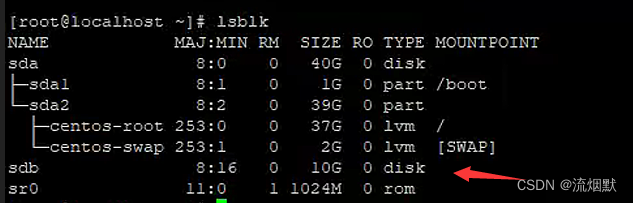
有个很惨的事情就是某个XX装机根目录搞了很小的空间,就像你windows下C盘很小。那么就库容吧。如下图所示,我们根目录 / 是37G,sdb 10G没有挂载,我们期望将其扩容到根目录 /下。
这里建议使用 lsblk -f 命令查看磁盘与挂载情况,可以看到磁盘的文件系统。
① 磁盘分区
可以使用命令fdisk -l查看磁盘详细信息
[root@localhost ~]# fdisk -l

Disk /dev/sda: 42.9 GB, 42949672960 bytes, 83886080 sectors
Units = sectors of 1 * 512 = 512 bytes
Sector size (logical/physical): 512 bytes / 512 bytes
I/O size (minimum/optimal): 512 bytes / 512 bytes
Disk label type: dos
Disk identifier: 0x000c072c

   Device Boot      Start         End      Blocks   Id  System
/dev/sda1   *        2048     2099199     1048576   83  Linux
/dev/sda2         2099200    83886079    40893440   8e  Linux LVM

Disk /dev/sdb: 10.7 GB, 10737418240 bytes, 20971520 sectors
Units = sectors of 1 * 512 = 512 bytes
Sector size (logical/physical): 512 bytes / 512 bytes
I/O size (minimum/optimal): 512 bytes / 512 bytes


Disk /dev/mapper/centos-root: 39.7 GB, 39720058880 bytes, 77578240 sectors
Units = sectors of 1 * 512 = 512 bytes
Sector size (logical/physical): 512 bytes / 512 bytes
I/O size (minimum/optimal): 512 bytes / 512 bytes


Disk /dev/mapper/centos-swap: 2147 MB, 2147483648 bytes, 4194304 sectors
Units = sectors of 1 * 512 = 512 bytes
Sector size (logical/physical): 512 bytes / 512 bytes
I/O size (minimum/optimal): 512 bytes / 512 bytes
首先对sdb进行分区,也就是硬盘 Disk /dev/sdb ,关于分区操作这里不再赘述了,不过记得分区后 执行一下命令partprobe 。
[root@localhost ~]# fdisk /dev/sdb
Welcome to fdisk (util-linux 2.23.2).

Changes will remain in memory only, until you decide to write them.
Be careful before using the write command.

Device does not contain a recognized partition table
Building a new DOS disklabel with disk identifier 0xafca51c6.

Command (m for help): m
Command action
   a   toggle a bootable flag
   b   edit bsd disklabel
   c   toggle the dos compatibility flag
   d   delete a partition
   g   create a new empty GPT partition table
   G   create an IRIX (SGI) partition table
   l   list known partition types
   m   print this menu
   n   add a new partition
   o   create a new empty DOS partition table
   p   print the partition table
   q   quit without saving changes
   s   create a new empty Sun disklabel
   t   change a partition's system id
   u   change display/entry units
   v   verify the partition table
   w   write table to disk and exit
   x   extra functionality (experts only)

Command (m for help): n
Partition type:
   p   primary (0 primary, 0 extended, 4 free)
   e   extended
Select (default p): p
Partition number (1-4, default 1):
First sector (2048-20971519, default 2048):
Using default value 2048
Last sector, +sectors or +size{K,M,G} (2048-20971519, default 20971519):
Using default value 20971519
Partition 1 of type Linux and of size 10 GiB is set

Command (m for help): w
The partition table has been altered!

Calling ioctl() to re-read partition table.
Syncing disks.
[root@localhost ~]# partprobe
查看分区是否创建:
[root@localhost ~]# lsblk
NAME            MAJ:MIN RM  SIZE RO TYPE MOUNTPOINT
sda               8:0    0   40G  0 disk
├─sda1            8:1    0    1G  0 part /boot
└─sda2            8:2    0   39G  0 part
  ├─centos-root 253:0    0   37G  0 lvm  /
  └─centos-swap 253:1    0    2G  0 lvm  [SWAP]
sdb               8:16   0   10G  0 disk
└─sdb1            8:17   0   10G  0 part
sr0              11:0    1 1024M  0 rom
② 开始扩容
创建物理卷
[root@localhost ~]# lvm
lvm> pvcreate /dev/sdb1
  Physical volume "/dev/sdb1" successfully created.
查看物理卷和卷组
lvm> pvdisplay
  --- Physical volume ---
  PV Name               /dev/sda2
  VG Name               centos
  PV Size               <39.00 GiB / not usable 3.00 MiB
  Allocatable           yes
  PE Size               4.00 MiB
  Total PE              9983
  Free PE               1
  Allocated PE          9982
  PV UUID               1U2WLT-W5iK-HPl4-rlUf-HAUZ-dEHy-DVA6BQ

  "/dev/sdb1" is a new physical volume of "<10.00 GiB"
  --- NEW Physical volume ---
  PV Name               /dev/sdb1
  VG Name
  PV Size               <10.00 GiB
  Allocatable           NO
  PE Size               0
  Total PE              0
  Free PE               0
  Allocated PE          0
  PV UUID               UJtprZ-kb3s-HOCG-qr9u-OERC-EGF3-8ArOMe

lvm> vgdisplay
  --- Volume group ---
  VG Name               centos
  System ID
  Format                lvm2
  Metadata Areas        1
  Metadata Sequence No  3
  VG Access             read/write
  VG Status             resizable
  MAX LV                0
  Cur LV                2
  Open LV               2
  Max PV                0
  Cur PV                1
  Act PV                1
  VG Size               <39.00 GiB
  PE Size               4.00 MiB
  Total PE              9983
  Alloc PE / Size       9982 / 38.99 GiB
  Free  PE / Size       1 / 4.00 MiB
  VG UUID               RPSLCx-cHyl-udBI-uK4G-CSvZ-u37n-OSQu5n
很显然,我们需要把 NEW Physical volume添加到目标 PV Name /dev/sda2所在的卷组 VG Name centos 。
将物理卷加入到卷组
lvm> vgextend centos /dev/sdb1
  Volume group "centos" successfully extended
再次查看卷组和卷,可以看到卷组的容量增加了10G,而我们前面增加的物理卷也归属到卷组centos中。
lvm> vgdisplay
  --- Volume group ---
  VG Name               centos
  System ID
  Format                lvm2
  Metadata Areas        2
  Metadata Sequence No  4
  VG Access             read/write
  VG Status             resizable
  MAX LV                0
  Cur LV                2
  Open LV               2
  Max PV                0
  Cur PV                2
  Act PV                2
  VG Size               48.99 GiB
  PE Size               4.00 MiB
  Total PE              12542
  Alloc PE / Size       9982 / 38.99 GiB
  Free  PE / Size       2560 / 10.00 GiB
  VG UUID               RPSLCx-cHyl-udBI-uK4G-CSvZ-u37n-OSQu5n

lvm> pvdisplay
  --- Physical volume ---
  PV Name               /dev/sda2
  VG Name               centos
  PV Size               <39.00 GiB / not usable 3.00 MiB
  Allocatable           yes
  PE Size               4.00 MiB
  Total PE              9983
  Free PE               1
  Allocated PE          9982
  PV UUID               1U2WLT-W5iK-HPl4-rlUf-HAUZ-dEHy-DVA6BQ

  --- Physical volume ---
  PV Name               /dev/sdb1
  VG Name               centos
  PV Size               <10.00 GiB / not usable 3.00 MiB
  Allocatable           yes
  PE Size               4.00 MiB
  Total PE              2559
  Free PE               2559
  Allocated PE          0
  PV UUID               UJtprZ-kb3s-HOCG-qr9u-OERC-EGF3-8ArOMe
将卷组剩余空间(刚添加的10G)添加到逻辑卷 /dev/mapper/centos-root 也就是我们挂载的 根目录 /所对应的分区。
lvm> lvextend -l +100%FREE /dev/mapper/centos-root
  Size of logical volume centos/root changed from 36.99 GiB (9470 extents) to 46.99 GiB (12030 extents).
  Logical volume centos/root successfully resized.
同步到文件系统
之前只是对逻辑卷扩容,还要同步到文件系统,实现对根目录的扩容。
[root@localhost ~]# xfs_growfs /dev/mapper/centos-root
meta-data=/dev/mapper/centos-root isize=512    agcount=4, agsize=2424320 blks
         =                       sectsz=512   attr=2, projid32bit=1
         =                       crc=1        finobt=0 spinodes=0
data     =                       bsize=4096   blocks=9697280, imaxpct=25
         =                       sunit=0      swidth=0 blks
naming   =version 2              bsize=4096   ascii-ci=0 ftype=1
log      =internal               bsize=4096   blocks=4735, version=2
         =                       sectsz=512   sunit=0 blks, lazy-count=1
realtime =none                   extsz=4096   blocks=0, rtextents=0
data blocks changed from 9697280 to 12318720
查看挂载情况:
[root@localhost ~]# df -h /
Filesystem               Size  Used Avail Use% Mounted on
/dev/mapper/centos-root   47G  4.5G   43G  10% /
reboot重启后使用命令 lsblk -f 查看磁盘与挂载,如下所示:
[root@localhost ~]# lsblk -f
NAME            FSTYPE      LABEL UUID                                   MOUNTPOINT
sda
├─sda1          xfs               e7069681-f367-42ae-b4b6-96d956e3d56a   /boot
└─sda2          LVM2_member       1U2WLT-W5iK-HPl4-rlUf-HAUZ-dEHy-DVA6BQ
  ├─centos-root xfs               d8a656a9-a925-4149-aad9-62b43da4323e   /
  └─centos-swap swap              c95cb5ef-5e17-46a8-90fa-b192c60c0de1   [SWAP]
sdb
└─sdb1          LVM2_member       UJtprZ-kb3s-HOCG-qr9u-OERC-EGF3-8ArOMe
  └─centos-root xfs               d8a656a9-a925-4149-aad9-62b43da4323e   /

# 使用 lsblk -l 命令查看
[root@localhost ~]# lsblk -l
NAME        MAJ:MIN RM  SIZE RO TYPE MOUNTPOINT
sda           8:0    0   40G  0 disk
sda1          8:1    0    1G  0 part /boot
sda2          8:2    0   39G  0 part
centos-root 253:0    0   47G  0 lvm  /
centos-swap 253:1    0    2G  0 lvm  [SWAP]
sdb           8:16   0   10G  0 disk
sdb1          8:17   0   10G  0 part
centos-root 253:0    0   47G  0 lvm  /
sr0          11:0    1 1024M  0 rom
OK,完美实现根目录的扩容。这里需要注意几个名词:磁盘、分区、物理卷与逻辑卷。前面咱们将磁盘分区后创建了物理卷,然后扩容到了逻辑卷。我们可以再回过来用命令查看逻辑卷:
[root@localhost ~]# lvm
lvm> lvdisplay
  --- Logical volume ---
  LV Path                /dev/centos/swap
  LV Name                swap
  VG Name                centos
  LV UUID                agbUio-CeVc-E22q-Uxru-vDuw-haLk-45r2nD
  LV Write Access        read/write
  LV Creation host, time localhost, 2020-02-13 21:11:37 -0500
  LV Status              available
  # open                 2
  LV Size                2.00 GiB
  Current LE             512
  Segments               1
  Allocation             inherit
  Read ahead sectors     auto
  - currently set to     8192
  Block device           253:1

  --- Logical volume ---
  LV Path                /dev/centos/root
  LV Name                root
  VG Name                centos
  LV UUID                00IpUh-dwJ2-Nr3S-ZDTU-wSf9-61Zz-V9AQYd
  LV Write Access        read/write
  LV Creation host, time localhost, 2020-02-13 21:11:37 -0500
  LV Status              available
  # open                 1
  LV Size                46.99 GiB
  Current LE             12030
  Segments               2
  Allocation             inherit
  Read ahead sectors     auto
  - currently set to     8192
  Block device           253:0
【5】问题总结
① 添加了分区但是格式化为文件系统的时候找不到
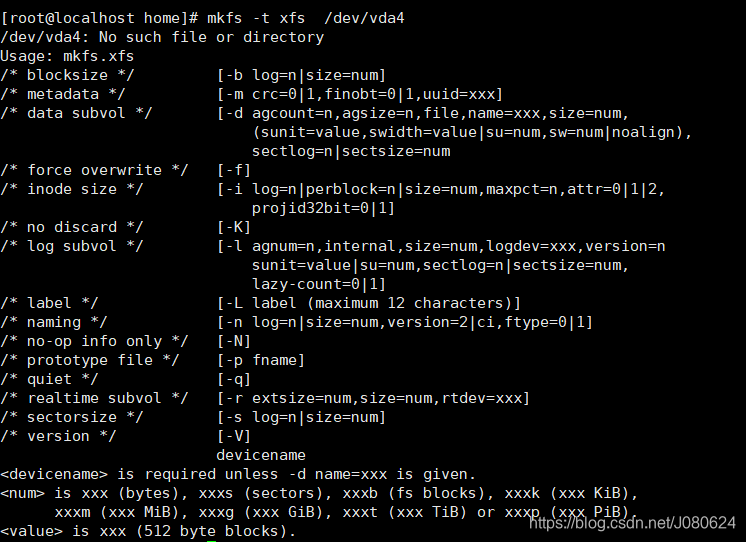
但是使用fdisk -l 命令却是可以看到:
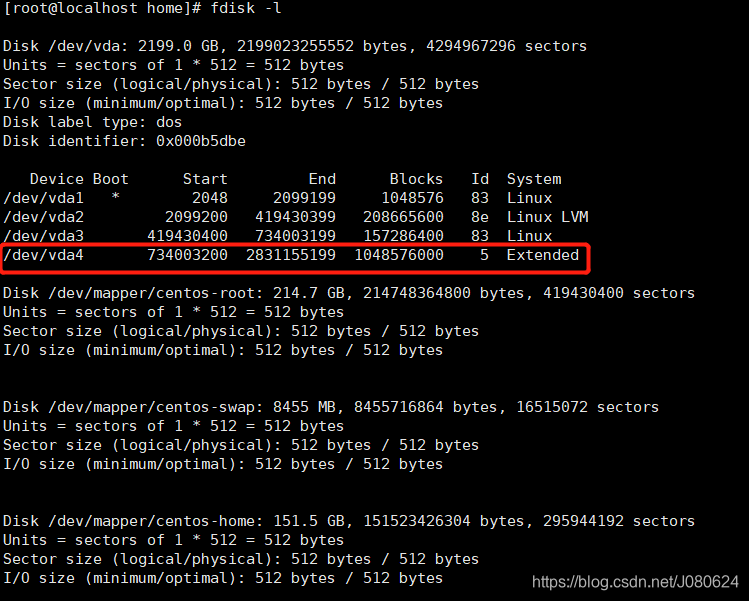
解决办法:
使用partprobe命令,作用为创建分区并且在不重新启动机器的情况下系统能够识别这些分区。
# 通知操作系统分区表的更改。
partprobe [OPTION] [DEVICE]...
选项如下:
  -d, --dry-run    do not actually inform the operating system
  -s, --summary    print a summary of contents
  -h, --help       display this help and exit
  -v, --version    output version information and exit
如果不指定DEVICE ,那么将会探测所有分区并通知给操作系统。
② 如何查看硬盘分区类型
使用命令fdisk -l 或者parted -l
[root@VM_0_12_centos ~]# parted -l
Warning: Unable to open /dev/sr0 read-write (Read-only file system).  /dev/sr0
has been opened read-only.
Error: /dev/sr0: unrecognised disk label

Model: Virtio Block Device (virtblk)
Disk /dev/vda: 53.7GB
Sector size (logical/physical): 512B/512B
Partition Table: msdos //表示mbr

Number  Start   End     Size    Type     File system  Flags
 1      1049kB  53.7GB  53.7GB  primary  ext3         boot


 3426
3426


 被折叠的 条评论
为什么被折叠?
被折叠的 条评论
为什么被折叠?
 到【灌水乐园】发言


