


1:自定义View基本知识(这里以一个简化版的TextView为例:名称为CustomTextView)
1.1 自定义属性
在android的布局文件中,我们会使用一些属性值来使得当前的这个控件达到自己想要的效果,最基本的,例如:android:layout_width , android:layout_width等等,这些便是控件本身的属性。下面,我们来说说如何去自定义一个控件的属性。
1:在资源文件attrs.xml中创建需要自定义的属性,例如:
<!-- name为自定义view的名字 -->
    <declare-styleable name="CustomTextView">


        <!-- name 属性名称

        format 格式如下: string 文字
                        color 颜色
                        dimension 宽高  尺寸大小 如字体的大小
                        integer 数字
                        reference 资源(drawable mipmap)

        -->
        <attr name="justhText" format="string"/>
        <attr name="justhTextColor" format="color"/>
        <attr name="justhTextSize" format="dimension"/>
        <attr name="justhTextMaxLength" format="integer"/>

        <!--枚举-->
        <attr name="justhInputType">
            <enum name="password" value="1"/>
            <enum name="number" value="2"/>
            <enum name="text" value="3"/>
        </attr>
在自定义属性时,需要把握好改自定义属性的名称(name)和该属性的格式(format)
2:当写好了自定义的属性后,需要在使用该自定义View的布局文件中引入命名空间,引入之后便可以被使用了;
自定义View必须知道的几个常用方法
onMeasure:用来给控件测量宽高
说到onMeasure这个方法,就不得不说两个概念,分别是测量模式和测量值:测量模式有上中类型,分别为:UNSPECIFIED,EXACTLY,AT_MOST.
1.1:UNSPECIFIED:该测量模式很少用到,基本上只在源码中有见到过。之前有一个问题,就是由于这种测量模式造成的:当一个ScrollView里面嵌套一个ListView的时候,会出现listview列表显示不全的情况只显示一个Item,该现象就是由于ScrollView测量子view的时候,给其传的测量模式为UNSPECIFIED造成的,有兴趣的可以稍微看下源码,其实我也没看太懂,啊哈哈哈)
1.2:EXACTLY:该测量模式代表给定的控件大小(width,height)为确定值,如matchParent,fill_parent,10px
1.3AT_MOST:该测量模式代表给定的控件模式是自适应的,需要自己去测量,如wrap_content,当计算完成之后,可以使用setMeasuredDimension(width,height)来设置控件大小onDraw:该方法用来绘制自定义view的效果
- 该方法使用canvas来画各种效果,如画圆:canvas.drawCircle ….
- onTouch:该方法处理的是触摸屏幕的事件,例如手指按下屏幕,手指在屏幕上滑动,手指释放,都会触发相应的event(事件)
下面贴出一个自定义view的例子,供大家参考,又不好的地方,欢迎提出!
自定义属性:`
<!-- name 属性名称

format 格式如下: string 文字
                color 颜色
                dimension 宽高  尺寸大小 如字体的大小
                integer 数字
                reference 资源(drawable mipmap)

-->
<attr name="justhText" format="string"/>
<attr name="justhTextColor" format="color"/>
<attr name="justhTextSize" format="dimension"/>
<attr name="justhTextMaxLength" format="integer"/>

<!--枚举-->
<attr name="justhInputType">
    <enum name="password" value="1"/>
    <enum name="number" value="2"/>
    <enum name="text" value="3"/>
</attr>
`
在布局文件中使用
<com.justh.dell.customtextview.CustomTextView
 android:layout_width="wrap_content"
 android:layout_height="wrap_content"
 app:justhText="justh"
 app:justhTextColor="#9fabb2"
 app:justhTextSize="30dp"
 />
在代码中获取自定义属性,并设置相应的属性
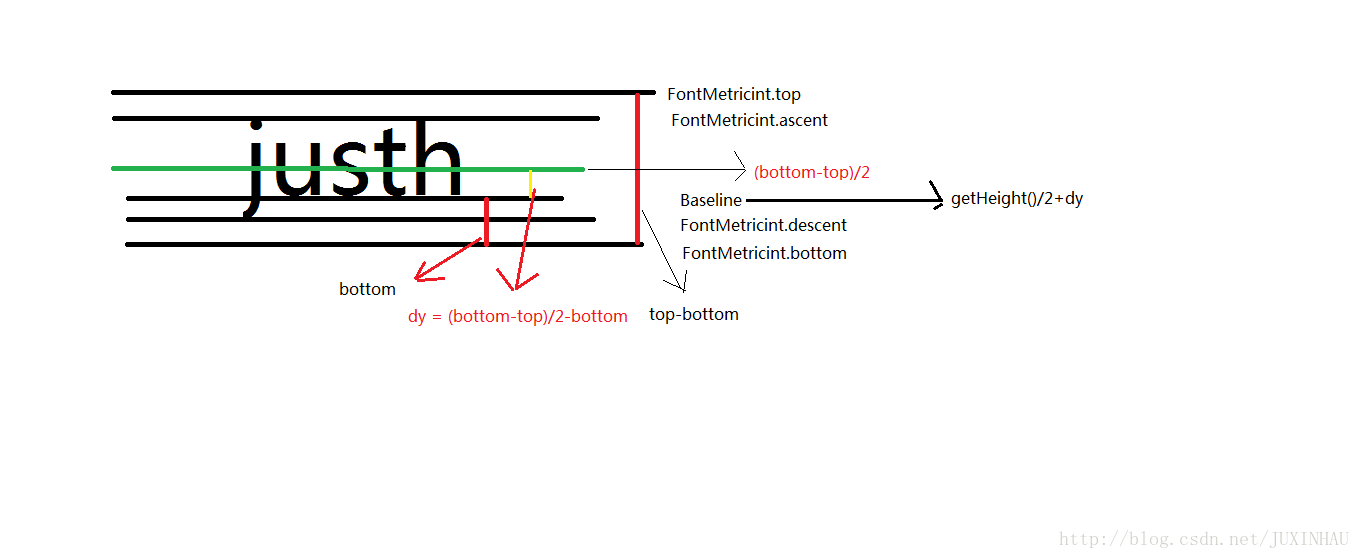
 public class CustomTextView extends View {

    private String mText ;
    private int mTextColor = Color.BLACK;
    private int mTextSize = 15;

    private Paint mPaint;

    /**
     * 在使用构造方法的时候被调用
     * @param context
     */
    public CustomTextView(Context context) {
        this(context,null);
    }

    /**
     * 在使用xml布局文件的时候被调用
     * @param context
     * @param attrs
     */
    public CustomTextView(Context context, @Nullable AttributeSet attrs) {
        this(context, attrs,0);
    }

    /**
     * 在使用xml布局文件 且该布局里面有style的时候被调用
     * @param context
     * @param attrs
     * @param defStyleAttr
     */
    public CustomTextView(Context context, @Nullable AttributeSet attrs, int defStyleAttr) {
        super(context, attrs, defStyleAttr);

        //获取自定义属性
        TypedArray array = context.obtainStyledAttributes(attrs,R.styleable.CustomTextView);
        mText = array.getString(R.styleable.CustomTextView_justhText);
        mTextColor = array.getColor(R.styleable.CustomTextView_justhTextColor,mTextColor);
        mTextSize = array.getDimensionPixelSize(R.styleable.CustomTextView_justhTextSize,dp2px(mTextSize));

        //记得回收
        array.recycle();

        //初始化画笔
        mPaint = new Paint();
        mPaint.setAntiAlias(true);
        mPaint.setColor(mTextColor);
        mPaint.setTextSize(mTextSize);

    }

    @Override
    protected void onMeasure(int widthMeasureSpec, int heightMeasureSpec) {
        super.onMeasure(widthMeasureSpec, heightMeasureSpec);
        int widthMode = MeasureSpec.getMode(widthMeasureSpec);
        int heightMode = MeasureSpec.getMode(heightMeasureSpec);

        //计算宽高
        //1:宽 若给定的宽度为确定的值   则不需要计算  给多少就是多少
        int width = MeasureSpec.getSize(widthMeasureSpec);

        //当给定的值是自适应的时候  则需要自己来计算
        if(widthMode == MeasureSpec.AT_MOST){
            Rect bounds = new Rect();
            mPaint.getTextBounds(mText,0,mText.length(),bounds);
            width = bounds.width() + getPaddingLeft() + getPaddingRight();
        }

        //高度的计算原理和宽度的计算原理一样
        int height = MeasureSpec.getSize(heightMeasureSpec);

        if(heightMode == MeasureSpec.AT_MOST){
            Rect bounds = new Rect();
            mPaint.getTextBounds(mText,0,mText.length(),bounds);
            height = bounds.height() + getPaddingTop() + getPaddingBottom();
        }

        setMeasuredDimension(width,height);
    }

    @Override
    protected void onDraw(Canvas canvas) {
        super.onDraw(canvas);

        //计算基线位置
        Paint.FontMetricsInt fontMetricsInt = mPaint.getFontMetricsInt();
        int dy = (fontMetricsInt.bottom - fontMetricsInt.top)/2 - fontMetricsInt.bottom;
        canvas.drawText(mText,getPaddingLeft(),getHeight()/2 + dy,mPaint);

    }

    private int dp2px(int dp){
        return (int) TypedValue.applyDimension(TypedValue.COMPLEX_UNIT_DIP,dp,getResources().getDisplayMetrics());
    }


}
在这里 有一个很重要的知识点,就是在使用画笔画文字的时候,如何计算文字的基线,下面引入一张图,来说明下:
首先 需要计算出图中dy的值,再通过文字的高度中点加上dy的值,获取的文字基线值,在paint.drawText()中,y左边应该为通过计算出来的基线位置。
最后,运行起来即可!


 1378
1378


 被折叠的 条评论
为什么被折叠?
被折叠的 条评论
为什么被折叠?
 到【灌水乐园】发言


