


Vue组件实例之间的作用域是孤立存在,要让它们之间的信息互通,就必须采用组件的通信方式。
props用于父组件向子组件传达信息
1.静态方式
例如:
<div id="app">
	<my-component message="hello"></my-component>
</div>
<script>
Vue.component('my-component',{
   template:"<h1>{{message}}</h1>",
   props:['message']
});
new Vue({
    el: "#app",
});
</script>
props以数组的形式发出自己所需要的信息(至于父亲给不给,就由父亲说了算),父作用域给予回应,将message=‘hello’回应回去,儿子得到自己想要的,然后展现在html结构中;
2.动态获取数据
子组件要得到父亲口袋里面的东西(实例里面的数据),必须通过v-bind类似于绑定结构属性的方式发送给子组件;
例如:
<div id="app">
    <my-component v-bind:message="message"></my-component>
</div>
<script>
    Vue.component('my-component',{
       template:"<div><h1 v-for='(val,key,index) in message'>{{val}}---{{key}}---{{index}}</h1></div>",
       props:['message']
    });
    new Vue({
        el: "#app",
        data:{
            message:{name:"zhangsan",sex:"man",job:"science"}
        }
    });
</script>
渲染结果为:
<div id="app">
   <div>
     <h1>zhangsan---name---0</h1>
     <h1>man---sex---1</h1>
     <h1>science---job---2</h1>
   </div>
</div>
效果为:

注意:用v-for一定要写个外层标签包着v-for,因为大哥只能有一个,不能写并行标签
当然也可以传递方法给子组件:
<div id="app">
    <my-component v-bind:test="test"></my-component>
</div>
<script>
    Vue.component('my-component',{
       template:"<button @click='test'>{{btn}}</button>",
       props:['test'],
        data:function(){
           return {
               btn:"按钮"
           }
        }
    });
    new Vue({
        el: "#app",
        methods:{
            test:function(){
                alert(1)
            }
        }
    });
</script>
如果传递过来的方法中带有父组件里面的属性,也可以用,例如:
<div id="app">
    <my-component v-bind:test="test"></my-component>
</div>
<script>
    Vue.component('my-component',{
       template:"<button @click='test'>{{btn}}</button>",
       props:['test'],
        data:function(){
           return {
               btn:"按钮"
           }
        }
    });
    new Vue({
        el: "#app",
        data:{
            message:"hello,world"
        },
        methods:{
            test:function(){
                alert(this.message)
            }
        }
    });
</script>
弹出框显示hello, world:

由此我们可以得出:父组件传递给子组件的是一个引用地址,但是这个引用是单向的,只能父组件改变的时候子组件获得的信息也会发生变化,但是子组件不可以去更改父组件传递过来的值,但是可以去加工
例如:
<div id="app">
    <my-component v-bind:message="message"></my-component>
</div>
<script>
    Vue.component('my-component',{
       template:"<button @click='f'>{{btn}}</button>",
       props:['message'],
        data:function(){
           return {
               btn:"按钮"
           }
        },
        methods:{
            f:function(){
                alert(this.message+"  "+"i am god")
            }
        }
    });
    new Vue({
        el: "#app",
        data:{
            message:"hello,world"
        }
    });
</script>
弹出框显示:hello,world i am god

例如:
<div id="app">
    <input type="text" v-model="message">
    <my-component v-bind:message="message"></my-component>
</div>
<script>
    Vue.component('my-component', {
        template: "<div><button @click='reverse'>{{btn}}</button><h1>{{message1}}</h1></div>",
        props: ['message'],
        data: function () {
            return {
                message1: "",
                btn: "反转"
            }
        },
        methods: {
            reverse: function () {
                this.message1 = this.message.split('').reverse().join('')
            }
        }
    });
    new Vue({
        el: "#app",
        data: {
            message: "我爱北京"
        }
    });
</script>
显示结果:

props可以用来规定自己需要的数据类型,此时props将需求以对象的形式呈现,儿子开始挑剔了,但是父亲给他的不符合要求时候,它便会报错,但是毕竟是父亲给的,所以还是会渲染出来
例如:
<div id="app">
    <my-component v-bind:message="message"></my-component>
</div>
<script>
    Vue.component('my-component',{
       template:"<h1>{{message}}</h1>",
       props:{message:Number},
    });
    new Vue({
        el: "#app",
        data:{
            message:"hello,world"
        }
    });
</script>
显示结果:

关于儿子组件的具体挑剔要求,我直接引个官网文档,就不做过多说明了
Vue.component('example', {
  props: {
    // 基础类型检测 (`null` 意思是任何类型都可以)
    propA: Number,
    // 多种类型
    propB: [String, Number],
    // 必传且是字符串
    propC: {
      type: String,
      required: true
    },
    // 数字,有默认值
    propD: {
      type: Number,
      default: 100
    },
    // 数组/对象的默认值应当由一个工厂函数返回
    propE: {
      type: Object,
      default: function () {
        return { message: 'hello' }
      }
    },
    // 自定义验证函数
    propF: {
      validator: function (value) {
        return value > 10
      }
    }
  }
})
emit与emit与on,关于这一对兄弟,接触过angular.js和react的应该都很熟悉,emit是发射的意思,emit是发射的意思,on 为监听,主要用于子组件向父组件传递信号,当然,儿子广播出去,父亲听不听就是父亲的事情了
例如:
<body>
<div id="app">
<h1>{{a}}</h1>
<my-component v-on:ok="add"></my-component>
</div>
<script>
Vue.component('my-component', {
template: "<button @click='add1'>{{btn}}</button>",
data:function(){
return {
i:10,
btn:"点击"
}
},
methods:{
add1:function(){
this.i++;
this.$emit("ok")
}
}
});
new Vue({
el: "#app",
data: {
a:0
},
methods:{
add:function(){
this.a++
}
}
});
</script>
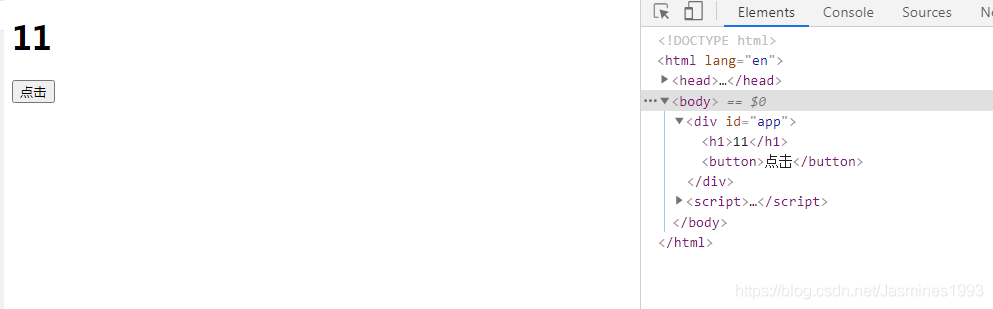
</body>显示如下:

父亲在监控ok,每当听到儿子通过$emit发送过来ok时候,父亲就开始执行自己的add方法
当然儿子也可以向父亲传递信息过去
例如:
<body>
<div id="app">
    <h1>{{a}}</h1>
    <my-component v-on:ok="add"></my-component>
</div>
<script>
    Vue.component('my-component', {
        template: "<button @click='add1'>{{btn}}</button>",
        data:function(){
            return {
                i:10,
                btn:"点击"
            }
        },
        methods:{
            add1:function(){
                this.i++;
                this.$emit("ok",this.i)
            }
        }
    });
    new Vue({
        el: "#app",
        data: {
            a:0
        },
        methods:{
            add:function(e){
                this.a=e
            }
        }
    });
</script>
</body>
显示效果:
儿子将自己的i值传递给父亲,父亲通过接收到的i值将自己的a值更改
监听原生事件的时候,父亲只需要在自己的监听器上加一个炫酷特效.native,儿子不需要去发广播,父亲就会知道,也就是说有些事情只要老爸愿意了解,不需要儿子去告诉,他自己也可以选择知道
例如:
<div id="app">
    <h1>{{a}}</h1>
    <my-component v-on:click.native="add"></my-component>
</div>
<script>
    Vue.component('my-component', {
        template: "<div><button @click='add1'>{{btn1}}</button><button @click='add2'>{{btn2}}</button></div>",
        data:function(){
            return {
                i:10,
                btn1:"点击1",
                btn2:"点击2"
            }
        },
       methods:{
            add1:function(){
                this.i++;
            },
           add2:function(){
                this.i--
           }
       }
    });
    new Vue({
        el: "#app",
        data: {
            a:0
        },
        methods:{
            add:function(){
                this.a++
            }
        }
    });
</script>
显示结果:
除了父子直接可以互相通信外,子组件直接互相通信,需要一个子组件先将信息传递给父组件,父组件再交给另一个子组件
例如:<body>
<div id="app">
<h1>我是父亲且a为:{{a}}</h1>
<child1 v-on:ok="add"></child1>
<child2 v-bind:m="a"></child2>
</div>
<script>
Vue.component('child1', {
template: "<div><h1>我是儿子1号且i为:{{i}}</h1><button @click='go'>点击传值</button></div>",
data:function(){
return {
i:100
}
},
methods:{
go:function(){
this.i+=100;
this.$emit("ok",this.i)
}
}
});
Vue.component('child2',{
template:"<h2>我是儿子2号且m:{{m}}</h2>",
props:['m']
});
new Vue({
el: "#app",
data: {
a:0
},
methods:{
add:function(e){
this.a=e
}
}
});
</script>
</body>显示结果为:

slot分发模式主要用于在组件中间插入标签或者组件之间的相互嵌套
单个内容插入,可以选择用slot标签事先占个位置
例如:
<body>
<div id="app">
   <child><span>slot分发</span></child>
</div>
<script>
    Vue.component('child', {
        template: "<h3>{{message}}<slot></slot></h3>",
        data:function(){
            return {
                message:"我就是:"
            }
        }
    });
    new Vue({
        el: "#app",
    });
</script>
</body>
渲染结果为:
也就是说slot类似于一个插槽,提前站好一个位置,要插入组件中的标签类似于卡,插入提前站好位置的插槽中
多个标签插入,就需要按照名字一一对号入座
例如:
<div id="app">
    <child>
        <h1 slot="card1">我是1号卡片</h1>
        <h1 slot="card2">我是2号卡片</h1>
        <h1 slot="card3">我是3号卡片</h1>
    </child>
</div>
<script>
    Vue.component('child', {
        template: "<div>{{message}}" +
        "<p>hello world</p>"+
        "<slot name='card1'></slot>" +
        "<slot name='card2'></slot>" +
        "<slot name='card3'></slot>" +
        "</div>",
        data:function(){
            return {
                message:"多个卡片插入:"
            }
        }
    });
    new Vue({
        el: "#app",
    });
</script>
渲染结果为:

作用域插槽还是有点抽象的,也就是子组件充当插槽,父组件将内容插在子组件上面,并且子组件将值传递给父组件,父组件用scope="props"来接收子组件传过来的值
<div id="app">
<parent></parent>
</div>
<script>
Vue.component("son",{
template:"<ul><slot name='ww' v-for='item in items' v-bind:text='item.name'></slot></ul>",
data:function(){
return{items:[{name:'张三'},{name:'李四'},{name:"王五"}]
}
}
});
Vue.component("parent",{
template:"<son>" +
"<template scope='props' slot='ww'>" +
"<li>{{props.text}}</li>" +
"</template>" +
"</son>"
});
new Vue({
el:"#app",
})
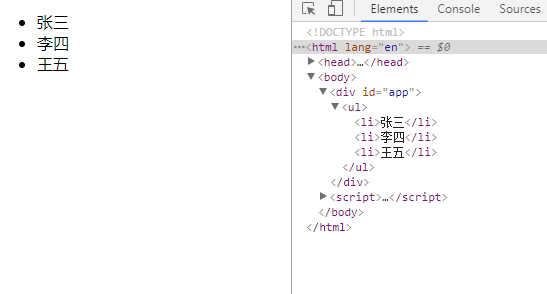
</script>渲染结果为:
例如:
<div id="app">
   <dad></dad>
</div>
<script>
    Vue.component('child', {
       template:"<h3><slot :content='m' name='son'></slot></h3>",
        data:function(){
           return{
               m:"我是子组件传过去的"
           }
        }
    });
    Vue.component("dad",{
       template:"<child><template scope='props' slot='son'><p>{{props.content}}</p></template></child>"
    });
    new Vue({
        el: "#app",
    });
</script>
渲染结果:
动态组件通过component来动态切换组件的内容
例如:
<div id="app">
    <button @click="add1">样式1</button>
    <button @click="add2">样式2</button>
    <button @click="add3">样式3</button><br>
    <component :is="m"></component>
</div>
<script>
    Vue.component("child",{
        template:"<div><button v-for='(val,key) in item' @click='key'>{{val}}</button></div>",
        data:function(){
            return{
                item:{add1:"样式1",add2:"样式2",add3:"样式3"}
            }
        }
    });
    var a1={template:"<h1><i style='color:red'>我是a1</i></h1>"};
    var a2={template:"<h1><b style='color:green'>我是a2</b></h1>"};
    var a3={template:"<h1><del style='color:blue'>我是a3</del></h1>"};
    new Vue({
        el: "#app",
        data:{
            m:"a1"
        },
        components:{
            a1:a1,
            a2:a2,
            a3:a3
        },
        methods:{
            add1:function(){
                this.m='a1'
            },
            add2:function(){
                this.m='a2'
            },
            add3:function(){
                this.m='a3'
            }
        }
    });
</script>
渲染结果为: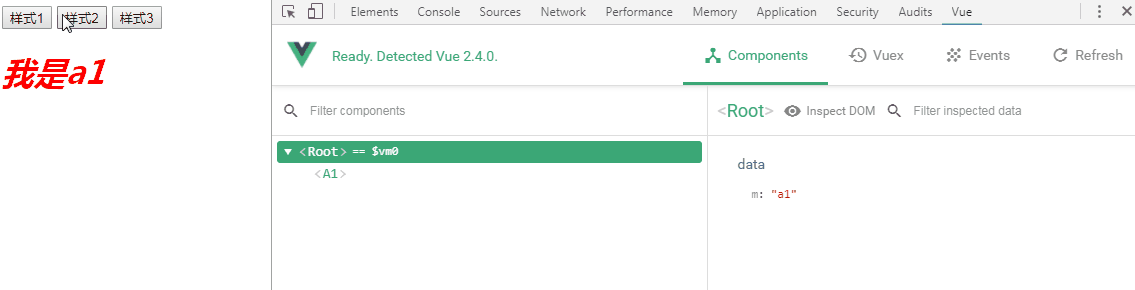
文章出处:https://www.cnblogs.com/douyaer/p/7638176.html
作者:爱编程的douyaer
来源:博客园


 1771
1771


 被折叠的 条评论
为什么被折叠?
被折叠的 条评论
为什么被折叠?
 到【灌水乐园】发言


