


Controller层配置
编写SpringMVC的配置文件
springmvc.xml
<?xml version="1.0" encoding="UTF-8"?>
<beans xmlns="http://www.springframework.org/schema/beans"
    xmlns:xsi="http://www.w3.org/2001/XMLSchema-instance"
    xmlns:mvc="http://www.springframework.org/schema/mvc"
    xmlns:context="http://www.springframework.org/schema/context"
    xmlns:aop="http://www.springframework.org/schema/aop"
    xmlns:tx="http://www.springframework.org/schema/tx"
    xsi:schemaLocation="http://www.springframework.org/schema/beans
    http://www.springframework.org/schema/beans/spring-beans-3.0.xsd
    http://www.springframework.org/schema/mvc
    http://www.springframework.org/schema/mvc/spring-mvc-3.0.xsd
    http://www.springframework.org/schema/context
    http://www.springframework.org/schema/context/spring-context-3.0.xsd
    http://www.springframework.org/schema/aop
    http://www.springframework.org/schema/aop/spring-aop-3.0.xsd
    http://www.springframework.org/schema/tx
    http://www.springframework.org/schema/tx/spring-tx-3.0.xsd ">

    <context:component-scan base-package="com.rl.ecps.controller"/>
    <bean class="org.springframework.web.servlet.view.InternalResourceViewResolver">
        <property name="prefix" value="/WEB-INF/shop/"></property>
        <property name="suffix" value=".jsp"></property>
    </bean>

    <bean id="multipartResolver" class="org.springframework.web.multipart.commons.CommonsMultipartResolver">
        <property name="maxUploadSize" value="1024000"></property>
    </bean>

</beans>
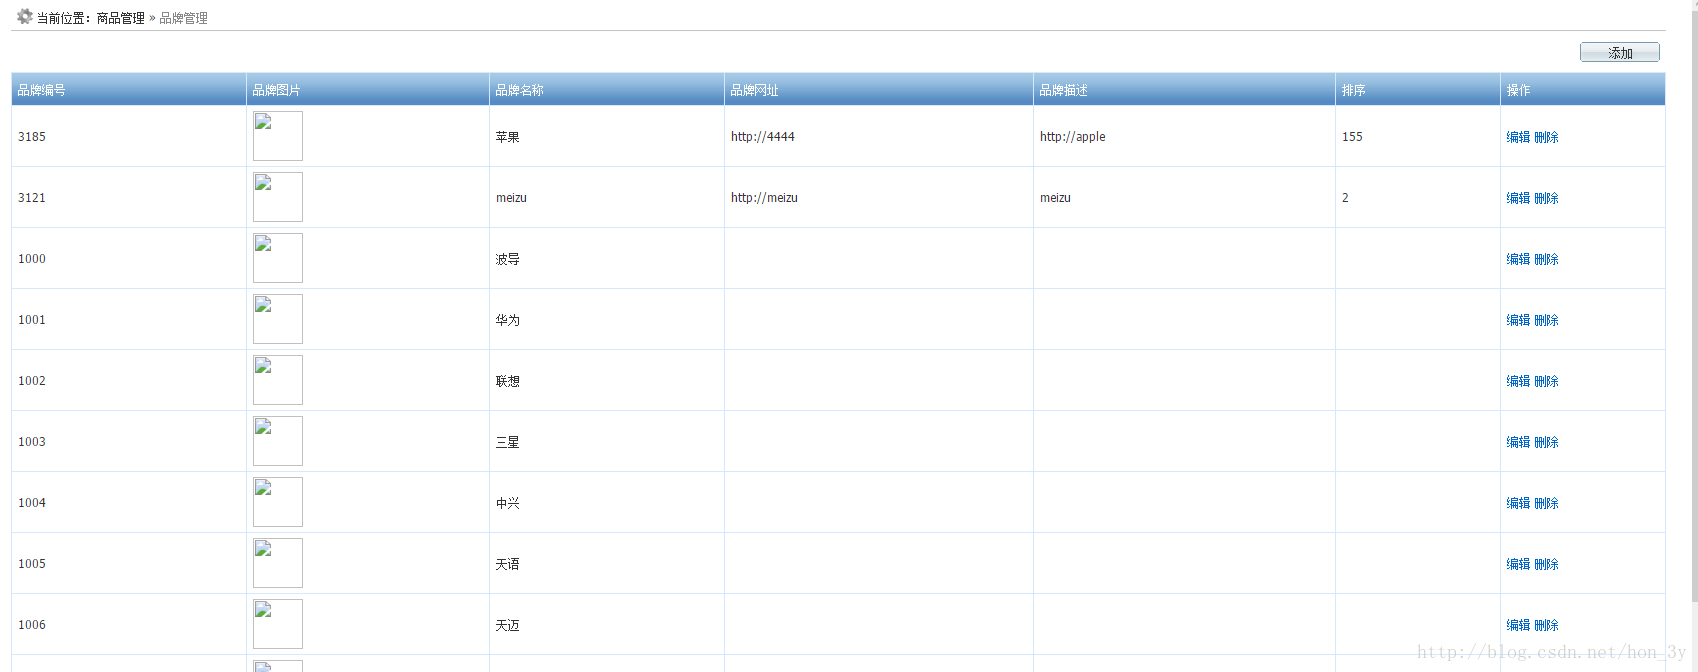
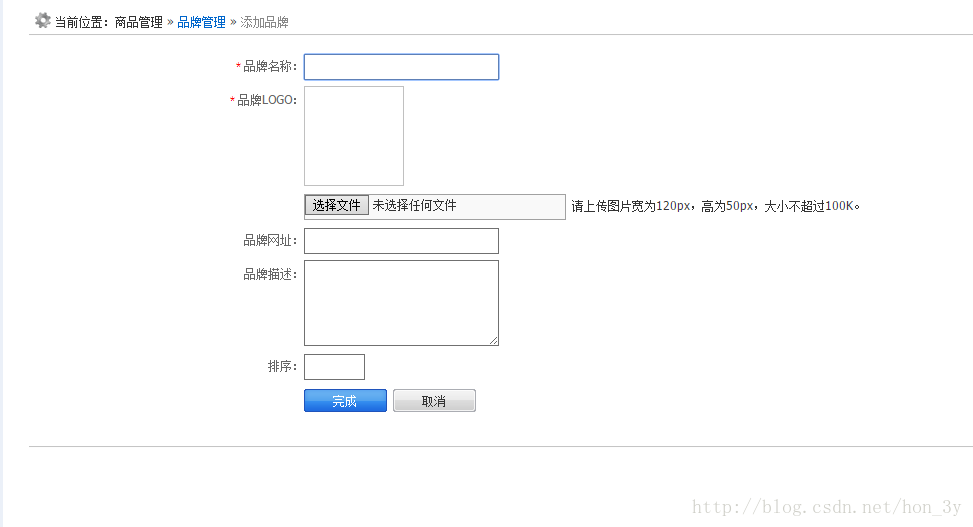
添加品牌
在原型界面上,我们都是一些“死”数据,我们需要将数据库的记录代替这些“死”数据!
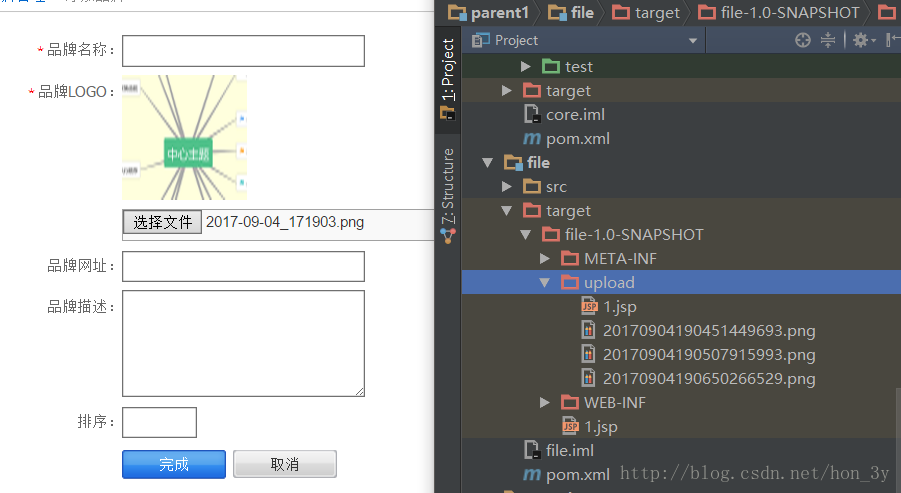
上传图片
服务端console对图片进行上传到我们的图片服务器上,而portal则访问的时候从图片服务器拿到图片…
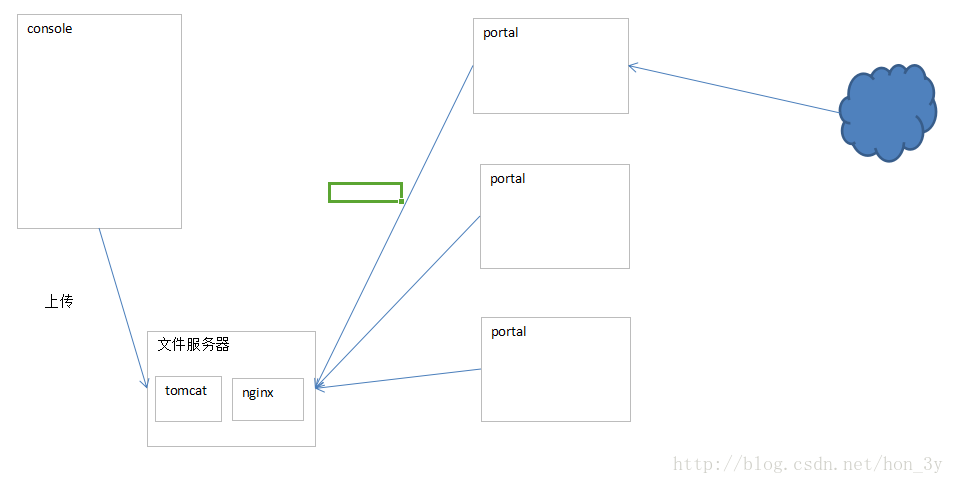
在前面,我们已经搭建了图片服务器了,那我们怎么将console要上传的图片“丢给”图片服务器呢???
上传图片时使用Jersey 客户端 API 调用 REST 风格的 Web 服务, Jersey 1 是一个开源的、可以用于生产环境的 JAX-RS(RESTful Web Services 的 Java API 规范,JSR-311)实现。通过 Jersey 可以很方便的使用 Java 来创建一个 RESTful Web Services。
配置文件上传解析器:
<bean id="multipartResolver" class="org.springframework.web.multipart.commons.CommonsMultipartResolver">
<property name="maxUploadSize" value="1024000"></property>
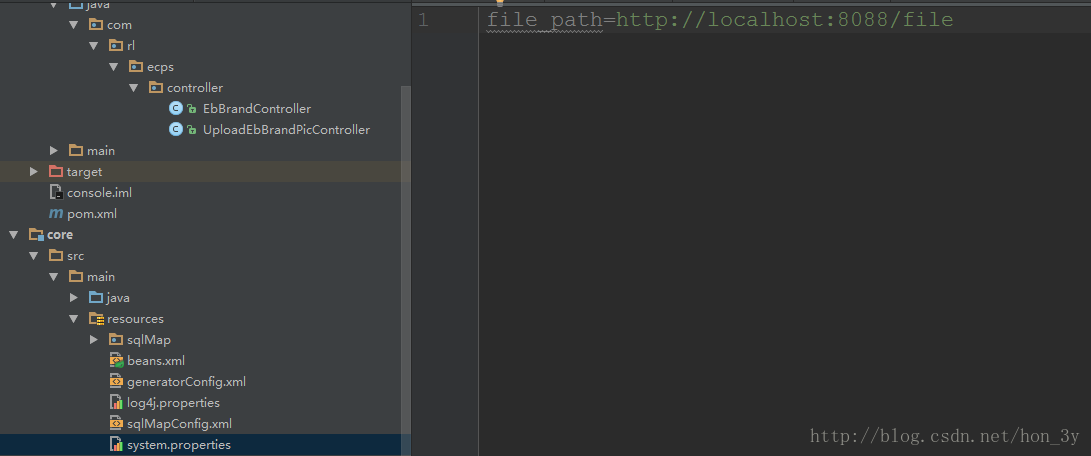
</bean>我们是上传到图片服务器上的,因此需要我们自己配置对应的路径….而这个配置文件应该是写在core的,因为它很有可能是会被重用的。
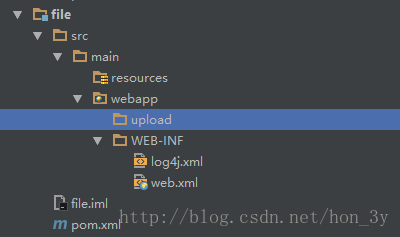
值得注意的是:文件服务器要设置成可写的【默认是只读的】
参考如下博文:
http://blog.csdn.net/hon_3y/article/details/77840532
编写工具类来获取对应的数据
public class ResourcesUtils {
    public static String readProp(String key) {
        InputStream in = ResourcesUtils.class.getClassLoader().getResourceAsStream("system.properties");
        Properties prop = new Properties();
        try {
            prop.load(in);
        } catch (IOException e) {
            e.printStackTrace();
        }

        return prop.getProperty(key);
    }

}
编写处理文件上传的Controller
如果有多个文件的话或者我们不知道上传的input的name,我们可以使用request对象来获取Map,再来获取对应的文件
        //把request转换成复杂request
        MultipartHttpServletRequest mr = (MultipartHttpServletRequest) request;
        //获得文件
        Map<String, MultipartFile> map = mr.getFileMap();
        Set<String> set = map.keySet();
        Iterator<String> it = set.iterator();
        String fileInputName = it.next();
MultipartFile mf = map.get(fileInputName);而我们现在是知道input的name的,因此,这里我就直接使用MultipartFile对象来获取了。
@Controller
@RequestMapping("/upload")
public class UploadEbBrandPicController {
    @RequestMapping("/uploadPic.do")
    public void uploadPic(@RequestParam MultipartFile imgsFile, Writer writer) throws IOException {

        //上传文件的名字是不能相同的,因此我们设置一下文件的名称
        String fileName = new SimpleDateFormat("yyyyMMddHHmmssSSS").format(new Date());
        Random random = new Random();
        for(int i = 0; i < 3; i++){
            fileName = fileName + random.nextInt(10);
        }
        //拿到该文件的原始名称
        String originalFilename = imgsFile.getOriginalFilename();

        //获取该文件的后缀
        String suffix = originalFilename.substring(originalFilename.lastIndexOf("."));

        /***
         * 绝对路径是留给页面src属性做显示的
         * 相对路径是保存在数据库中,通过input来进行提交的。
         */
        //获得上传文件的绝对路径
        String realPath = ResourcesUtils.readProp("file_path")+"/upload/"+fileName+suffix;
        //获得相对路径
        String relativePath = "/upload/"+fileName+suffix;

        //创建jersy的客户端
        Client client = Client.create();
        //创建web资源对象
        WebResource wr = client.resource(realPath);

        //拿到文件的二进制数据,使用web资源对象上传
        byte[] bytes = imgsFile.getBytes();
        wr.put(bytes);

        //使用JSON格式把我们的绝对路径和相对路径返回出去。
        JSONObject jo = new JSONObject();
        jo.accumulate("realPath", realPath);
        jo.accumulate("relativePath", relativePath);
        String result = jo.toString();
        writer.write(result);
    }
}
在前端我们是使用ajax进行异步上传文件的,当图片选项修改时,我们就触发事件把图片上传到我们的图片服务器上了,。
function submitUpload(){
            var opt = {
                //重新指定form的action的值
                url:"${path}/upload/uploadPic.do",
                type:"post",
                dateType:"json",
                success:function(responseText){
                    //解决多余的字符串数据导致无法解析JSON的问题【另外的博文有写】
                    var jsonObj = $.parseJSON(responseText.replace(/<.*?>/ig,""));
                    $("#imgsImgSrc").attr("src",jsonObj.realPath);
                    $("#imgs").val(jsonObj.relativePath);
                },
                error:function(){
                    alert("系统错误");
                }
            };
            $("#form111").ajaxSubmit(opt);
        }
成功把图片上传到图片服务器中了
数据校验
添加商品的界面是这样子的,需要我们进行校验
而校验我们有两种方式:
- 前台使用JS校验
- 后台再进行校验
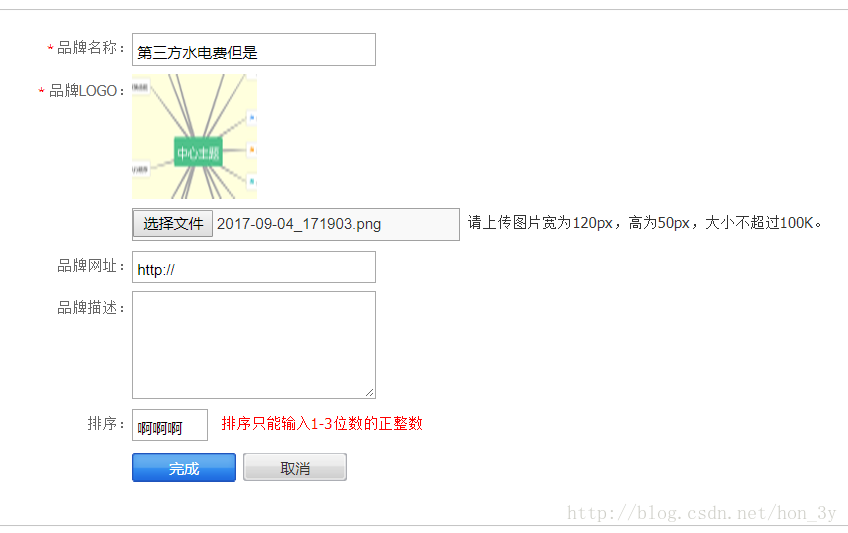
我们是这样做的:在输入框中自定义了几个属性:reg2表示一定要校验的,reg1表示可校验可不校验。如果reg1有数据的话,那么也要校验
<div class="edit set">
<p><label><samp>*</samp>品牌名称:</label><input type="text" id="brandName" name="brandName" class="text state" reg2="^[a-zA-Z0-9\u4e00-\u9fa5]{1,20}$" tip="必须是中英文或数字字符,长度1-20"/>
<span></span>
</p>
<p><label class="alg_t"><samp>*</samp>品牌LOGO:</label><img id='imgsImgSrc' src="" height="100" width="100" />
</p>
<p><label></label><input type='file' size='27' id='imgsFile' name='imgsFile' class="file" onchange='submitUpload()' /><span id="submitImgTip" class="pos">请上传图片宽为120px,高为50px,大小不超过100K。</span>
<input type='hidden' id='imgs' name='imgs' value='' reg2="^.+$" tip="亲!您忘记上传图片了。" />
</p>
<p><label>品牌网址:</label><input type="text" name="website" class="text state" maxlength="100" tip="请以http://开头" reg1="http:///*"/>
<span class="pos"> </span>
</p>
<p><label class="alg_t">品牌描述:</label><textarea rows="4" cols="45" name="brandDesc" class="are" reg1="^(.|\n){0,300}$" tip="任意字符,长度0-300"></textarea>
<span class="pos"> </span>
</p>
<p><label>排序:</label><input type="text" id="brandSort" reg1="^[1-9][0-9]{0,2}$" tip="排序只能输入1-3位数的正整数" name="brandSort" class="text small"/>
<span class="pos"> </span>
</p>
<p><label> </label><input type="submit" name="button1" d class="hand btn83x23" value="完成" /><input type="button" class="hand btn83x23b" id="reset1" value='取消' onclick="backList('${backurl}')"/>
</p>
</div>首先,我们先来写前台的校验…
当该表单提交的时候,我们就对表单的数据进行校验
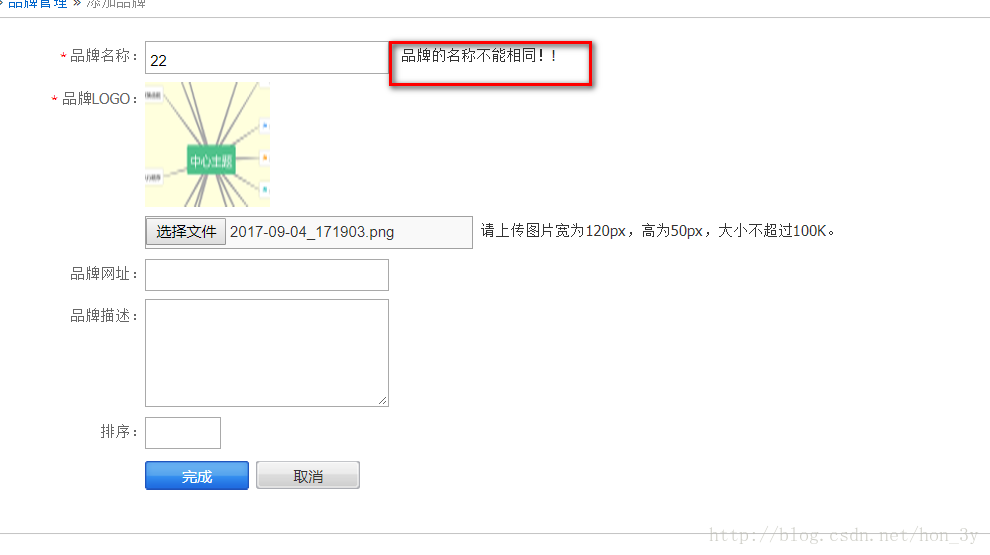
检测每个必填的input输入框数据,如果每个必填的输入框数据都符合内容,那么检测品牌的名字是否重复!
        $(function () {
            $("#form111").submit(function () {
                /*设置标识量为true,如果不校验不通过设置为false*/
                var isSubmit = true;
                /*得到每个必填的input输入框数据*/
                $("[reg2]").each(function () {
                    var tip = $(this).attr("tip");
                    var regStr = $(this).attr("reg2");
                    /*拿到js校验的对象*/
                    var reg = new RegExp(regStr);
                    var value = $.trim($(this).val());

                    /*校验输入的值与校验规则是否匹配*/
                    if (!reg.test(value)) {
                        /*把错误的信息填充到span中*/
                        $(this).next("span").html("<font color='red'>" + tip + "</font>");
                        isSubmit = false;
                        //中断each使用return false,不能使用return;和break;
                        return false;
                    } else {
                        //必填的数据规则都通过了,那么判断品牌名字是否有重复的【后台校验】
                        var inputName = $(this).attr("name");
                        if (inputName == "brandName") {
                            $.ajax({
                                url: "${path}/brand/validateBrandName.do",
                                type:"post",
                                async:false,
                                data:{
                                    brandName:value
                                },
                                dataType:"text",
                                success: function (responseTest) {
                                    if (responseTest == "no") {
                                        $("#brandNameSpan").html("品牌的名称不能相同!!");
                                        isSubmit = false;
                                        return false;
                                    }else{
                                        $(this).next("span").html("");
                                    }
                                },
                                error: function () {
                                    alert("系统错误");
                                }
                            });
                        }
                    }
                });

                return isSubmit;
            });
        });
检测名字是否相同的controller方法
    @RequestMapping("/validateBrandName.do")
    public void validateBrandName(String brandName, Writer out) throws IOException {

        //表示成功
        String responseTest = "yes";

        //根据名字去查找数据库
        List<EbBrand> brands = ebBrandService.selectBrandByName(brandName);
        //如果返回的集合有Brand了,那么就证明数据库有相同的品牌了
        if (brands != null && brands.size() > 0) {
            responseTest = "no";
        }

        out.write(responseTest);

    }
如果品牌名称相同,那么不允许提交!
对于非必填的数据项,如果用户填了数据的话,那么就必须按照我们的规则来写
                /*非必填的数据,如果填了就必须按照规则*/
                $("[reg1]").each(function () {
                    var tip = $(this).attr("tip");
                    var regStr = $(this).attr("reg1");
                    /*拿到js校验的对象*/
                    var reg = new RegExp(regStr);
                    var value = $.trim($(this).val());

                   /*如果用户填了数据,那么就需要按照规则*/
                   if(value!=null && value!="") {
                       if (!reg.test(value)) {
                           /*把错误的信息填充到span中*/
                           $(this).next("span").html("<font color='red'>" + tip + "</font>");
                           isSubmit = false;
                           //中断each使用return false,不能使用return;和break;
                           return false;
                       }else{
                           //如果改正了,那么就把对应的错误提示清空了。
                           $(this).next("span").html("");
                       }
                   }
                });
为了达到更好的用户体验,我们应该在光标焦点离开的时候就进行一次校验!
逻辑和上边是一样的,只不过我们使用的是blur方法,而在表单验证的时候使用的是each遍历每一个输入框罢了。
            //光标失去焦点的校验
            $("#form111").find("[reg2]").blur(function () {
                var tip = $(this).attr("tip");
                var regStr = $(this).attr("reg2");
                /*拿到js校验的对象*/
                var reg = new RegExp(regStr);
                var value = $.trim($(this).val());

                /*校验输入的值与校验规则是否匹配*/
                if (!reg.test(value)) {
                    /*把错误的信息填充到span中*/
                    $(this).next("span").html("<font color='red'>" + tip + "</font>");
                } else {
                    //必填的数据规则都通过了,那么判断品牌名字是否有重复的【后台校验】
                    var inputName = $(this).attr("name");
                    if (inputName == "brandName") {
                        $.ajax({
                            url: "${path}/brand/validateBrandName.do",
                            type: "post",
                            async: false,
                            data: {
                                brandName: value
                            },
                            dataType: "text",
                            success: function (responseTest) {
                                if (responseTest == "no") {
                                    $("#brandNameSpan").html("品牌的名称不能相同!!");
                                } else {
                                    //如果改正了,那么就把对应的错误提示清空了。
                                    $(this).next("span").html("");
                                }
                            },
                            error: function () {
                                alert("系统错误");
                            }
                        });
                    }
                }
            });

            //失去焦点校验
            $("#form111").find("[reg1]").blur(function () {
                var tip = $(this).attr("tip");
                var regStr = $(this).attr("reg1");
                /*拿到js校验的对象*/
                var reg = new RegExp(regStr);
                var value = $.trim($(this).val());
                /*如果用户填了数据,那么就需要按照规则*/
                if (value != null && value != "") {
                    if (!reg.test(value)) {
                        /*把错误的信息填充到span中*/
                        $(this).next("span").html("<font color='red'>" + tip + "</font>");
                    } else {
                        //如果改正了,那么就把对应的错误提示清空了。
                        $(this).next("span").html("");
                    }
                }
            });


 被折叠的 条评论
为什么被折叠?
被折叠的 条评论
为什么被折叠?
 到【灌水乐园】发言


