


# 介绍
SpringMVC是一款Web MVC框架。它跟Struts框架类似,是目前主流的Web MVC框架之一。
本文通过实例来介绍SpringMVC的入门知识。
# 实例
本文所写的实例是一个员工的CRUD demo。用idea编写,基于maven, Web框架使用SpringMVC,视图采取Freemarker技术,数据库使用MySQL,用Hibernate4存储数据。
本文关于其他一些内容 如maven的pom文件内容,spring常规bean,事务,数据源的配置等不会详细描述,可自行下载代码查看
项目文件目录如下:
首先在web.xml中配置入口servlet
<servlet><servlet-name>dispatcher</servlet-name><servlet-class>org.springframework.web.servlet.DispatcherServlet</servlet-class><init-param><param-name>contextConfigLocation</param-name><param-value>classpath:springConfig/dispatcher-servlet.xml</param-value></init-param><load-on-startup>1</load-on-startup></servlet><servlet-mapping><servlet-name>dispatcher</servlet-name><url-pattern>/</url-pattern></servlet-mapping>
注意有个初始参数 contextConfigLocation, 顾名思义 上下文配置文件路径
还有另外一个注意点,这个servlet对应的url-pattern最好写成 "/", 不要写成 "/*"。
在dispatcher-servlet.xml中主要是配置springmvc的一些Controller的初始化,静态文件的映射策略,视图的配置等。
然后开始编写Controller类(类似Struts2中的Action)
首先来看一个主页的Controller:
@Controller@RequestMapping("/")public class IndexController {@RequestMappingpublic ModelAndView index() {ModelAndView view = new ModelAndView("index");view.addObject("welcome", "hello");return view;}}
这里有2个注解:@Controller和@RequestMapping
@Controller注解就是表明这是一个Controller,且会被spring容器进行初始化。
dispatcher-servlet.xml中的扫描包配置语句:
<context:component-scan base-package="org.format.demo.controller" />这条语句是扫描org.format.demo.controller下被@Controller(还有其他的如
@Component, @Service, @Repository)注解的那些类,并进行实例化。
@RequestMapping 顾名思义,就是请求映射。
我们看到@RequestMapping("/")中的"/"的意义就是contextPath后面的路径;也就是 http://host:port/contextPath 后面的路径。 (这里不一定都要以"/"开头,比如 "/employee", 我们可以写成 "employee" )
ModelAndView对象就是一个带模型的视图对象。我们看到IndexController返回了1个index名称的ModelAndView对象。
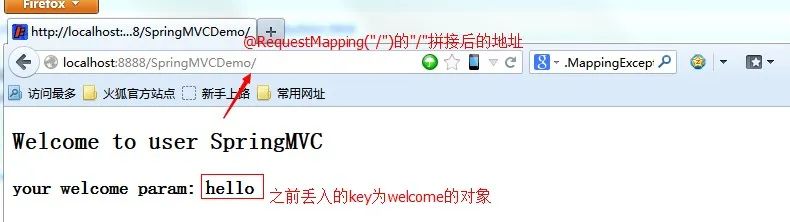
addObject对象就类似HttpServletRequest的setAttribute对象,也就是视图里面丢数据。我们看到丢了一个key为welcome的对象。
最后的视图代码:
<!DOCTYPE html><html><head lang="en"><meta charset="UTF-8"><title></title></head><body><h2>Welcome to user SpringMVC</h2><h3>your welcome param: ${welcome}</h3></body></html>
我们看到用了el表达式得到了丢入的数据welcome,也就是hello。因此,最终生成的页面及地址如下:
最后SpringMVC会通过配置文件中的视图对象拼接成最终的视图地址。
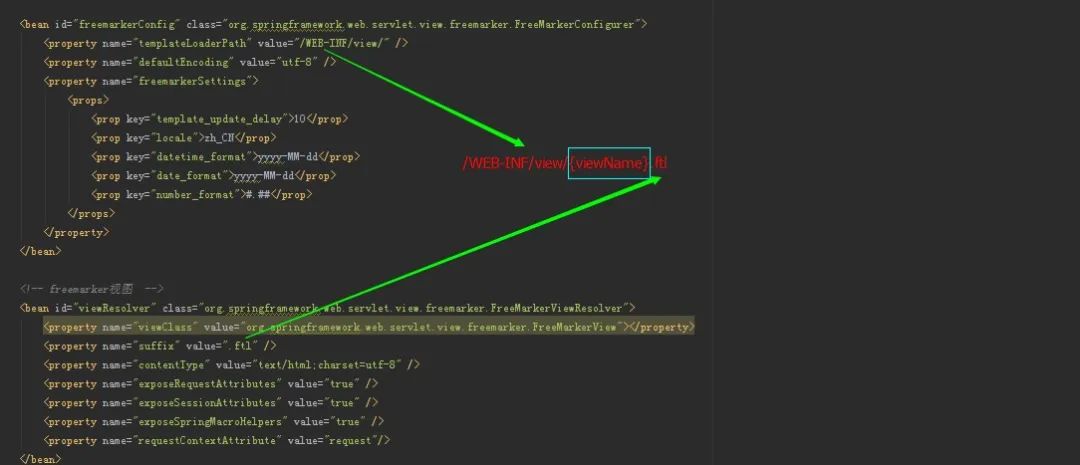
图中viewName也就是返回的ModelAndView中的viewName 即index。 因此,最终的视图路径为 /WEB-INF/view/index.ftl。
下面在来看一个员工操作的Controller代码:
@Controller@RequestMapping(value = "/employee")public class EmployeeController {@Autowiredprivate IEmployeeService employeeService;@Autowiredprivate IDeptService deptService;@RequestMappingpublic ModelAndView index() {ModelAndView view = new ModelAndView("employee/list");List<Employee> employees = employeeService.list();view.addObject("list", employees);return view;}@RequestMapping(method = RequestMethod.POST, value = "/delete/{employeeId}")@ResponseBodypublic String delete(@PathVariable Integer employeeId) {employeeService.delete(employeeId);return "success";}@RequestMapping(method = RequestMethod.GET, value = "/add")public ModelAndView add(ModelAndView view) {view.setViewName("employee/form");view.addObject("depts", deptService.listAll());return view;}@RequestMapping(method = RequestMethod.GET, value = "/detail/{employeeId}")public ModelAndView detail(@PathVariable Integer employeeId, ModelAndView view) {view.setViewName("employee/form");view.addObject("employee", employeeService.getById(employeeId));view.addObject("depts", deptService.listAll());return view;}@RequestMapping(method = RequestMethod.POST, value = "/update")public String add(Employee employee) {if(employee.getDept().getId() == null) {employee.setDept(null);}employeeService.saveOrUpdate(employee);return "redirect:/employee/";}}
这里多了几个新的内容
1. @RequestMapping注解的作用位置
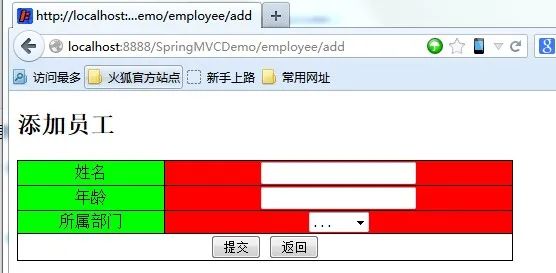
@RequestMapping可以作用在类名上,也可以作用在方法上。如果都有, 产生作用的路径是类名上的路径+方法上的路径。比如EmployeeController的add方法,最终起作用的路径是 http://host:port/contextPath/employee/add
2. @RequestMapping注解的method参数
method参数表示的HTTP请求的方式。常见的有GET,PUT,POST,DELETE等。若请求的方法与后台编写的方法不一致,会出现HTTP 405错误。
3. @PathVariable注解
这是一种基于RESTFUL的注解。我们看到detail方法的@RequestMapping的value值/detail/{employeeId},参数中加入了一个@PathVariable employeeId。这样起作用的路径就根据employee的Id,即每个员工都有独立的一个URI路径资源。符合RESTFUL架构。
4. Controller的方法参数
Controller的方法访问非常灵活。比如Employee有id,name,age等属性。只要我们在前台传入name为id,name,age这3个参数,并且接受的方法有一个Employee对象参数,SpringMVC会自动把3个注入到这个对象中。还有其他一些Integer,Long参数等,SpringMVC会默认帮我们自动转化。同时参数也可以丢入一些HttpServletRequest, HttpServletResponse, HttpServletSession对象,SpringMVC会自动帮我们注入。这点非常方便。
5. 不带参数基于方法的@RequestMapping会被当然基于类的@RequestMapping所作用的地址的默认进入的方法
 add方法。get请求
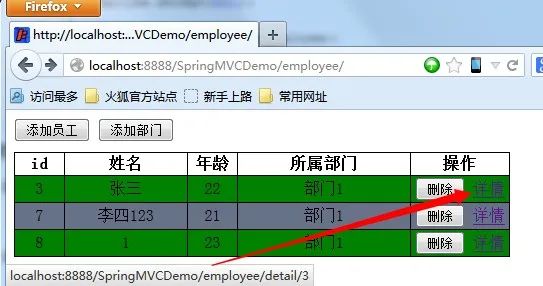
detail方法。RESTFUL风格
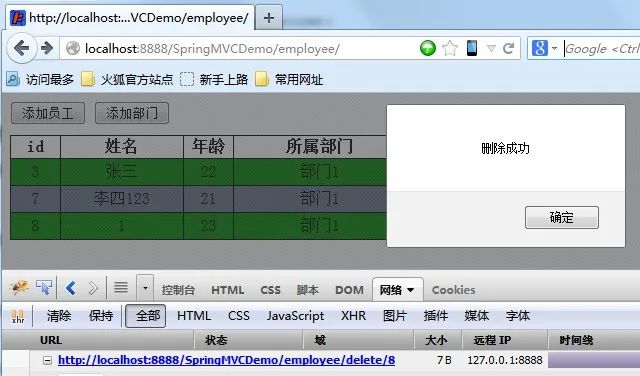
delete方法。RESTFUL风格
# 总结
SpringMVC是一个Web MVC框架。它的特点是轻便,与Spring无缝整合,上手简单。它的易用性、可扩展性、安全性均非常理想。
来源:微信公众号
作者:javatiku


 344
344


 被折叠的 条评论
为什么被折叠?
被折叠的 条评论
为什么被折叠?
 到【灌水乐园】发言


