


使用的工具版本信息
- Centos 7.7
- Docker 19.03.12
- Kubernetes 1.17.0
- Flannel 0.7.1
安装Docker和kubeadm(整个这部分master和各node都需要安装)
1、用kubeadm的安装方式简单,所以采用这种方式。
2、Kubernetes只装了个master,单我会指明哪些是master和其他node都要用到的命令。
目录
系统环境配置
添加主机名
cat /etc/hosts
#添加内容
#本机ip
10.10.63.201 master
关闭防火墙
systemctl stop firewalld
systemctl disable firewalld
禁用SELINUX:
setenforce 0
vi /etc/selinux/config
SELINUX=disabled
创建/etc/sysctl.d/k8s.conf文件,添加如下内容:
vi /etc/sysctl.d/k8s.conf
net.bridge.bridge-nf-call-ip6tables = 1
net.bridge.bridge-nf-call-iptables = 1
net.ipv4.ip_forward = 1
使其生效
modprobe br_netfilter
sysctl -p /etc/sysctl.d/k8s.conf
安装kube-proxy会用到的ipvs
vi /etc/sysconfig/modules/ipvs.modules
#!/bin/bash
modprobe -- ip_vs
modprobe -- ip_vs_rr
modprobe -- ip_vs_wrr
modprobe -- ip_vs_sh
modprobe -- nf_conntrack_ipv4
使其生效
chmod 755 /etc/sysconfig/modules/ipvs.modules
bash /etc/sysconfig/modules/ipvs.modules
lsmod | grep -e ip_vs -e nf_conntrack_ipv4
配置成功将看到:
[root@node1 ~]# lsmod | grep -e ip_vs -e nf_conntrack_ipv4
nf_conntrack_ipv4      15053  10
nf_defrag_ipv4         12729  1 nf_conntrack_ipv4
ip_vs_sh               12688  0
ip_vs_wrr              12697  0
ip_vs_rr               12600  0
ip_vs                 145497  6 ip_vs_rr,ip_vs_sh,ip_vs_wrr
nf_conntrack          133095  9 ip_vs,nf_nat,nf_nat_ipv4,nf_nat_ipv6,xt_conntrack,nf_nat_masquerade_ipv4,nf_conntrack_netlink,nf_conntrack_ipv4,nf_conntrack_ipv6
libcrc32c              12644  4 xfs,ip_vs,nf_nat,nf_conntrack
安装ipvs用到的软件包和管理工具
yum install ipset
yum install ipvsadm
安装Docker
yum install -y yum-utils device-mapper-persistent-data lvm2
yum-config-manager --add-repo \
    https://download.docker.com/linux/centos/docker-ce.repo
查看最新的Docker版本
yum list docker-ce.x86_64  --showduplicates |sort -r
docker-ce.x86_64            3:19.03.9-3.el7                    docker-ce-stable
docker-ce.x86_64            3:19.03.8-3.el7                    docker-ce-stable
docker-ce.x86_64            3:19.03.7-3.el7                    docker-ce-stable
docker-ce.x86_64            3:19.03.6-3.el7                    docker-ce-stable
docker-ce.x86_64            3:19.03.5-3.el7                    docker-ce-stable
docker-ce.x86_64            3:19.03.4-3.el7                    docker-ce-stable
docker-ce.x86_64            3:19.03.3-3.el7                    docker-ce-stable
docker-ce.x86_64            3:19.03.2-3.el7                    docker-ce-stable
docker-ce.x86_64            3:19.03.1-3.el7                    docker-ce-stable
docker-ce.x86_64            3:19.03.12-3.el7                   docker-ce-stable
docker-ce.x86_64            3:19.03.11-3.el7                   docker-ce-stable
docker-ce.x86_64            3:19.03.10-3.el7                   docker-ce-stable
安装新的Docker并启动
yum makecache fast

yum install -y --setopt=obsoletes=0 docker-ce-18.09.7-3.el7

systemctl start docker
systemctl enable docker
修改docker cgroup driver为systemd
vi /etc/docker/daemon.json

{
  "exec-opts": ["native.cgroupdriver=systemd"]
}
重启docker
systemctl restart docker查看一下是否修改成功
docker info | grep Cgroup
Cgroup Driver: systemd
安装kubeadm和kubelet
添加yum源,国内源
vi /etc/yum.repos.d/kubernetes.repo
添加如下内容
[kubernetes]
name=Kubernetes
baseurl=https://mirrors.aliyun.com/kubernetes/yum/repos/kubernetes-el7-x86_64
enabled=1
gpgcheck=1
repo_gpgcheck=1
gpgkey=https://mirrors.aliyun.com/kubernetes/yum/doc/yum-key.gpg https://mirrors.aliyun.com/kubernetes/yum/doc/rpm-package-key.gpg
安装
yum makecache fast
yum install -y kubelet-1.17.0 kubeadm-1.17.0 kubectl-1.17.0
关闭swap分区
swapoff -avi /etc/fstab
注释掉swap的那一行
# Created by anaconda on Tue Jun 11 22:47:09 2019
#
# Accessible filesystems, by reference, are maintained under '/dev/disk'
# See man pages fstab(5), findfs(8), mount(8) and/or blkid(8) for more info
#
/dev/mapper/centos-root / xfs defaults 0 0
UUID=564e4172-ea50-4676-8e80-3f94a97c9b62 /boot xfs defaults 0 0
/dev/mapper/centos-home /home xfs defaults 0 0
#/dev/mapper/centos-swap swap swap defaults 0 0vi /etc/sysctl.d/k8s.conf
添加一行
vm.swappiness=0sysctl -p /etc/sysctl.d/k8s.conf再配置kubelet的配置去掉这个限制
vi /etc/sysconfig/kubelet
KUBELET_EXTRA_ARGS=--fail-swap-on=false
启动kubeadm的服务kubelet.service
systemctl enable kubelet.service安装Kubernetes(使用kubeadm)
拉取kubernetes所需镜像
vi /home/docker_pull_kube.sh
写入如下内容:用kubeadm config images list 先确认可用版本

#! /bin/bash
images=(
    kube-apiserver:v1.17.0
    kube-controller-manager:v1.17.0
    kube-scheduler:v1.17.0
    kube-proxy:v1.17.0
    pause:3.2
    etcd:3.4.3-0
    coredns:1.6.5
)
for imageName in ${images[@]} ; do
    docker pull registry.cn-hangzhou.aliyuncs.com/google_containers/$imageName
    docker tag registry.cn-hangzhou.aliyuncs.com/google_containers/$imageName k8s.gcr.io/$imageName
done
bash /home/docker_pull_kube.sh创建一个安装配置文件
vi /home/kubeadm.yaml写入如下内容:
apiVersion: kubeadm.k8s.io/v1beta2
kind: InitConfiguration
localAPIEndpoint:
  advertiseAddress: 10.10.63.201
  bindPort: 6443
nodeRegistration:
  taints:
  - effect: PreferNoSchedule
    key: node-role.kubernetes.io/master
---
apiVersion: kubeadm.k8s.io/v1beta2
kind: ClusterConfiguration
kubernetesVersion: v1.17.0
networking:
  podSubnet: 10.244.0.0/16
安装部署kubernetes
## 如果安装的服务器为一核服务器需要添加 “--ignore-preflight-errors=NumCPU”
kubeadm init --config kubeadm.yaml --ignore-preflight-errors=Swap
运行结果如下:
[init] Using Kubernetes version: v1.15.0
[preflight] Running pre-flight checks
    [WARNING Swap]: running with swap on is not supported. Please disable swap
[preflight] Pulling images required for setting up a Kubernetes cluster
[preflight] This might take a minute or two, depending on the speed of your internet connection
[preflight] You can also perform this action in beforehand using 'kubeadm config images pull'
[kubelet-start] Writing kubelet environment file with flags to file "/var/lib/kubelet/kubeadm-flags.env"
[kubelet-start] Writing kubelet configuration to file "/var/lib/kubelet/config.yaml"
[kubelet-start] Activating the kubelet service
[certs] Using certificateDir folder "/etc/kubernetes/pki"
[certs] Generating "etcd/ca" certificate and key
[certs] Generating "apiserver-etcd-client" certificate and key
[certs] Generating "etcd/server" certificate and key
[certs] etcd/server serving cert is signed for DNS names [node1 localhost] and IPs [192.168.99.11 127.0.0.1 ::1]
[certs] Generating "etcd/peer" certificate and key
[certs] etcd/peer serving cert is signed for DNS names [node1 localhost] and IPs [192.168.99.11 127.0.0.1 ::1]
[certs] Generating "etcd/healthcheck-client" certificate and key
[certs] Generating "ca" certificate and key
[certs] Generating "apiserver" certificate and key
[certs] apiserver serving cert is signed for DNS names [node1 kubernetes kubernetes.default kubernetes.default.svc kubernetes.default.svc.cluster.local] and IPs [10.96.0.1 192.168.99.11]
[certs] Generating "apiserver-kubelet-client" certificate and key
[certs] Generating "front-proxy-ca" certificate and key
[certs] Generating "front-proxy-client" certificate and key
[certs] Generating "sa" key and public key
[kubeconfig] Using kubeconfig folder "/etc/kubernetes"
[kubeconfig] Writing "admin.conf" kubeconfig file
[kubeconfig] Writing "kubelet.conf" kubeconfig file
[kubeconfig] Writing "controller-manager.conf" kubeconfig file
[kubeconfig] Writing "scheduler.conf" kubeconfig file
[control-plane] Using manifest folder "/etc/kubernetes/manifests"
[control-plane] Creating static Pod manifest for "kube-apiserver"
[control-plane] Creating static Pod manifest for "kube-controller-manager"
[control-plane] Creating static Pod manifest for "kube-scheduler"
[etcd] Creating static Pod manifest for local etcd in "/etc/kubernetes/manifests"
[wait-control-plane] Waiting for the kubelet to boot up the control plane as static Pods from directory "/etc/kubernetes/manifests". This can take up to 4m0s
[apiclient] All control plane components are healthy after 26.004907 seconds
[upload-config] Storing the configuration used in ConfigMap "kubeadm-config" in the "kube-system" Namespace
[kubelet] Creating a ConfigMap "kubelet-config-1.15" in namespace kube-system with the configuration for the kubelets in the cluster
[upload-certs] Skipping phase. Please see --upload-certs
[mark-control-plane] Marking the node node1 as control-plane by adding the label "node-role.kubernetes.io/master=''"
[mark-control-plane] Marking the node node1 as control-plane by adding the taints [node-role.kubernetes.io/master:PreferquNoSchedule]
[bootstrap-token] Using token: 4qcl2f.gtl3h8e5kjltuo0r
[bootstrap-token] Configuring bootstrap tokens, cluster-info ConfigMap, RBAC Roles
[bootstrap-token] configured RBAC rules to allow Node Bootstrap tokens to post CSRs in order for nodes to get long term certificate credentials
[bootstrap-token] configured RBAC rules to allow the csrapprover controller automatically approve CSRs from a Node Bootstrap Token
[bootstrap-token] configured RBAC rules to allow certificate rotation for all node client certificates in the cluster
[bootstrap-token] Creating the "cluster-info" ConfigMap in the "kube-public" namespace
[addons] Applied essential addon: CoreDNS
[addons] Applied essential addon: kube-proxy

Your Kubernetes control-plane has initialized successfully!

To start using your cluster, you need to run the following as a regular user:

  mkdir -p $HOME/.kube
  sudo cp -i /etc/kubernetes/admin.conf $HOME/.kube/config
  sudo chown $(id -u):$(id -g) $HOME/.kube/config

You should now deploy a pod network to the cluster.
Run "kubectl apply -f [podnetwork].yaml" with one of the options listed at:
  https://kubernetes.io/docs/concepts/cluster-administration/addons/

Then you can join any number of worker nodes by running the following on each as root:

kubeadm join 10.10.63.201:6443 --token 4qcl2f.gtl3h8e5kjltuo0r \
    --discovery-token-ca-cert-hash sha256:7ed5404175cc0bf18dbfe53f19d4a35b1e3d40c19b10924275868ebf2a3bbe6e
mkdir -p $HOME/.kube
sudo cp -i /etc/kubernetes/admin.conf $HOME/.kube/config
sudo chown $(id -u):$(id -g) $HOME/.kube/config安装flannel插件(必须安装否则启动不正常)
yum install -y flannelwget https://raw.githubusercontent.com/coreos/flannel/2140ac876ef134e0ed5af15c65e414cf26827915/Documentation/kube-flannel.yml
sed -i 's/quay.io\/coreos/registry.cn-beijing.aliyuncs.com\/imcto/g' kube-flannel.yml
# 安装flannel
kubectl apply -f kube-flannel.yml确认运行正常(nodes是Ready,pod都是Running状态)
[root@VM201 functions]# kubectl get cs
NAME                 STATUS    MESSAGE             ERROR
scheduler            Healthy   ok
controller-manager   Healthy   ok
etcd-0               Healthy   {"health":"true"}
[root@VM201 functions]# kubectl get nodes
NAME STATUS ROLES AGE VERSION
vm201 Ready master 68m v1.17.0[root@VM201 functions]# kubectl get pod -n kube-system
NAME READY STATUS RESTARTS AGE
coredns-6955765f44-9w46t 1/1 Running 0 68m
coredns-6955765f44-rkpwr 1/1 Running 0 68m
etcd-vm201 1/1 Running 0 68m
kube-apiserver-vm201 1/1 Running 0 68m
kube-controller-manager-vm201 1/1 Running 0 68m
kube-flannel-ds-amd64-dc548 1/1 Running 0 66m
kube-proxy-6x86m 1/1 Running 0 68m
kube-scheduler-vm201 1/1 Running 0 68mKubernetes安装完成
其实helm和dashboard等都不用安装。都是一些易用工具,如果有需要这都是Kubernetes的内容。对OpenFaas的首次部署意义不大。
如果想搭建Kubernetes集群,只需要在node中安装好该安装的kubeadm和docker(前文提到了),然后运行:
kubeadm join 10.10.63.201:6443 --token 4qcl2f.gtl3h8e5kjltuo0r
–discovery-token-ca-cert-hash sha256:7ed5404175cc0bf18dbfe53f19d4a35b1e3d40c19b10924275868ebf2a3bbe6e
安装OpenFaas
安装faas-netes(这是OpenFaas的核心组件)
git clone https://github.com/openfaas/faas-netes
cd faas-netes
kubectl apply -f ./namespaces.yml
验证是否成功创建openfaas,openfaas-fn两个namespaces
[root@VM201 functions]# kubectl get namespaces
NAME              STATUS   AGE
default           Active   70m
kube-node-lease   Active   70m
kube-public       Active   70m
kube-system       Active   70m
openfaas          Active   66m
openfaas-fn       Active   66m
给openfaas创建密码(必须要做否则必入坑)
kubectl -n openfaas create secret generic basic-auth \
--from-literal=basic-auth-user=admin \
--from-literal=basic-auth-password=admin
装openfaas的所有组件
git clone https://github.com/openfaas/faas-netes
cd faas-netes
kubectl apply -f ./yaml/
验证是否安装成功
[root@VM201 ~]# kubectl get pod -n openfaas
NAME                                 READY   STATUS    RESTARTS   AGE
alertmanager-6557847898-cfrnf        1/1     Running   0          77m
basic-auth-plugin-665bf4d59b-94zlc   1/1     Running   0          77m
faas-idler-f4597f655-mlj2n           1/1     Running   2          77m
gateway-5f46b56fd6-wgwch             2/2     Running   1          77m
nats-8455bfbb58-fgjxh                1/1     Running   0          77m
prometheus-7ff77749d-md248           1/1     Running   0          77m
queue-worker-649bdf958f-5vtlh        1/1     Running   1          77m
如果出现ImagePullBackOff,ErrImagePull,可能是网络问题,可以先等等。下载faas-cli工具(就一个可执行文件,官方被墙直接下吧)
https://github.com/openfaas/faas-cli/releases

去下载吧,windows和linux的都有
放入bin中
cp faas-cli /usr/local/bin写个小例子
登录docker hub (必须要登录成功否则无法继续)
docker login -u 你的用户名 -p 你的密码准备一个函数,python的
mkdir -p /home/functions
cd /home/functions
faas-cli new --lang python hello-python
这会生成hello-python.yml,hello-python文件夹
修改下hello-python/handler.py文件
vi hello-python/handler.py

def handle(req):
    print("Hello! You said: " + req)
查看Cluster IP和Port
kubectl -n 命名空间名称 get Service
[root@VM201 ~]# kubectl -n openfaas get Service
NAME                TYPE        CLUSTER-IP      EXTERNAL-IP   PORT(S)          AGE
alertmanager        ClusterIP   10.96.175.171   <none>        9093/TCP         79m
basic-auth-plugin   ClusterIP   10.96.225.245   <none>        8080/TCP         79m
gateway             ClusterIP   10.96.168.191   <none>        8080/TCP         79m
gateway-external    NodePort    10.96.123.48    <none>        8080:31112/TCP   79m
nats                ClusterIP   10.96.182.236   <none>        4222/TCP         79m
prometheus          ClusterIP   10.96.43.115    <none>        9090/TCP         79m
修改下hello-python.yml文件
vi hello-python.yml:

provider:
  name: faas
  # 使用cluster ip和port
  gateway: http://10.96.168.191:8080

functions:
  hello-python:
    lang: python
    handler: ./hello-python
    image: yourName/hello-python(yourName这个地址是dockerhub地址)
faas-cli build -f ./hello-python.yml下面是上传,部署,和运行,这个步骤还是很耗时的。(其实主要是网络速度,如果docker仓库在本地就没问题了)
faas-cli push -f ./hello-python.yml这样你的node节点,就可以有地方下载了,当然如果你有私有镜像仓库,就传到私有镜像仓库。我这里使用的是docker.hub。接下来部署
faas-cli deploy -f ./hello-python.yml运行
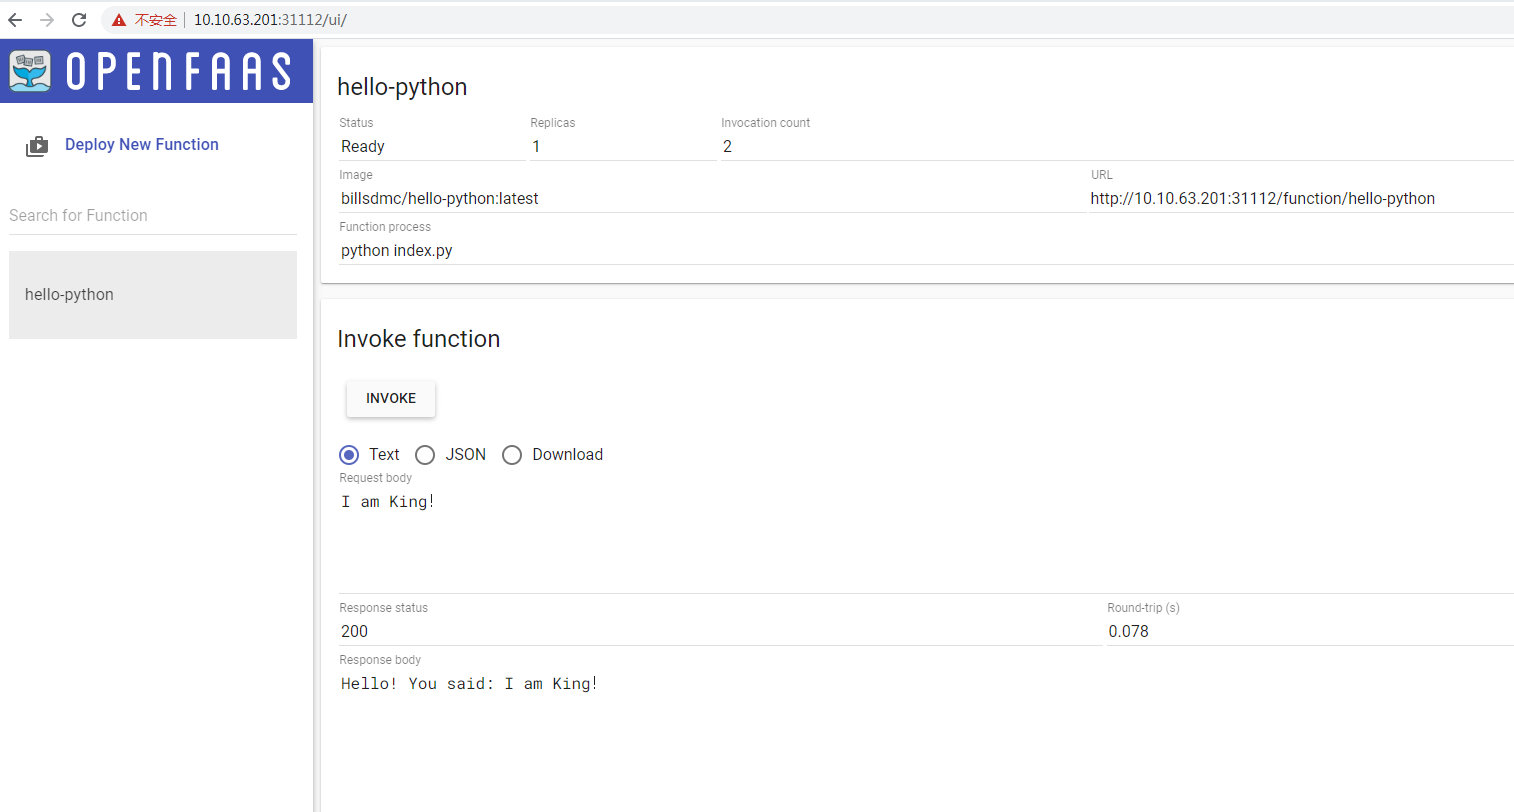
[root@VM201 ~]# curl -d 'I am king!' http://10.10.63.201:31112/function/hello-python.openfaas-fn
Hello! You said: I am king!
至此OpenFaas全部安装结束
常用命令整理
kubectl get pod -n kube-system
kubectl get cs
kubectl get nodes
kubectl get namespaces
彻底卸载kube
kubeadm reset
ifconfig cni0 down
ip link delete cni0
ifconfig flannel.1 down
ip link delete flannel.1
rm -rf /var/lib/cni/
浏览器登录UI
地址:http://10.10.63.201:31112/ui/
登录账号密码:admin/admin
参考文档
k8s官网:https://docs.openfaas.com/deployment/kubernetes/#deploy-a-function
操作教程:https://blog.csdn.net/yanshine/article/details/102958263


 2529
2529


 被折叠的 条评论
为什么被折叠?
被折叠的 条评论
为什么被折叠?
 到【灌水乐园】发言


