


3.SpringBoot整合RabbitMQ
Direct Exchange
- 直连型交换机,根据消息携带的路由键将消息投递给对应队列。
- 大致流程,有一个队列绑定到一个直连交换机上,同时赋予一个路由键 routing key 。然后当一个消息携带着路由值为X,这个消息通过生产者发送给交换机时,交换机就会根据这个路由值X去寻找绑定值也是X的队列。
Fanout Exchange
扇型交换机,这个交换机没有路由键概念,就算你绑了路由键也是无视的。 这个交换机在接收到消息后,会直接转发到绑定到它上面的所有队列。
Topic Exchange
主题交换机,这个交换机其实跟直连交换机流程差不多,但是它的特点就是在它的路由键和绑定键之间是有规则的。
* (星号) 用来表示一个单词 (必须出现的)
# (井号) 用来表示任意数量(零个或多个)单词
新建spring Boot项目 rabbitMQ
添加依赖:
<!--rabbitmq-->
        <dependency>
            <groupId>org.springframework.boot</groupId>
            <artifactId>spring-boot-starter-amqp</artifactId>
        </dependency>
        <dependency>
            <groupId>org.springframework.boot</groupId>
            <artifactId>spring-boot-starter-web</artifactId>
        </dependency>
配置文件application.yml
server:
  port: 8021
spring:
  application:
    name: rabbitmq-provider

  rabbitmq:
    host: 192.168.200.10
    port: 5672
    username: admin
    password: admin
    virtual-host: /music
    listener:
      simple:
        acknowledge-mode: manual
    #在需要使用消息的return机制时候,此参数必须设置为true
    template:
      mandatory: true
    #确认消息已发送到队列(Queue)
    publisher-returns: true
    #确认消息已发送到交换机(Exchange) correlated:开启;NONE:关闭
    publisher-confirm-type: correlated
3.1 direct exchange(直连型交换机)
DirectRabbitConfig.class
package com.rabbitmq.provider.conf;


import org.springframework.amqp.core.Binding;
import org.springframework.amqp.core.BindingBuilder;
import org.springframework.amqp.core.DirectExchange;
import org.springframework.amqp.core.Queue;
import org.springframework.context.annotation.Bean;
import org.springframework.context.annotation.Configuration;


/**
 * Direct直连型交换机
 * 根据消息携带的路由键将消息投递给对应队列。
 * 大致流程,有一个队列绑定到一个直连交换机上,同时赋予一个路由键 routing key 。
 * 然后当一个消息携带着路由值为X,这个消息通过生产者发送给交换机时,交换机就会根据这个路由值X去寻找绑定值也是X的队列。
 *
 */
@Configuration
public class DirectRabbitConfig {

    /**
     * 队列名称
     * @return
     */
    @Bean
    public Queue TestDirectQueue(){

        // durable:是否持久化,默认是false,持久化队列:会被存储在磁盘上,当消息代理重启时仍然存在,暂存队列:当前连接有效
        // exclusive:默认也是false,只能被当前创建的连接使用,而且当连接关闭后队列即被删除。此参考优先级高于durable
        // autoDelete:是否自动删除,当没有生产者或者消费者使用此队列,该队列会自动删除。
        //   return new Queue("TestDirectQueue",true,true,false);
        //一般设置一下队列的持久化就好,其余两个就是默认false

        return new Queue("TestDirectQueue",true);
    }


    /**
     * Direct交换机
     * @return
     */
    @Bean
    DirectExchange TestDirectExchange(){
        //  return new DirectExchange("TestDirectExchange",true,true);
        return new DirectExchange("TestDirectExchange",true,false);
    }

    /**
     * 绑定  将队列和交换机绑定, 并设置用于匹配键:TestDirectRouting
     * @return
     */
    @Bean
    Binding TestDirectBinding(){
        return BindingBuilder.bind(TestDirectQueue()).to(TestDirectExchange()).with("TestDirectRouting");
    }


    @Bean
    DirectExchange lonelyDirectExchange() {
        return new DirectExchange("lonelyDirectExchange");
    }
}
生产者生产消息接口类 SendMessageController.class(根据需求也可以改为定时任务等等)
package com.rabbitmq.provider.controller;

import com.rabbitmq.provider.conf.DeadLetterRabbitConfig;
import com.rabbitmq.provider.conf.DelayedMsgRabbitConfig;
import com.rabbitmq.provider.conf.DelayedRabbitConfig;
import org.springframework.amqp.rabbit.core.RabbitTemplate;
import org.springframework.beans.factory.annotation.Autowired;
import org.springframework.web.bind.annotation.GetMapping;
import org.springframework.web.bind.annotation.RestController;

import java.time.LocalDateTime;
import java.time.format.DateTimeFormatter;
import java.util.Date;
import java.util.HashMap;
import java.util.UUID;

@RestController
public class SendMessageController {

    /**
     * 使用RabbitTemplate,这提供了接收/发送等等方法
     */
    @Autowired
    RabbitTemplate rabbitTemplate;


    /**
     * Direct直连方式消息发送
     * @param msg
     * @return
     */
    @GetMapping("/sendDirectMessage")
    public String sendDirectMessage(String msg){
        String messageId = String.valueOf(UUID.randomUUID());
//        String messageData = "七里香 DirectMessage";
        String createTime = LocalDateTime.now().format(DateTimeFormatter.ofPattern("yyyy-MM-dd HH:mm:ss"));
        HashMap<String, Object> map = new HashMap<>();
        map.put("messageId",messageId);
        map.put("messageData",msg);
        map.put("createTime",createTime);
        map.put("type","1");
        //将消息携带绑定键值:TestDirectRouting 发送到交换机TestDirectExchange
        rabbitTemplate.convertAndSend("TestDirectExchange","TestDirectRouting",map);
        return "发送成功";
    }
}
DirectReceiver.class(消费者监听页面)
package com.rabbitmq.provider.receiver;

import org.springframework.amqp.rabbit.annotation.RabbitHandler;
import org.springframework.amqp.rabbit.annotation.RabbitListener;
import org.springframework.stereotype.Component;

import java.util.Map;

@Component
@RabbitListener(queues = "TestDirectQueue")//监听的队列名称 TestDirectQueue
public class DirectReceiver {

    @RabbitHandler
    public void  process(Map message){
        System.out.println("DirectReceiver消费者1接收到消息:"+message.toString());
    }
}
PostMan调用测试

直连交换机既然是一对一,那如果咱们配置多台监听绑定到同一个直连交互的同一个队列
可以看到是实现了轮询的方式对消息进行消费,而且不存在重复消费。

3.2Topic Exchange(主题交换机)
package com.rabbitmq.provider.conf;

import org.springframework.amqp.core.Binding;
import org.springframework.amqp.core.BindingBuilder;
import org.springframework.amqp.core.Queue;
import org.springframework.amqp.core.TopicExchange;
import org.springframework.context.annotation.Bean;
import org.springframework.context.annotation.Configuration;

/**
 * Topic主题交换机
 * 主题交换机,这个交换机其实跟直连交换机流程差不多,但是它的特点就是在它的路由键和绑定键之间是有规则的.
 * *  (星号) 用来表示一个单词 (必须出现的)
 * #  (井号) 用来表示任意数量(零个或多个)单词
 *
 */

@Configuration
public class TopicRabbitConfig {

    /**
     * 绑定键
     */
    public final static String man = "topic.man";
    public final static String woman = "topic.woman";

    /**
     * 队列
     * @return
     */
    @Bean
    public Queue manQueue(){
        return new Queue(man);
    }

    @Bean
    public Queue womanQueue(){
        return new Queue(woman);
    }

    /**
     * topic 交换机
     * @return
     */
    @Bean
    TopicExchange topicExchange(){
        return new TopicExchange("topicExchange");
    }

    /**
     * 将manQueue和topicExchange绑定,而且绑定的键值为topic.man
     * 这样只要是消息携带的路由键是topic.man,才会分发到该队列
     * @return
     */
    @Bean
    Binding topicBindingExchangeMessage(){
        return BindingBuilder.bind(manQueue()).to(topicExchange()).with(man);
    }

    /**
     * 将womanQueue和topicExchange绑定,而且绑定的键值为用上通配路由键规则topic.#
     * 这样只要是消息携带的路由键是以topic.开头,都会分发到该队列
     * @return
     */
    @Bean
    Binding topicBindingExchangeMessage2(){
        return BindingBuilder.bind(womanQueue()).to(topicExchange()).with("topic.#");
    }

}
然后添加多2个接口,用于推送消息到主题交换机:
/**
     * Topic订阅方式消息发送
     * @param msg
     * @return
     */
    @GetMapping("/sendTopicMessage1")
    public String sendTopicMessage1(String msg){
        String messageId = String.valueOf(UUID.randomUUID());
//        String messageData = "七里香 DirectMessage";
        String createTime = LocalDateTime.now().format(DateTimeFormatter.ofPattern("yyyy-MM-dd HH:mm:ss"));
        HashMap<String, Object> map = new HashMap<>();
        map.put("messageId",messageId);
        map.put("messageData",msg);
        map.put("createTime",createTime);
        map.put("type","主题类型");
        //将消息主题:topic.man 发送到交换机TestDirectExchange
        rabbitTemplate.convertAndSend("topicExchange","topic.man",map);
        return "发送成功";
    }

    /**
     * Topic订阅方式消息发送
     * @param msg
     * @return
     */
    @GetMapping("/sendTopicMessage2")
    public String sendTopicMessage2(String msg){
        String messageId = String.valueOf(UUID.randomUUID());
//        String messageData = "七里香 DirectMessage";
        String createTime = LocalDateTime.now().format(DateTimeFormatter.ofPattern("yyyy-MM-dd HH:mm:ss"));
        HashMap<String, Object> map = new HashMap<>();
        map.put("messageId",messageId);
        map.put("messageData",msg);
        map.put("createTime",createTime);
        map.put("type","主题类型");
        //将消息主题:topic.man 发送到交换机TestDirectExchange
        rabbitTemplate.convertAndSend("topicExchange","topic.woman",map);
        return "发送成功";
    }
TopicReceiver.class (主题交换机消费者)
package com.rabbitmq.provider.receiver;


import org.springframework.amqp.rabbit.annotation.RabbitHandler;
import org.springframework.amqp.rabbit.annotation.RabbitListener;
import org.springframework.stereotype.Component;

import java.util.Map;

@Component
public class TopicReceiver {

    @RabbitHandler
    @RabbitListener(queues = "topic.man")
    public void process(Map map){
        System.out.println("TopicReceiver消费者topic.man收到消息:"+map.toString());
    }

    @RabbitHandler
    @RabbitListener(queues = "topic.woman")
    public void process1(Map map){
        System.out.println("TopicReceiver消费者topic.#收到消息:"+map.toString());
    }
}
调用/sendTopicMessage1

process监听队列1,绑定键为:topic.man
process1监听队列2,绑定键为:topic.
#而当前推送的消息,携带的路由键为:topic.man
所以可以看到两个监听消费者receiver都成功消费到了消息,因为这两个recevier监听的队列的绑定键都能与这条消息携带的路由键匹配上。

调用/sendTopicMessage2

process监听队列1,绑定键为:topic.man
process1监听队列2,绑定键为:topic.#
而当前推送的消息,携带的路由键为:topic.woman
所以可以看到两个监听消费者只有TopicTotalReceiver成功消费到了消息

3.3 Fanout Exchang (扇型交换机)
FanoutRabbitConfig.class
package com.rabbitmq.provider.conf;

import org.springframework.amqp.core.*;
import org.springframework.context.annotation.Bean;
import org.springframework.context.annotation.Configuration;

/**
 * Fanout扇形交换机
 * 扇型交换机,这个交换机没有路由键概念,就算你绑了路由键也是无视的。
 * 这个交换机在接收到消息后,会直接转发到绑定到它上面的所有队列。
 */

@Configuration
public class FanoutRabbitConfig {

    /**
     * 创建三个队列 :fanout.A   fanout.B  fanout.C
     * 将三个队列都绑定在交换机 fanoutExchange 上
     *  因为是扇型交换机, 路由键无需配置,配置也不起作用
     * @return
     */
    @Bean
    public Queue queueA(){
        return new Queue("fanout.A");
    }

    @Bean
    public Queue queueB(){
        return new Queue("fanout.B");
    }

    @Bean
    public Queue queueC(){
        return new Queue("fanout.C");
    }

    /**
     * 扇形交换机
     * @return
     */
    @Bean
    FanoutExchange fanoutExchange(){
        return new FanoutExchange("fanoutExchange");
    }

    @Bean
    Binding bindingExchangeA() {
        return BindingBuilder.bind(queueA()).to(fanoutExchange());
    }

    @Bean
    Binding bindingExchangeB() {
        return BindingBuilder.bind(queueB()).to(fanoutExchange());
    }

    @Bean
    Binding bindingExchangeC() {
        return BindingBuilder.bind(queueC()).to(fanoutExchange());
    }
}
写一个接口用于推送消息
   /**
     * Fanout扇形方式消息发送
     * @param msg
     * @return
     */
    @GetMapping("/sendFanoutMessage")
    public String sendFanoutMessage(String msg){
        String messageId = String.valueOf(UUID.randomUUID());
//        String messageData = "七里香 DirectMessage";
        String createTime = LocalDateTime.now().format(DateTimeFormatter.ofPattern("yyyy-MM-dd HH:mm:ss"));
        HashMap<String, Object> map = new HashMap<>();
        map.put("messageId",messageId);
        map.put("messageData",msg);
        map.put("createTime",createTime);
        map.put("type","扇形");
        //将消息主题:topic.man 发送到交换机TestDirectExchange
        rabbitTemplate.convertAndSend("fanoutExchange",null,map);
        return "发送成功";
    }
FanoutReceiver.class (消费者监听)
package com.rabbitmq.provider.receiver;

import org.springframework.amqp.rabbit.annotation.RabbitHandler;
import org.springframework.amqp.rabbit.annotation.RabbitListener;
import org.springframework.stereotype.Component;

import java.util.Map;

@Component
public class FanoutReceiver {

    @RabbitHandler
    @RabbitListener(queues = "fanout.A")
    public void prosess1(Map msg){
        System.out.println("FanoutReceiver消费者fanout.A收到消息:"+msg.toString());
    }

    @RabbitHandler
    @RabbitListener(queues = "fanout.B")
    public void prosess2(Map msg){
        System.out.println("FanoutReceiver消费者fanout.B收到消息:"+msg.toString());
    }

    @RabbitHandler
    @RabbitListener(queues = "fanout.C")
    public void prosess3(Map msg){
        System.out.println("FanoutReceiver消费者fanout.C收到消息:"+msg.toString());
    }
}

可以看到只要发送到 fanoutExchange 这个扇型交换机的消息,
三个队列都绑定这个交换机,所以三个消息接收类都监听到了这条消息。

4.消息的回调
4.1生产者推送消息的消息确认调用回调函数
修改配置文件application.yml
listener:
  simple:
    acknowledge-mode: manual
#在需要使用消息的return机制时候,此参数必须设置为true
template:
  mandatory: true
#确认消息已发送到队列(Queue)
publisher-returns: true
#确认消息已发送到交换机(Exchange) correlated:开启;NONE:关闭
publisher-confirm-type: correlated配置相关的消息确认回调函数,RabbitConfig.java
package com.rabbitmq.provider.conf;


import org.springframework.amqp.core.Message;
import org.springframework.amqp.rabbit.connection.ConnectionFactory;
import org.springframework.amqp.rabbit.connection.CorrelationData;
import org.springframework.amqp.rabbit.core.RabbitTemplate;
import org.springframework.context.annotation.Bean;
import org.springframework.context.annotation.Configuration;

/**
 * 生产者推送消息的消息确认调用回调函数
 * ConfirmCallback:消息发送到 Broker 后触发回调,确认消息是否到达 Broker 服务器,也就是只确认是否正确到达 Exchange 中
 * ReturnCallback:启动消息失败返回,比如路由不到队列时触发回调
 *
 * 推送消息存在四种情况:
 * ①消息推送到server,但是在server里找不到交换机
 * ②消息推送到server,找到交换机了,但是没找到队列
 * ③消息推送到sever,交换机和队列啥都没找到
 * ④消息推送成功
 */

@Configuration
public class RabbitConfig {


    /**
     * 生产者推送消息的消息确认调用回调函数
     * @param connectionFactory
     * @return
     */
    @Bean
    public RabbitTemplate createRabbitTemplate(ConnectionFactory connectionFactory){
        RabbitTemplate rabbitTemplate = new RabbitTemplate();
        rabbitTemplate.setConnectionFactory(connectionFactory);
        //设置开启Mandatory,才能触发回调函数,无论消息推送结果怎么样都强制调用回调函数
        rabbitTemplate.setMandatory(true);

        //消息发送到 Broker 后触发回调,确认消息是否到达 Broker 服务器,也就是只确认是否正确到达 Exchange 中
        rabbitTemplate.setConfirmCallback(new RabbitTemplate.ConfirmCallback() {
            @Override
            public void confirm(CorrelationData correlationData, boolean ack, String cause) {
                System.out.println("ConfirmCallback--相关数据:"+correlationData);
                System.out.println("ConfirmCallback--确认情况:"+ack);
                System.out.println("ConfirmCallback--原因:"+cause);
            }
        });
        //启动消息失败返回,比如路由不到队列时触发回调
        rabbitTemplate.setReturnCallback(new RabbitTemplate.ReturnCallback() {
            @Override
            public void returnedMessage(Message message, int replyCode, String replyText, String exchange, String routingKey) {
                System.out.println("ReturnCallback--消息:"+message);
                System.out.println("ReturnCallback--回应码:"+replyCode);
                System.out.println("ReturnCallback--回应信息:"+replyText);
                System.out.println("ReturnCallback--交换机:"+exchange);
                System.out.println("ReturnCallback--路由键:"+routingKey);
            }
        });
        return rabbitTemplate;
    }
}
推送消息存在四种情况:
①消息推送到server,但是在server里找不到交换机(触发:ConfirmCallback 回调函数)
把消息推送到名为‘notAckExchange’的交换机上(这个交换机是没有创建没有配置的)
/**
     *  消息推送存在四种情况 ①消息推送到server,但是在server里找不到交换机  (触发:ConfirmCallback 回调函数)
     *  把消息推送到名为‘notAckExchange’的交换机上(这个交换机是没有创建没有配置的)
     * @param msg
     * @return
     */
    @GetMapping("/testMessageACK1")
    public String testMessageACK1(String msg){
        String messageId = String.valueOf(UUID.randomUUID());
//        String messageData = "七里香 DirectMessage";
        String createTime = LocalDateTime.now().format(DateTimeFormatter.ofPattern("yyyy-MM-dd HH:mm:ss"));
        HashMap<String, Object> map = new HashMap<>();
        map.put("messageId",messageId);
        map.put("messageData",msg);
        map.put("createTime",createTime);
        map.put("type","ACK测试");
        //将消息主题:topic.man 发送到交换机TestDirectExchange
        rabbitTemplate.convertAndSend("notAckExchange",null,map);
        return "发送成功";
    }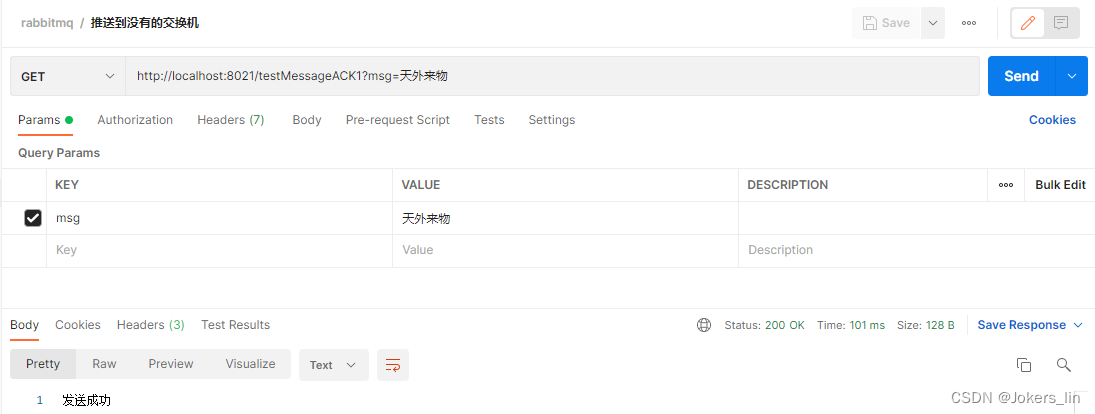

控制台
2021-12-03 11:20:34.674 ERROR 12412 --- [168.200.10:5672] o.s.a.r.c.CachingConnectionFactory       : Channel shutdown: channel error; protocol method: #method<channel.close>(reply-code=404, reply-text=NOT_FOUND - no exchange 'notAckExchange' in vhost '/music', class-id=60, method-id=40)
ConfirmCallback--相关数据:null
ConfirmCallback--确认情况:false
ConfirmCallback--原因:channel error; protocol method: #method<channel.close>(reply-code=404, reply-text=NOT_FOUND - no exchange 'notAckExchange' in vhost '/music', class-id=60, method-id=40)
②消息推送到server,找到交换机了,但是没找到队列
这种情况就是需要新增一个交换机,但是不给这个交换机绑定队列,
简单地在DirectRabitConfig里面新增一个直连交换机,名叫‘lonelyDirectExchange’,但没给它做任何绑定配置操作:
@Bean
DirectExchange lonelyDirectExchange() {
    return new DirectExchange("lonelyDirectExchange");
}
/**
* 消息推送存在四种情况 ②消息推送到server,找到交换机Exchange了,但是没找到队列 (触发:ConfirmCallback 与 ReturnCallback 回调函数)
* 这种情况就是需要新增一个交换机,但是不给这个交换机绑定队列
* 在DirectRabitConfig里面新增一个直连交换机,名叫‘lonelyDirectExchange’,但没给它做任何绑定配置操作
* 把消息推送到名为‘lonelyDirectExchange’的交换机上(这个交换机是没有任何队列配置的)
*
* 两个函数都被调用了:
* 这种情况下,消息是推送成功到服务器了的,所以ConfirmCallback对消息确认情况是true;
* 而在RetrunCallback回调函数的打印参数里面可以看到,消息是推送到了交换机成功了,但是在路由分发给队列的时候,找不到队列,所以报了错误 NO_ROUTE 。
*
* @param msg
* @return
*/
@GetMapping("/testMessageACK2")
public String testMessageACK2(String msg){
String messageId = String.valueOf(UUID.randomUUID());
// String messageData = "七里香 DirectMessage";
String createTime = LocalDateTime.now().format(DateTimeFormatter.ofPattern("yyyy-MM-dd HH:mm:ss"));
HashMap<String, Object> map = new HashMap<>();
map.put("messageId",messageId);
map.put("messageData",msg);
map.put("createTime",createTime);
map.put("type","ACK测试");
//将消息主题:topic.man 发送到交换机TestDirectExchange
rabbitTemplate.convertAndSend("lonelyDirectExchange","TestDirectRouting",map);
return "发送成功";
}

ReturnCallback--消息:(Body:'{createTime=2021-12-03 11:22:58, messageId=f0995a0d-d62d-488d-ba35-137a00f450c5, type=ACK测试, messageData=天下}' MessageProperties [headers={}, contentType=application/x-java-serialized-object, contentLength=0, receivedDeliveryMode=PERSISTENT, priority=0, deliveryTag=0])
ReturnCallback--回应码:312
ReturnCallback--回应信息:NO_ROUTE
ReturnCallback--交换机:lonelyDirectExchange
ReturnCallback--路由键:TestDirectRouting
ConfirmCallback--相关数据:null
ConfirmCallback--确认情况:true
ConfirmCallback--原因:null
可以看到这种情况,两个函数都被调用了;
这种情况下,消息是推送成功到服务器了的,所以ConfirmCallback对消息确认情况是true;
而在RetrunCallback回调函数的打印参数里面可以看到,消息是推送到了交换机成功了,但是在路由分发给队列的时候,找不到队列,所以报了错误 NO_ROUTE 。
③消息推送到sever,交换机和队列啥都没找到
③和①情况回调是一致的
/**
     *  消息推送存在四种情况 ③消息推送到sever,交换机和队列啥都没找到   (触发:ConfirmCallback 回调函数)
     *  与①情况一致
     *  把消息推送到名为 null 的交换机上(这个交换机是没有创建没有配置的)
     * @param msg
     * @return
     */
    @GetMapping("/testMessageACK3")
    public String testMessageACK3(String msg){
        String messageId = String.valueOf(UUID.randomUUID());
//        String messageData = "七里香 DirectMessage";
        String createTime = LocalDateTime.now().format(DateTimeFormatter.ofPattern("yyyy-MM-dd HH:mm:ss"));
        HashMap<String, Object> map = new HashMap<>();
        map.put("messageId",messageId);
        map.put("messageData",msg);
        map.put("createTime",createTime);
        map.put("type","ACK测试");
        //将消息主题:topic.man 发送到交换机TestDirectExchange
        rabbitTemplate.convertAndSend("notAckExchange",null,map);
        return "发送成功";
    }
④消息推送成功 (集合上述正常推送消息)
生产者推送消息的消息确认 回调函数的使用介绍(可以在回调函数根据需求做对应的扩展或者业务数据处理)。
4.2 消费者接收到消息的消息确认机制
和生产者的消息确认机制不同,因为消息接收本来就是在监听消息,符合条件的消息就会消费下来。
所以,消息接收的确认机制主要存在三种模式:
①自动确认, 这也是默认的消息确认情况。 AcknowledgeMode.NONE
RabbitMQ成功将消息发出(即将消息成功写入TCP Socket)中立即认为本次投递已经被正确处理,不管消费者端是否成功处理本次投递。
所以这种情况如果消费端消费逻辑抛出异常,也就是消费端没有处理成功这条消息,那么就相当于丢失了消息。
一般这种情况我们都是使用try catch捕捉异常后,打印日志用于追踪数据,这样找出对应数据再做后续处理。
③ 手动确认 , 这个比较关键,也是我们配置接收消息确认机制时,多数选择的模式。
消费者收到消息后,手动调用basic.ack/basic.nack/basic.reject后,RabbitMQ收到这些消息后,才认为本次投递成功。
basic.ack用于肯定确认
basic.nack用于否定确认(注意:这是AMQP 0-9-1的RabbitMQ扩展)
basic.reject用于否定确认,但与basic.nack相比有一个限制:一次只能拒绝单条消息
消费者端以上的3个方法都表示消息已经被正确投递,但是basic.ack表示消息已经被正确处理。
而basic.nack,basic.reject表示没有被正确处理:
着重讲下reject,因为有时候一些场景是需要重新入列的。
channel.basicReject(deliveryTag, true); 拒绝消费当前消息,如果第二参数传入true,就是将数据重新丢回队列里,那么下次还会消费这消息。设置false,就是告诉服务器,我已经知道这条消息数据了,因为一些原因拒绝它,而且服务器也把这个消息丢掉就行。 下次不想再消费这条消息了。
使用拒绝后重新入列这个确认模式要谨慎,因为一般都是出现异常的时候,catch异常再拒绝入列,选择是否重入列。
但是如果使用不当会导致一些每次都被你重入列的消息一直消费-入列-消费-入列这样循环,会导致消息积压。
顺便也简单讲讲 nack,这个也是相当于设置不消费某条消息。
channel.basicNack(deliveryTag, false, true);
第一个参数依然是当前消息到的数据的唯一id;
第二个参数是指是否针对多条消息;如果是true,也就是说一次性针对当前通道的消息的tagID小于当前这条消息的,都拒绝确认。
第三个参数是指是否重新入列,也就是指不确认的消息是否重新丢回到队列里面去。
同样使用不确认后重新入列这个确认模式要谨慎,因为这里也可能因为考虑不周出现消息一直被重新丢回去的情况,导致积压。
配置如下:
MessageListenerConfig.class
package com.rabbitmq.provider.conf;

import org.springframework.amqp.core.AcknowledgeMode;
import org.springframework.amqp.rabbit.connection.CachingConnectionFactory;
import org.springframework.beans.factory.annotation.Autowired;
import org.springframework.context.annotation.Bean;
import org.springframework.context.annotation.Configuration;
import org.springframework.amqp.rabbit.listener.SimpleMessageListenerContainer;


@Configuration
public class MessageListenerConfig {

    @Autowired
    private CachingConnectionFactory connectionFactory;

    /**
     * 消息接收处理类
     */
    @Autowired
    private MyAckReceiverConfig myAckReceiverConfig;

    @Bean
    public SimpleMessageListenerContainer simpleMessageListenerContainer(){
        SimpleMessageListenerContainer container  = new SimpleMessageListenerContainer(connectionFactory);
        container.setConcurrentConsumers(1);
        container.setMaxConcurrentConsumers(1);
        container.setAcknowledgeMode(AcknowledgeMode.MANUAL);// RabbitMQ默认是自动确认,这里改为手动确认消息
        //设置一个队列
//        container.setQueueNames("TestDirectQueue");
        //如果同时设置多个如下: 前提是队列都是必须已经创建存在的
        container.setQueueNames("TestDirectQueue","fanout.A");

        //另一种设置队列的方法,如果使用这种情况,那么要设置多个,就使用addQueues
        //container.setQueues(new Queue("TestDirectQueue",true));
        //container.addQueues(new Queue("TestDirectQueue2",true));
        //container.addQueues(new Queue("TestDirectQueue3",true));

        container.setMessageListener(myAckReceiverConfig);

        return container;
    }
}
对应的手动确认消息监听类,MyAckReceiver.java(手动确认模式需要实现 ChannelAwareMessageListener):
//之前的相关监听器可以先注释掉,以免造成多个同类型监听器都监听同一个队列。
//这里的获取消息转换,只作参考,如果报数组越界可以自己根据格式去调整。
package com.rabbitmq.provider.conf;


import com.rabbitmq.client.Channel;
import org.springframework.amqp.core.Message;
import org.springframework.amqp.rabbit.listener.api.ChannelAwareMessageListener;
import org.springframework.stereotype.Component;
import java.util.HashMap;
import java.util.Map;

/**
 * 消息接收处理类 手动确认消息监听类
 * 手动确认模式需要实现 ChannelAwareMessageListener
 */

@Component
public class MyAckReceiverConfig implements ChannelAwareMessageListener {

    @Override
    public void onMessage(Message message, Channel channel) throws Exception {
        long deliveryTag = message.getMessageProperties().getDeliveryTag();
        try {
                //因为传递消息的时候用的map传递,所以将Map从Message内取出需要做些处理
                String msg = message.toString();
                //可以点进Message里面看源码,单引号直接的数据就是我们的map消息数据
                String[] msgArray = msg.split("'");

                Map<String, String> msgMap  = mapStringToMap(msgArray[1].trim(), 4);
                String messageId=msgMap.get("messageId");
                String messageData=msgMap.get("messageData");
                String createTime=msgMap.get("createTime");
                String type=msgMap.get("type");

    	     //需要做不同的业务处理不同的逻辑
                if("TestDirectQueue".equals(message.getMessageProperties().getConsumerQueue())){
                    System.out.println("消费的消息来自的队列名为:"+message.getMessageProperties().getConsumerQueue());
                    System.out.println("消息成功消费到  messageId:"+messageId+"  messageData:"+messageData+"  createTime:"+createTime);
                    System.out.println("执行TestDirectQueue中的消息的业务处理流程......");
                }

                if ("fanout.A".equals(message.getMessageProperties().getConsumerQueue())){
                    System.out.println("消费的消息来自的队列名为:"+message.getMessageProperties().getConsumerQueue());
                    System.out.println("消息成功消费到  messageId:"+messageId+"  messageData:"+messageData+"  createTime:"+createTime);
                    System.out.println("执行fanout.A中的消息的业务处理流程......");

                }

//                System.out.println("MyAckReceiver  messageId:"+messageId+"  messageData:"+messageData+"  createTime:"+createTime+"   type"+type);
//                System.out.println("消费的主题消息来自:"+message.getMessageProperties().getConsumerQueue());

                channel.basicAck(deliveryTag,true);//第二个参数,手动确认可以被批处理,当该参数为 true 时,则可以一次性确认 delivery_tag 小于等于传入值的所有消息
    //          channel.basicReject(deliveryTag, true);//第二个参数,true会重新放回队列,所以需要自己根据业务逻辑判断什么时候使用拒绝
        }catch (Exception e){
            channel.basicReject(deliveryTag,false);
            e.printStackTrace();
        }

    }

    //{key=value,key=value,key=value} 格式转换成map
    public static Map<String, String> mapStringToMap(String str,int entryNum ) {
        str = str.substring(1, str.length() - 1);
        String[] strs = str.split(",",entryNum);
        Map<String, String> map = new HashMap<String, String>();
        for (String string : strs) {
            String key = string.split("=")[0].trim();
            String value = string.split("=")[1];
            map.put(key, value);
        }
        return map;
    }

}
分别往不同队列推送消息:
调用接口/sendDirectMessage 和 /sendFanoutMessage

5.死信队列
5.1死信队列是什么:
“死信”是RabbitMQ中的一种消息机制,当你在消费消息时,如果队列里的消息出现以下情况:那么该消息将成为“死信”。
1.消息被否定确认,使用channel.basicNack或channel.basicReject,并且此时requeue属性被设置为false。
2.消息在队列的存活时间超过设置的TTL时间。
3.消息队列的消息数量已经超过最大队列长度。
“死信”消息会被RabbitMQ进行特殊处理,如果配置了死信队列信息,那么该消息将会被丢进死信队列中,如果没有配置,则该消息将会被丢弃。
5.2如何配置死信队列:
- 配置业务队列,绑定到业务交换机上
- 为业务队列配置死信交换机和路由key
- 为死信交换机配置死信队列
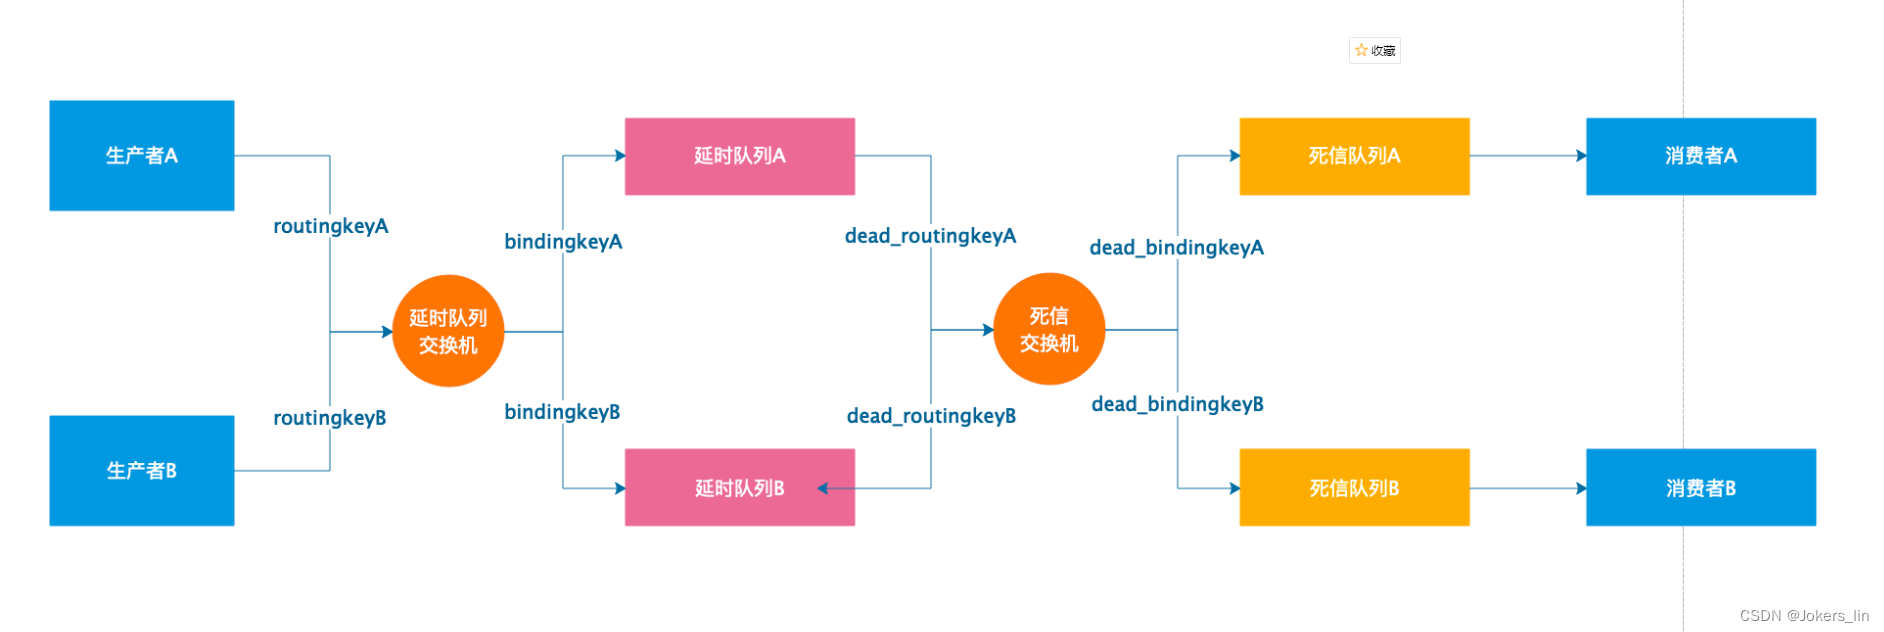
注意,并不是直接声明一个公共的死信队列,然后所以死信消息就自己跑到死信队列里去了。
而是为每个需要使用死信的业务队列配置一个死信交换机,这里同一个项目的死信交换机可以共用一个,然后为每个业务队列分配一个单独的路由key。
有了死信交换机和路由key后,接下来,就像配置业务队列一样,配置死信队列,然后绑定在死信交换机上。
也就是说,死信队列并不是什么特殊的队列,只不过是绑定在死信交换机上的队列。
死信交换机也不是什么特殊的交换机,只不过是用来接受死信的交换机,所以可以为任何类型【Direct、Fanout、Topic】。
一般来说,会为每个业务队列分配一个独有的路由key,并对应的配置一个死信队列进行监听,也就是说,一般会为每个重要的业务队列配置一个死信队列。
DeadLetterRabbitConfig.class
package com.rabbitmq.provider.conf;

import org.springframework.amqp.core.*;
import org.springframework.context.annotation.Bean;
import org.springframework.context.annotation.Configuration;

import java.util.HashMap;


@Configuration
public class DeadLetterRabbitConfig {

    public static final String DEAD_LETTER_QUEUE = "dead.letter.queue";

    public static final String DEAD_LETTER_EXCHANGE = "dead.letter.exchange";

    public static final String DEAD_LETTER_ROUTING_KEY = "dead.letter.routingKey";


    public static final String EXCHANGE = "exchange";

    public static final String QUEUE = "queue";

    public static final String ROUTING_KEY = "routingKey";


    /**
     * 死信队列
     * @return
     */
    @Bean
    public Queue deadLetterQueue(){
        return new Queue(DEAD_LETTER_QUEUE);
    }

    /**
     * 死信交换机
     * @return
     */
    @Bean
    public DirectExchange deadLetterExchange(){
        return new DirectExchange(DEAD_LETTER_EXCHANGE);
    }

    /**
     * 死信队列绑定
     * @return
     */
    @Bean
    public Binding deadLetterBinding(){
        return BindingBuilder.bind(deadLetterQueue()).to(deadLetterExchange()).with(DEAD_LETTER_ROUTING_KEY);
    }


    /**
     * 业务队列 \ 需绑定死信交换机、需匹配死信队列路由
     * @return
     */
    @Bean
    public Queue businessQueue(){
        HashMap<String, Object> map = new HashMap<>(2);
        // 配置当前队列绑定的死信交换器
        map.put("x-dead-letter-exchange",DEAD_LETTER_EXCHANGE);
        // 配置当前队列的死信队列路由key,如果不设置默认为当前队列的路由key
        map.put("x-dead-letter-routing-key",DEAD_LETTER_ROUTING_KEY);
        return QueueBuilder.durable(QUEUE).withArguments(map).build();
    }

    /**
     * 业务交换机
     * @return
     */
    @Bean
    public DirectExchange businessExchange(){
        return new DirectExchange(EXCHANGE);
    }

    /**
     * 业务绑定队列
     * @return
     */
    @Bean
    public Binding queueBinding(){
        return BindingBuilder.bind(businessQueue()).to(businessExchange()).with(ROUTING_KEY);
    }

}
这里声明了两个Exchange,一个是业务Exchange,另一个是死信Exchange,
业务Exchange下绑定了一个业务队列,
业务队列都配置了同一个死信Exchange,并分别配置了路由key,
在死信Exchange下绑定了一个死信队列,设置的路由key分别为业务队列里配置的路由key。
修改配置文件application.yml
listener:
      type: simple
      simple:
          default-requeue-rejected: false
          acknowledge-mode: manual
死信队列生产者接口
 /**
     *  死信队列测试
     * @param msg
     * @return
     */
    @GetMapping("/sendDeadLetterMessage")
    public String sendDeadLetterMessage(String msg){
        String messageId = String.valueOf(UUID.randomUUID());
//        String messageData = "七里香 DirectMessage";
        String createTime = LocalDateTime.now().format(DateTimeFormatter.ofPattern("yyyy-MM-dd HH:mm:ss"));
        HashMap<String, Object> map = new HashMap<>();
        map.put("messageId",messageId);
        map.put("messageData",msg);
        map.put("createTime",createTime);
        map.put("type","死信测试");
        //将消息主题:topic.man 发送到交换机TestDirectExchange
        rabbitTemplate.convertAndSend(DeadLetterRabbitConfig.EXCHANGE,DeadLetterRabbitConfig.ROUTING_KEY,map);
        return "发送成功";
    }
DeadLetterReceiver.calss(死信队列消费者监听)
package com.rabbitmq.provider.receiver;

import com.rabbitmq.client.Channel;
import com.rabbitmq.provider.conf.DeadLetterRabbitConfig;
import com.rabbitmq.provider.conf.MyAckReceiverConfig;
import org.springframework.amqp.core.Message;
import org.springframework.amqp.rabbit.annotation.RabbitHandler;
import org.springframework.amqp.rabbit.annotation.RabbitListener;
import org.springframework.stereotype.Component;

import java.io.IOException;
import java.util.Date;
import java.util.Map;

@Component
public class DeadLetterReceiver {


    @RabbitListener(queues = DeadLetterRabbitConfig.QUEUE)
    @RabbitHandler
    public void buinessMsg(Message message, Channel channel) throws IOException {
        String msg = message.toString();
        String[] msgArray = msg.split("'");
        Map<String, String> msgMap  = MyAckReceiverConfig.mapStringToMap(msgArray[1].trim(), 4);
        System.out.println("buinessMsg消费者接收到消息:"+new Date().toString()+"时--间"+msgMap.toString());
        String msgInfo = msgMap.get("messageData");
        if(msgInfo.startsWith("false")){
            System.out.println("消费失败:"+msg);
            channel.basicNack(message.getMessageProperties().getDeliveryTag(),false,false);
        }else {
            channel.basicAck(message.getMessageProperties().getDeliveryTag(),false);
        }
    }

    @RabbitListener(queues = DeadLetterRabbitConfig.DEAD_LETTER_QUEUE)
    @RabbitHandler
    public void deadLetterMsg(Message message, Channel channel) throws IOException {
        String msg = message.toString();
        String[] msgArray = msg.split("'");
        Map<String, String> msgMap  = MyAckReceiverConfig.mapStringToMap(msgArray[1].trim(), 4);
        System.out.println("收到死信消息:"+new Date().toString()+"时--间"+msgMap.toString());
        channel.basicAck(message.getMessageProperties().getDeliveryTag(),false);
    }
}可以看到RabbitMQ控制台 死信队列含DLX DLK标识
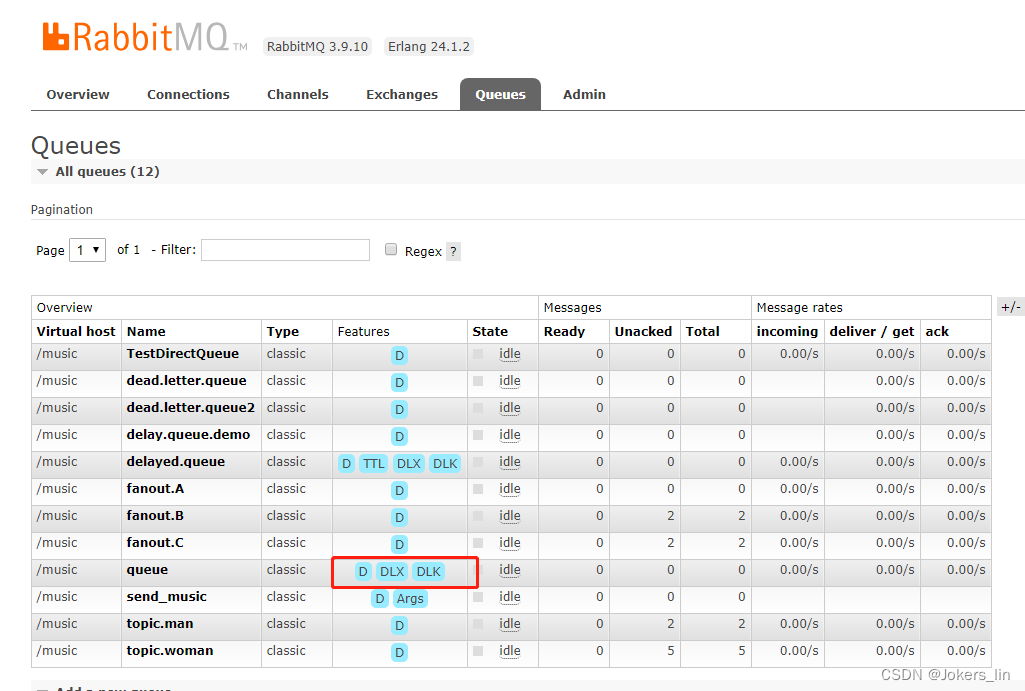
按照预期,消息被ACK后,会抛到死信队列中,因此死信队列将会出现这个消息

5.3死信队列应用场景
一般用在较为重要的业务队列中,确保未被正确消费的消息不被丢弃,一般发生消费异常可能原因主要有由于消息信息本身存在错误导致处理异常,处理过程中参数校验异常,或者因网络波动导致的查询异常等等,当发生异常时,当然不能每次通过日志来获取原消息,然后让运维帮忙重新投递消息。通过配置死信队列,可以让未正确处理的消息暂存到另一个队列中,待后续排查清楚问题后,编写相应的处理代码来处理死信消息,这样比手工恢复数据要好太多了。
5.4 死信队列的生命周期:
死信队列不过是绑定在死信交换机上的普通队列,而死信交换机也只是一个普通的交换机,不过是用来专门处理死信的交换机。
死信消息的生命周期:
- 业务消息被投入业务队列
- 消费者消费业务队列的消息,由于处理过程中发生异常,于是进行了nck或者reject操作
- 被nck或reject的消息由RabbitMQ投递到死信交换机中
- 死信交换机将消息投入相应的死信队列
- 死信队列的消费者消费死信消息
6.延时队列
6.1什么是延迟队列
首先,它是一种队列,队列意味着内部的元素是有序的,元素出队和入队是有方向性的,元素从一端进入,从另一端取出。
其次,延时队列,最重要的特性就体现在它的延时属性上,跟普通的队列不一样的是,普通队列中的元素总是等着希望被早点取出处理,而延时队列中的元素则是希望被在指定时间得到取出和处理,所以延时队列中的元素是都是带时间属性的,通常来说是需要被处理的消息或者任务。
简单来说,延时队列就是用来存放需要在指定时间被处理的元素的队列。
DelayedRabbitConfig.class(基于队列延时)
package com.rabbitmq.provider.conf;

import org.springframework.amqp.core.*;
import org.springframework.context.annotation.Bean;
import org.springframework.context.annotation.Configuration;

import java.util.HashMap;


@Configuration
public class DelayedRabbitConfig {


    public static final String DELAYED_QUEUE = "delayed.queue";

    public static final String DELAYED_EXCHANGE = "delayed.exchange";

    public static final String DELAYED_ROUTING = "delayed.routingkey";


    public static final String DEAD_LETTER_QUEUE = "dead.letter.queue2";

    public static final String DEAD_LETTER_EXCHANGE = "dead.letter.exchange2";

    public static final String DEAD_LETTER_ROUTING_KEY = "dead.letter.routingKey2";


    /**
     * 死信队列
     * @return
     */
    @Bean
    public Queue deadLetterQueue2(){
        return new Queue(DEAD_LETTER_QUEUE);
    }

    /**
     * 死信交换机
     * @return
     */
    @Bean
    public DirectExchange deadLetterExchange2(){
        return new DirectExchange(DEAD_LETTER_EXCHANGE);
    }

    /**
     * 死信队列绑定
     * @return
     */
    @Bean
    public Binding deadLetterBinding2(){
        return BindingBuilder.bind(deadLetterQueue2()).to(deadLetterExchange2()).with(DEAD_LETTER_ROUTING_KEY);
    }


    /**
     * 延迟队列绑定死信队列
     * @return
     */
    @Bean
    public Queue delayedQueue(){
        HashMap<String, Object> hashMap = new HashMap<>(2);
        //这里声明当前队列绑定的死信交换机
        hashMap.put("x-dead-letter-exchange",DEAD_LETTER_EXCHANGE);
        //这里声明当前队列的死信路由key
        hashMap.put("x-dead-letter-routing-key", DEAD_LETTER_ROUTING_KEY);
        // x-message-ttl  声明队列的TTL
        hashMap.put("x-message-ttl",6000);
        return QueueBuilder.durable(DELAYED_QUEUE).withArguments(hashMap).build();
    }

    /**
     * 延迟交换机
     * @return
     */
    @Bean
    public DirectExchange delayedExchange(){
        return new DirectExchange(DELAYED_EXCHANGE);
    }

    /**
     * 延迟队列绑定
     * @return
     */
    @Bean
    public Binding delayedBinding(){
        return BindingBuilder.bind(delayedQueue()).to(delayedExchange()).with(DELAYED_ROUTING);
    }

}
延时队列测试接口
/**
     *  延迟队列测试(基于队列)
     * @param msg
     * @return
     */
    @GetMapping("/sendDelayedMessage")
    public String sendDelayedMessage(String msg,String time){
        String messageId = String.valueOf(UUID.randomUUID());
//        String messageData = "七里香 DirectMessage";
        String createTime = LocalDateTime.now().format(DateTimeFormatter.ofPattern("yyyy-MM-dd HH:mm:ss"));
        HashMap<String, Object> map = new HashMap<>();
        map.put("messageId",messageId);
        map.put("messageData",msg);
        map.put("createTime",createTime);
        map.put("type","延迟测试");
        //将消息主题:topic.man 发送到交换机TestDirectExchange
        System.out.println("发送消息:"+new Date()+"--时间:"+map.toString());
        rabbitTemplate.convertAndSend(DelayedRabbitConfig.DELAYED_EXCHANGE, DelayedRabbitConfig.DELAYED_ROUTING, map);
        return "发送成功";
    }
DelayedReceiver.class(延迟队列消费者)
package com.rabbitmq.provider.receiver;

import com.rabbitmq.client.Channel;
import com.rabbitmq.provider.conf.DeadLetterRabbitConfig;
import com.rabbitmq.provider.conf.DelayedRabbitConfig;
import com.rabbitmq.provider.conf.MyAckReceiverConfig;
import org.springframework.amqp.core.Message;
import org.springframework.amqp.rabbit.annotation.RabbitHandler;
import org.springframework.amqp.rabbit.annotation.RabbitListener;
import org.springframework.stereotype.Component;

import java.io.IOException;
import java.util.Date;
import java.util.Map;

@Component
public class DelayedReceiver {

//    @RabbitHandler
//    @RabbitListener(queues = DelayedRabbitConfig.DELAYED_QUEUE)
//    public void delayedMsg(Message message, Channel channel) throws IOException {
//        String msg = message.toString();
//        String[] msgArray = msg.split("'");
//        Map<String, String> msgMap  = MyAckReceiverConfig.mapStringToMap(msgArray[1].trim(), 4);
//        System.out.println("收到消息:"+new Date()+"--时间:"+msgMap.toString());
//        channel.basicAck(message.getMessageProperties().getDeliveryTag(), false);
//    }


    @RabbitListener(queues = DelayedRabbitConfig.DEAD_LETTER_QUEUE)
    @RabbitHandler
    public void deadLetterMsg(Message message, Channel channel) throws IOException {
        String msg = message.toString();
        String[] msgArray = msg.split("'");
        Map<String, String> msgMap  = MyAckReceiverConfig.mapStringToMap(msgArray[1].trim(), 4);
        System.out.println("收到死信消息:"+new Date()+"--时间:"+msgMap.toString());
        channel.basicAck(message.getMessageProperties().getDeliveryTag(),false);
    }
}
延时队列包含TTL标识

PostMan推送消息

消息在发送后的6s变成了死信消息、进入死信队列被消费

利用RabbitMQ插件实现延时队列
下载地址:Community Plugins — RabbitMQ
下载rabbitmq_delayed_message_exchange插件,然后解压放置到RabbitMQ的插件目录。
./rabbitmq-plugins enable rabbitmq_delayed_message_exchange DelayedMsgRabbitConfig.class
package com.rabbitmq.provider.conf;

import org.springframework.amqp.core.*;
import org.springframework.context.annotation.Bean;
import org.springframework.context.annotation.Configuration;

import java.util.HashMap;
import java.util.Map;


@Configuration
public class DelayedMsgRabbitConfig {


    public static final String DELAYED_QUEUE_NAME = "delay.queue.demo";
    public static final String DELAYED_EXCHANGE_NAME = "delay.exchange.demo";
    public static final String DELAYED_ROUTING_KEY = "delay.routingkey.demo";


    @Bean
    public Queue immediateQueue() {
        return new Queue(DELAYED_QUEUE_NAME);
    }

    @Bean
    public CustomExchange  customExchange() {
        //创建一个自定义交换机,可以发送延迟消息
        Map<String, Object> args = new HashMap<>();
        args.put("x-delayed-type", "direct");
        return new CustomExchange(DELAYED_EXCHANGE_NAME, "x-delayed-message",true, false,args);
    }


    @Bean
    public Binding bindingNotify(CustomExchange customExchange,Queue immediateQueue){
        return BindingBuilder.bind(immediateQueue).to(customExchange).with(DELAYED_ROUTING_KEY).noargs();
    }

}
需要设置TTL时间
/**
* 延迟队列测试(基于消息)
* @param msg
* @return
*/
@GetMapping("/sendDelayedMsgMessage")
public String sendDelayedMsgMessage(String msg,Integer time){
String messageId = String.valueOf(UUID.randomUUID());
// String messageData = "七里香 DirectMessage";
String createTime = LocalDateTime.now().format(DateTimeFormatter.ofPattern("yyyy-MM-dd HH:mm:ss"));
HashMap<String, Object> map = new HashMap<>();
map.put("messageId",messageId);
map.put("messageData",msg);
map.put("createTime",createTime);
map.put("type","延迟消息测试");
//将消息主题:topic.man 发送到交换机TestDirectExchange
System.out.println("发送消息:"+new Date()+"--时间:"+map.toString());
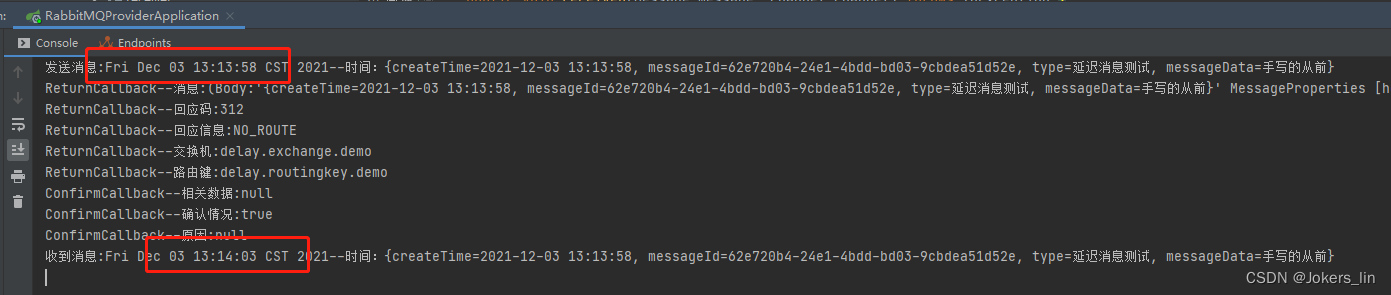
rabbitTemplate.convertAndSend(DelayedMsgRabbitConfig.DELAYED_EXCHANGE_NAME, DelayedMsgRabbitConfig.DELAYED_ROUTING_KEY, map, a->{
a.getMessageProperties().setDelay(time);
return a;
});
return "发送成功";
}DelayMsgReceiver.class(消费者消费)
package com.rabbitmq.provider.receiver;

import com.rabbitmq.client.Channel;
import com.rabbitmq.provider.conf.DelayedMsgRabbitConfig;
import com.rabbitmq.provider.conf.MyAckReceiverConfig;
import org.springframework.amqp.core.Message;
import org.springframework.amqp.rabbit.annotation.RabbitHandler;
import org.springframework.amqp.rabbit.annotation.RabbitListener;
import org.springframework.stereotype.Component;

import java.io.IOException;
import java.util.Date;
import java.util.Map;

@Component
public class DelayMsgReceiver {

    @RabbitListener(queues = DelayedMsgRabbitConfig.DELAYED_QUEUE_NAME)
    @RabbitHandler
    public void receiveD(Message message, Channel channel) throws IOException {
        String msg = message.toString();
        String[] msgArray = msg.split("'");
        Map<String, String> msgMap  = MyAckReceiverConfig.mapStringToMap(msgArray[1].trim(), 4);
        System.out.println("收到消息:"+new Date()+"--时间:"+msgMap.toString());
        channel.basicAck(message.getMessageProperties().getDeliveryTag(), false);
    }

} 


 368
368


 被折叠的 条评论
为什么被折叠?
被折叠的 条评论
为什么被折叠?
 到【灌水乐园】发言


