


本文转载于CSKIN论坛,地址:http://bbs.cskin.net/thread-63-1-1.html
在这之前 首先的准备好素材导入到工程资源里面去:
素材提取参考:点击跳转相关帖、此帖有教你如何取得素材,便于自己二次开发。
其次 这些图完全可以做成一张图 然后绘制的时候 自己从大图上面切图绘制就行、、不然到时候 会有很多图看着别扭、、
但分开也有分开的好处,更可定义性强,素材更容易找。
public partial class ButtonEx : Button
{
public ButtonEx() {
//首先开启双缓冲,防止闪烁
//双缓冲的一大堆设置 具体参数含义参照msdn的ControlStyles枚举值
this.SetStyle(ControlStyles.UserPaint, true);
this.SetStyle(ControlStyles.ResizeRedraw, true);
this.SetStyle(ControlStyles.AllPaintingInWmPaint, true);
this.SetStyle(ControlStyles.OptimizedDoubleBuffer, true);
this.SetStyle(ControlStyles.SupportsTransparentBackColor, true);
this.BackColor = Color.Transparent;
}
//用来标示是否鼠标正在悬浮在按钮上 true:悬浮在按钮上 false:鼠标离开了按钮
private bool m_bMouseHover;
//用来标示是否鼠标点击了按钮 true:按下了按钮 false:松开了按钮
private bool m_bMouseDown;
//重写鼠标悬浮的事件
protected override void OnMouseEnter(EventArgs e) {
//当鼠标进入控件时,标示变量为进入了控件
m_bMouseHover = true;
//刷新面板触发OnPaint重绘
this.Invalidate();
base.OnMouseEnter(e);
}
//重载鼠标离开的事件
protected override void OnMouseLeave(EventArgs e) {
//当鼠标离开控件时,标示变量为离开了控件
m_bMouseHover = false;
//刷新面板触发OnPaint重绘
this.Invalidate();
base.OnMouseLeave(e);
}
//重写鼠标按下的事件
protected override void OnMouseDown(MouseEventArgs mevent) {
//当鼠标按下控件时,标示变量为按下了控件
m_bMouseDown = true;
//刷新面板触发OnPaint重绘
this.Invalidate();
base.OnMouseDown(mevent);
}
//重写鼠标松开的事件
protected override void OnMouseUp(MouseEventArgs mevent) {
//当鼠标松开时,标示变量为按下并松开了控件
m_bMouseDown = false;
//刷新面板触发OnPaint重绘
this.Invalidate();
base.OnMouseUp(mevent);
}
//重写绘画事件
protected override void OnPaint(PaintEventArgs pevent) {
base.OnPaint(pevent);
//因为上面调用了base会绘制原生控件 重刷一下背景清掉原生绘制 不然自己绘制的是重叠在原生绘制上
base.OnPaintBackground(pevent);
//得到绘画句柄
Graphics g = pevent.Graphics;
//定义字体格式
StringFormat sf = new StringFormat();
sf.Alignment = StringAlignment.Center;
sf.LineAlignment = StringAlignment.Center;
//处理热键 当Alt点下时
sf.HotkeyPrefix = this.ShowKeyboardCues ? HotkeyPrefix.Show : HotkeyPrefix.Hide;
//判断使用什么资源图
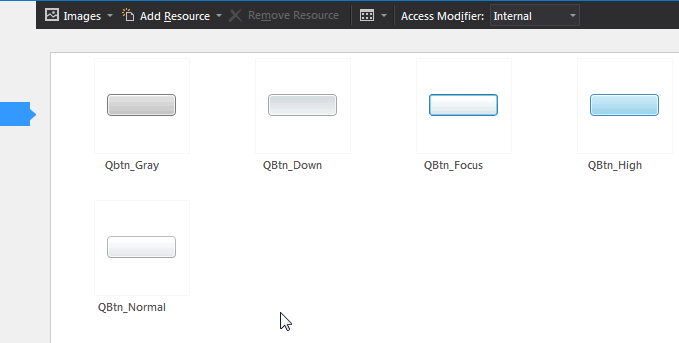
Bitmap bmpDraw = Properties.Resources.QBtn_Normal;
//如果禁用了,则使用禁用时的样式图片绘制,否则调用其他满足条件的样式图片绘制
if (!this.Enabled) bmpDraw = Properties.Resources.Qbtn_Gray;
else if (m_bMouseDown) bmpDraw = Properties.Resources.QBtn_Down;
else if (m_bMouseHover) bmpDraw = Properties.Resources.QBtn_High;
else if (this.Focused) bmpDraw = Properties.Resources.QBtn_Focus;
//绘制背景(若不知道这句啥意思 参照九宫切图里面的代码)
RenderHelper.RenderBackground(g, bmpDraw, this.ClientRectangle);
//如果禁用了
if (!this.Enabled) {
//则绘制双重阴影文字
g.DrawString(this.Text, this.Font, Brushes.White, this.ClientRectangle, sf);
g.TranslateTransform(-1, -1);//左上移动一个单位坐标系
g.DrawString(this.Text, this.Font, Brushes.DarkGray, this.ClientRectangle, sf);
g.ResetTransform();
return;
}
//否则,默认绘制正常字体
using (SolidBrush sb = new SolidBrush(this.ForeColor)) {
g.DrawString(this.Text, this.Font, sb, this.ClientRectangle, sf);
}
}
}
分别是 正常状态的按钮 鼠标移动上去 获得焦点 禁用


 905
905

 被折叠的 条评论
为什么被折叠?
被折叠的 条评论
为什么被折叠?
 到【灌水乐园】发言


