


Spring Boot核心技术系统学习总结(五)web开发02
主要内容:
Restful配置
国际化
登陆&拦截器
公共页抽取
一.Restful配置(spring boot1.5.10.RELEASE+thymelef3.0.9.RELEASE)
1.pom.xml文件依赖加载
<?xml version="1.0" encoding="UTF-8"?>
<project xmlns="http://maven.apache.org/POM/4.0.0" xmlns:xsi="http://www.w3.org/2001/XMLSchema-instance"
         xsi:schemaLocation="http://maven.apache.org/POM/4.0.0 http://maven.apache.org/xsd/maven-4.0.0.xsd">
    <modelVersion>4.0.0</modelVersion>
    <parent>
        <groupId>org.springframework.boot</groupId>
        <artifactId>spring-boot-starter-parent</artifactId>
        <version>1.5.10.RELEASE</version>
        <relativePath/> <!-- lookup parent from repository -->
    </parent>
    <groupId>com.springboot.web</groupId>
    <artifactId>springboot-web</artifactId>
    <version>0.0.1-SNAPSHOT</version>
    <name>springboot-web</name>
    <description>Demo project for Spring Boot</description>

    <properties>
        <java.version>1.8</java.version>
        <project.build.sourceEncoding>UTF-8</project.build.sourceEncoding>
        <thymeleaf.version>3.0.9.RELEASE</thymeleaf.version>
        <!-- 布局功能的支持程序  thymeleaf3主程序  layout2以上版本 -->
        <!-- thymeleaf2   layout1-->
        <thymeleaf-layout-dialect.version>2.2.2</thymeleaf-layout-dialect.version>
        <project.reporting.outputEncoding>UTF-8</project.reporting.outputEncoding>
    </properties>

    <dependencies>
        <dependency>
            <groupId>org.springframework.boot</groupId>
            <artifactId>spring-boot-starter-web</artifactId>
            <exclusions>
                <exclusion>
                    <artifactId>log4j-api</artifactId>
                    <groupId>org.apache.logging.log4j</groupId>
                </exclusion>
                <exclusion>
                    <artifactId>spring-jcl</artifactId>
                    <groupId>org.springframework</groupId>
                </exclusion>
            </exclusions>
        </dependency>

        <dependency>
            <groupId>org.springframework.boot</groupId>
            <artifactId>spring-boot-devtools</artifactId>
            <scope>runtime</scope>
        </dependency>
        <dependency>
            <groupId>org.springframework.boot</groupId>
            <artifactId>spring-boot-configuration-processor</artifactId>
            <optional>true</optional>
        </dependency>
        <dependency>
            <groupId>org.projectlombok</groupId>
            <artifactId>lombok</artifactId>
            <optional>true</optional>
        </dependency>
        <dependency>
            <groupId>org.springframework.boot</groupId>
            <artifactId>spring-boot-starter-test</artifactId>
            <scope>test</scope>
            <exclusions>
                <exclusion>
                    <artifactId>spring-jcl</artifactId>
                    <groupId>org.springframework</groupId>
                </exclusion>
            </exclusions>
        </dependency>
        <dependency>
            <groupId>org.webjars</groupId>
            <artifactId>jquery</artifactId>
            <version>3.3.1</version>
        </dependency>
        <dependency>
            <groupId>org.webjars</groupId>
            <artifactId>bootstrap</artifactId>
            <version>4.0.0</version>
        </dependency>
        <dependency>
            <groupId>org.springframework.boot</groupId>
            <artifactId>spring-boot-starter-thymeleaf</artifactId>
        </dependency>
        <!-- 统一日志 -->
        <!-- https://mvnrepository.com/artifact/org.slf4j/jcl-over-slf4j -->
        <dependency>
            <groupId>org.slf4j</groupId>
            <artifactId>jcl-over-slf4j</artifactId>
            <version>1.7.26</version>
        </dependency>
        <!-- https://mvnrepository.com/artifact/org.slf4j/log4j-over-slf4j -->
        <dependency>
            <groupId>org.slf4j</groupId>
            <artifactId>log4j-over-slf4j</artifactId>
            <version>1.7.25</version>
        </dependency>
    </dependencies>

    <build>
        <plugins>
            <plugin>
                <groupId>org.springframework.boot</groupId>
                <artifactId>spring-boot-maven-plugin</artifactId>
            </plugin>
        </plugins>
    </build>
</project>
2.applications.properties文件: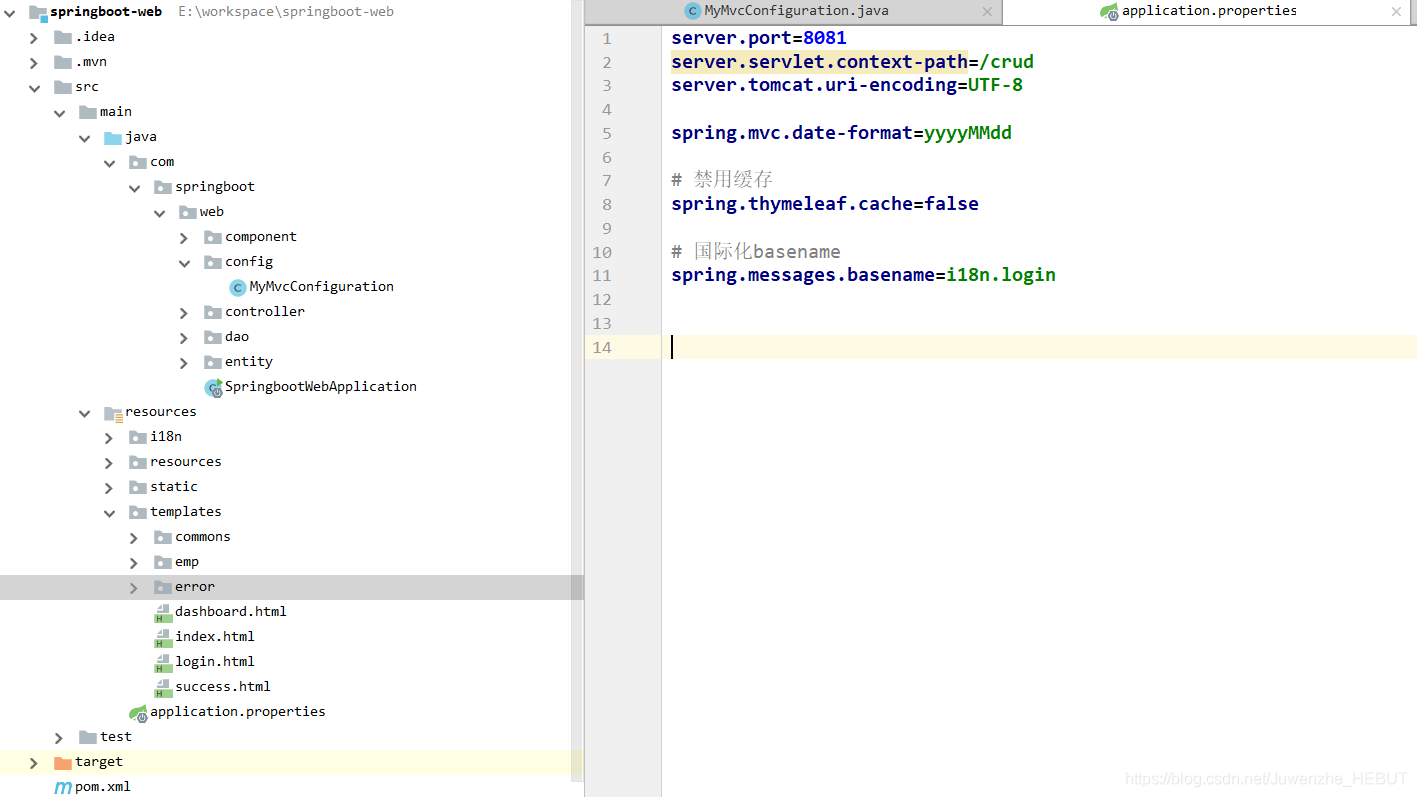
☆3.扩展Spring MVC功能配置:
package com.springboot.web.config;

import com.springboot.web.component.LoginHandlerInterceptor;
import com.springboot.web.component.MyLocaleResolver;
import org.springframework.context.annotation.Bean;
import org.springframework.context.annotation.Configuration;
import org.springframework.web.servlet.LocaleResolver;
import org.springframework.web.servlet.config.annotation.InterceptorRegistry;
import org.springframework.web.servlet.config.annotation.ViewControllerRegistry;
import org.springframework.web.servlet.config.annotation.WebMvcConfigurerAdapter;

/**
 * @author Jupiter
 * @date 2019/2/27-22:58
 * @description MVC扩展配置
 */

//使用WebmvcConfigurerAdapter可以扩展SpringMVC的功能
@Configuration
public class MyMvcConfiguration extends WebMvcConfigurerAdapter {

    @Override
    public void addViewControllers(ViewControllerRegistry registry) {
        //浏览器发送 /atmars 请求来到 success
        registry.addViewController("/atmars").setViewName("success");
    }

    //所有的WebMvcConfigurerAdapter组件都会一起起作用
    @Bean //将组件注册到容器
    public WebMvcConfigurerAdapter webMvcConfigurer(){

        WebMvcConfigurerAdapter adapter = new WebMvcConfigurerAdapter() {
            @Override
            public void addViewControllers(ViewControllerRegistry registry) {
                registry.addViewController("/").setViewName("login");
                registry.addViewController("/index.html").setViewName("login");
                registry.addViewController("main.html").setViewName("dashboard");
            }

            @Override
            public void addInterceptors(InterceptorRegistry registry) {
                registry.addInterceptor(new LoginHandlerInterceptor()).addPathPatterns("/**")
                        .excludePathPatterns("/index.html", "/", "/user/login");
            }
        };
        return adapter;
    }
}
二.国际化
1.步骤:
|- 在application.properties文件中添加:
# 国际化basename
spring.messages.basename=i18n.login
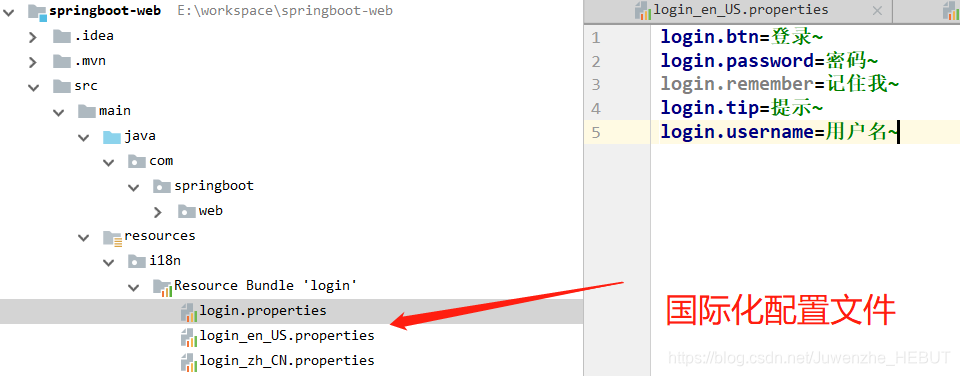
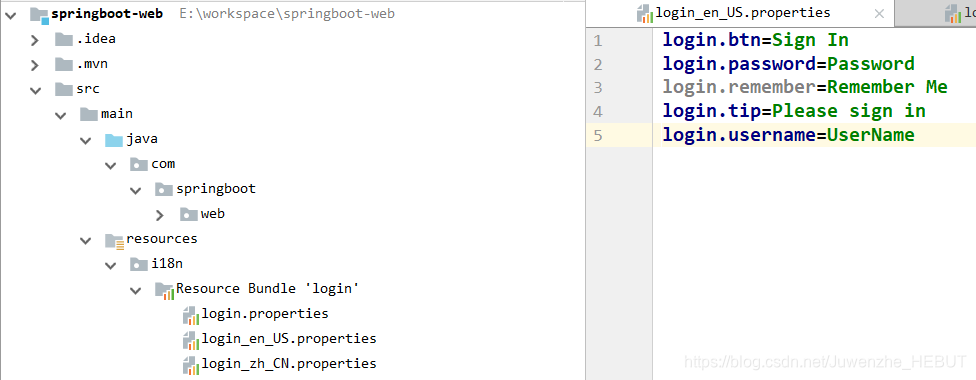
编写国际化配置文件,注意命名格式:
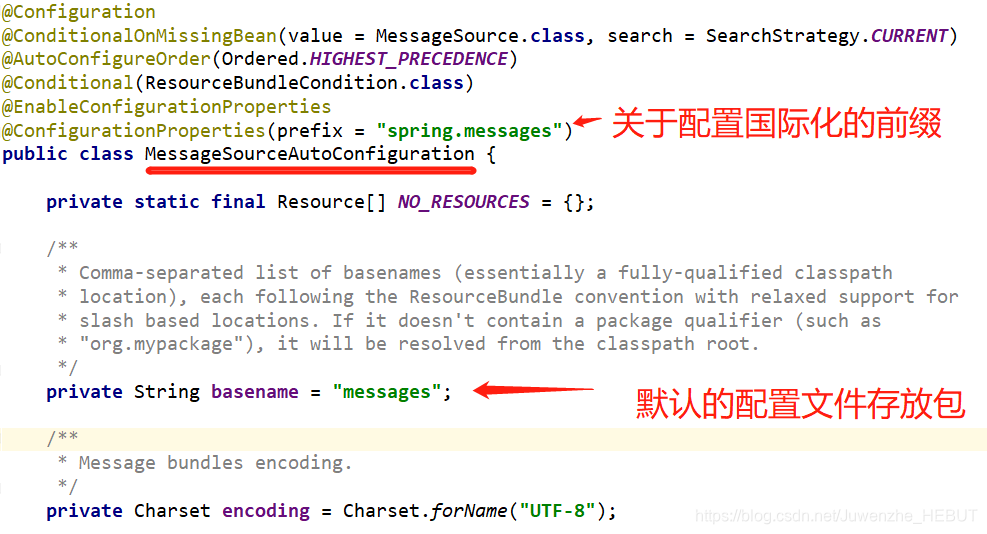
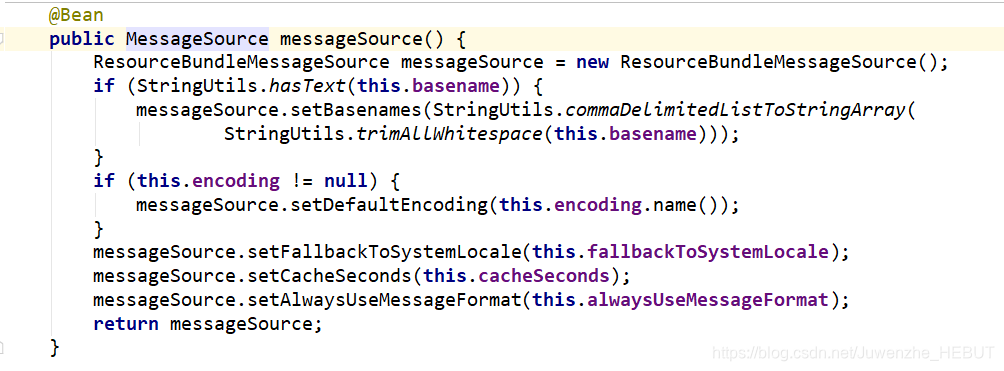
|- SpringBoot自动配置了国际化组件:MessageSourceAutoConfiguration类:
|- 在页面设置国际化key,两种取值方式
<label class="sr-only" th:text="#{login.username}">Username</label>
<input type="checkbox" value="remember-me"/> [[#{login.remember}]]
2.点击切换国际化实现
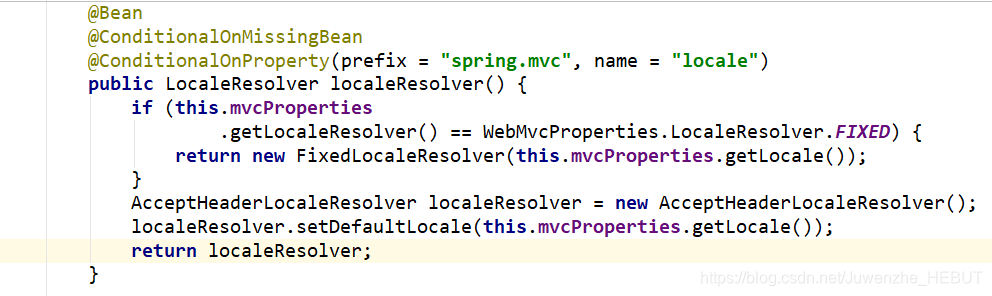
原理:切换区域信息对象Locale,SpringBoot默认配置源码:

实现步骤:
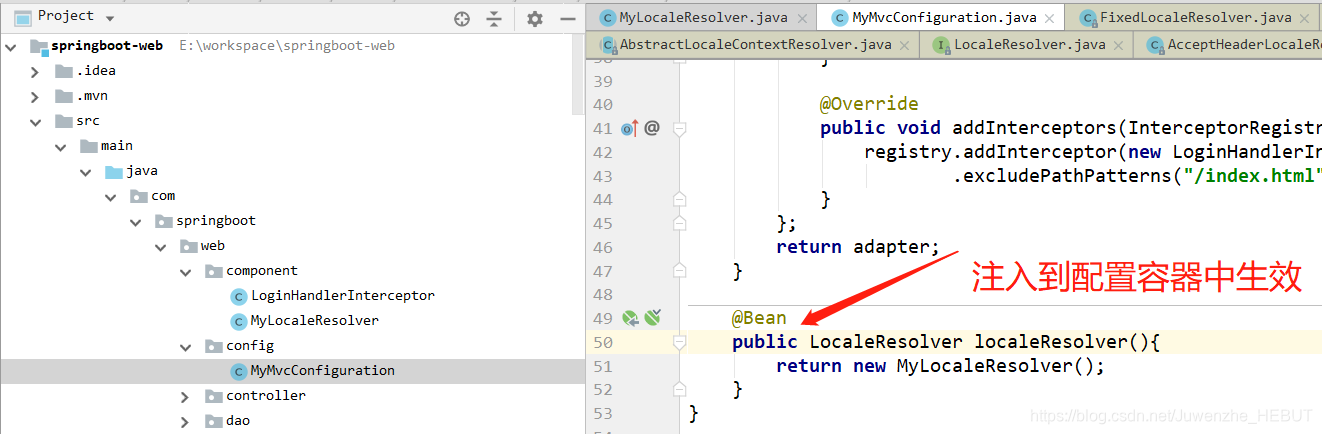
|- 新建配置类:MyLocaleResolver
public class MyLocaleResolver implements LocaleResolver {
    @Override
    public Locale resolveLocale(HttpServletRequest request) {
        String language = request.getParameter("l");
        Locale locale = Locale.getDefault();

        if (!StringUtils.isEmpty(language)){
            String[] split = language.split("_");
            locale = new Locale(split[0], split[1]);
        }
        return locale;
    }
    @Override
    public void setLocale(HttpServletRequest request, HttpServletResponse response, Locale locale) {

    }
}
|- 注入自定义配置组件
|- 页面中在请求后追加请求参数:
<a class="btn btn-sm" th:href="@{/index.html(l='zh_CN')}">中文</a>
<a class="btn btn-sm" th:href="@{/index.html(l='en_US')}">English</a>
三、登陆&拦截器
1.自定义拦截器
public class LoginHandlerInterceptor implements HandlerInterceptor {

    @Override
    public boolean preHandle(HttpServletRequest request, HttpServletResponse response, Object handler) throws Exception {
        Object user = request.getSession().getAttribute("loginUser");
        if (user == null ){
            //未登录,返回登录页面
            request.setAttribute("msg", "没有权限,请先登录");
            request.getRequestDispatcher("index.html").forward(request, response);
            return false;
        }else {
            //已登录,放行请求
            return true;
        }
    }
    @Override
    public void postHandle(HttpServletRequest request, HttpServletResponse response, Object handler, ModelAndView modelAndView) throws Exception {}
    @Override
    public void afterCompletion(HttpServletRequest request, HttpServletResponse response, Object handler, Exception ex) throws Exception {}
}
2.注册拦截器
//使用WebmvcConfigurerAdapter可以扩展SpringMVC的功能
@Configuration
public class MyMvcConfiguration extends WebMvcConfigurerAdapter {

    @Override
    public void addViewControllers(ViewControllerRegistry registry) {
        //浏览器发送 /atmars 请求来到 success
        registry.addViewController("/atmars").setViewName("success");
    }

    //所有的WebMvcConfigurerAdapter组件都会一起起作用
    @Bean //将组件注册到容器
    public WebMvcConfigurerAdapter webMvcConfigurer(){

        WebMvcConfigurerAdapter adapter = new WebMvcConfigurerAdapter() {
            @Override
            public void addViewControllers(ViewControllerRegistry registry) {
                registry.addViewController("/").setViewName("login");
                registry.addViewController("/index.html").setViewName("login");
                registry.addViewController("main.html").setViewName("dashboard");
            }

            @Override
            public void addInterceptors(InterceptorRegistry registry) {
                //拦截需要用户登录后操作的页面,放行公共页面
                registry.addInterceptor(new LoginHandlerInterceptor()).addPathPatterns("/**")
                        .excludePathPatterns("/index.html", "/", "/user/login");
            }
        };
        return adapter;
    }
    @Bean
    public LocaleResolver localeResolver(){
        return new MyLocaleResolver();
    }
}
四、公共页抽取
1.thymeleaf页面公共元素抽取步骤:
1、抽取公共片段
<div th:fragment="copy">
© 2011 The Good Thymes Virtual Grocery
</div>
2、引入公共片段
<div th:insert="~{footer :: copy}"></div>
~{templatename::selector}:模板名::选择器
~{templatename::fragmentname}:模板名::片段名
3、默认效果:
insert的公共片段在div标签中
如果使用th:insert等属性进行引入,可以不用写~{}:
行内写法可以加上:[[~{}]];[(~{})];
2.三种引入公共片段的th属性:
th:insert:将公共片段整个插入到声明引入的元素中
th:replace:将声明引入的元素替换为公共片段
th:include:将被引入的片段的内容包含进这个标签中
<footer th:fragment="copy">
© 2011 The Good Thymes Virtual Grocery
</footer>
引入方式
<div th:insert="footer :: copy"></div>
<div th:replace="footer :: copy"></div>
<div th:include="footer :: copy"></div>
效果
<div>
<footer>
© 2011 The Good Thymes Virtual Grocery
</footer>
</div>
<footer>
© 2011 The Good Thymes Virtual Grocery
</footer>
<div>
© 2011 The Good Thymes Virtual Grocery
</div>
3.做链接高亮(原理:引入片段的时候传入参数)
<nav class="col-md-2 d-none d-md-block bg-light sidebar" id="sidebar">
<div class="sidebar-sticky">
        <ul class="nav flex-column">
            <li class="nav-item">
                <a class="nav-link active" th:class="${activeUri=='main.html'?'nav-link active':'nav-link'}" href="#" th:href="@{/main.html}"> Dashboard </a>
            </li>
<!--引入侧边栏;传入参数-->
<div th:replace="commons/bar::#sidebar(activeUri='emps')"></div>
4.错误页面替换
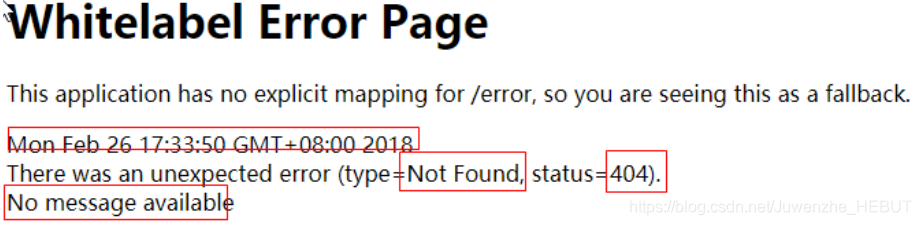
SpringBoot默认的错误处理机制:
|- 浏览器返回以下信息:
|- postman返回json数据:
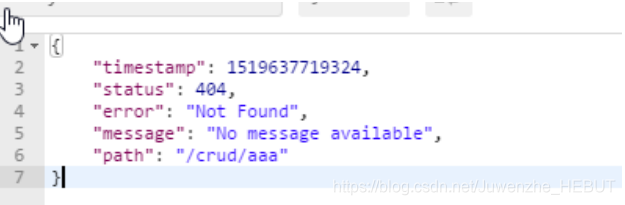
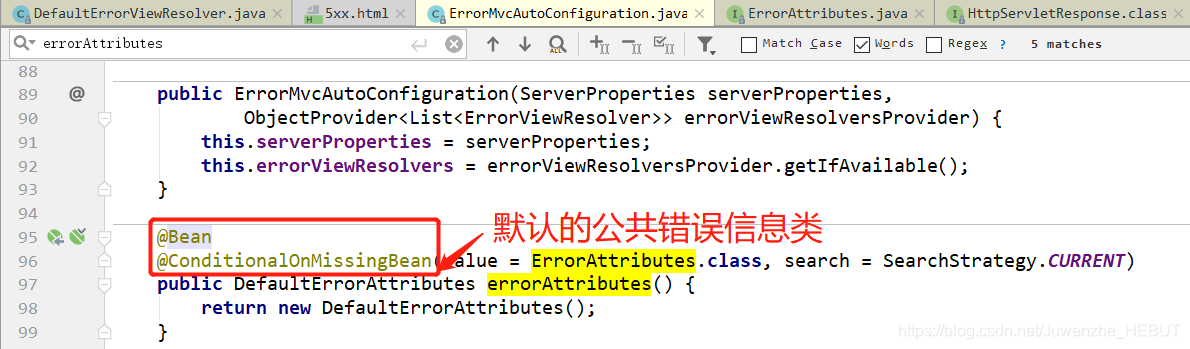
原理:ErrorMvcAutoConfiguration,错误处理的自动配置;
默认错误页面解析源码如下:(IDEA快捷键:alt+f7查看哪里调用了该方法)
public class DefaultErrorViewResolver implements ErrorViewResolver, Ordered {

    private static final Map<Series, String> SERIES_VIEWS;
    static {
        Map<Series, String> views = new HashMap<Series, String>();
        views.put(Series.CLIENT_ERROR, "4xx"); //4开头的客户端错误
        views.put(Series.SERVER_ERROR, "5xx"); //5开头的服务端错误
        SERIES_VIEWS = Collections.unmodifiableMap(views);
    }
    @Override
    public ModelAndView resolveErrorView(HttpServletRequest request, HttpStatus status,
            Map<String, Object> model) {
        ModelAndView modelAndView = resolve(String.valueOf(status), model);
        //如果没有视图名与错误码相等的情况,那么就是用4xx.html或5xx.html作为错误页面返回
        if (modelAndView == null && SERIES_VIEWS.containsKey(status.series())) {
            modelAndView = resolve(SERIES_VIEWS.get(status.series()), model);
        }
        return modelAndView;
    }
    //视图解析,将错误码作为错误页面的视图名
    private ModelAndView resolve(String viewName, Map<String, Object> model) {
        String errorViewName = "error/" + viewName;
        TemplateAvailabilityProvider provider = this.templateAvailabilityProviders
                .getProvider(errorViewName, this.applicationContext);
        if (provider != null) {
            return new ModelAndView(errorViewName, model);
        }
        return resolveResource(errorViewName, model);
    }
}
如何定制错误的页面;
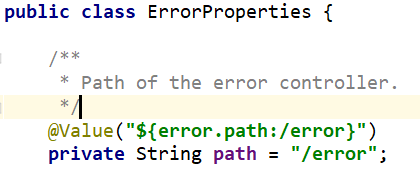
1)、有模板引擎的情况下;error/状态码; 【将错误页面命名为 错误状态码.html 放在模板引擎文件夹templates里面的error文件夹下】,发生此状态码的错误就会来到对应的页面;
可以使用4xx和5xx作为错误页面的文件名来匹配这种类型的所有错误,精确优先(优先寻找精确的状态码.html);
页面能获取的信息;
<h1>status:[[${status}]]</h1>
<h2>timestamp:[[${timestamp}]]</h2>
<h2>exception:[[${exception}]]</h2>
<h2>message:[[${message}]]</h2>
<h2>ext:[[${ext.code}]]</h2>
<h2>ext:[[${ext.message}]]</h2>
2)、没有模板引擎(模板引擎找不到这个错误页面),静态资源文件夹下找;
3)、以上都没有错误页面,就是默认来到SpringBoot默认的错误提示页面;
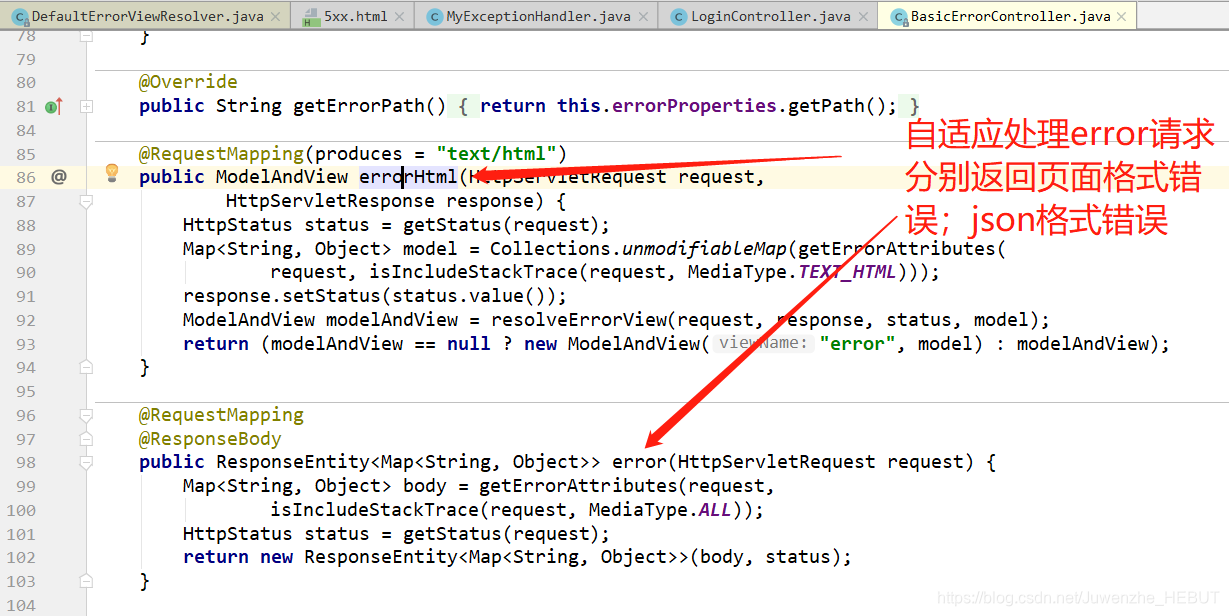
☆ 5.返回错误json数据的定制:
|- 原理:
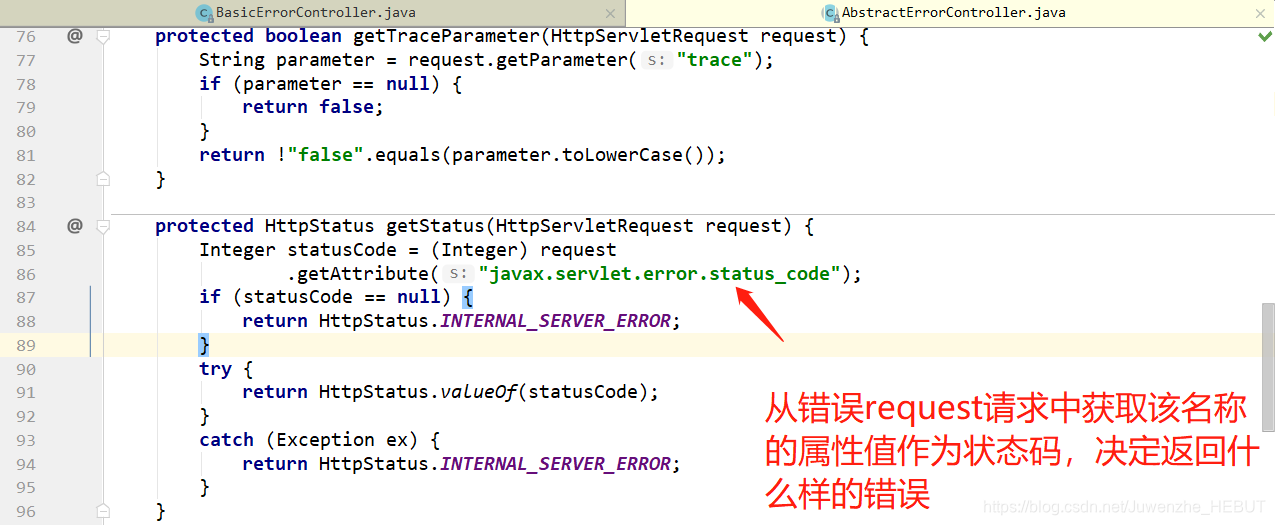
出现错误以后,会来到/error请求,会被BasicErrorController处理,响应出去可以获取的数据是由getErrorAttributes得到的,源码如下:
|- 实践:
1)借助SpringMVC的ExceptionHandler注解完成,编写MyExceptionHandler类:
package com.springboot.web.exception;

import org.springframework.web.bind.annotation.ControllerAdvice;
import org.springframework.web.bind.annotation.ExceptionHandler;
import org.springframework.web.bind.annotation.ResponseBody;

import javax.servlet.http.HttpServletRequest;
import java.util.HashMap;
import java.util.Map;

/**
 * @author Jupiter
 * @date 2019/6/18-21:06
 * @description
 */
@ControllerAdvice
public class MyExceptionHandler {

    @ExceptionHandler(UserNotExistException.class)
    public String userNotExistException(Exception e, HttpServletRequest request){

        //自定义异常返回值
        Map<String, Object> map = new HashMap<>();
        map.put("message", "用户不存在");
        map.put("code", "user.notexist");

        //设置错误类型
        request.setAttribute("javax.servlet.error.status_code",500 );
        request.setAttribute("ext", map);

        //所有的错误交给BasicErrorController自适应处理
        return "forward:/error";
    }

}
2)编写异常类
package com.springboot.web.exception;
/**
 * @author Jupiter
 * @date 2019/6/18-21:08
 * @description
 */
public class UserNotExistException extends RuntimeException {
    public UserNotExistException() {
        super("用户不存在");
    }
}
3)接收用户请求
@RequestMapping(value = "/user/aaa")
public String hello(@PathParam("username") String username){
    if (!"haha".equals(username)){
        throw new UserNotExistException();
    }else{return "success";}
}
4)页面取出封装的错误信息
<h1>status:[[${status}]]</h1>
<h2>timestamp:[[${timestamp}]]</h2>
<h2>exception:[[${exception}]]</h2>
<h2>message:[[${message}]]</h2>
<h2>ext:[[${ext.code}]]</h2>
<h2>ext:[[${ext.message}]]</h2>
5)注:对于公共的错误信息添加,原理与方法:
原理:
SpringBoot自动配置了默认的公共错误信息:
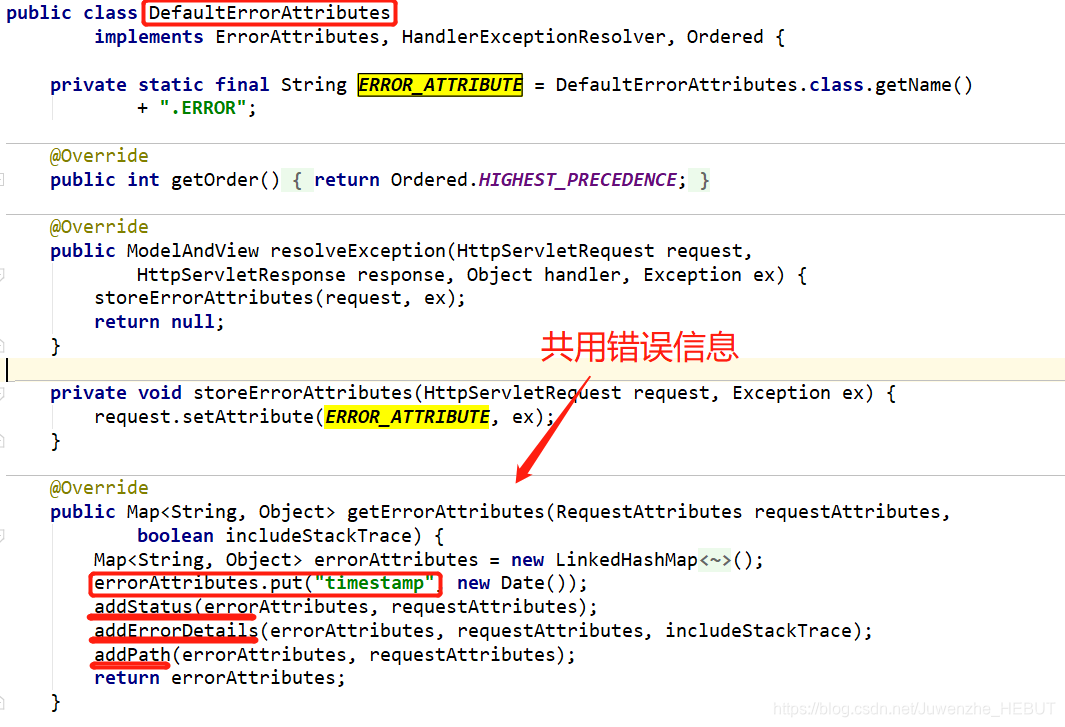
想要添加,可以写默认配置类的继承子类,并添加到Spring容器中,实践:
package com.springboot.web.component;
import org.springframework.boot.autoconfigure.web.DefaultErrorAttributes;
import org.springframework.stereotype.Component;
import org.springframework.web.context.request.RequestAttributes;
import java.util.Map;
/**
* @author Jupiter
* @date 2019/6/18-22:52
* @description
*/
@Component
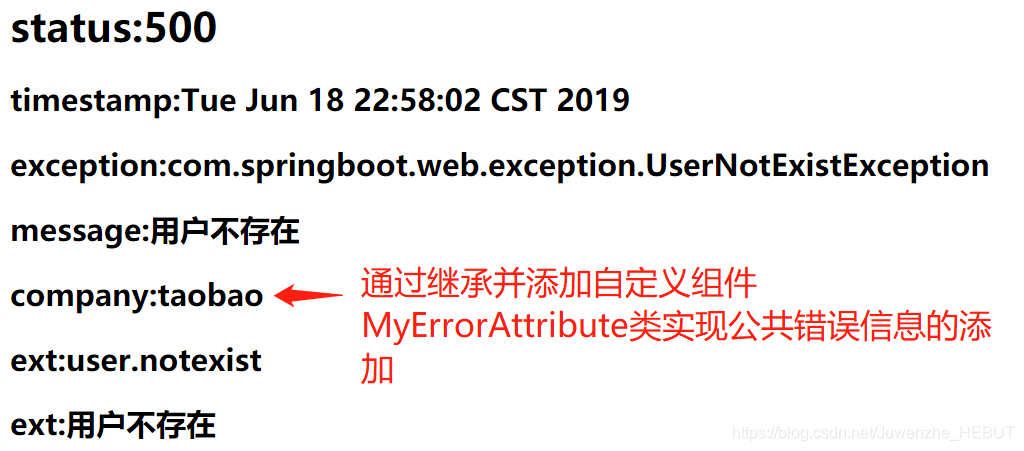
public class MyErrorAttributes extends DefaultErrorAttributes {
@Override
public Map<String, Object> getErrorAttributes(RequestAttributes requestAttributes, boolean includeStackTrace) {
Map<String, Object> map = super.getErrorAttributes(requestAttributes, includeStackTrace);
map.put("company", "taobao");
return map;
}
} 页面取出封装的错误信息:<h2>company:[[${company}]]</h2>,效果:


 1916
1916


 被折叠的 条评论
为什么被折叠?
被折叠的 条评论
为什么被折叠?
 到【灌水乐园】发言


