


准 备
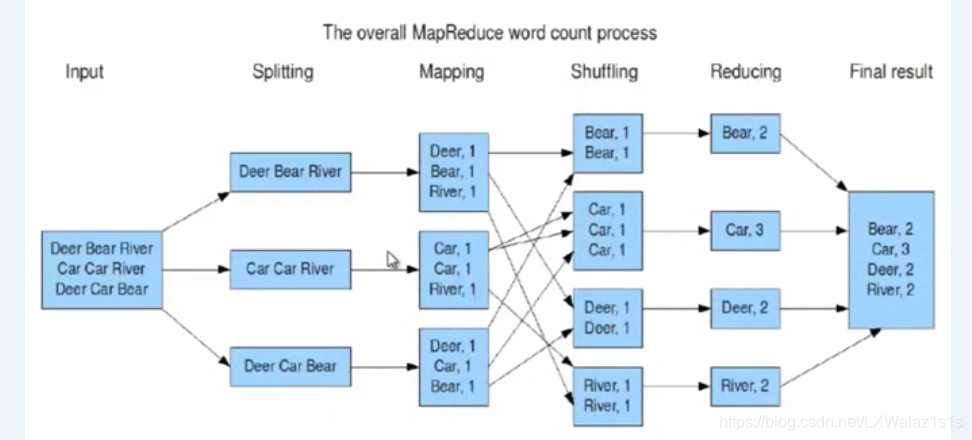
关于mapreduce的原理,说的再天花乱坠,也还是原理,如图1,用程序练习一个简单的word count程序,采用IDE+Maven简单的撸一把,下一篇博客可以搞点有趣的,哎呀,不得不说Maven这个东西真是太好用了,想起以前手动导依赖的Jar包,简直苦不堪言。
测试数据如下,在集群hdfs上/tmp/wcinput/wordcount.xt下文件:
hello myname hadoop world lau hello map
hdfs spark hive reduce map zookeeper
world word log hdfs
myname hive hi lau
编写项目
| Java基本类型 | Writable实现 | 序列化大小(字节) |
|---|---|---|
| boolean | BooleanWritable | 1 |
| byte | ByteWritable | 1 |
| short | ShortWritable | 2 |
| int | IntWritable | 4 |
| int | VintWritable(可变长) | 1~5 |
| float | FloatWritable | 4 |
| long | LongWritable | 8 |
| long | VlongWritable(可变长) | 1~9 |
| double | DoubleWritable | 8 |
| String | Text | 最大2G |
首先普及下,Hadoop自带有org.apache,hadoop.io包,包含广泛的Writable类,即有自己的数据类型(真是的,既然是Java写的,还搞得这么生硬,吐槽下!),对比如表1,特变说明下,char是存储在IntWritable内,Writable类不能直接赋给Java的基本数据类型,需要通过.get()和.set两个方法勇于读取或存储封装的Writable类的值给到Java的基本类型的变量,具体可参考下面Reducer Class里面“ sum=sum+i.get(); ”这句语句;
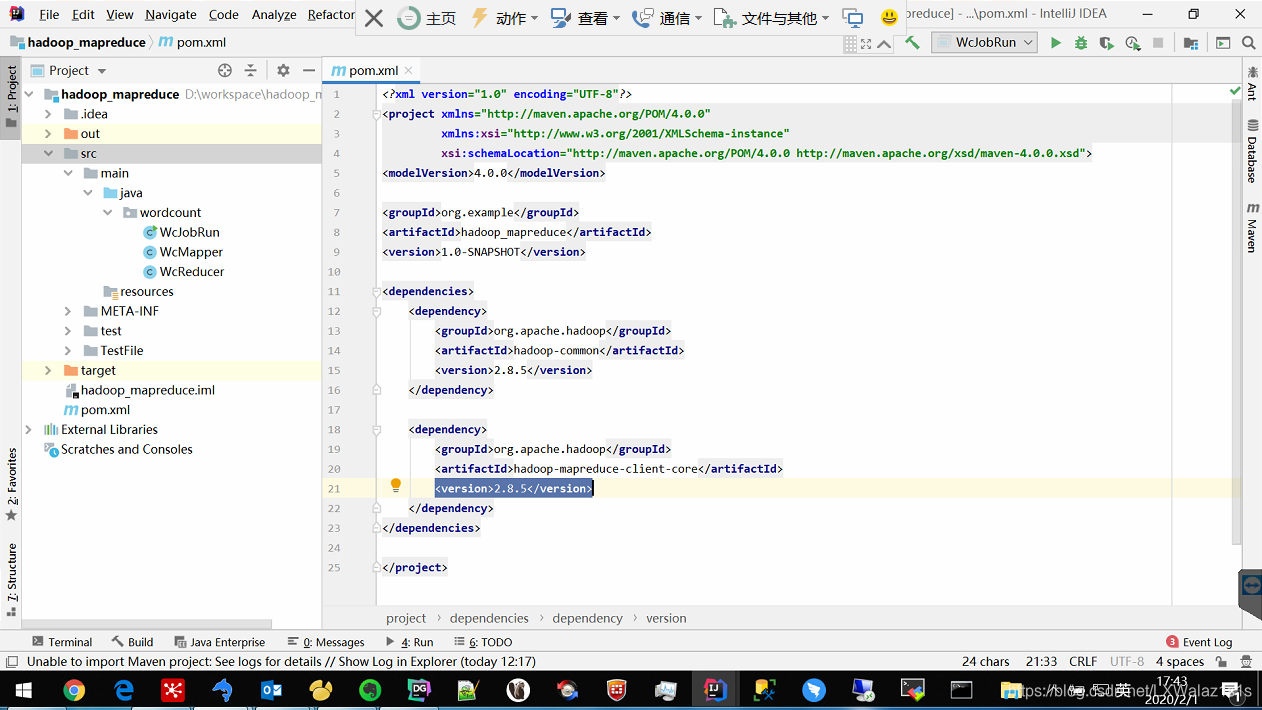
1)打开IDE,新建一个Maven项目,如图2,Maven的pom.xml配置如下,只要引用两个dependency就行了,连上网,会自动去下载mapreduce需要依赖的Jar包,怎一个爽子了得。
<?xml version="1.0" encoding="UTF-8"?>
<project xmlns="http://maven.apache.org/POM/4.0.0"
        xmlns:xsi="http://www.w3.org/2001/XMLSchema-instance"
        xsi:schemaLocation="http://maven.apache.org/POM/4.0.0 http://maven.apache.org/xsd/maven-4.0.0.xsd">
<modelVersion>4.0.0</modelVersion>

<groupId>org.example</groupId>
<artifactId>hadoop_mapreduce</artifactId>
<version>1.0-SNAPSHOT</version>

<dependencies>
   <dependency>
       <groupId>org.apache.hadoop</groupId>
       <artifactId>hadoop-common</artifactId>
       <version>2.8.5</version>
   </dependency>

   <dependency>
       <groupId>org.apache.hadoop</groupId>
       <artifactId>hadoop-mapreduce-client-core</artifactId>
       <version>2.8.5</version>
   </dependency>
</dependencies>

</project>
2)新建一个wordcount的package,然后在该package下新建一个WcMapper的Java Class,开始编Map程序,具体代码内容如下:
package wordcount;

import org.apache.hadoop.io.IntWritable;
import org.apache.hadoop.io.LongWritable;
import org.apache.hadoop.io.Text;
import org.apache.hadoop.mapreduce.Mapper;

import java.io.IOException;
import java.util.StringTokenizer;

//每个自定义的Mapper都继承于Mappeer基类,以及声明自己Mapper的输入key,value和输出key value
public class WcMapper extends Mapper <LongWritable, Text,Text, IntWritable>
{
  @Override
  //重写map方法,默认读入流每次调用map方法会传入split中的一行数据key:该数据所在文件中的位置下标,value,这行数据
  protected void map(LongWritable key, Text value, Context context) throws IOException, InterruptedException
  {
      String line = value.toString();  //value本身是text型,需要转化成string
      StringTokenizer st =new StringTokenizer(line);  //利用StringTokenizer将一行数据按空格分开,StringTokenizer方法默认按空格分开
      while (st.hasMoreTokens())
      {
          String world =st.nextToken();
          context.write(new Text(world),new IntWritable(1)); //每有一个单词,输出该单词并且计数为1
      }

  }
}
3)这次重在实现程序,所以简单的只写Map和Reduce,整个Shuffle阶段都交给MapReduce框架默认处理,接下来就编写Reduce部分,一样在package wordcount下新建一个Java Class文件WcReducer,具体代码如下:
package wordcount;

import org.apache.hadoop.io.IntWritable;
import org.apache.hadoop.io.Text;
import org.apache.hadoop.mapreduce.Reducer;

import java.io.IOException;

//每个自定义的reducer都需要继承于reduce的基类Reducer,并先声明自定义reducer的输入输出类型
public class WcReducer extends Reducer<Text, IntWritable, Text,IntWritable> {
    @Override
    //重写reduce函数,注意reduce前会把相同key shuffle输出结果合并掉,所以得到的value是一个很大的集合,如key=aaa,value=[1,2,4,6,7]
    // 但是又不好把
    //整个集合传给reduce,就选择传一个迭代器iterable
    protected void reduce(Text key, Iterable<IntWritable> iterable, Context context) throws IOException, InterruptedException
    {
        int sum=0;
        for(IntWritable i:iterable)
        {
            sum=sum+i.get(); //i是IntWritable,采用i.get()将i转成整形
        }
        context.write(key,new IntWritable(sum)); //输出每次的单词和统计整数

    }
}
4)Map和Reduce写完了,接下来就是让这个Job Run起来的主函数编写,在同一个package下,新建个WcJobRun的Java Class文件,具体代码如下:
package wordcount;


import org.apache.hadoop.conf.Configuration;

import org.apache.hadoop.fs.FileSystem;
import org.apache.hadoop.fs.Path;
import org.apache.hadoop.io.IntWritable;
import org.apache.hadoop.io.Text;
import org.apache.hadoop.mapreduce.Job;
import org.apache.hadoop.mapreduce.lib.input.FileInputFormat;
import org.apache.hadoop.mapreduce.lib.output.FileOutputFormat;


public class WcJobRun {
    public static void main(String[] args)
    {
        //获取环境变量,设置提交该Job的mapred.job.tracker
        Configuration conf =new Configuration();

        //配置mapreduce.job.tracker,
        //和集群mapred-site.xml里面的属性 保持一致即可,
        //此句也可以不写,直接省略。
        conf.set("mapreduce.job.tracker","dw-cluster-master:9001");//这里

        try
        {
            //mapreduce输出结果会自动创建folder,
            //但是如果指定的输出target folder如果已存在,是会报错的,
            //这段是做容错,可以让程序rerun
            Path outputPath= new Path(args[2]);
            FileSystem fileSystem =FileSystem.get(conf);
            if(fileSystem.exists(outputPath)){
                fileSystem.delete(outputPath,true);
                System.out.println("outputPath is exist,but has deleted!");
            }

            Job myjob= Job.getInstance(conf);
            myjob.setJarByClass(WcJobRun.class);//指定调用的WcJobRun Class打成Jar再跑
            myjob.setMapperClass(WcMapper.class);//指定Map类
            myjob.setReducerClass(WcReducer.class);//指定Reduce类
            myjob.setCombinerClass(WcReducer.class);//设置combiner,也可以省略
            myjob.setMapOutputKeyClass(Text.class);//指定Map的输出key类型
            myjob.setMapOutputValueClass(IntWritable.class);//指定Map输出的value的类型
            myjob.setNumReduceTasks(1);//指定reduce的个数,如果不写,默认为1个
            //为什么用args[1],因为args[0]第一个参数留给main方法所在的Class
            FileInputFormat.addInputPath(myjob,new Path(args[1]));//指定整个Job的输入文件路径,args[1]表示调用Jar包时,紧跟Jar包的第二个参数
            //FileInputFormat.addInputPath(myjob,new Path("/tmp/wcinput/wordcount.xt"));
//指定整个Job的输出文件路径,args[2]表示调用Jar包时,紧跟Jar包的第三个参数
            FileOutputFormat.setOutputPath(myjob,new Path(args[2]));
            //FileOutputFormat.setOutputPath(myjob,new Path("/tmp/wcoutput"));
            System.exit(myjob.waitForCompletion(true)?0:1);//等待Job完成,正确完成则退出
        }
        catch (Exception e)
        {
            e.printStackTrace();
        }


    }
}
打包部署
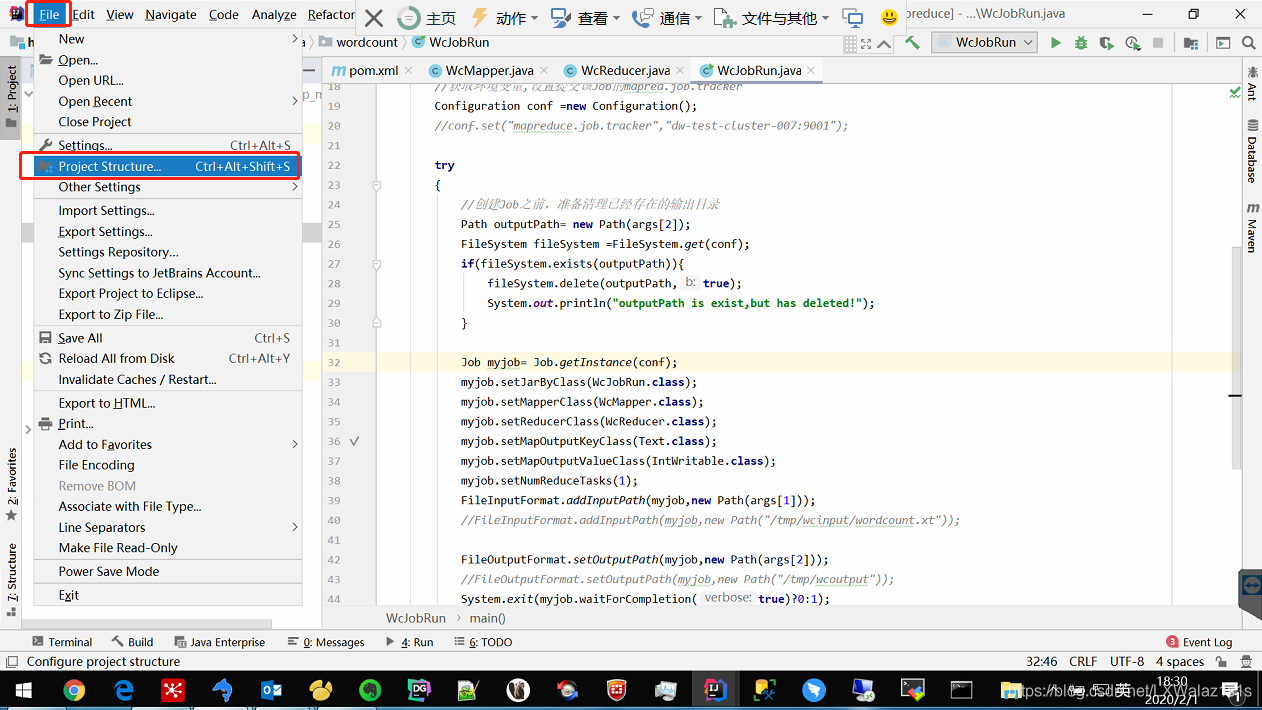
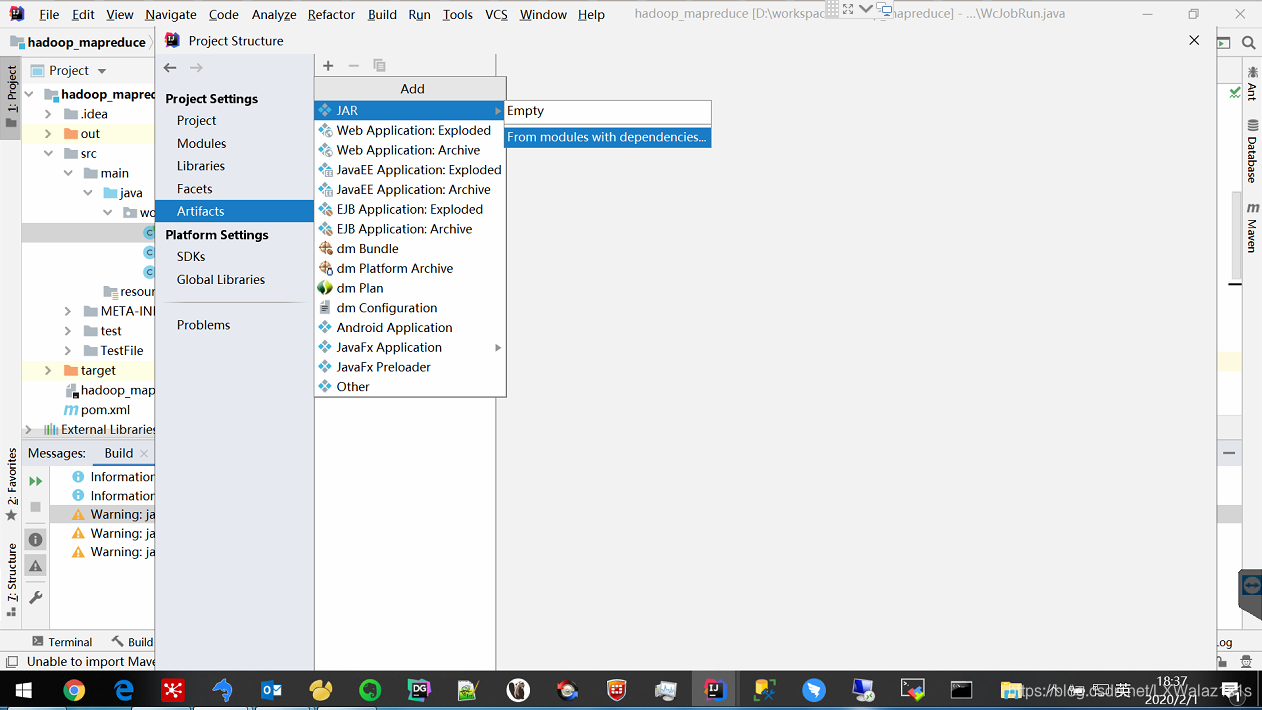
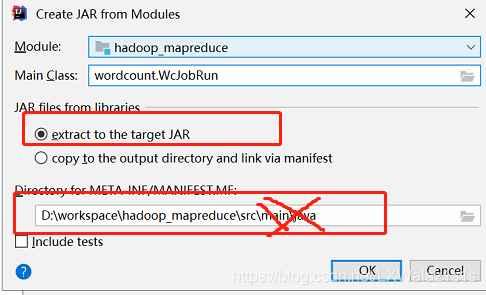
1)将程序打成Jar包,如图3,点击菜单栏File,选择Project Structure…,跳转图4,然后选择Artifact,然后中间栏的“+”号,然后选择Jar,选择From modules with dependence,然后调转界图5,图5重点说一下:
- 第一点:JAR files from libraries,如果选择了“extract to the target JAR”则只会打包自己的程序,如果勾选了“copy to the out directory and link via manifest”则会吧Maven依赖的所有Jar包都打包出来,比如那一些了的hadoop Jar包,这里我们显然不需要这一些列Jar,因为集群里面都有,所以勾选“extract to the target JAR”;
- 第二点:选择打包的路劲,最好保留到…/src/即可,如“D:\workspace\hadoop_mapreduce\src\”,后面的就不要带出来,因为如果你文件排版不规范的话,打包太细,会遗漏文件,坑的自己吐血的那种;
- 第三点:如果反复打包,会报错图6,找到该报错所说的文件,删除即可。
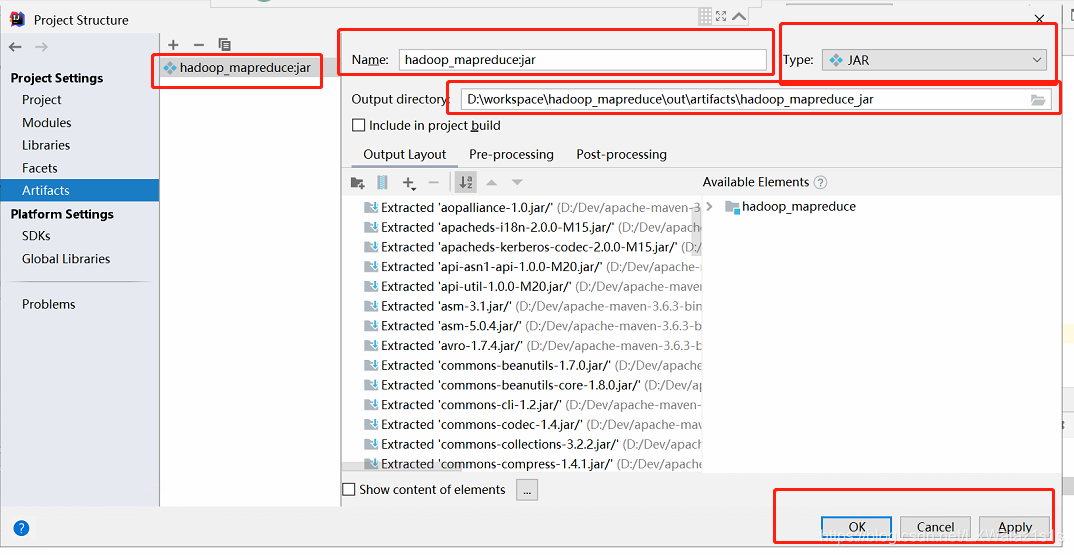
2)以上一切就绪后,点击确定跳转图7,注意下标红部分,Name看不顺眼可以改,一切好了后,点击Apply 和Ok后会回到主界面;
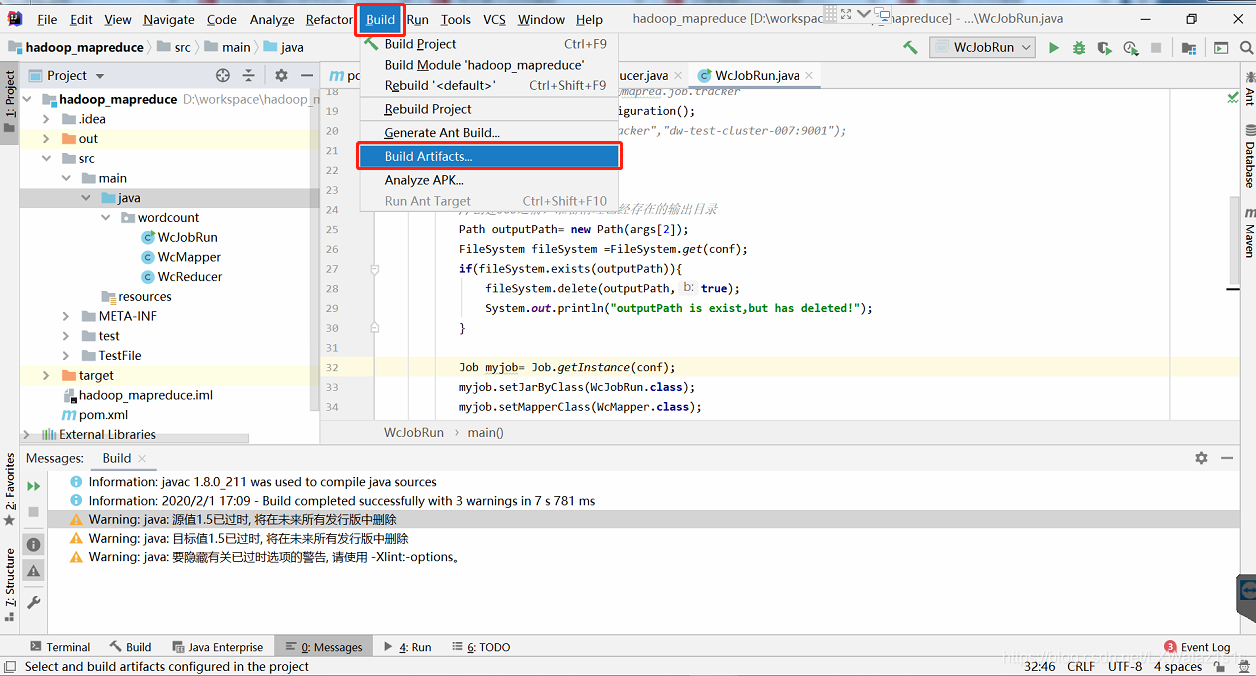
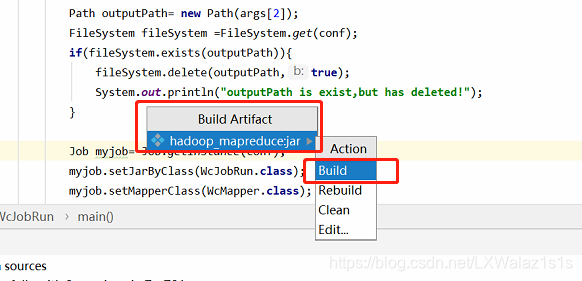
3)然后如图8,点击菜单栏的Build,选择Build Artifact,跳转图9,选择Build,即可大功告成;
4)在该项目下,如图10,多了个out folder,里面的jar包就是你想要的(图10 我测试了很多功能,打包了多次,实际上只会有一个jar包和folder);
5)将最终的Jar上传到集群即可完成 部署。


在集群上调用
1)在集群上调用其实很简单,一句指令(我的hadoop配置过环境变量):
hadoop jar /home/liuxiaowei/Java/wc_count/hadoop_mapreduce_v6.jar wordcount.WcJobRun /tmp/wcinput/wordcount.xt /tmp/wcoutput3
2)指令解析:
hadoop jar jar_path args[0] args[1] args[2]
hadoop jar 是调jar的通用格式;
后面接jar包的路径;
后面接的第一个参数最好是main函数所在的Class,然后第二个参数是在WcJobRun Class指定的args[1],指的是整个mapreduce job的输入文件;
第三个参数是WcJobRun Class指定的args[2],指的是整个mapreduce job的输出文件;
现在想想为什么要用args[1]和args[2]而直接跳过args[0],就很明白了。
3)整体结果如下:
[liuxiaowei@dw-cluster-master wc_count]$ hadoop jar /home/liuxiaowei/Java/wc_count/hadoop_mapreduce_v6.jar wordcount.WcJobRun /tmp/wcinput/wordcount.xt /tmp/wcoutput3
outputPath is exist,but has deleted!
20/02/01 17:11:11 INFO client.RMProxy: Connecting to ResourceManager at dw-cluster-master/10.216.10.141:8032
20/02/01 17:11:12 WARN mapreduce.JobResourceUploader: Hadoop command-line option parsing not performed. Implement the Tool interface and execute your application with ToolRunner to remedy this.
20/02/01 17:11:12 INFO input.FileInputFormat: Total input files to process : 1
20/02/01 17:11:12 INFO mapreduce.JobSubmitter: number of splits:1
20/02/01 17:11:13 INFO mapreduce.JobSubmitter: Submitting tokens for job: job_1578394893972_0051
20/02/01 17:11:13 INFO impl.YarnClientImpl: Submitted application application_1578394893972_0051
20/02/01 17:11:13 INFO mapreduce.Job: The url to track the job: http://dw-cluster-master:8088/proxy/application_1578394893972_0051/
20/02/01 17:11:13 INFO mapreduce.Job: Running job: job_1578394893972_0051
20/02/01 17:11:19 INFO mapreduce.Job: Job job_1578394893972_0051 running in uber mode : false
20/02/01 17:11:19 INFO mapreduce.Job:  map 0% reduce 0%
20/02/01 17:11:24 INFO mapreduce.Job:  map 100% reduce 0%
20/02/01 17:11:30 INFO mapreduce.Job:  map 100% reduce 100%
20/02/01 17:11:30 INFO mapreduce.Job: Job job_1578394893972_0051 completed successfully
20/02/01 17:11:30 INFO mapreduce.Job: Counters: 49
        File System Counters
                FILE: Number of bytes read=248
                FILE: Number of bytes written=321577
                FILE: Number of read operations=0
                FILE: Number of large read operations=0
                FILE: Number of write operations=0
                HDFS: Number of bytes read=234
                HDFS: Number of bytes written=107
                HDFS: Number of read operations=6
                HDFS: Number of large read operations=0
                HDFS: Number of write operations=2
        Job Counters
                Launched map tasks=1
                Launched reduce tasks=1
                Data-local map tasks=1
                Total time spent by all maps in occupied slots (ms)=3195
                Total time spent by all reduces in occupied slots (ms)=3417
                Total time spent by all map tasks (ms)=3195
                Total time spent by all reduce tasks (ms)=3417
                Total vcore-milliseconds taken by all map tasks=3195
                Total vcore-milliseconds taken by all reduce tasks=3417
                Total megabyte-milliseconds taken by all map tasks=3271680
                Total megabyte-milliseconds taken by all reduce tasks=3499008
        Map-Reduce Framework
                Map input records=4
                Map output records=21
                Map output bytes=200
                Map output materialized bytes=248
                Input split bytes=116
                Combine input records=0
                Combine output records=0
                Reduce input groups=14
                Reduce shuffle bytes=248
                Reduce input records=21
                Reduce output records=14
                Spilled Records=42
                Shuffled Maps =1
                Failed Shuffles=0
                Merged Map outputs=1
                GC time elapsed (ms)=96
                CPU time spent (ms)=1920
                Physical memory (bytes) snapshot=1478197248
                Virtual memory (bytes) snapshot=12747206656
                Total committed heap usage (bytes)=1520959488
        Shuffle Errors
                BAD_ID=0
                CONNECTION=0
                IO_ERROR=0
                WRONG_LENGTH=0
                WRONG_MAP=0
                WRONG_REDUCE=0
        File Input Format Counters
                Bytes Read=118
        File Output Format Counters
                Bytes Written=107
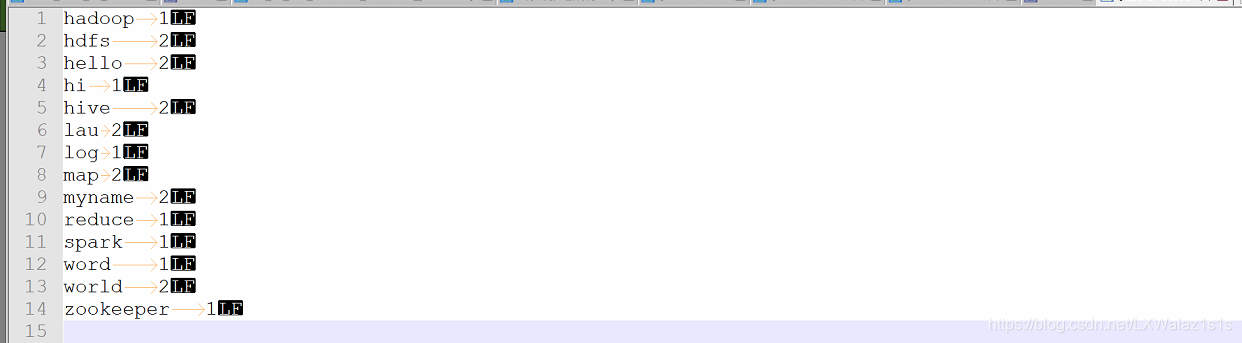
4)输出文件为如图11:
后面玩票大的,传送门Hadoop集群大数据解决方案之MapReduce 程序实战进阶(自定义partition&sort&group)(六)


 1391
1391


 被折叠的 条评论
为什么被折叠?
被折叠的 条评论
为什么被折叠?
 到【灌水乐园】发言


