


转载请注明出处:http://blog.csdn.net/harryweasley/article/details/41413547
前言:前段时间,由于自己比较悠闲,没有什么工作上的事情所做,所以当时就想,何不做一下qq聊天列表的item右滑出现后面的视图,然后我就开始着手自己做,之后无意间发现了可以利用一个github开源项目swiplistview完成,但是当我查看那些swiplistview的相关文档时,很不全面,github官网上下载的和之前他们写的文档已经有所不同,所以在这里我就重新来写一下怎么使用swiplistview的准备阶段。
之前的文档都是说,当从官网上下载下来后,有两个文件,一个是lib:android-swiplistview,另一个是例子:SwipListViewExampleActivity,但是现在下载后,解压后是这样的
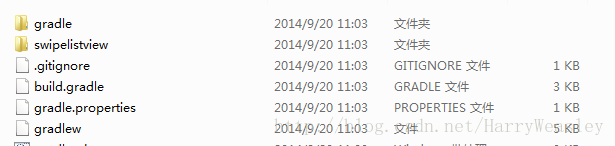
显然已经和之前的不一样了,现在的官网上是用了gradle来构造Android程序,但我以前根本没有接触过gradle,所以只能自己去找以前的那个swiplistview。当时我也是纠结了很久,自己翻墙出去,各种Google,最后终于找到了,swiplistview,我之后会全部上传,共享给大家。
下面是qq的效果图:

下面是我这个项目的效果图:
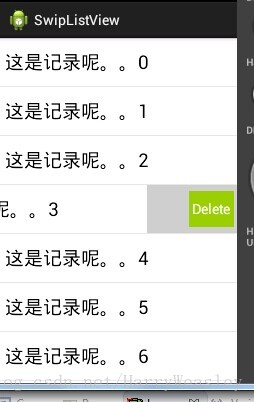
现在我们进入正题:
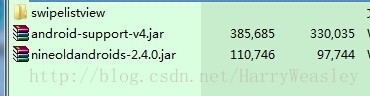
我们一共需要两个jar包,一个swiplistview,如图所示:这三个下载地址http://download.csdn.net/detail/harryweasley/8190519
1. 引入android-swipelistview库:导入开源库,用Import选项,然后Android选项下的“Existing Android Code Into Workspace”引入库;在这里将“copy projects into workspace”前面打钩哦
2.引入android-swipelistview的依赖库nineoldandroids-2.4.0.jar:建立一个libs文件夹,将nineoldandroids-2.4.0.jar拷贝到libs文件夹之下;
3.引入android-swipelistview的依赖内部库android-support-v4.jar:项目的Android Tools选项,“Add Support Library”来增加android-support-v4库;(注:如果找不到对应的support库,可以通过SDK Manager来进行下载)
4.编译android-swipelistview库的jar包:项目的Properties选项,Android选项,勾选"Is Library";
5.编译android-swipelistview项目,在项目的bin目录应该能看到android-swipelistview.jar包。
这样,我们就完成了swiplistview的库了。
然后我们自己建立一个Android程序SwipListView进行测试,建好后,开始导入库,项目的Properties选项,Android选项,Library框选择add按钮添加swipelistview.jar包;
这里需要注意:swipelistview这个lib必须和SwiplistView在同一工作区间,否则导入的包前面会有红叉。如图所示

我们可以看下官网上关于SwipListView的描述
If you decide to use SwipeListView as a view, you can define it in your xml layout like this:
    <com.fortysevendeg.swipelistview.SwipeListView
            xmlns:swipe="http://schemas.android.com/apk/res-auto"
            android:id="@+id/example_lv_list"
            android:listSelector="#00000000"
            android:layout_width="fill_parent"
            android:layout_height="wrap_content"
            swipe:swipeFrontView="@+id/front"
            swipe:swipeBackView="@+id/back"
            swipe:swipeActionLeft="[reveal | dismiss]"
            swipe:swipeActionRight="[reveal | dismiss]"
            swipe:swipeMode="[none | both | right | left]"
            swipe:swipeCloseAllItemsWhenMoveList="[true | false]"
            swipe:swipeOpenOnLongPress="[true | false]"
            swipe:swipeAnimationTime="[miliseconds]"
            swipe:swipeOffsetLeft="[dimension]"
            swipe:swipeOffsetRight="[dimension]"
            />
swipeFrontView- Required - front view id. 即ListView Item正常显示的控件Id,且必须与Item的布局文件中的控件id一样swipeBackView- Required - back view id. 手指滑动时显示的,隐藏在FrontView后面,且必须与item的布局文件中控件Id一样swipeActionLeft- Optional - left swipe action Default: 'reveal' 左滑的动作,默认reveal,即显示BackView,还有dismiss,choice会触发响应的方法。swipeActionRight- Optional - right swipe action Default: 'reveal' 同上swipeMode- Gestures to enable or 'none'. Default: 'both' 设置左滑、右滑、都支持swipeCloseAllItemsWhenMoveList- Close revealed items on list motion. Default: 'true' 当滚动listview时,关闭所有展开的Item,最好不要设置为false,由于item的复用,false存在一些问题。swipeOpenOnLongPress- Reveal on long press Default: 'true' 长按时触发显示swipeAnimationTime- item drop animation time. Default: android configuration 动画时间长度swipeOffsetLeft- left offset 左偏移量swipeOffsetRight- right offset 右偏移量
首先是activity_main.xml下的代码:
接下来是itm.xml的代码:
这里要强调一下:对应布局的id和swipeListView中的frontView和backView的Id一致。
接下来是DataAdapter的代码
最后是MainActivity的代码了,都比较简单:
这样就大功告成了。
上面的都是最基本的功能,完成了上面的那些,然后我们就可以做相应的点击事件了。所以一起加油吧。
最后还有一个我在github下载的一个Demo,但并不是47deg的,是一个普通人写的,我给她上传了,下载地址http://download.csdn.net/detail/harryweasley/8190525
这里多说一下,你刚导入Eclipse时,会报一个不能解析android-14,你重启一下Eclipse,就好了。第二个问题,重启Eclipse后,bin文件里又有错误了,删除bin文件,Eclipse会重新自动生成一个,这样两个小bug就解决了。
-
顶
-
踩
-
猜你在找
转载请注明出处:http://blog.csdn.net/harryweasley/article/details/41413547
前言:前段时间,由于自己比较悠闲,没有什么工作上的事情所做,所以当时就想,何不做一下qq聊天列表的item右滑出现后面的视图,然后我就开始着手自己做,之后无意间发现了可以利用一个github开源项目swiplistview完成,但是当我查看那些swiplistview的相关文档时,很不全面,github官网上下载的和之前他们写的文档已经有所不同,所以在这里我就重新来写一下怎么使用swiplistview的准备阶段。
之前的文档都是说,当从官网上下载下来后,有两个文件,一个是lib:android-swiplistview,另一个是例子:SwipListViewExampleActivity,但是现在下载后,解压后是这样的
显然已经和之前的不一样了,现在的官网上是用了gradle来构造Android程序,但我以前根本没有接触过gradle,所以只能自己去找以前的那个swiplistview。当时我也是纠结了很久,自己翻墙出去,各种Google,最后终于找到了,swiplistview,我之后会全部上传,共享给大家。
下面是qq的效果图:
下面是我这个项目的效果图:
现在我们进入正题:
我们一共需要两个jar包,一个swiplistview,如图所示:这三个下载地址http://download.csdn.net/detail/harryweasley/8190519
1. 引入android-swipelistview库:导入开源库,用Import选项,然后Android选项下的“Existing Android Code Into Workspace”引入库;在这里将“copy projects into workspace”前面打钩哦
2.引入android-swipelistview的依赖库nineoldandroids-2.4.0.jar:建立一个libs文件夹,将nineoldandroids-2.4.0.jar拷贝到libs文件夹之下;
3.引入android-swipelistview的依赖内部库android-support-v4.jar:项目的Android Tools选项,“Add Support Library”来增加android-support-v4库;(注:如果找不到对应的support库,可以通过SDK Manager来进行下载)
4.编译android-swipelistview库的jar包:项目的Properties选项,Android选项,勾选"Is Library";
5.编译android-swipelistview项目,在项目的bin目录应该能看到android-swipelistview.jar包。
这样,我们就完成了swiplistview的库了。
然后我们自己建立一个Android程序SwipListView进行测试,建好后,开始导入库,项目的Properties选项,Android选项,Library框选择add按钮添加swipelistview.jar包;
这里需要注意:swipelistview这个lib必须和SwiplistView在同一工作区间,否则导入的包前面会有红叉。如图所示
我们可以看下官网上关于SwipListView的描述
If you decide to use SwipeListView as a view, you can define it in your xml layout like this:
    <com.fortysevendeg.swipelistview.SwipeListView
            xmlns:swipe="http://schemas.android.com/apk/res-auto"
            android:id="@+id/example_lv_list"
            android:listSelector="#00000000"
            android:layout_width="fill_parent"
            android:layout_height="wrap_content"
            swipe:swipeFrontView="@+id/front"
            swipe:swipeBackView="@+id/back"
            swipe:swipeActionLeft="[reveal | dismiss]"
            swipe:swipeActionRight="[reveal | dismiss]"
            swipe:swipeMode="[none | both | right | left]"
            swipe:swipeCloseAllItemsWhenMoveList="[true | false]"
            swipe:swipeOpenOnLongPress="[true | false]"
            swipe:swipeAnimationTime="[miliseconds]"
            swipe:swipeOffsetLeft="[dimension]"
            swipe:swipeOffsetRight="[dimension]"
            />
swipeFrontView- Required - front view id. 即ListView Item正常显示的控件Id,且必须与Item的布局文件中的控件id一样swipeBackView- Required - back view id. 手指滑动时显示的,隐藏在FrontView后面,且必须与item的布局文件中控件Id一样swipeActionLeft- Optional - left swipe action Default: 'reveal' 左滑的动作,默认reveal,即显示BackView,还有dismiss,choice会触发响应的方法。swipeActionRight- Optional - right swipe action Default: 'reveal' 同上swipeMode- Gestures to enable or 'none'. Default: 'both' 设置左滑、右滑、都支持swipeCloseAllItemsWhenMoveList- Close revealed items on list motion. Default: 'true' 当滚动listview时,关闭所有展开的Item,最好不要设置为false,由于item的复用,false存在一些问题。swipeOpenOnLongPress- Reveal on long press Default: 'true' 长按时触发显示swipeAnimationTime- item drop animation time. Default: android configuration 动画时间长度swipeOffsetLeft- left offset 左偏移量swipeOffsetRight- right offset 右偏移量
首先是activity_main.xml下的代码:
接下来是itm.xml的代码:
这里要强调一下:对应布局的id和swipeListView中的frontView和backView的Id一致。
接下来是DataAdapter的代码
最后是MainActivity的代码了,都比较简单:
这样就大功告成了。
上面的都是最基本的功能,完成了上面的那些,然后我们就可以做相应的点击事件了。所以一起加油吧。
最后还有一个我在github下载的一个Demo,但并不是47deg的,是一个普通人写的,我给她上传了,下载地址http://download.csdn.net/detail/harryweasley/8190525
这里多说一下,你刚导入Eclipse时,会报一个不能解析android-14,你重启一下Eclipse,就好了。第二个问题,重启Eclipse后,bin文件里又有错误了,删除bin文件,Eclipse会重新自动生成一个,这样两个小bug就解决了。
-
顶
-
踩
-
猜你在找
-
3楼
oaosj2015-09-29 16:16发表
-

- 先收藏了。有时间看,这两天项目的事太忙-.-这是我之前一直琢磨的事情,自己想不出来又没在网上搜索办法,碰巧看到了。给博主一个赞-0-
-
2楼
小鱼20122015-02-11 14:21发表
-

-
我想问一下如果我position = 0 时,这一条是不可滑动的,其他可以滑动 并删除,这个怎么设置?
-
Re:
HarryWeasley2015-02-11 17:41发表
-

- 回复小鱼2012:我是这样想的,你既然不想让第一个item滑动,那你就完全可以将他弄出来啊,不需要共用一组数据的,因为你的第一个item的数据一直在,不会有改变
-
-
1楼
HarryWeasley2014-11-24 09:22发表
-
- http://download.csdn.net/detail/harryweasley/8190511这个是我自己的那个程序,就是上面那个效果图的小Demo,昨天不知道为什么上传后一直没显示,今天才显示出来


 5760
5760

 被折叠的 条评论
为什么被折叠?
被折叠的 条评论
为什么被折叠?
 到【灌水乐园】发言


3楼 oaosj2015-09-29 16:16发表 [回复]-

-
先收藏了。有时间看,这两天项目的事太忙-.-这是我之前一直琢磨的事情,自己想不出来又没在网上搜索办法,碰巧看到了。给博主一个赞-0-
2楼 小鱼20122015-02-11 14:21发表 [回复]-

-
我想问一下如果我position = 0 时,这一条是不可滑动的,其他可以滑动 并删除,这个怎么设置?
Re: HarryWeasley2015-02-11 17:41发表 [回复]-

-
回复小鱼2012:我是这样想的,你既然不想让第一个item滑动,那你就完全可以将他弄出来啊,不需要共用一组数据的,因为你的第一个item的数据一直在,不会有改变
1楼 HarryWeasley2014-11-24 09:22发表 [回复] [引用] [举报]-

-
http://download.csdn.net/detail/harryweasley/8190511这个是我自己的那个程序,就是上面那个效果图的小Demo,昨天不知道为什么上传后一直没显示,今天才显示出来