


转自:http://www.uml.org.cn/mobiledev/201211221.asp
今天,我着重讲解下如下三个内容:
- measure过程
- WRAP_CONTENT、MATCH_PARENT/FILL_PARENT属性的原理说明
- xml布局文件解析成View树的流程分析。
希望对大家能有帮助。- - 分析版本基于Android 2.3 。
1、WRAP_CONTENT、MATCH_PARENT/FILL_PARENT
初入Android殿堂的同学们,对这三个属性一定又爱又恨。爱的是使用起来挺爽地---照葫芦画瓢即可,恨的
却是时常混淆这几个属性地意义,需要三思而后行。在带着大家重温下这几个属性的用法吧(希望我没有啰嗦)。
这三个属性都用来适应视图的水平或垂直大小,一个以视图的内容或尺寸为基础的布局比精确地指定视图范围
更加方便。
① fill_parent
设置一个视图的布局为fill_parent将强制性地使视图扩展至父元素大小。
② match_parent
Android 中match_parent和fill_parent意思一样,但match_parent更贴切,于是从2.2开始两个词都可以
用,但2.3版本后建议使用match_parent。
③ wrap_content
自适应大小,强制性地使视图扩展以便显示其全部内容。以TextView和ImageView控件为例,设置为
wrap_content将完整显示其内部的文本和图像。布局元素将根据内容更改大小。
可不要重复造轮子,以上摘自<<Android fill_parent、wrap_content和match_parent的区别>>。
当然,我们可以设置View的确切宽高,而不是由以上属性指定。
01.android:layout_weight="wrap_content" //自适应大小 02.android:layout_weight="match_parent" //与父视图等高 03.android:layout_weight="fill_parent" //与父视图等高 04.android:layout_weight="100dip" //精确设置高度值为 100dip |
接下来,我们需要转换下视角,看看ViewGroup.LayoutParams类及其派生类。
2、ViewGroup.LayoutParams类及其派生类
2.1、 ViewGroup.LayoutParams类说明
Android API中如下介绍:
LayoutParams are used by views to tell their parents how they want to be laid out.
意思大概是说: View通过LayoutParams类告诉其父视图它想要地大小(即,长度和宽度)。
因此,每个View都包含一个ViewGroup.LayoutParams类或者其派生类,View类依赖于ViewGroup.LayoutParams。
路径:frameworks\base\core\java\android\view\View.java
01.public class View implements Drawable.Callback, KeyEvent.Callback, AccessibilityEventSource {
02.  ...
03.  /**
04.   * The layout parameters associated with this view and used by the parent
05.   * {@link android.view.ViewGroup} to determine how this view should be
06.   * laid out.
07.   * {@hide}
08.   */
09.  //该View拥有的 LayoutParams属性,父试图添加该View时,会为其赋值,特别注意,其类型为ViewGroup.LayoutParams。
10.  protected ViewGroup.LayoutParams mLayoutParams;
11.  ...
12.} |
2.2、 ViewGroup.LayoutParams源码分析
路径位于:frameworks\base\core\java\android\view\ViewGroup.java
01.public abstract class ViewGroup extends View implements ViewParent, ViewManager {
02.    ...
03.     public static class LayoutParams {
04.        /**
05.         * Special value for the height or width requested by a View.
06.         * FILL_PARENT means that the view wants to be as big as its parent,
07.         * minus the parent's padding, if any. This value is deprecated
08.         * starting in API Level 8 and replaced by {@link #MATCH_PARENT}.
09.         */
10.        @Deprecated
11.        public static final int FILL_PARENT = -1;  // 注意值为-1,Android2.2版本不建议使用
12.        /**
13.         * Special value for the height or width requested by a View.
14.         * MATCH_PARENT means that the view wants to be as big as its parent,
15.         * minus the parent's padding, if any. Introduced in API Level 8.
16.         */
17.        public static final int MATCH_PARENT = -1; // 注意值为-1
18.        /**
19.         * Special value for the height or width requested by a View.
20.         * WRAP_CONTENT means that the view wants to be just large enough to fit
21.         * its own internal content, taking its own padding into account.
22.         */
23.        public static final int WRAP_CONTENT = -2; // 注意值为-2
24.        /**
25.         * Information about how wide the view wants to be. Can be one of the
26.         * constants FILL_PARENT (replaced by MATCH_PARENT ,
27.         * in API Level 8) or WRAP_CONTENT. or an exact size.
28.         */
29.        public int width;  //该View的宽度,可以为WRAP_CONTENT/MATCH_PARENT 或者一个具体值
30.        /**
31.         * Information about how tall the view wants to be. Can be one of the
32.         * constants FILL_PARENT (replaced by MATCH_PARENT ,
33.         * in API Level 8) or WRAP_CONTENT. or an exact size.
34.         */
35.        public int height; //该View的高度,可以为WRAP_CONTENT/MATCH_PARENT 或者一个具体值
36.        /**
37.         * Used to animate layouts.
38.         */
39.        public LayoutAnimationController.AnimationParameters layoutAnimationParameters;
40.        /**
41.         * Creates a new set of layout parameters. The values are extracted from
42.         * the supplied attributes set and context. The XML attributes mapped
43.         * to this set of layout parameters are:、
44.         */
45.        public LayoutParams(Context c, AttributeSet attrs) {
46.            TypedArray a = c.obtainStyledAttributes(attrs, R.styleable.ViewGroup_Layout);
47.            setBaseAttributes(a,
48.                    R.styleable.ViewGroup_Layout_layout_width,
49.                    R.styleable.ViewGroup_Layout_layout_height);
50.            a.recycle();
51.        }
52.
53.        /**
54.         * Creates a new set of layout parameters with the specified width
55.         * and height.
56.         */
57.        public LayoutParams(int width, int height) {
58.            this.width = width;
59.            this.height = height;
60.        }
61.        /**
62.         * Copy constructor. Clones the width and height values of the source.
63.         *
64.         * @param source The layout params to copy from.
65.         */
66.        public LayoutParams(LayoutParams source) {
67.            this.width = source.width;
68.            this.height = source.height;
69.        }
70.        /**
71.         * Used internally by MarginLayoutParams.
72.         * @hide
73.         */
74.        LayoutParams() {
75.        }
76.        /**
77.         * Extracts the layout parameters from the supplied attributes.
78.         *
79.         * @param a the style attributes to extract the parameters from
80.         * @param widthAttr the identifier of the width attribute
81.         * @param heightAttr the identifier of the height attribute
82.         */
83.        protected void setBaseAttributes(TypedArray a, int widthAttr, int heightAttr) {
84.            width = a.getLayoutDimension(widthAttr, "layout_width");
85.            height = a.getLayoutDimension(heightAttr, "layout_height");
86.        }
87.} |
我们发现FILL_PARENT/MATCH_PARENT值为 -1 ,WRAP_CONETENT值为-2,是不是有点诧异? 将值
设置为负值的目的是为了区别View的具体值(an exact size) 总是大于0的。
ViewGroup子类可以实现自定义LayoutParams,自定义LayoutParams提供了更好地扩展性,例如LinearLayout
就有LinearLayout. LayoutParams自定义类(见下文)。整个LayoutParams类家族还是挺复杂的。
ViewGroup.LayoutParams及其常用派生类的类图(部分类图)如下:
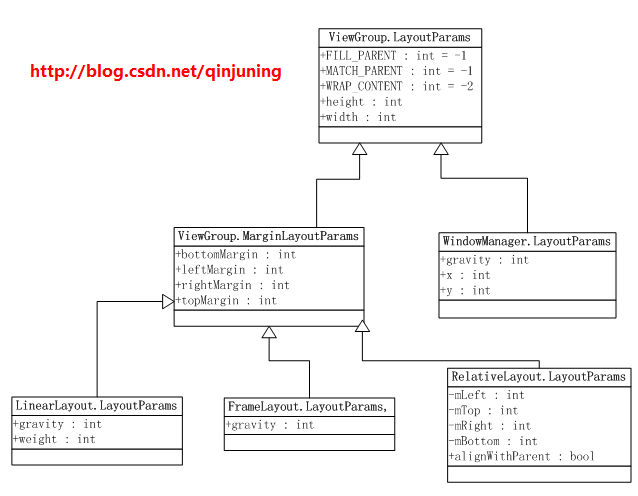
该类图是在太庞大了,大家有兴趣的去看看Android API吧。
前面我们说过,每个View都包含一个ViewGroup.LayoutParams类或者其派生类,下面我们的疑问是Android框架
中时如何为View设置其LayoutParams属性的。
有两种方法会设置View的LayoutParams属性:
1、 直接添加子View时,常见于如下几种方法:ViewGroup.java
01.//Adds a child view. 02.void addView(View child, int index) 03.//Adds a child view with this ViewGroup's default layout parameters 04.//and the specified width and height. 05.void addView(View child, int width, int height) 06.//Adds a child view with the specified layout parameters. 07.void addView(View child, ViewGroup.LayoutParams params) |
三个重载方法的区别只是添加View时构造LayoutParams对象的方式不同而已,稍后我们探寻一下它们的源码。
2、 通过xml布局文件指定某个View的属性为:android:layout_heigth=””以及android:layout_weight=”” 时。
总的来说,这两种方式都会设定View的LayoutParams属性值----指定的或者Default值。
方式1流程分析:
直接添加子View时,比较容易理解,我们先来看看这种方式设置LayoutParams的过程:
路径:\frameworks\base\core\java\android\view\ViewGroup.java
01.public abstract class ViewGroup extends View implements ViewParent, ViewManager {
02.    ...
03.    /**
04.     * Adds a child view. If no layout parameters are already set on the child, the
05.     * default parameters for this ViewGroup are set on the child.
06.     *
07.     * @param child the child view to add
08.     *
09.     * @see #generateDefaultLayoutParams()
10.     */
11.    public void addView(View child) {
12.        addView(child, -1);
13.    }
14.    /**
15.     * Adds a child view. If no layout parameters are already set on the child, the
16.     * default parameters for this ViewGroup are set on the child.
17.     *
18.     * @param child the child view to add
19.     * @param index the position at which to add the child
20.     *
21.     * @see #generateDefaultLayoutParams()
22.     */
23.    public void addView(View child, int index) {
24.        LayoutParams params = child.getLayoutParams();
25.        if (params == null) {
26.            params = generateDefaultLayoutParams(); //返回默认地LayoutParams类,作为该View的属性值
27.            if (params == null) {//如果不能获取到LayoutParams对象,则抛出异常。
28.                throw new IllegalArgumentException("generateDefaultLayoutParams() cannot return null");
29.            }
30.        }
31.        addView(child, index, params);
32.    }
33.    /**
34.     * Adds a child view with this ViewGroup's default layout parameters and the
35.     * specified width and height.
36.     *
37.     * @param child the child view to add
38.     */
39.    public void addView(View child, int width, int height) {
40.        //返回默认地LayoutParams类,作为该View的属性值
41.        final LayoutParams params = generateDefaultLayoutParams();
42.        params.width = width;   //重新设置width值
43.        params.height = height; //重新设置height值
44.        addView(child, -1, params); //这儿,我们有指定width、height的大小了。
45.    }
46.    /**
47.     * Adds a child view with the specified layout parameters.
48.     *
49.     * @param child the child view to add
50.     * @param params the layout parameters to set on the child
51.     */
52.    public void addView(View child, LayoutParams params) {
53.        addView(child, -1, params);
54.    }
55.    /**
56.     * Adds a child view with the specified layout parameters.
57.     *
58.     * @param child the child view to add
59.     * @param index the position at which to add the child
60.     * @param params the layout parameters to set on the child
61.     */
62.    public void addView(View child, int index, LayoutParams params) {
63.        ...
64.        // addViewInner() will call child.requestLayout() when setting the new LayoutParams
65.        // therefore, we call requestLayout() on ourselves before, so that the child's request
66.        // will be blocked at our level
67.        requestLayout();
68.        invalidate();
69.        addViewInner(child, index, params, false);
70.    }
71.    /**
72.     * Returns a set of default layout parameters. These parameters are requested
73.     * when the View passed to {@link #addView(View)} has no layout parameters
74.     * already set. If null is returned, an exception is thrown from addView.
75.     *
76.     * @return a set of default layout parameters or null
77.     */
78.    protected LayoutParams generateDefaultLayoutParams() {
79.        //width 为 WRAP_CONTENT大小 , height 为WRAP_CONTENT
80.        //ViewGroup的子类可以重写该方法,达到其特定要求。稍后会以LinearLayout类为例说明。
81.        return new LayoutParams(LayoutParams.WRAP_CONTENT, LayoutParams.WRAP_CONTENT);
82.    }
83.    private void addViewInner(View child, int index, LayoutParams params,
84.            boolean preventRequestLayout) {
85.
86.        if (!checkLayoutParams(params)) { //params对象是否为null
87.            params = generateLayoutParams(params); //如果params对象是为null,重新构造个LayoutParams对象
88.        }
89.        //preventRequestLayout值为false
90.        if (preventRequestLayout) {
91.            child.mLayoutParams = params; //为View的mLayoutParams属性赋值
92.        } else {
93.            child.setLayoutParams(params);//为View的mLayoutParams属性赋值,但会调用requestLayout()请求重新布局
94.        }
95.        //if else 语句会设置View为mLayoutParams属性赋值
96.        ...
97.    }
98.    ...
99.} |
主要功能就是在添加子View时为其构建了一个LayoutParams对象。但更重要的是,ViewGroup的子类可以重载上面的几个方法,返回特定的LayoutParams对象,例如:对于LinearLayout而言,则是LinearLayout.LayoutParams对象。这么做地目的是,能在其他需要它的地方,可以将其强制转换成LinearLayout.LayoutParams对象。
LinearLayout重写函数地实现为:
01.public class LinearLayout extends ViewGroup {
02.    ...
03.    @Override
04.    public LayoutParams generateLayoutParams(AttributeSet attrs) {
05.        return new LinearLayout.LayoutParams(getContext(), attrs);
06.    }
07.    @Override
08.    protected LayoutParams generateDefaultLayoutParams() {
09.        //该LinearLayout是水平方向还是垂直方向
10.        if (mOrientation == HORIZONTAL) {
11.            return new LayoutParams(LayoutParams.WRAP_CONTENT, LayoutParams.WRAP_CONTENT);
12.        } else if (mOrientation == VERTICAL) {
13.            return new LayoutParams(LayoutParams.MATCH_PARENT, LayoutParams.WRAP_CONTENT);
14.        }
15.        return null;
16.    }
17.    @Override
18.    protected LayoutParams generateLayoutParams(ViewGroup.LayoutParams p) {
19.        return new LayoutParams(p);
20.    }
21.    /**
22.     * Per-child layout information associated with ViewLinearLayout.
23.     *
24.     * @attr ref android.R.styleable#LinearLayout_Layout_layout_weight
25.     * @attr ref android.R.styleable#LinearLayout_Layout_layout_gravity
26.     */ //自定义的LayoutParams类
27.    public static class LayoutParams extends ViewGroup.MarginLayoutParams {
28.        /**
29.         * Indicates how much of the extra space in the LinearLayout will be
30.         * allocated to the view associated with these LayoutParams. Specify
31.         * 0 if the view should not be stretched. Otherwise the extra pixels
32.         * will be pro-rated among all views whose weight is greater than 0.
33.         */
34.        @ViewDebug.ExportedProperty(category = "layout")
35.        public float weight;      //  见于属性,android:layout_weight=""  ;
36.        /**
37.         * Gravity for the view associated with these LayoutParams.
38.         *
39.         * @see android.view.Gravity
40.         */
41.        public int gravity = -1;  // 见于属性, android:layout_gravity=""  ;
42.        /**
43.         * {@inheritDoc}
44.         */
45.        public LayoutParams(Context c, AttributeSet attrs) {
46.            super(c, attrs);
47.            TypedArray a =c.obtainStyledAttributes(attrs, com.android.internal.R.styleable.LinearLayout_Layout);
48.            weight = a.getFloat(com.android.internal.R.styleable.LinearLayout_Layout_layout_weight, 0);
49.            gravity = a.getInt(com.android.internal.R.styleable.LinearLayout_Layout_layout_gravity, -1);
50.
51.            a.recycle();
52.        }
53.        /**
54.         * {@inheritDoc}
55.         */
56.        public LayoutParams(int width, int height) {
57.            super(width, height);
58.            weight = 0;
59.        }
60.        /**
61.         * Creates a new set of layout parameters with the specified width, height
62.         * and weight.
63.         *
64.         * @param width the width, either {@link #MATCH_PARENT},
65.         *        {@link #WRAP_CONTENT} or a fixed size in pixels
66.         * @param height the height, either {@link #MATCH_PARENT},
67.         *        {@link #WRAP_CONTENT} or a fixed size in pixels
68.         * @param weight the weight
69.         */
70.        public LayoutParams(int width, int height, float weight) {
71.            super(width, height);
72.            this.weight = weight;
73.        }
74.        public LayoutParams(ViewGroup.LayoutParams p) {
75.            super(p);
76.        }
77.        public LayoutParams(MarginLayoutParams source) {
78.            super(source);
79.        }
80.    }
81.    ...
82.} |
LinearLayout.LayoutParams类继承至ViewGroup.MarginLayoutParams类,添加了对android:layout_weight以及 android:layout_gravity这两个属性的获取和保存。而且它的重写函数返回的都是LinearLayout.LayoutParams类型。这样,我们可以再对子View进行其他操作时,可以将将其强制转换成LinearLayout.LayoutParams对象进行使用。
例如,LinearLayout进行measure过程,使用了LinearLayout.LayoutParam对象,有如下代码:
01.public class LinearLayout extends ViewGroup {
02.    ...
03.    @Override  //onMeasure方法。
04.    protected void onMeasure(int widthMeasureSpec, int heightMeasureSpec) {
05.        //判断是垂直方向还是水平方向,这儿我们假设是VERTICAL垂直方向,
06.        if (mOrientation == VERTICAL) {
07.            measureVertical(widthMeasureSpec, heightMeasureSpec);
08.        } else {
09.            measureHorizontal(widthMeasureSpec, heightMeasureSpec);
10.        }
11.    }
12.     /**
13.     * Measures the children when the orientation of this LinearLayout is set
14.     * to {@link #VERTICAL}.
15.     *
16.     * @param widthMeasureSpec Horizontal space requirements as imposed by the parent.
17.     * @param heightMeasureSpec Vertical space requirements as imposed by the parent.
18.     *
19.     * @see #getOrientation()
20.     * @see #setOrientation(int)
21.     * @see #onMeasure(int, int)
22.     */
23.      void measureVertical(int widthMeasureSpec, int heightMeasureSpec) {
24.            mTotalLength = 0;
25.            ...
26.            // See how tall everyone is. Also remember max width.
27.            for (int i = 0; i < count; ++i) {
28.                final View child = getVirtualChildAt(i); //获得索引处为i的子VIew
29.                ...
30.                //注意,我们将类型为 ViewGroup.LayoutParams的实例对象强制转换为了LinearLayout.LayoutParams,
31.                //即父对象转换为了子对象,能这样做的原因就是LinearLayout的所有子View的LayoutParams类型都为
32.                //LinearLayout.LayoutParams
33.                LinearLayout.LayoutParams lp = (LinearLayout.LayoutParams) child.getLayoutParams();
34.                ...
35.        }
36.    ...
37.} |
超类ViewGroup.LayoutParams强制转换为了子类LinearLayout.LayoutParams,因为LinearLayout的每个”直接“子View的LayoutParams属性都是LinearLayout.LayoutParams类型,因此可以安全转换。
PS : Android 2.3源码Launcher2中也实现了自定义的LayoutParams类,在IDLE界面的每个View至少包含如下
信息:所在X方向的单元格索引和高度、所在Y方向的单元格索引和高度等。
路径: packages\apps\Launcher2\src\com\android\launcher2\CellLayout.java
01.public class CellLayout extends ViewGroup {
02.    ...
03.    public static class LayoutParams extends ViewGroup.MarginLayoutParams {
04.            /**
05.             * Horizontal location of the item in the grid.
06.             */
07.            public int cellX;   //X方向的单元格索引
08.            /**
09.             * Vertical location of the item in the grid.
10.             */
11.            public int cellY;   //Y方向的单元格索引
12.            /**
13.             * Number of cells spanned horizontally by the item.
14.             */
15.            public int cellHSpan;  //水平方向所占高度
16.            /**
17.             * Number of cells spanned vertically by the item.
18.             */
19.            public int cellVSpan;  //垂直方向所占高度
20.            ...
21.            public LayoutParams(Context c, AttributeSet attrs) {
22.                super(c, attrs);
23.                cellHSpan = 1;  //默认为高度 1
24.                cellVSpan = 1;
25.            }
26.
27.            public LayoutParams(ViewGroup.LayoutParams source) {
28.                super(source); //默认为高度 1
29.                cellHSpan = 1;
30.                cellVSpan = 1;
31.            }
32.
33.            public LayoutParams(int cellX, int cellY, int cellHSpan, int cellVSpan) {
34.                super(LayoutParams.MATCH_PARENT, LayoutParams.MATCH_PARENT);
35.                this.cellX = cellX;
36.                this.cellY = cellY;
37.                this.cellHSpan = cellHSpan;
38.                this.cellVSpan = cellVSpan;
39.            }
40.            ...
41.        }
42.    ...
43.} |
对该自定义CellLayout.LayoutParams类的使用可以参考LinearLayout.LayoutParams类,我也不再赘述了。
方法2流程分析:
使用属性android:layout_heigth=””以及android:layout_weight=”” 时,为某个View设置LayoutParams值。
其实这种赋值方法其实也如同前面那种,只不过它需要一个前期孵化过程---需要利用XML解析将布局文件解析成一个完整的View树,可别小看它了,所有Xxx.xml的布局文件都需要解析成一个完整的View树。下面,我们就来仔细走这个过程,重点关注如下两个方面
①、xml布局是如何解析成View树的 ;
②、android:layout_heigth=””和android:layout_weight=””的解析。
PS: 一直以来,我都想当然android:layout_heigth以及android:layout_weight这两个属性的解析过程是在View.java内部完成的,但当我真正去找寻时,却一直没有在View.java类或者ViewGroup.java类找到。直到一位网友的一次提问,才发现它们的藏身之地。
3、布局文件解析流程分析
解析布局文件时,使用的类为LayoutInflater。 关于该类的使用请参考如下博客:
<android中LayoutInflater的使用 >>
主要有如下API方法:
public View inflate (XmlPullParser parser, ViewGroup root, boolean attachToRoot)
public View inflate (int resource, ViewGroup root)
public View inflate (int resource, ViewGroup root, boolean attachToRoot)
这三个类主要迷惑之处在于地三个参数attachToRoot,即是否将该View树添加到root中去。具体可看这篇博客:
<<关于inflate的第3个参数>>
当然还有LayoutInflater的inflate()的其他重载方法,大家可以自行了解下。
我利用下面的例子给大家走走这个流程 :
01.public class MainActivity extends Activity {
02.    /** Called when the activity is first created. */
03.    @Override
04.    public void onCreate(Bundle savedInstanceState) {
05.        super.onCreate(savedInstanceState);
06.        //1、该方法最终也会调用到 LayoutInflater的inflate()方法中去解析。
07.        setContentView(R.layout.main);
08.
09.        //2、使用常见的API方法去解析xml布局文件,
10.        LayoutInflater layoutInflater = (LayoutInflater)getSystemService();
11.        View root = layoutInflater.inflate(R.layout.main, null);
12.    }
13.} |
Step 1、获得LayoutInflater的引用。
路径:\frameworks\base\core\java\android\app\ContextImpl.java
01./**
02. * Common implementation of Context API, which provides the base
03. * context object for Activity and other application components.
04. */
05.class ContextImpl extends Context {
06.    if (WINDOW_SERVICE.equals(name)) {
07.        return WindowManagerImpl.getDefault();
08.    } else if (LAYOUT_INFLATER_SERVICE.equals(name)) {
09.        synchronized (mSync) {
10.            LayoutInflater inflater = mLayoutInflater;
11.            //是否已经赋值,如果是,直接返回引用
12.            if (inflater != null) {
13.                return inflater;
14.            }
15.            //返回一个LayoutInflater对象,getOuterContext()指的是我们的Activity、Service或者Application引用
16.            mLayoutInflater = inflater = PolicyManager.makeNewLayoutInflater(getOuterContext());
17.            return inflater;
18.        }
19.    } else if (ACTIVITY_SERVICE.equals(name)) {
20.        return getActivityManager();
21.    }...
22.} |
继续去PolicyManager查询对应函数,看看内部实现。
路径:frameworks\base\core\java\com\android\internal\policy\PolicyManager.java
01.public final class PolicyManager {
02.    private static final String POLICY_IMPL_CLASS_NAME = "com.android.internal.policy.impl.Policy";
03.    private static final IPolicy sPolicy;   // 这可不是Binder机制额,这只是是一个接口,别想多啦
04.    static {
05.        // Pull in the actual implementation of the policy at run-time
06.        try {
07.            Class policyClass = Class.forName(POLICY_IMPL_CLASS_NAME);
08.            sPolicy = (IPolicy)policyClass.newInstance();
09.        }
10.        ...
11.    }
12.    ...
13.    public static LayoutInflater makeNewLayoutInflater(Context context) {
14.        return sPolicy.makeNewLayoutInflater(context); //继续去实现类中去查找
15.    }
16.} |
IPolicy接口的实现对为Policy类。路径:/frameworks/base/policy/src/com/android/internal/policy/impl/Policy.java
01.//Simple implementation of the policy interface that spawns the right
02.//set of objects
03.public class Policy implements IPolicy{
04.    ...
05.    public PhoneLayoutInflater makeNewLayoutInflater(Context context) {
06.        //实际上返回的是PhoneLayoutInflater类。
07.        return new PhoneLayoutInflater(context);
08.    }
09.}
10.//PhoneLayoutInflater继承至LayoutInflater类
11.public class PhoneLayoutInflater extends LayoutInflater {
12.    ...
13.    /**
14.     * Instead of instantiating directly, you should retrieve an instance
15.     * through {@link Context#getSystemService}
16.     *
17.     * @param context The Context in which in which to find resources and other
18.     *                application-specific things.
19.     *
20.     * @see Context#getSystemService
21.     */
22.    public PhoneLayoutInflater(Context context) {
23.        super(context);
24.    }
25.    ...
26.} |
LayoutInflater是个抽象类,实际上我们返回的是PhoneLayoutInflater类,但解析过程的操作基本上是在
LayoutInflater中完成地。
Step 2、调用inflate()方法去解析布局文件。
 01.public abstract class LayoutInflater {
02.    ...
03.    public View inflate(int resource, ViewGroup root) {
04.        //继续看下个函数,注意root为null
05.        return inflate(resource, root, root != null);
06.    }
07.
08.    public View inflate(int resource, ViewGroup root, boolean attachToRoot) {
09.        //获取一个XmlResourceParser来解析XML文件---布局文件。
10.        //XmlResourceParser类以及xml是如何解析的,大家自己有兴趣找找。
11.        XmlResourceParser parser = getContext().getResources().getLayout(resource);
12.        try {
13.            return inflate(parser, root, attachToRoot);
14.        } finally {
15.            parser.close();
16.        }
17.    }
18.}
19./**
20. * The XML parsing interface returned for an XML resource.  This is a standard
21. * XmlPullParser interface, as well as an extended AttributeSet interface and
22. * an additional close() method on this interface for the client to indicate
23. * when it is done reading the resource.
24. */
25.public interface XmlResourceParser extends XmlPullParser, AttributeSet {
26.    /**
27.     * Close this interface to the resource.  Calls on the interface are no
28.     * longer value after this call.
29.     */
30.    public void close();
31.} |
我们获得了一个当前应用程序环境的XmlResourceParser对象,该对象的主要作用就是来解析xml布局文件的。XmlResourceParser类是个接口类,
Step 3 、真正地开始解析工作 。
01.public abstract class LayoutInflater {
02.    ...
03.    /**
04.     * Inflate a new view hierarchy from the specified XML node. Throws
05.     * {@link InflateException} if there is an error.
06.     */
07.    //我们传递过来的参数如下: root 为null , attachToRoot为false 。
08.    public View inflate(XmlPullParser parser, ViewGroup root, boolean attachToRoot) {
09.        synchronized (mConstructorArgs) {
10.            final AttributeSet attrs = Xml.asAttributeSet(parser);
11.            Context lastContext = (Context)mConstructorArgs[0];
12.            mConstructorArgs[0] = mContext;  //该mConstructorArgs属性最后会作为参数传递给View的构造函数
13.            View result = root;  //根View
14.
15.            try {
16.                // Look for the root node.
17.                int type;
18.                while ((type = parser.next()) != XmlPullParser.START_TAG &&
19.                        type != XmlPullParser.END_DOCUMENT) {
20.                    // Empty
21.                }
22.                ...
23.                final String name = parser.getName();  //节点名,即API中的控件或者自定义View完整限定名。
24.                if (TAG_MERGE.equals(name)) { // 处理标签
25.                    if (root == null || !attachToRoot) {
26.                        throw new InflateException(" can be used only with a valid "
27.                                + "ViewGroup root and attachToRoot=true");
28.                    }
29.                    //将标签的View树添加至root中,该函数稍后讲到。
30.                    rInflate(parser, root, attrs);
31.                } else {
32.                    // Temp is the root view that was found in the xml
33.                    //创建该xml布局文件所对应的根View。
34.                    View temp = createViewFromTag(name, attrs);
35.
36.                    ViewGroup.LayoutParams params = null;
37.
38.                    if (root != null) {
39.                        // Create layout params that match root, if supplied
40.                        //根据AttributeSet属性获得一个LayoutParams实例,记住调用者为root。
41.                        params = root.generateLayoutParams(attrs);
42.                        if (!attachToRoot) { //重新设置temp的LayoutParams
43.                            // Set the layout params for temp if we are not
44.                            // attaching. (If we are, we use addView, below)
45.                            temp.setLayoutParams(params);
46.                        }
47.                    }
48.                    // Inflate all children under temp
49.                    //添加所有其子节点,即添加所有字View
50.                    rInflate(parser, temp, attrs);
51.
52.                    // We are supposed to attach all the views we found (int temp)
53.                    // to root. Do that now.
54.                    if (root != null && attachToRoot) {
55.                        root.addView(temp, params);
56.                    }
57.                    // Decide whether to return the root that was passed in or the
58.                    // top view found in xml.
59.                    if (root == null || !attachToRoot) {
60.                        result = temp;
61.                    }
62.                }
63.            }
64.            ...
65.            return result;
66.        }
67.    }
68.
69.    /*
70.     * default visibility so the BridgeInflater can override it.
71.     */
72.    View createViewFromTag(String name, AttributeSet attrs) {
73.        //节点是否为View,如果是将其重新赋值,形如
74.        if (name.equals("view")) {
75.            name = attrs.getAttributeValue(null, "class");
76.        }
77.        try {
78.            View view = (mFactory == null) ? null : mFactory.onCreateView(name,
79.                    mContext, attrs);  //没有设置工厂方法
80.
81.            if (view == null) {
82.                //通过这个判断是Android API的View,还是自定义View
83.                if (-1 == name.indexOf('.')) {
84.                    view = onCreateView(name, attrs); //创建Android API的View实例
85.                } else {
86.                    view = createView(name, null, attrs);//创建一个自定义View实例
87.                }
88.            }
89.            return view;
90.        }
91.        ...
92.    }
93.    //获得具体视图的实例对象
94.    public final View createView(String name, String prefix, AttributeSet attrs) {
95.        Constructor constructor = sConstructorMap.get(name);
96.        Class clazz = null;
97.        //以下功能主要是获取如下三个类对象:
98.        //1、类加载器  ClassLoader
99.        //2、Class对象
100.        //3、类的构造方法句柄 Constructor
101.        try {
102.            if (constructor == null) {
103.            // Class not found in the cache, see if it's real, and try to add it
104.            clazz = mContext.getClassLoader().loadClass(prefix != null ? (prefix + name) : name);
105.            ...
106.            constructor = clazz.getConstructor(mConstructorSignature);
107.            sConstructorMap.put(name, constructor);
108.        } else {
109.            // If we have a filter, apply it to cached constructor
110.            if (mFilter != null) {
111.                ...
112.            }
113.        }
114.            //传递参数获得该View实例对象
115.            Object[] args = mConstructorArgs;
116.            args[1] = attrs;
117.            return (View) constructor.newInstance(args);
118.        }
119.        ...
120.    }
121.
122.} |
这段代码的作用是获取xml布局文件的root View,做了如下两件事情
1、获取xml布局的View实例,通过createViewFromTag()方法获取,该方法会判断节点名是API 控件
还是自定义控件,继而调用合适的方法去实例化View。
2、判断root以及attachToRoot参数,重新设置root View值以及temp变量的LayoutParams值。
如果仔细看着段代码,不知大家心里有没有疑惑:当root为null时,我们的temp变量的LayoutParams值是为
null的,即它不会被赋值?有个View的LayoutParams值为空,那么,在系统中不会报异常吗?见下面部分
代码:
01.//我们传递过来的参数如下: root 为null , attachToRoot为false 。
02.public View inflate(XmlPullParser parser, ViewGroup root, boolean attachToRoot) {
03.    synchronized (mConstructorArgs) {
04.        ...
05.        try {
06.
07.            ...
08.            if (TAG_MERGE.equals(name)) { // 处理标签
09.                ...
10.            } else {
11.                // Temp is the root view that was found in the xml
12.                //创建该xml布局文件所对应的根View。
13.                View temp = createViewFromTag(name, attrs);
14.                ViewGroup.LayoutParams params = null;
15.
16.                //注意!!! root为null时,temp变量的LayoutParams属性不会被赋值的。
17.                if (root != null) {
18.                    // Create layout params that match root, if supplied
19.                    //根据AttributeSet属性获得一个LayoutParams实例,记住调用者为root。
20.                    params = root.generateLayoutParams(attrs);
21.                    if (!attachToRoot) { //重新设置temp的LayoutParams
22.                        // Set the layout params for temp if we are not
23.                        // attaching. (If we are, we use addView, below)
24.                        temp.setLayoutParams(params);
25.                    }
26.                }
27.                ...
28.            }
29.        }
30.        ...
31.    }
32.} |
关于这个问题的详细答案,我会在后面讲到。这儿我简单说下,任何View树的顶层View被添加至窗口时,一般调用WindowManager.addView()添加至窗口时,在这个方法中去做进一步处理。即使,LayoutParams值为空,UI框架每次measure()时都忽略该View的LayoutParams值,而是直接传递MeasureSpec值至View树。
接下来,我们关注另外一个函数,rInflate(),该方法会递归调用每个View下的子节点,以当前View作为根View形成一个View树。
01./**
02. * Recursive method used to descend down the xml hierarchy and instantiate
03. * views, instantiate their children, and then call onFinishInflate().
04. */
05.//递归调用每个字节点
06.private void rInflate(XmlPullParser parser, View parent, final AttributeSet attrs)
07.        throws XmlPullParserException, IOException {
08.
09.    final int depth = parser.getDepth();
10.    int type;
11.
12.    while (((type = parser.next()) != XmlPullParser.END_TAG ||
13.            parser.getDepth() > depth) && type != XmlPullParser.END_DOCUMENT) {
14.
15.        if (type != XmlPullParser.START_TAG) {
16.            continue;
17.        }
18.        final String name = parser.getName();
19.
20.        if (TAG_REQUEST_FOCUS.equals(name)) { //处理标签
21.            parseRequestFocus(parser, parent);
22.        } else if (TAG_INCLUDE.equals(name)) { //处理标签
23.            if (parser.getDepth() == 0) {
24.                throw new InflateException(" cannot be the root element");
25.            }
26.            parseInclude(parser, parent, attrs);//解析节点
27.        } else if (TAG_MERGE.equals(name)) { //处理标签
28.            throw new InflateException(" must be the root element");
29.        } else {
30.            //根据节点名构建一个View实例对象
31.            final View view = createViewFromTag(name, attrs);
32.            final ViewGroup viewGroup = (ViewGroup) parent;
33.            //调用generateLayoutParams()方法返回一个LayoutParams实例对象,
34.            final ViewGroup.LayoutParams params = viewGroup.generateLayoutParams(attrs);
35.            rInflate(parser, view, attrs); //继续递归调用
36.            viewGroup.addView(view, params); //OK,将该View以特定LayoutParams值添加至父View中
37.        }
38.    }
39.    parent.onFinishInflate();  //完成了解析过程,通知....
40.} |
值得注意的是,每次addView前都调用了viewGroup.generateLayoutParams(attrs)去构建一个LayoutParams
实例,然后在addView()方法中为其赋值。参见如下代码:ViewGroup.java
01.public abstract class ViewGroup extends View implements ViewParent, ViewManager {
02.    ...
03.
04.    public LayoutParams generateLayoutParams(AttributeSet attrs) {
05.        return new LayoutParams(getContext(), attrs);
06.    }
07.    public static class LayoutParams {
08.        ... //会调用这个构造函数
09.        public LayoutParams(Context c, AttributeSet attrs) {
10.            TypedArray a = c.obtainStyledAttributes(attrs, R.styleable.ViewGroup_Layout);
11.            setBaseAttributes(a,
12.                    R.styleable.ViewGroup_Layout_layout_width,
13.                    R.styleable.ViewGroup_Layout_layout_height);
14.            a.recycle();
15.        }
16.        protected void setBaseAttributes(TypedArray a, int widthAttr, int heightAttr) {
17.            width = a.getLayoutDimension(widthAttr, "layout_width");
18.            height = a.getLayoutDimension(heightAttr, "layout_height");
19.        }
20.
21.} |
好吧 ~~ 我们还是探寻根底,去TypeArray类的getLayoutDimension()看看。
路径:/frameworks/base/core/java/android/content/res/TypedArray.java
01.public class TypedArray {
02.    ...
03.    /**
04.     * Special version of {@link #getDimensionPixelSize} for retrieving
05.     * {@link android.view.ViewGroup}'s layout_width and layout_height
06.     * attributes.  This is only here for performance reasons; applications
07.     * should use {@link #getDimensionPixelSize}.
08.     *
09.     * @param index Index of the attribute to retrieve.
10.     * @param name Textual name of attribute for error reporting.
11.     *
12.     * @return Attribute dimension value multiplied by the appropriate
13.     * metric and truncated to integer pixels.
14.     */
15.    public int getLayoutDimension(int index, String name) {
16.        index *= AssetManager.STYLE_NUM_ENTRIES;
17.        final int[] data = mData;
18.        //获得属性对应的标识符 , Identifies,目前还没有仔细研究相关类。
19.        final int type = data[index+AssetManager.STYLE_TYPE];
20.        if (type >= TypedValue.TYPE_FIRST_INT
21.                && type <= TypedValue.TYPE_LAST_INT) {
22.            return data[index+AssetManager.STYLE_DATA];
23.        } else if (type == TypedValue.TYPE_DIMENSION) { //类型为dimension类型
24.            return TypedValue.complexToDimensionPixelSize(
25.                data[index+AssetManager.STYLE_DATA], mResources.mMetrics);
26.        }
27.        //没有提供layout_weight和layout_height会来到此处 ,这儿会报异常!
28.        //因此布局文件中的View包括自定义View必须加上属性layout_weight和layout_height。
29.        throw new RuntimeException(getPositionDescription()
30.                + ": You must supply a " + name + " attribute.");
31.    }
32.    ...
33.} |
从上面得知, 我们将View的AttributeSet属性传递给generateLayoutParams()方法,让其构建合适地LayoutParams对象,并且初始化属性值weight和height。同时我们也得知 布局文件中的View包括自定义View必须加上属性layout_weight和layout_height,否则会报异常。
Step 3 主要做了如下事情:
首先,获得了了布局文件地root View,即布局文件中最顶层的View。
其次,通过递归调用,我们形成了整个View树以及设置了每个View的LayoutParams对象。
总结:通过对布局文件的解析流程的学习,也就是转换为View树的过程,我们明白了解析过程的个中奥妙,以及
设置ViewLayoutParams对象的过程。但是,我们这儿只是简单的浮光掠影,更深层次的内容希望大家能深入学习。
本来是准备接下去往下写的,但无奈贴出来的代码太多,文章有点长而且自己也有点凌乱了,因此决定做两篇博客发表吧。下篇内容包括如下方面:
- MeasureSpec类说明 ;
- measure过程中如何正确设置每个View的长宽 ;
- UI框架正确设置顶层View的LayoutParams对象,对Activity而言,顶层View则是DecorView,其他的皆是普通View了。
上篇文章中,我们了解了View树的转换过程以及如何设置View的LayoutParams的。本文继续沿着既定轨迹继续未完成的job。
主要知识点如下:
- MeasureSpc类说明
- measure过程详解(揭秘其细节);
- root View被添加至窗口时,UI框架是如何设置其LayoutParams值得。
在讲解measure过程前,我们非常有必要理解MeasureSpc类的使用,否则理解起来也只能算是囫囵吞枣。
1、MeasureSpc类说明
1.1 SDK 说明如下
A MeasureSpec encapsulates the layout requirements passed from parent to child. Each MeasureSpec represents a requirement for either the width or the height. A MeasureSpec is comprised of a size and a mode.
即:
MeasureSpc类封装了父View传递给子View的布局(layout)要求。每个MeasureSpc实例代表宽度或者高度(只能是其一)要求。 它有三种模式:
①、UNSPECIFIED(未指定),父元素部队自元素施加任何束缚,子元素可以得到任意想要的大小;
②、EXACTLY(完全),父元素决定自元素的确切大小,子元素将被限定在给定的边界里而忽略它本身大小;
③、AT_MOST(至多),子元素至多达到指定大小的值。
常用的三个函数:
static int getMode(int measureSpec) : 根据提供的测量值(格式)提取模式(上述三个模式之一)
static int getSize(int measureSpec) : 根据提供的测量值(格式)提取大小值(这个大小也就是我们通常所说的大小)
static int makeMeasureSpec(int size,int mode) : 根据提供的大小值和模式创建一个测量值(格式)
1.2 MeasureSpc类源码分析 其为View.java类的内部类,路径:\frameworks\base\core\java\android\view\View.java
01.public class View implements ... {
02.     ...
03.     public static class MeasureSpec {
04.        private static final int MODE_SHIFT = 30; //移位位数为30
05.        //int类型占32位,向右移位30位,该属性表示掩码值,用来与size和mode进行"&"运算,获取对应值。
06.        private static final int MODE_MASK  = 0x3 << MODE_SHIFT;
07.
08.        //向右移位30位,其值为00 + (30位0)  , 即 0x0000(16进制表示)
09.        public static final int UNSPECIFIED = 0 << MODE_SHIFT;
10.        //向右移位30位,其值为01 + (30位0)  , 即0x1000(16进制表示)
11.        public static final int EXACTLY     = 1 << MODE_SHIFT;
12.        //向右移位30位,其值为02 + (30位0)  , 即0x2000(16进制表示)
13.        public static final int AT_MOST     = 2 << MODE_SHIFT;
14.
15.        //创建一个整形值,其高两位代表mode类型,其余30位代表长或宽的实际值。
           可以是WRAP_CONTENT、MATCH_PARENT或具体大小exactly size
16.        public static int makeMeasureSpec(int size, int mode) {
17.            return size + mode;
18.        }
19.        //获取模式  ,与运算
20.        public static int getMode(int measureSpec) {
21.            return (measureSpec & MODE_MASK);
22.        }
23.        //获取长或宽的实际值 ,与运算
24.        public static int getSize(int measureSpec) {
25.            return (measureSpec & ~MODE_MASK);
26.        }
27.
28.    }
29.    ...
30.} |
MeasureSpec类的处理思路是:
①、右移运算,使int 类型的高两位表示模式的实际值,其余30位表示其余30位代表长或宽的实际值----可以是
WRAP_CONTENT、MATCH_PARENT或具体大小exactly size。
②、通过掩码MODE_MASK进行与运算 “&”,取得模式(mode)以及长或宽(value)的实际值。
2、measure过程详解
2.1 measure过程深入分析
之前的一篇博文<< Android中View绘制流程以及invalidate()等相关方法分析>>,我们从”二B程序员”的角度简单 解了measure过程的调用过程。过了这么多,我们也该升级了,- - 。现在请开始从”普通程序员”角度去理解这个过程。我们重点查看measure过程中地相关方法。
我们说过,当UI框架开始绘制时,皆是从ViewRoot.java类开始绘制的。ViewRoot类简要说明: 任何显示在设备中的窗口,例如:Activity、Dialog等,都包含一个ViewRoot实例,该类主要用来与远端 WindowManagerService交互以及控制(开始/销毁)绘制。
Step 1、 开始UI绘制 , 具体绘制方法则是:
01.路径:\frameworks\base\core\java\android\view\ViewRoot.java
02.public final class ViewRoot extends Handler implements ViewParent,View.AttachInfo.Callbacks {
03.    ...
04.    //mView对象指添加至窗口的root View ,对Activity窗口而言,则是DecorView对象。
05.    View mView;
06.
07.    //开始View绘制流程
08.    private void performTraversals(){
09.        ...
10.        //这两个值我们在后面讨论时,在回过头来看看是怎么赋值的。现在只需要记住其值MeasureSpec.
 makeMeasureSpec()构建的。
11.        int childWidthMeasureSpec; //其值由MeasureSpec类构建 , makeMeasureSpec
12.        int childHeightMeasureSpec;//其值由MeasureSpec类构建 , makeMeasureSpec
13.
14.
15.        // Ask host how big it wants to be
16.        host.measure(childWidthMeasureSpec, childHeightMeasureSpec);
17.        ...
18.    }
19.    ...
20.} |
这儿,我并没有说出childWidthMeasureSpec和childHeightMeasureSpec类的来由(为了避免额外地开销,等到
第三部分时我们在来攻克它,现在只需要记住其值MeasureSpec.makeMeasureSpec()构建的。
Step 2 、调用measure()方法去做一些前期准备
measure()方法原型定义在View.java类中,final修饰符修饰,其不能被重载:
01.public class View implements ... {
02.    ...
03.    /**
04.     * This is called to find out how big a view should be. The parent
05.     * supplies constraint information in the width and height parameters.
06.     *
07.     * @param widthMeasureSpec Horizontal space requirements as imposed by the
08.     *        parent
09.     * @param heightMeasureSpec Vertical space requirements as imposed by the
10.     *        parent
11.     * @see #onMeasure(int, int)
12.     */
13.    public final void measure(int widthMeasureSpec, int heightMeasureSpec) {
14.        //判断是否为强制布局,即带有“FORCE_LAYOUT”标记 以及 widthMeasureSpec或heightMeasureSpec发生了改变
15.        if ((mPrivateFlags & FORCE_LAYOUT) == FORCE_LAYOUT ||
16.                widthMeasureSpec != mOldWidthMeasureSpec ||
17.                heightMeasureSpec != mOldHeightMeasureSpec) {
18.
19.            // first clears the measured dimension flag
20.            //清除MEASURED_DIMENSION_SET标记   ,该标记会在onMeasure()方法后被设置
21.            mPrivateFlags &= ~MEASURED_DIMENSION_SET;
22.
23.            // measure ourselves, this should set the measured dimension flag back
24.            // 1、 测量该View本身的大小 ; 2 、 设置MEASURED_DIMENSION_SET标记,否则接写来会报异常。
25.            onMeasure(widthMeasureSpec, heightMeasureSpec);
26.
27.            // flag not set, setMeasuredDimension() was not invoked, we raise
28.            // an exception to warn the developer
29.            if ((mPrivateFlags & MEASURED_DIMENSION_SET) != MEASURED_DIMENSION_SET) {
30.                throw new IllegalStateException("onMeasure() did not set the"
31.                        + " measured dimension by calling" + " setMeasuredDimension()");
32.            }
33.
34.            mPrivateFlags |= LAYOUT_REQUIRED;  //下一步是layout了,添加LAYOUT_REQUIRED标记
35.        }
36.
37.        mOldWidthMeasureSpec = widthMeasureSpec;   //保存值
38.        mOldHeightMeasureSpec = heightMeasureSpec; //保存值
39.    }
40.    ...
41.} |
参数widthMeasureSpec和heightMeasureSpec 由父View构建,表示父View给子View的测量要求。其值地构建
会在下面步骤中详解。
measure()方法显示判断是否需要重新调用设置改View大小,即调用onMeasure()方法,然后操作两个标识符:
①、重置MEASURED_DIMENSION_SET : onMeasure()方法中,需要添加该标识符,否则,会报异常;
②、添加LAYOUT_REQUIRED : 表示需要进行layout操作。
最后,保存当前的widthMeasureSpec和heightMeasureSpec值。
Step 3 、调用onMeasure()方法去真正设置View的长宽值,其默认实现为:
01./**
02.   * Measure the view and its content to determine the measured width and the
03.   * measured height. This method is invoked by {@link #measure(int, int)} and
04.   * should be overriden by subclasses to provide accurate and efficient
05.   * measurement of their contents.
06.   *
07.   * @param widthMeasureSpec horizontal space requirements as imposed by the parent.
08.   *                         The requirements are encoded with
09.   * @param heightMeasureSpec vertical space requirements as imposed by the parent.
10.   *                         The requirements are encoded with
11.   */
12.  //设置该View本身地大小
13.  protected void onMeasure(int widthMeasureSpec, int heightMeasureSpec) {
14.      setMeasuredDimension(getDefaultSize(getSuggestedMinimumWidth(), widthMeasureSpec),
15.              getDefaultSize(getSuggestedMinimumHeight(), heightMeasureSpec));
16.  }
17.
18.  /**
19.   * Utility to return a default size. Uses the supplied size if the
20.   * MeasureSpec imposed no contraints. Will get larger if allowed
21.   * by the MeasureSpec.
22.   *
23.   * @param size Default size for this view
24.   * @param measureSpec Constraints imposed by the parent
25.   * @return The size this view should be.
26.   */
27.  //@param size参数一般表示设置了android:minHeight属性或者该View背景图片的大小值
28.  public static int getDefaultSize(int size, int measureSpec) {
29.      int result = size;
30.      int specMode = MeasureSpec.getMode(measureSpec);
31.      int specSize =  MeasureSpec.getSize(measureSpec);
32.
33.      //根据不同的mode值,取得宽和高的实际值。
34.      switch (specMode) {
35.      case MeasureSpec.UNSPECIFIED:  //表示该View的大小父视图未定,设置为默认值
36.          result = size;
37.          break;
38.      case MeasureSpec.AT_MOST:      //表示该View的大小由父视图指定了
39.      case MeasureSpec.EXACTLY:
40.          result = specSize;
41.          break;
42.      }
43.      return result;
44.  }
45.  //获得设置了android:minHeight属性或者该View背景图片的大小值, 最为该View的参考值
46.  protected int getSuggestedMinimumWidth() {
47.      int suggestedMinWidth = mMinWidth;  //  android:minHeight
48.
49.      if (mBGDrawable != null) { // 背景图片对应地Width。
50.          final int bgMinWidth = mBGDrawable.getMinimumWidth();
51.          if (suggestedMinWidth < bgMinWidth) {
52.              suggestedMinWidth = bgMinWidth;
53.          }
54.      }
55.
56.      return suggestedMinWidth;
57.  }
58.  //设置View在measure过程中宽和高
59.  protected final void setMeasuredDimension(int measuredWidth, int measuredHeight) {
60.      mMeasuredWidth = measuredWidth;
61.      mMeasuredHeight = measuredHeight;
62.
63.      mPrivateFlags |= MEASURED_DIMENSION_SET;  //设置了MEASURED_DIMENSION_SET标记
64. } |
主要功能就是根据该View属性(android:minWidth和背景图片大小)和父View对该子View的"测量要求",设置该 View的 mMeasuredWidth 和 mMeasuredHeight 值。
这儿只是一般的View类型地实现方法。一般来说,父View,也就是ViewGroup类型,都需要在重写onMeasure() 方法,遍历所有子View,设置每个子View的大小。基本思想如下:遍历所有子View,设置每个子View的大小。伪代码表示为:
01.//某个ViewGroup类型的视图
02.protected void onMeasure(int widthMeasureSpec, int heightMeasureSpec) {
03.  //必须调用super.ononMeasure()或者直接调用setMeasuredDimension()方法设置该View大小,否则会报异常。
04.  super.onMeasure(widthMeasureSpec , heightMeasureSpec)
05.     //setMeasuredDimension(getDefaultSize(getSuggestedMinimumWidth(), widthMeasureSpec),
06.     //        getDefaultSize(getSuggestedMinimumHeight(), heightMeasureSpec));
07.
08.  //遍历每个子View
09.  for(int i = 0 ; i < getChildCount() ; i++){
10.    View child = getChildAt(i);
11.    //调用子View的onMeasure,设置他们的大小。childWidthMeasureSpec , childHeightMeasureSpec ?
12.    child.onMeasure(childWidthMeasureSpec, childHeightMeasureSpec);
13.  }
14.} |
Step 2、Step 3 代码也比较好理解,但问题是我们示例代码中widthMeasureSpec、heightMeasureSpec是如何确定的呢?父View是如何设定其值的?
要想回答这个问题,我们看是去源代码里找找答案吧。在ViewGroup.java类中,为我们提供了三个方法,去设置每个子View的大小,基本思想也如同我们之前描述的思想:遍历所有子View,设置每个子View的大小。
主要有如下方法:
01./**
02. * Ask all of the children of this view to measure themselves, taking into
03. * account both the MeasureSpec requirements for this view and its padding.
04. * We skip children that are in the GONE state The heavy lifting is done in
05. * getChildMeasureSpec.
06. */
07.//widthMeasureSpec 和  heightMeasureSpec 表示该父View的布局要求
08.//遍历每个子View,然后调用measureChild()方法去实现每个子View大小
09.protected void measureChildren(int widthMeasureSpec, int heightMeasureSpec) {
10.    final int size = mChildrenCount;
11.    final View[] children = mChildren;
12.    for (int i = 0; i < size; ++i) {
13.        final View child = children[i];
14.        if ((child.mViewFlags & VISIBILITY_MASK) != GONE) { // 不处于 “GONE” 状态
15.            measureChild(child, widthMeasureSpec, heightMeasureSpec);
16.        }
17.    }
18.}
19.
20./**
21. * Ask one of the children of this view to measure itself, taking into
22. * account both the MeasureSpec requirements for this view and its padding.
23. * The heavy lifting is done in getChildMeasureSpec.
24. *
25. * @param child The child to measure
26. * @param parentWidthMeasureSpec The width requirements for this view
27. * @param parentHeightMeasureSpec The height requirements for this view
28. */
29.//测量每个子View高宽时,清楚了该View本身的边距大小,即android:padding属性 或android:paddingLeft等属性标记
30.protected void measureChild(View child, int parentWidthMeasureSpec,
31.        int parentHeightMeasureSpec) {
32.    final LayoutParams lp = child.getLayoutParams(); // LayoutParams属性
33.    //设置子View的childWidthMeasureSpec属性,去除了该父View的边距值  mPaddingLeft + mPaddingRight
34.    final int childWidthMeasureSpec = getChildMeasureSpec(parentWidthMeasureSpec,
35.            mPaddingLeft + mPaddingRight, lp.width);
36.    //设置子View的childHeightMeasureSpec属性,去除了该父View的边距值  mPaddingTop + mPaddingBottom
37.    final int childHeightMeasureSpec = getChildMeasureSpec(parentHeightMeasureSpec,
38.            mPaddingTop + mPaddingBottom, lp.height);
39.
40.    child.measure(childWidthMeasureSpec, childHeightMeasureSpec);
41.} |
measureChildren()方法:遍历所有子View,调用measureChild()方法去设置该子View的属性值。
measureChild() 方法 : 获取特定子View的widthMeasureSpec、heightMeasureSpec,调用measure()方法设置子View的实际宽高值。
getChildMeasureSpec()就是获取子View的widthMeasureSpec、heightMeasureSpec值。
01./**
02. * Does the hard part of measureChildren: figuring out the MeasureSpec to
03. * pass to a particular child. This method figures out the right MeasureSpec
04. * for one dimension (height or width) of one child view.
05. *
06. * The goal is to combine information from our MeasureSpec with the
07. * LayoutParams of the child to get the best possible results.
08. */
09.// spec参数       表示该父View本身所占的widthMeasureSpec 或  heightMeasureSpec值
10.// padding参数  表示该父View的边距大小,见于android:padding属性 或android:paddingLeft等属性标记
11.// childDimension参数  表示该子View内部LayoutParams属性的值,可以是wrap_content、match_parent、
一个精确指(an exactly size),
12.//           例如:由android:width指定等。
13.public static int getChildMeasureSpec(int spec, int padding, int childDimension) {
14.    int specMode = MeasureSpec.getMode(spec);  //获得父View的mode
15.    int specSize = MeasureSpec.getSize(spec);  //获得父View的实际值
16.
17.    int size = Math.max(0, specSize - padding); //父View为子View设定的大小,减去边距值,
18.
19.    int resultSize = 0;    //子View对应地 size 实际值 ,由下面的逻辑条件赋值
20.    int resultMode = 0;    //子View对应地 mode 值 , 由下面的逻辑条件赋值
21.
22.    switch (specMode) {
23.    // Parent has imposed an exact size on us
24.    //1、父View是EXACTLY的 !
25.    case MeasureSpec.EXACTLY:
26.        //1.1、子View的width或height是个精确值 (an exactly size)
27.        if (childDimension >= 0) {
28.            resultSize = childDimension;         //size为精确值
29.            resultMode = MeasureSpec.EXACTLY;    //mode为 EXACTLY 。
30.        }
31.        //1.2、子View的width或height为 MATCH_PARENT/FILL_PARENT
32.        else if (childDimension == LayoutParams.MATCH_PARENT) {
33.            // Child wants to be our size. So be it.
34.            resultSize = size;                   //size为父视图大小
35.            resultMode = MeasureSpec.EXACTLY;    //mode为 EXACTLY 。
36.        }
37.        //1.3、子View的width或height为 WRAP_CONTENT
38.        else if (childDimension == LayoutParams.WRAP_CONTENT) {
39.            // Child wants to determine its own size. It can't be
40.            // bigger than us.
41.            resultSize = size;                   //size为父视图大小
42.            resultMode = MeasureSpec.AT_MOST;    //mode为AT_MOST 。
43.        }
44.        break;
45.
46.    // Parent has imposed a maximum size on us
47.    //2、父View是AT_MOST的 !
48.    case MeasureSpec.AT_MOST:
49.        //2.1、子View的width或height是个精确值 (an exactly size)
50.        if (childDimension >= 0) {
51.            // Child wants a specific size... so be it
52.            resultSize = childDimension;        //size为精确值
53.            resultMode = MeasureSpec.EXACTLY;   //mode为 EXACTLY 。
54.        }
55.        //2.2、子View的width或height为 MATCH_PARENT/FILL_PARENT
56.        else if (childDimension == LayoutParams.MATCH_PARENT) {
57.            // Child wants to be our size, but our size is not fixed.
58.            // Constrain child to not be bigger than us.
59.            resultSize = size;                  //size为父视图大小
60.            resultMode = MeasureSpec.AT_MOST;   //mode为AT_MOST
61.        }
62.        //2.3、子View的width或height为 WRAP_CONTENT
63.        else if (childDimension == LayoutParams.WRAP_CONTENT) {
64.            // Child wants to determine its own size. It can't be
65.            // bigger than us.
66.            resultSize = size;                  //size为父视图大小
67.            resultMode = MeasureSpec.AT_MOST;   //mode为AT_MOST
68.        }
69.        break;
70.
71.    // Parent asked to see how big we want to be
72.    //3、父View是UNSPECIFIED的 !
73.    case MeasureSpec.UNSPECIFIED:
74.        //3.1、子View的width或height是个精确值 (an exactly size)
75.        if (childDimension >= 0) {
76.            // Child wants a specific size... let him have it
77.            resultSize = childDimension;        //size为精确值
78.            resultMode = MeasureSpec.EXACTLY;   //mode为 EXACTLY
79.        }
80.        //3.2、子View的width或height为 MATCH_PARENT/FILL_PARENT
81.        else if (childDimension == LayoutParams.MATCH_PARENT) {
82.            // Child wants to be our size... find out how big it should
83.            // be
84.            resultSize = 0;                        //size为0! ,其值未定
85.            resultMode = MeasureSpec.UNSPECIFIED;  //mode为 UNSPECIFIED
86.        }
87.        //3.3、子View的width或height为 WRAP_CONTENT
88.        else if (childDimension == LayoutParams.WRAP_CONTENT) {
89.            // Child wants to determine its own size.... find out how
90.            // big it should be
91.            resultSize = 0;                        //size为0! ,其值未定
92.            resultMode = MeasureSpec.UNSPECIFIED;  //mode为 UNSPECIFIED
93.        }
94.        break;
95.    }
96.    //根据上面逻辑条件获取的mode和size构建MeasureSpec对象。
97.    return MeasureSpec.makeMeasureSpec(resultSize, resultMode);
98.} |
为了便于分析,我将上面的逻辑判断语句使用列表项进行了说明.
getChildMeasureSpec()方法的主要功能如下:
根据父View的measureSpec值(widthMeasureSpec,heightMeasureSpec)值以及子View的子View内部LayoutParams属性值,共同决定子View的measureSpec值的大小。主要判断条件主要为MeasureSpec的mode类型以及LayoutParams的宽高实际值(lp.width,lp.height),见于以上所贴代码中的列表项: 1、 1.1 ; 1.2 ; 1.3 ; 2、2.1等。
例如,分析列表3:假设当父View为MeasureSpec.UNSPECIFIED类型,即未定义时,只有当子View的width或height指定时,其mode才为MeasureSpec.EXACTLY,否者该View size为 0 ,mode为MeasureSpec.UNSPECIFIED时,即处于未指定状态。
由此可以得出, 每个View大小的设定都事由其父View以及该View共同决定的。但这只是一个期望的大小,每个View在测量时最终大小的设定是由setMeasuredDimension()最终决定的。因此,最终确定一个View的“测量长宽“是由以下几个方面影响:
- 父View的MeasureSpec属性;
- 子View的LayoutParams属性 ;
- setMeasuredDimension()或者其它类似设定 mMeasuredWidth 和 mMeasuredHeight 值的方法。
setMeasuredDimension()原型:
01.//设置View在measure过程中宽和高
02.protected final void setMeasuredDimension(int measuredWidth, int measuredHeight) {
03.    mMeasuredWidth = measuredWidth;
04.    mMeasuredHeight = measuredHeight;
05.
06.    mPrivateFlags |= MEASURED_DIMENSION_SET;  //设置了MEASURED_DIMENSION_SET标记
07.} |
将上面列表项转换为表格为:
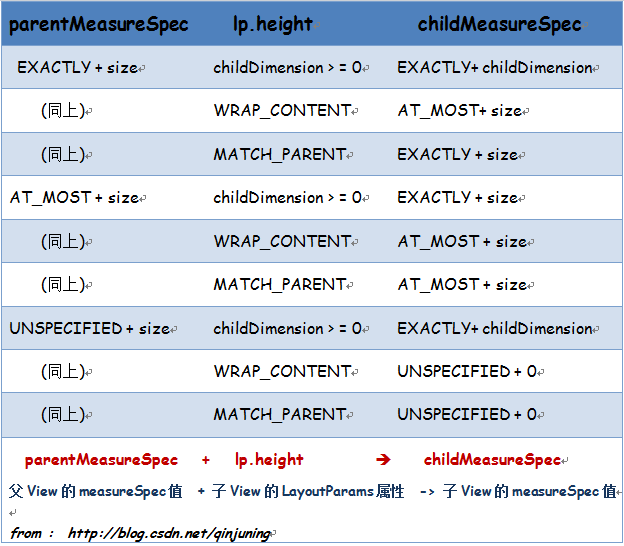
这张表格更能帮助我们分析View的MeasureSpec的确定条件关系。
为了帮助大家理解,下面我们分析某个窗口使用地xml布局文件,我们弄清楚该xml布局文件中每个View的
MeasureSpec值的组成。
01.<?xml version="1.0" encoding="utf-8"?> 02.<LinearLayout xmlns:android="http://schemas.android.com/apk/res/android" 03. android:id="@+id/llayout" 04. android:orientation="vertical" 05. android:layout_width="match_parent" 06. android:layout_height="match_parent"> 07. 08. 09. <TextView android:id="@+id/tv" 10. android:layout_width="match_parent" 11. android:layout_height="wrap_content" 12. android:text="@string/hello" /> 13. 14.</LinearLayout> |
该布局文件共有两个View: ①、id为llayout的LinearLayout布局控件 ;②、id为tv的TextView控件。
假设LinearLayout的父View对应地widthSpec和heightSpec值皆为MeasureSpec.EXACTLY类型(Activity窗口的父View为DecorView,具体原因见第三部分说明)。
对LinearLayout而言比较简单,由于 android:layout_width="match_parent",因此其width对应地widthSpec mode值为MeasureSpec.EXACTLY , size由父视图大小指定 ; 由于android:layout_height = "match_parent",因此其height对应地heightSpec mode值为MeasureSpec.EXACTLY,size由父视图大小指定 ;
对TextView而言 ,其父View为LinearLayout的widthSpec和heightSpec值皆为MeasureSpec.EXACTLY类型,由于android:layout_width="match_parent" , 因此其width对应地widthSpec mode值为MeasureSpec.EXACTLY,size由父视图大小指定 ; 由于android:layout_width="wrap_content" , 因此其height对应地widthSpec mode值为MeasureSpec.AT_MOST,size由父视图大小指定 。
我们继续窥测下LinearLayout类是如何进行measure过程的:
01. public class LinearLayout extends ViewGroup {
02....
03.@Override  //onMeasure方法。
04.protected void onMeasure(int widthMeasureSpec, int heightMeasureSpec) {
05.    //判断是垂直方向还是水平方向,这儿我们假设是VERTICAL垂直方向,
06.    if (mOrientation == VERTICAL) {
07.        measureVertical(widthMeasureSpec, heightMeasureSpec);
08.    } else {
09.        measureHorizontal(widthMeasureSpec, heightMeasureSpec);
10.    }
11.}
12.//垂直方向布局
13.   void measureVertical(int widthMeasureSpec, int heightMeasureSpec) {
14.       mTotalLength = 0;         //该LinearLayout测量子View时的总高度。
15.    float totalWeight = 0;    //所有子View的权重和 , android:layout_weight
16.    int maxWidth = 0;         //保存子View中最大width值
17.       ...
18.       final int count = getVirtualChildCount();  //子View的个数
19.
20.       final int widthMode = MeasureSpec.getMode(widthMeasureSpec);
21.       final int heightMode = MeasureSpec.getMode(heightMeasureSpec);
22.          ...
23.       // See how tall everyone is. Also remember max width.
24.       for (int i = 0; i < count; ++i) {
25.           final View child = getVirtualChildAt(i);
26.              ...
27.           LinearLayout.LayoutParams lp = (LinearLayout.LayoutParams) child.getLayoutParams();
28.
29.           totalWeight += lp.weight;
30.           //满足该条件地View会在该LinearLayout有剩余高度时,才真正调用measure()
31.           if (heightMode == MeasureSpec.EXACTLY && lp.height == 0 && lp.weight > 0) {
32.               ...
33.           } else {
34.               int oldHeight = Integer.MIN_VALUE;
35.               //如果View的hight值为0,并且设置了android:layout_weight属性,重新纠正其height值为WRAP_CONTENT
36.               if (lp.height == 0 && lp.weight > 0) {
37.                   oldHeight = 0;
38.                   lp.height = LayoutParams.WRAP_CONTENT;
39.               }
40.               // Determine how big this child would like to be. If this or
41.               // previous children have given a weight, then we allow it to
42.               // use all available space (and we will shrink things later
43.               // if needed).
44.               //对每个子View调用measure()方法
45.               measureChildBeforeLayout(
46.                      child, i, widthMeasureSpec, 0, heightMeasureSpec,
47.                      totalWeight == 0 ? mTotalLength : 0);
48.
49.               //这三行代码做了如下两件事情:
50.               //1、获得该View的measuredHeight值,每个View都会根据他们地属性正确设置值  > 0 ;
51.               //2、更新mTotalLength值:取当前高度mTotalLength值与mTotalLength + childHeight 的最大值
52.               // 于是对于android:layout_height="wrap_height"属性地LinearLayout控件也就知道了它的确切高度值了。
53.               final int childHeight = child.getMeasuredHeight();
54.               final int totalLength = mTotalLength;
55.               mTotalLength = Math.max(totalLength, totalLength + childHeight + lp.topMargin +
56.                      lp.bottomMargin + getNextLocationOffset(child));
57.               ...
58.           }
59.           final int margin = lp.leftMargin + lp.rightMargin;
60.           final int measuredWidth = child.getMeasuredWidth() + margin;
61.           maxWidth = Math.max(maxWidth, measuredWidth);
62.           ...
63.       }
64.          //后续还有很多处理,包括继续measure()某些符合条件地子View
65.       ...
66.   }
67.   void measureChildBeforeLayout(View child, int childIndex,
68.           int widthMeasureSpec, int totalWidth, int heightMeasureSpec,
69.           int totalHeight) {
70.    //调用measureChildWithMargins()方法去设置子View大小
71.       measureChildWithMargins(child, widthMeasureSpec, totalWidth,
72.               heightMeasureSpec, totalHeight);
73.   }
74.... |
继续看看measureChildWithMargins()方法,该方法定义在ViewGroup.java内,基本流程同于measureChild()方法,但添加了对子View Margin的处理,即:android:margin属性或者android:marginLeft等属性的处理。
measureChildWithMargins@ViewGroup.java
 01./**
02. * Ask one of the children of this view to measure itself, taking into
03. * account both the MeasureSpec requirements for this view and its padding
04. * and margins. The child must have MarginLayoutParams The heavy lifting is
05. * done in getChildMeasureSpec.
06. */
07.//基本流程同于measureChild()方法,但添加了对子View Margin的处理,
即:android:margin属性或者android:marginLeft等属性的处理
08.//widthUsed参数  表示该父View已经使用的宽度
09.//heightUsed参数  表示该父View已经使用的高度
10.protected void measureChildWithMargins(View child,
11.        int parentWidthMeasureSpec, int widthUsed,
12.        int parentHeightMeasureSpec, int heightUsed) {
13.    final MarginLayoutParams lp = (MarginLayoutParams) child.getLayoutParams();
14.
15.    //获得子View的childWidthMeasureSpec和childHeightMeasureSpec值
16.    final int childWidthMeasureSpec = getChildMeasureSpec(parentWidthMeasureSpec,
17.            mPaddingLeft + mPaddingRight + lp.leftMargin + lp.rightMargin
18.                    + widthUsed, lp.width);
19.    final int childHeightMeasureSpec = getChildMeasureSpec(parentHeightMeasureSpec,
20.            mPaddingTop + mPaddingBottom + lp.topMargin + lp.bottomMargin
21.                    + heightUsed, lp.height);
22.
23.    child.measure(childWidthMeasureSpec, childHeightMeasureSpec);
24.}
|
measure()过程时,LinearLayout类做了如下事情 :
1、遍历每个子View,对其调用measure()方法;
2、子View measure()完成后,需要取得该子View地宽高实际值,继而做处理(例如:LinearLayout属性为android:widht="wrap_content"时,LinearLayout的实际width值则是每个子View的width值的累加值)。
2.2 WRAP_CONTENT、MATCH_PARENT以及measure动机揭秘子View地宽高实际值 ,即child.getMeasuredWidth()值得返回最终会是一个确定值? 难道WRAP_CONTENT(其值为-2) 、MATCH_PARENT(值为-1)或者说一个具体值(an exactly size > 0)。前面我们说过,View最终“测量”值的确定是有三个部分组成地:
①、父View的MeasureSpec属性;
②、子View的LayoutParams属性 ;
③、setMeasuredDimension()或者其它类似设定 mMeasuredWidth 和 mMeasuredHeight 值的方法。
因此,一个View必须以某种合适地方法确定它地最终大小。例如,如下自定义View:
01.//自定义View
02.public Class MyView extends View {
03.
04.     //针对不同地mode值,设置本View地大小
05.     protected void onMeasure(int widthMeasureSpec, int heightMeasureSpec){
06.         //获得父View传递给我们地测量需求
07.         int widthMode = MeasureSpec.getMode(widthMeasureSpec);
08.         int heightMode = MeasureSpec.getMode(heightMeasureSpec);
09.
10.         int width = 0 ;
11.         int height = 0 ;
12.         //对UNSPECIFIED 则抛出异常
13.         if(widthMode == MeasureSpec.UNSPECIFIED || heightMode == MeasureSpec.UNSPECIFIED)
14.             throw new RuntimeException("widthMode or heightMode cannot be UNSPECIFIED");
15.
16.         //精确指定
17.         if(widthMode == MeasureSpec.EXACTLY){
18.             width = 100 ;
19.         }
20.         //模糊指定
21.         else if(widthMode == MeasureSpec.AT_MOST )
22.             width = 50 ;
23.
24.          //精确指定
25.         if(heightMode == MeasureSpec.EXACTLY){
26.             height = 100 ;
27.         }
28.         //模糊指定
29.         else if(heightMode == MeasureSpec.AT_MOST )
30.             height = 50 ;
31.
32.         setMeasuredDimension(width , height) ;
33.     }
34.} |
该自定义View重写了onMeasure()方法,根据传递过来的widthMeasureSpec和heightMeasureSpec简单设置了该View的mMeasuredWidth 和 mMeasuredHeight值。
对于TextView而言,如果它地mode不是Exactly类型 , 它会根据一些属性,例如:android:textStyle、android:textSizeandroid:typeface等去确定TextView类地需要占用地长和宽。
因此,如果你地自定义View必须手动对不同mode做出处理。否则,则是mode对你而言是无效的。
Android框架中提供地一系列View/ViewGroup都需要去进行这个measure()过程地 ,因为在layout()过程中,父View需要调用getMeasuredWidth()或getMeasuredHeight()去为每个子View设置他们地布局坐标,只有确定布局坐标后,才能真正地将该View 绘制(draw)出来,否则该View的layout大小为0,得不到期望效果。我们继续看看LinearLayout的layout布局过程:
01.public class LinearLayout extends ViewGroup {
02.    ...
03.    @Override  //layout 过程
04.    protected void onLayout(boolean changed, int l, int t, int r, int b) {
05.        //假定是垂直方向布局
06.        if (mOrientation == VERTICAL) {
07.            layoutVertical();
08.        } else {
09.            layoutHorizontal();
10.        }
11.    }
12.    //对每个子View调用layout过程
13.    void layoutVertical() {
14.        ...
15.        final int count = getVirtualChildCount();
16.        ...
17.        for (int i = 0; i < count; i++) {
18.            final View child = getVirtualChildAt(i);
19.            if (child == null) {  //一般为非null
20.                childTop += measureNullChild(i);
21.            } else if (child.getVisibility() != GONE) {
22.                //获得子View测量时的实际宽高值,
23.                final int childWidth = child.getMeasuredWidth();
24.                final int childHeight = child.getMeasuredHeight();
25.
26.                ...
27.                //  封装了child.layout()方法,见如下
28.                setChildFrame(child, childLeft, childTop + getLocationOffset(child),
29.                        childWidth, childHeight);
30.                childTop += childHeight + lp.bottomMargin + getNextLocationOffset(child);
31.
32.                i += getChildrenSkipCount(child, i);
33.            }
34.        }
35.    }
36.    //width = getMeasuredWidth() ; height = childHeight(); View的大小就是测量大小
37.    private void setChildFrame(View child, int left, int top, int width, int height) {
38.
39.        child.layout(left, top, left + width, top + height);
40.    }
41.    ...
42.} |
对一个View进行measure操作地主要目的就是为了确定该View地布局大小,见上面所示代码。但measure操作通常是耗时的,因此对自定义ViewGroup而言,我们可以自由控制measure、layout过程,如果我们知道如何layout一个View,我们可以跳过该ViewGroup地measure操作(onMeasure()方法中measure所有子View地),直接去layout
在前面一篇博客<<Android中滑屏初探 ---- scrollTo 以及 scrollBy方法使用说明>>中,我们自定义了一个 ViewGroup, 并且重写了onMeasure()和onLayout()方法去分别操作每个View。就该ViewGroup而言,我们只需要重写onLayout()操作即可,因为我们知道如何layout每个子View。如下代码所示:
01.//自定义ViewGroup , 包含了三个LinearLayout控件,存放在不同的布局位置
02.public class MultiViewGroup extends ViewGroup {
03.    private void init() {
04.        // 初始化3个 LinearLayout控件
05.        LinearLayout oneLL = new LinearLayout(mContext);
06.        oneLL.setBackgroundColor(Color.RED);
07.        addView(oneLL);
08.        ...
09.    }
10.    @Override
11.    // 我们知晓每个子View的layout布局大小,因此我们不需要为每个子View进行measure()操作了。
12.//  protected void onMeasure(int widthMeasureSpec, int heightMeasureSpec) {
13.//      setMeasuredDimension(width, height);
14.//      // 设置该ViewGroup的大小
15.//      int width = MeasureSpec.getSize(widthMeasureSpec);
16.//      int height = MeasureSpec.getSize(heightMeasureSpec);
17.//      int childCount = getChildCount();
18.//      for (int i = 0; i < childCount; i++) {
19.//          View child = getChildAt(i);
20.//          // 设置每个子视图的大小 , 即全屏
21.//          child.measure(MultiScreenActivity.screenWidth, MultiScreenActivity.scrrenHeight);
22.//      }
23.    }
24.
25.    // layout过程
26.    @Override
27.    protected void onLayout(boolean changed, int l, int t, int r, int b) {
28.        // TODO Auto-generated method stub
29.        Log.i(TAG, "--- start onLayout --");
30.        int startLeft = 0; // 每个子视图的起始布局坐标
31.        int startTop = 10; // 间距设置为10px 相当于 android:marginTop= "10px"
32.        int childCount = getChildCount();
33.        Log.i(TAG, "--- onLayout childCount is -->" + childCount);
34.        for (int i = 0; i < childCount; i++) {
35.            View child = getChildAt(i);
36.            child.layout(startLeft, startTop,
37.                    startLeft + MultiScreenActivity.screenWidth,
38.                    startTop + MultiScreenActivity.scrrenHeight);
39.            startLeft = startLeft + MultiScreenActivity.screenWidth ; //校准每个子View的起始布局位置
40.            //三个子视图的在屏幕中的分布如下 [0 , 320] / [320,640] / [640,960]
41.        }
42.    }
43.} |
3、root View被添加至窗口时,UI框架是如何设置其LayoutParams值
老子道德经有言:“道生一,一生二,二生三,三生万物。” UI绘制也就是个递归过程。理解其基本架构后,也就“掌握了一个中心点”了。在第一节中,我们没有说明开始UI绘制时 ,没有说明mView.measure()参数地由来,参数也就是我们本节需要弄懂的“道” --- root View的 widthMeasureSpec和heightMeasureSpec 是如何确定的。
对于如下布局文件: main.xml
01.<?xml version="1.0" encoding="utf-8"?> 02.<LinearLayout xmlns:android="http://schemas.android.com/apk/res/android" 03. android:orientation="vertical" 04. android:layout_width="fill_parent" 05. android:layout_height="fill_parent" 06. > 07.<TextView 08. android:layout_width="fill_parent" 09. android:layout_height="wrap_content" 10. android:text="@string/hello" 11. /> 12.</LinearLayout> |
当使用LayoutInflater类解析成View时 ,LinearLayout对象的LayoutParams参数为null 。具体原因请参考上篇博文
任何一个View被添加至窗口时,都需要利用WindowManager类去操作。例如,如下代码:
01.//显示一个悬浮窗吧 , just so so
02.public void showView()
03.{
04.    //解析布局文件
05.    LayoutInflater layoutInflater = (LayoutInflater)getSystemService(Context.LAYOUT_INFLATER_SERVICE);
06.    //rootView对应地LayoutParams属性值为null,将会在UI绘制时设定其值
07.    View rootView = layoutInflater.inflate(R.layout.main, null);
08.
09.    WindowManager windowManager = (WindowManager)getSystemService(Context.WINDOW_SERVICE);
10.    //设置WindowManager.LayoutParams参数值,作为该窗口的各种属性
11.    WindowManager.LayoutParams winparams = WindowManager.LayoutParams();
12.     // 以屏幕左上角为原点,设置x、y初始值
13.    winparams.x = 0;
14.    winparams.y = 0;
15.
16.    //设置悬浮窗口长宽数据
17.    winparams.width = WindowManager.LayoutParams.WRAP_CONTENT;;
18.    winparams.height = WindowManager.LayoutParams.WRAP_CONTENT;;
19.
20.    windowManager.addView(rootView, winparams);
21.} |
下面,我们从获得WindowManager对象引用开始,一步步观察addView()做了一些什么事情。
Step 1 、获得WindowManager对象服务 ,具体实现类在ContextImpl.java内中
路径: /frameworks/base/core/java/android/app/ContextImpl.java
01.@Override
02.public Object getSystemService(String name) {
03.    if (WINDOW_SERVICE.equals(name)) {
04.        return WindowManagerImpl.getDefault();
05.    }
06.    ...
07.} |
WindowManager是个接口,具体返回对象则是WindowManagerImpl的单例对象。
Step 2 、 获得WindowManagerImpl的单例对象,以及部分源码分析
路径: /frameworks/base/core/java/android/view/WindowManagerImpl.java
01.public class WindowManagerImpl implements WindowManager{
02.
03.   public static WindowManagerImpl getDefault()
04.   {
05.       return mWindowManager;
06.   }
07.   //以特定Window属性添加一个窗口
08.   public void addView(View view, ViewGroup.LayoutParams params)
09.   {
10.       addView(view, params, false);
11.   }
12.   //参数nest表示该窗口是不是一个字窗口
13.   private void addView(View view, ViewGroup.LayoutParams params, boolean nest)
14.   {   ...
15.       final WindowManager.LayoutParams wparams = (WindowManager.LayoutParams)params;
16.
17.       ViewRoot root;
18.       View panelParentView = null;    //该子窗口对应地父窗口View
19.
20.       synchronized (this) {
21.
22.           ...//需要对传递过来地参数进行检测...
23.
24.           //对每个窗口皆构建一个ViewRoot对象
25.           root = new ViewRoot(view.getContext());
26.           root.mAddNesting = 1;
27.           //设置root View 的LayoutParams为wparams,即WindowManager.LayoutParams类型
28.           view.setLayoutParams(wparams);
29.           ...//对参数检测,以及拷贝原有数组...
30.
31.           //将窗口对应地view、root、wparams保存在属性集合中
32.           mViews[index] = view;
33.           mRoots[index] = root;
34.           mParams[index] = wparams;
35.       }
36.       // do this last because it fires off messages to start doing things
37.       // 调用ViewRoot对象去通知系统添加一个窗口
38.       root.setView(view, wparams, panelParentView);
39.   }
40.   ...
41.   //这三个数组分别保存了一个窗口对应地属性
42.   private View[] mViews;         //root View对象 , View类型
43.   private ViewRoot[] mRoots;     //ViewRoot类型 , 与WMS通信
44.   private WindowManager.LayoutParams[] mParams;  //窗口属性
45.
46.   //WindowManagerImpl实现了单例模式
47.   private static WindowManagerImpl mWindowManager = new WindowManagerImpl();
48.} |
WindowManagerImpl类的三个数组集合保存了每个窗口相关属性,这样我们可以通过这些属性去操作特定的窗口(例如,可以根据View去更新/销毁该窗口)。当参数检查成功时,构建一个ViewRoot对象,并且设置设置root View 的LayoutParams为wparams,即WindowManager.LayoutParams类型。最后调用root.setView()方法去通知系统需要创建该窗口。我们接下来往下看看ViewRoot类相关操作。
Step 3、
01.public final class ViewRoot extends Handler implements ViewParent,View.AttachInfo.Callbacks {
02.
03.    View mView;   //所有窗口地root View
04.    final WindowManager.LayoutParams mWindowAttributes = new WindowManager.LayoutParams();
05.
06.    ...
07.     /**
08.     * We have one child
09.     */
10.    public void setView(View view, WindowManager.LayoutParams attrs,
11.            View panelParentView) {
12.        synchronized (this) {
13.            if (mView == null) {
14.                mView = view;
15.                mWindowAttributes.copyFrom(attrs); //保存WindowManager.LayoutParams属性值
16.                attrs = mWindowAttributes;
17.                ...
18.
19.                mAdded = true;
20.                int res; /* = WindowManagerImpl.ADD_OKAY; */
21.
22.                // Schedule the first layout -before- adding to the window
23.                // manager, to make sure we do the relayout before receiving
24.                // any other events from the system.
25.                requestLayout();   //请求UI开始绘制。
26.                mInputChannel = new InputChannel();  //创建一个InputChannel对象,接受消息
27.                try {
28.                    //通知WindowManagerService添加一个窗口
29.                    res = sWindowSession.add(mWindow, mWindowAttributes,
30.                            getHostVisibility(), mAttachInfo.mContentInsets,
31.                            mInputChannel);
32.                }
33.                ...
34.                view.assignParent(this);  //将root View的父View设置为该ViewRoot对象(实现了ViewParent接口)
35.                ...
36.            }
37.        }
38.    }
39.} |
说明:ViewRoot类继承了Handler,实现了ViewParent接口
setView()方法地主要功能如下:
- 保存相关属性值,例如:mView、mWindowAttributes等;
- 调用requestLayout()方法请求UI绘制,由于ViewRoot是个Handler对象,异步请求;
- 通知WindowManagerService添加一个窗口;
- 注册一个事件监听管道,用来监听:按键(KeyEvent)和触摸(MotionEvent)事件。
我们这儿重点关注 requestLayout()方法请求UI绘制地流程。
Step 4、异步调用请求UI绘制
01./**
02. * {@inheritDoc}
03. */
04.public void requestLayout() {
05.    checkThread();        //检查是不是UI线程调用,如果不是UI线程,会报异常
06.    mLayoutRequested = true;   //置为真,表示需要进行measure和layout过程
07.    scheduleTraversals();
08.}
09.//开始UI绘制流程
10.public void scheduleTraversals() {
11.    if (!mTraversalScheduled) {
12.        mTraversalScheduled = true;       //防止多次调用
13.        sendEmptyMessage(DO_TRAVERSAL);   //异步请求UI绘制
14.    }
15.}
16.@Override
17.public void handleMessage(Message msg) {
18. switch (msg.what) {
19.        case DO_TRAVERSAL:
20.             performTraversals();  //开始UI绘制
21.             break;
22. }
23.} |
由于performTraversals()方法比较复杂,我们侧重于第一次设置root View的widhtSpecSize以及
heightSpecSize值。
01.private void performTraversals() {
02.    // cache mView since it is used so much below...
03.    final View host = mView;
04.
05.    mTraversalScheduled = false;
06.    boolean surfaceChanged = false;
07.    WindowManager.LayoutParams lp = mWindowAttributes;
08.
09.    int desiredWindowWidth;              //表示该窗口期望width值
10.    int desiredWindowHeight;             //表示该窗口期望width值
11.    int childWidthMeasureSpec;           //保存root View的widthMeasureSpec
12.    int childHeightMeasureSpec;          //保存root View的heightMeasureSpec
13.
14.    final View.AttachInfo attachInfo = mAttachInfo;
15.
16.    final int viewVisibility = getHostVisibility();
17.    boolean viewVisibilityChanged = mViewVisibility != viewVisibility
18.            || mNewSurfaceNeeded;
19.
20.    float appScale = mAttachInfo.mApplicationScale;
21.
22.    WindowManager.LayoutParams params = null;
23.    if (mWindowAttributesChanged) {
24.        mWindowAttributesChanged = false;
25.        surfaceChanged = true;
26.        params = lp;
27.    }
28.    Rect frame = mWinFrame;
29.    if (mFirst) {   //mFirst表示是否是第一次绘制该Window
30.        fullRedrawNeeded = true;
31.        mLayoutRequested = true;
32.
33.        DisplayMetrics packageMetrics =
34.            mView.getContext().getResources().getDisplayMetrics();
35.        //第一次绘制时desiredWindowWidth,desiredWindowHeight 值大小为屏幕大小
36.        desiredWindowWidth = packageMetrics.widthPixels;
37.        desiredWindowHeight = packageMetrics.heightPixels;
38.        ...
39.    } else {   //不是第一次绘制,则desiredWindowWidth值为frame保存大小,frame值会由WMS填充
40.        desiredWindowWidth = frame.width();
41.        desiredWindowHeight = frame.height();
42.        ...
43.    }
44.    ...
45.    boolean insetsChanged = false;
46.
47.    if (mLayoutRequested) {
48.        ...//获得root View的widthMeasureSpec 和 heightMeasureSpec值
49.        childWidthMeasureSpec = getRootMeasureSpec(desiredWindowWidth, lp.width);
50.        childHeightMeasureSpec = getRootMeasureSpec(desiredWindowHeight, lp.height);
51.        //开始measure过程
52.        host.measure(childWidthMeasureSpec, childHeightMeasureSpec);
53.    }
54.    ...
55.    final boolean didLayout = mLayoutRequested;
56.
57.    boolean triggerGlobalLayoutListener = didLayout
58.            || attachInfo.mRecomputeGlobalAttributes;
59.    if (didLayout) {
60.        ... //layout过程
61.       host.layout(0, 0, host.mMeasuredWidth, host.mMeasuredHeight);
62.        ...
63.    }
64.    ...
65.    if (!cancelDraw && !newSurface) {
66.        mFullRedrawNeeded = false;
67.        draw(fullRedrawNeeded);
68.        ...
69.} |
01./**
02.  * @param windowSize  The available width or height of the window
03.  *
04.  * @param rootDimension The layout params for one dimension (width or height) of the window.
05. */
06. private int getRootMeasureSpec(int windowSize, int rootDimension) {
07.     int measureSpec;
08.     switch (rootDimension) {
09.     case ViewGroup.LayoutParams.MATCH_PARENT:
10.         // Window can't resize. Force root view to be windowSize.
11.         measureSpec = MeasureSpec.makeMeasureSpec(windowSize, MeasureSpec.EXACTLY);
12.         break;
13.     case ViewGroup.LayoutParams.WRAP_CONTENT:
14.         // Window can resize. Set max size for root view.
15.         measureSpec = MeasureSpec.makeMeasureSpec(windowSize, MeasureSpec.AT_MOST);
16.         break;
17.     default:
18.         // Window wants to be an exact size. Force root view to be that size.
19.         measureSpec = MeasureSpec.makeMeasureSpec(rootDimension, MeasureSpec.EXACTLY);
20.         break;
21.     }
22.     return measureSpec;
23. } |
调用root View的measure()方法时,其参数是由getRootMeasureSpec()设置的,基本思路同我们前面描述的
差不多。贴出来的代码只是简简单单列出了measure 、layout 、 draw 过程的调用点,里面有很多逻辑处理。


 3515
3515


 被折叠的 条评论
为什么被折叠?
被折叠的 条评论
为什么被折叠?
 到【灌水乐园】发言


